> ## Documentation Index
> Fetch the complete documentation index at: https://docs.cello.so/llms.txt
> Use this file to discover all available pages before exploring further.
# Quickstart
> Learn how to install Cello Referral Component into your web application
This guide follows basic steps to **integrate Referral Component into your web application** using [Cello JS SDK](/sdk/client-side/cello-js-introduction).
[Cello JS SDK](/sdk/client-side/cello-js-introduction) is a browser-based JavaScript library compatible with all web frameworks that output HTML/JavaScript, including React, Next.js, Vue, and Angular.
For server-side rendering frameworks like Next.js, Cello interactions must occur client-side, not server-side.
## Prerequisites
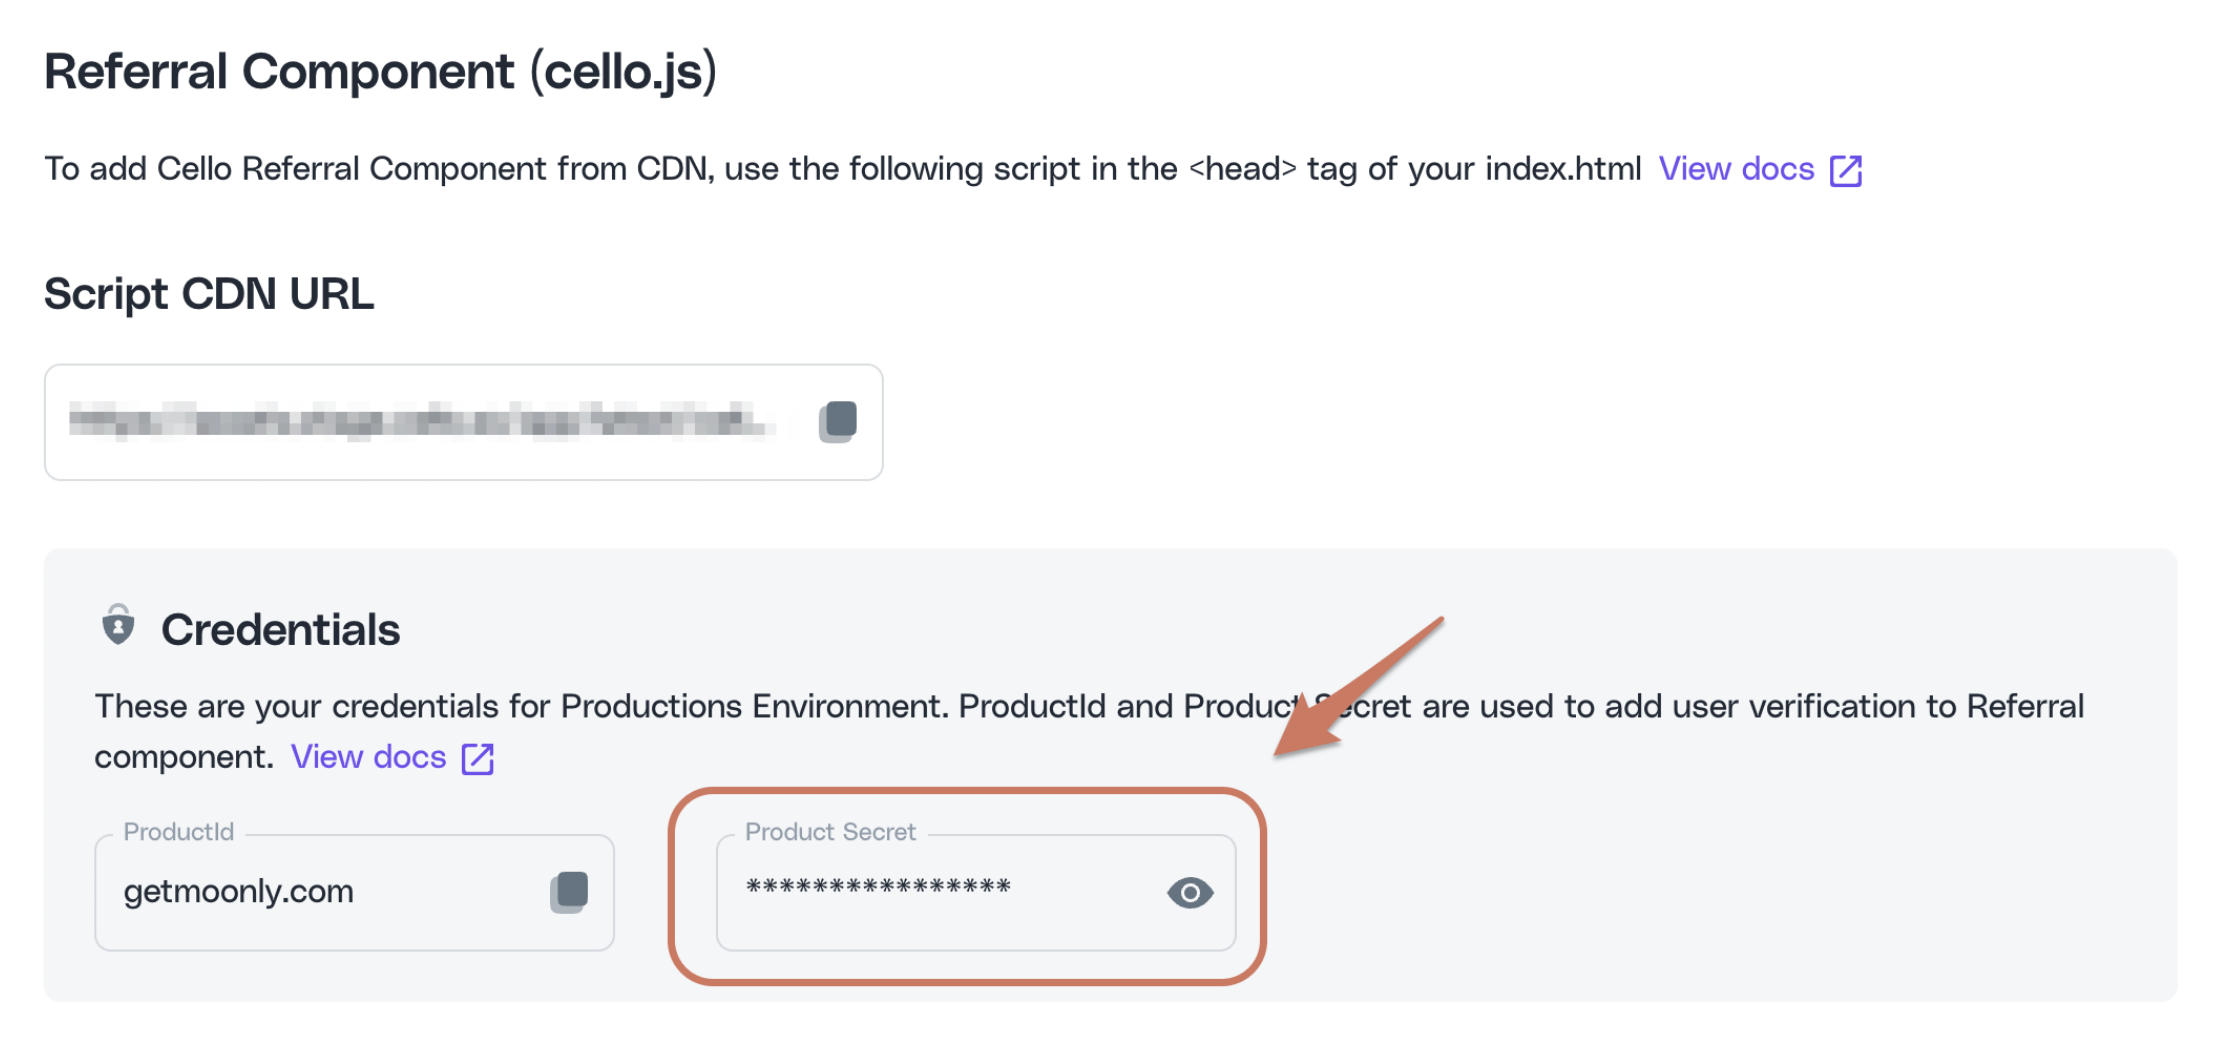
First, you'll need your `productId` and `PRODUCT_SECRET` from your Cello dashboard's [Access Keys page](https://portal.cello.so/integrations/accesskeys) for the right environment (Sandbox or Production)
 ## Installation Steps
Follow these steps to integrate the Referral Component:
1. Load the Cello script from our CDN
2. Generate a JWT token server-side for user authentication
3. Initialize the component with the token to connect your user session
## Step 1: Load the script
Add the Cello script to your HTML. The script loads asynchronously to avoid blocking page rendering and can be included anywhere on your website. This approach is recommended for optimal SEO performance.
Add this script to the `head` tag of your HTML:
```javascript theme={null}
```
```javascript theme={null}
```
Once loaded, the script:
1. Registers `window.Cello` for communication between your page and Cello
2. Processes any queued commands from `window.cello.cmd` and maintains the command interface
### Content Security Policy (CSP)
Most applications don't need any changes here. This section only applies if your site enforces a Content Security Policy - if you don't set CSP headers, or your policy is permissive, you can skip it.
The Cello widget loads its script and assets from Cello domains at runtime. If your policy is restrictive, extend it with the following sources so the widget can load and run:
```text theme={null}
script-src https://assets.cello.so
connect-src https://share.cello.so
img-src https://cdn.cello.so https://p.typekit.net blob: data:
style-src https://use.typekit.net 'unsafe-inline'
font-src https://use.typekit.net https://p.typekit.net
```
* These directives extend your existing policy; if you use a restrictive `default-src`, keep all of the above explicit.
* Sandbox environments use the equivalent `*.sandbox.cello.so` domains (for example `https://assets.sandbox.cello.so` and `https://share.sandbox.cello.so`).
If the widget fails to load and your browser console shows errors like `Refused to connect because it violates the document's Content Security Policy`, see [Troubleshooting](#the-widget-doesnt-load-and-the-console-shows-content-security-policy-errors) below.
## Step 2: Generate a JWT token
Create a JWT token to securely connect your user's session to Cello. The token authenticates your application and provides user identity for generating unique referral links.
Generate JWT tokens server-side only. Never create tokens in the browser.
See [User Authentication](/sdk/client-side/user-authentication) for complete JWT token generation instructions.
## Step 3: Initialize the library
Initialize Cello with a single function call that includes your **product ID**, **JWT token**, and configuration options.
User details (email, first name) are required for fraud detection and features like email notifications and personalized messaging.
```javascript JavaScript theme={null}
window.cello = window.cello || { cmd: [] };
window.cello.cmd.push(async function (cello) {
try {
await cello.boot({
productId: "CELLO_PRODUCT_ID",
token: "REPLACE_ME",
language: "en",
productUserDetails: {
firstName: "Bob",
lastName: "Bobsky",
fullName: "Bob B Bobsky",
email: "bob@gmail.com",
},
});
} catch (error) {
console.error("Failed to boot cello:", error);
// Handle the error appropriately
}
});
```
This implementation works with asynchronous script loading. For complete configuration options, see [SDK Reference](/sdk/client-side/cello-js-usage#cello-boot-options).
After initialization, the library:
1. Adds a Cello button to your page or [connects to your custom element](https://docs.cello.so/referral-component/custom-launcher)
2. Creates a session to handle configured callbacks
**Congratulations!** You have successfully integrated Cello Referral Component!
Next, you can integrate Referral Component into your mobile applications:
***
## Controlling access to Referral component
If you want to enable the Cello referral component only to selected users or control its visibility dynamically, we provide the following options:
During the new referral program rollout with Cello, you may want to pilot with a small cohort of selected users. This can be achieved using our Named user whitelist.
All you need to do is to provide a list of selected users UIDs (productUserIds) to Cello. After they are added to the whitelist, only these users will have access to the Referral component until you are ready to rollout to your entire user base.
To control dynamically when and who sees the Referral component, you can use `show()` and `hide()` methods.
For example, you may decide to only show the Referral component after the user has completed onboarding. In that case, when a user first logs in, boot the component with `hideDefaultLauncher = true` configuration option. Then, when the onboarding is complete, use `cello.show()` to show the Cello button.
## Opening the Referral Component with a Link
You can automatically open the Referral Component with a link to your product by adding a `cello-open=true` param to your URL.
For example, add a link to the referral component to your email communication to help your users access the sharing options directly from the email.
If a user is redirected between URLs on login, make sure to re-attach this param to the final URL the user lands on in order to automatically open the Cello Referral Component.
You may also pass one of `invite`, `rewards` and `edit-payments` values to the param for the Referral Component to open a specific tab automatically e.g.:
```html theme={null}
https://your-product.com?cello-open=edit-payments
```
## Troubleshooting
### `Error 1200: Invalid Tenant`
The main cause for this error is that the used URL for the referral component, the product ID, and the Product Secret do not fit together. Make sure that you are using all three components of the same environment.
### `Error 1100: Invalid JWT token`
This means that the token is not valid and the main cause is that some of the attributes for constructing the token are not correct. You can decode your token using [https://jwt.io/](https://jwt.io/). After decoding, please check all the attributes against the requirements in User Authentication, specifically make sure that productUserId is a string, iat is valid, algorithm is H512 and the secret is the correct one for the environment you are using (Sandbox or Production)
### `Failed to load resource: the server responded with a status of 401 () [Cello]: "User is not authorized to load the widget"`
Most likely, the created JWT token is not valid. Common causes for this error are:
* The use of an incorrect `PRODUCT_SECRET`.
* The `productUserId` is not passed as a `string` in the payload for the JWT token creation.
* The use of an incorrect `productId`.
* `issuedAt` (`iat`) date cannot be older than 24h or set in the future.
### `Error: User is not authorized to load the widget`
Most likely you are not passing the `productUserId` as a `string` into the payload for the JWT token creation.
### `[Cello]: Cannot read properties of null (reading ‘__H')`
Most likely, you are using `http` in your script’s source: `src="http://assets.cello.so/app/latest/cello.js"` . Please use `https`.
### The widget doesn't load and the console shows `Content Security Policy` errors
If your browser console shows errors like these, your site's Content Security Policy (CSP) is blocking Cello resources:
```text theme={null}
Refused to execute inline script because it violates the following Content Security Policy directive: "script-src ..."
Refused to load the script 'https://assets.cello.so/app/latest/cello.js' because it violates the following Content Security Policy directive: "script-src ..."
Fetch API cannot load https://share.cello.so/api/products/.../initialize/v2. Refused to connect because it violates the document's Content Security Policy.
Refused to load the image because it violates the following Content Security Policy directive: "img-src ..."
Refused to apply inline style because it violates the following Content Security Policy directive: "style-src ..."
Refused to load the font because it violates the following Content Security Policy directive: "font-src ..."
```
Any error containing `violates the following Content Security Policy directive` or `violates the document's Content Security Policy` means your CSP headers need to be updated: add the Cello domains to your policy. The directive named in the error (`script-src`, `connect-src`, `img-src`, `style-src`, `font-src`) tells you which one is missing. See [Content Security Policy (CSP)](#content-security-policy-csp) above for the full list of required sources. Remember that sandbox environments use `*.sandbox.cello.so` domains.
## Frequently asked questions
### How much effort on tech side is the integration of Cello?
The complexity of integrating Cello can vary greatly, depending on your individual setup. Integration generally consists of frontend integration and user authentication. For our typical customer, setting up these components on a development environment requires hours, not days. The integration of attribution and reward automation is also relatively straightforward, though it depends on your existing setup.
### The Cello Floating Action Button is overlaying or covering another component within my product. What can I do?
Sometimes, the Cello Floating Action Button or the Referral Component might overlay another component in your product. Here's what you can do:
* **Adjust the z-index**: Cello can modify the z-index of the Floating Action Button or the Referral Component. This ensures that your other components can cover the Cello elements.
* **Hide the element**: Using the `cello.hide()` function, you can hide the Floating Action Button or the Referral Component when other components are open. Implement this function in your frontend.
You can also use the `cello.hide()` function to hide the Cello Floating Action Button on specific pages.
### Is it possible to hide the Cello Floating Action Button on certain pages?
You can hide the Cello Floating Action Button using the [cello.hide()](/sdk/client-side/cello-js-usage#hide) function when other components open. The implementation has to be done in your frontend.
### What exactly is the `productUserId` that is required in the user authentication?
The `productUserId` is the internal user id that you are using inside your product to uniquely identify users.
### Do you support server-side rendering?
Yes, for server-side rendering frameworks like Next.js, Cello interactions must occur client-side, not server-side.
### Do you support Angular?
As mentioned before, the Cello Referral Component is being loaded independently from your angular app and appends itself to `` tag. That being said, you need to just make sure that the injected HTML code is not being overridden by your angular app. This can be achieved in various ways. The safest choice would be not to use `` as your AppRoot element as it would create a race condition.
```typescript theme={null}
@Component({
selector: 'app-root',
...
})
```
```html theme={null}
```
The other option that we have seen customers implement is to load the cello javascript dynamically from your angular app, making sure that it is being loaded after angular is finished rendering its own components.
Here is an example that has been provided by one of our customers:
```typescript theme={null}
export interface CelloReferralPayload {
productId: string;
token: string;
showOnBoot: boolean;
productUserId: string;
language: string;
iat: string;
}
@Injectable({ providedIn: 'root' })
export class CelloReferralAdapter {
constructor(@Inject(DOCUMENT) private document: Document, @Inject(WINDOW) private window: Window) {}
async init(payload: CelloReferralPayload, isProd: boolean){
await this.loadScript(isProd
? 'https://assets.cello.so/app/latest/cello.js'
: 'https://assets.sandbox.cello.so/app/latest/cello.js');
await this.wait(1000);
(this.window as Window & {Cello: any}).Cello('boot', payload);
}
async wait(timeout: number) {
// due to a race condition a timeout is needed after initializing the script.
return new Promise(resolve => setTimeout(() => resolve(), timeout));
}
async loadScript(src: string): Promise {
return new Promise(resolve => {
const script = this.document.createElement('script');
script.onload = () => resolve();
script.type = 'module';
script.src = src;
this.document.head.appendChild(script);
});
}
}
```
***
### What about other frameworks?
Since Cello is a Javascript library running on browser, then it works naturally with all frameworks that end up resulting in a standard HTML/Javascript application. That includes React, Angular, Vue and all similar JS/TS libraries.
## Installation Steps
Follow these steps to integrate the Referral Component:
1. Load the Cello script from our CDN
2. Generate a JWT token server-side for user authentication
3. Initialize the component with the token to connect your user session
## Step 1: Load the script
Add the Cello script to your HTML. The script loads asynchronously to avoid blocking page rendering and can be included anywhere on your website. This approach is recommended for optimal SEO performance.
Add this script to the `head` tag of your HTML:
```javascript theme={null}
```
```javascript theme={null}
```
Once loaded, the script:
1. Registers `window.Cello` for communication between your page and Cello
2. Processes any queued commands from `window.cello.cmd` and maintains the command interface
### Content Security Policy (CSP)
Most applications don't need any changes here. This section only applies if your site enforces a Content Security Policy - if you don't set CSP headers, or your policy is permissive, you can skip it.
The Cello widget loads its script and assets from Cello domains at runtime. If your policy is restrictive, extend it with the following sources so the widget can load and run:
```text theme={null}
script-src https://assets.cello.so
connect-src https://share.cello.so
img-src https://cdn.cello.so https://p.typekit.net blob: data:
style-src https://use.typekit.net 'unsafe-inline'
font-src https://use.typekit.net https://p.typekit.net
```
* These directives extend your existing policy; if you use a restrictive `default-src`, keep all of the above explicit.
* Sandbox environments use the equivalent `*.sandbox.cello.so` domains (for example `https://assets.sandbox.cello.so` and `https://share.sandbox.cello.so`).
If the widget fails to load and your browser console shows errors like `Refused to connect because it violates the document's Content Security Policy`, see [Troubleshooting](#the-widget-doesnt-load-and-the-console-shows-content-security-policy-errors) below.
## Step 2: Generate a JWT token
Create a JWT token to securely connect your user's session to Cello. The token authenticates your application and provides user identity for generating unique referral links.
Generate JWT tokens server-side only. Never create tokens in the browser.
See [User Authentication](/sdk/client-side/user-authentication) for complete JWT token generation instructions.
## Step 3: Initialize the library
Initialize Cello with a single function call that includes your **product ID**, **JWT token**, and configuration options.
User details (email, first name) are required for fraud detection and features like email notifications and personalized messaging.
```javascript JavaScript theme={null}
window.cello = window.cello || { cmd: [] };
window.cello.cmd.push(async function (cello) {
try {
await cello.boot({
productId: "CELLO_PRODUCT_ID",
token: "REPLACE_ME",
language: "en",
productUserDetails: {
firstName: "Bob",
lastName: "Bobsky",
fullName: "Bob B Bobsky",
email: "bob@gmail.com",
},
});
} catch (error) {
console.error("Failed to boot cello:", error);
// Handle the error appropriately
}
});
```
This implementation works with asynchronous script loading. For complete configuration options, see [SDK Reference](/sdk/client-side/cello-js-usage#cello-boot-options).
After initialization, the library:
1. Adds a Cello button to your page or [connects to your custom element](https://docs.cello.so/referral-component/custom-launcher)
2. Creates a session to handle configured callbacks
**Congratulations!** You have successfully integrated Cello Referral Component!
Next, you can integrate Referral Component into your mobile applications:
***
## Controlling access to Referral component
If you want to enable the Cello referral component only to selected users or control its visibility dynamically, we provide the following options:
During the new referral program rollout with Cello, you may want to pilot with a small cohort of selected users. This can be achieved using our Named user whitelist.
All you need to do is to provide a list of selected users UIDs (productUserIds) to Cello. After they are added to the whitelist, only these users will have access to the Referral component until you are ready to rollout to your entire user base.
To control dynamically when and who sees the Referral component, you can use `show()` and `hide()` methods.
For example, you may decide to only show the Referral component after the user has completed onboarding. In that case, when a user first logs in, boot the component with `hideDefaultLauncher = true` configuration option. Then, when the onboarding is complete, use `cello.show()` to show the Cello button.
## Opening the Referral Component with a Link
You can automatically open the Referral Component with a link to your product by adding a `cello-open=true` param to your URL.
For example, add a link to the referral component to your email communication to help your users access the sharing options directly from the email.
If a user is redirected between URLs on login, make sure to re-attach this param to the final URL the user lands on in order to automatically open the Cello Referral Component.
You may also pass one of `invite`, `rewards` and `edit-payments` values to the param for the Referral Component to open a specific tab automatically e.g.:
```html theme={null}
https://your-product.com?cello-open=edit-payments
```
## Troubleshooting
### `Error 1200: Invalid Tenant`
The main cause for this error is that the used URL for the referral component, the product ID, and the Product Secret do not fit together. Make sure that you are using all three components of the same environment.
### `Error 1100: Invalid JWT token`
This means that the token is not valid and the main cause is that some of the attributes for constructing the token are not correct. You can decode your token using [https://jwt.io/](https://jwt.io/). After decoding, please check all the attributes against the requirements in User Authentication, specifically make sure that productUserId is a string, iat is valid, algorithm is H512 and the secret is the correct one for the environment you are using (Sandbox or Production)
### `Failed to load resource: the server responded with a status of 401 () [Cello]: "User is not authorized to load the widget"`
Most likely, the created JWT token is not valid. Common causes for this error are:
* The use of an incorrect `PRODUCT_SECRET`.
* The `productUserId` is not passed as a `string` in the payload for the JWT token creation.
* The use of an incorrect `productId`.
* `issuedAt` (`iat`) date cannot be older than 24h or set in the future.
### `Error: User is not authorized to load the widget`
Most likely you are not passing the `productUserId` as a `string` into the payload for the JWT token creation.
### `[Cello]: Cannot read properties of null (reading ‘__H')`
Most likely, you are using `http` in your script’s source: `src="http://assets.cello.so/app/latest/cello.js"` . Please use `https`.
### The widget doesn't load and the console shows `Content Security Policy` errors
If your browser console shows errors like these, your site's Content Security Policy (CSP) is blocking Cello resources:
```text theme={null}
Refused to execute inline script because it violates the following Content Security Policy directive: "script-src ..."
Refused to load the script 'https://assets.cello.so/app/latest/cello.js' because it violates the following Content Security Policy directive: "script-src ..."
Fetch API cannot load https://share.cello.so/api/products/.../initialize/v2. Refused to connect because it violates the document's Content Security Policy.
Refused to load the image because it violates the following Content Security Policy directive: "img-src ..."
Refused to apply inline style because it violates the following Content Security Policy directive: "style-src ..."
Refused to load the font because it violates the following Content Security Policy directive: "font-src ..."
```
Any error containing `violates the following Content Security Policy directive` or `violates the document's Content Security Policy` means your CSP headers need to be updated: add the Cello domains to your policy. The directive named in the error (`script-src`, `connect-src`, `img-src`, `style-src`, `font-src`) tells you which one is missing. See [Content Security Policy (CSP)](#content-security-policy-csp) above for the full list of required sources. Remember that sandbox environments use `*.sandbox.cello.so` domains.
## Frequently asked questions
### How much effort on tech side is the integration of Cello?
The complexity of integrating Cello can vary greatly, depending on your individual setup. Integration generally consists of frontend integration and user authentication. For our typical customer, setting up these components on a development environment requires hours, not days. The integration of attribution and reward automation is also relatively straightforward, though it depends on your existing setup.
### The Cello Floating Action Button is overlaying or covering another component within my product. What can I do?
Sometimes, the Cello Floating Action Button or the Referral Component might overlay another component in your product. Here's what you can do:
* **Adjust the z-index**: Cello can modify the z-index of the Floating Action Button or the Referral Component. This ensures that your other components can cover the Cello elements.
* **Hide the element**: Using the `cello.hide()` function, you can hide the Floating Action Button or the Referral Component when other components are open. Implement this function in your frontend.
You can also use the `cello.hide()` function to hide the Cello Floating Action Button on specific pages.
### Is it possible to hide the Cello Floating Action Button on certain pages?
You can hide the Cello Floating Action Button using the [cello.hide()](/sdk/client-side/cello-js-usage#hide) function when other components open. The implementation has to be done in your frontend.
### What exactly is the `productUserId` that is required in the user authentication?
The `productUserId` is the internal user id that you are using inside your product to uniquely identify users.
### Do you support server-side rendering?
Yes, for server-side rendering frameworks like Next.js, Cello interactions must occur client-side, not server-side.
### Do you support Angular?
As mentioned before, the Cello Referral Component is being loaded independently from your angular app and appends itself to `` tag. That being said, you need to just make sure that the injected HTML code is not being overridden by your angular app. This can be achieved in various ways. The safest choice would be not to use `` as your AppRoot element as it would create a race condition.
```typescript theme={null}
@Component({
selector: 'app-root',
...
})
```
```html theme={null}
```
The other option that we have seen customers implement is to load the cello javascript dynamically from your angular app, making sure that it is being loaded after angular is finished rendering its own components.
Here is an example that has been provided by one of our customers:
```typescript theme={null}
export interface CelloReferralPayload {
productId: string;
token: string;
showOnBoot: boolean;
productUserId: string;
language: string;
iat: string;
}
@Injectable({ providedIn: 'root' })
export class CelloReferralAdapter {
constructor(@Inject(DOCUMENT) private document: Document, @Inject(WINDOW) private window: Window) {}
async init(payload: CelloReferralPayload, isProd: boolean){
await this.loadScript(isProd
? 'https://assets.cello.so/app/latest/cello.js'
: 'https://assets.sandbox.cello.so/app/latest/cello.js');
await this.wait(1000);
(this.window as Window & {Cello: any}).Cello('boot', payload);
}
async wait(timeout: number) {
// due to a race condition a timeout is needed after initializing the script.
return new Promise(resolve => setTimeout(() => resolve(), timeout));
}
async loadScript(src: string): Promise {
return new Promise(resolve => {
const script = this.document.createElement('script');
script.onload = () => resolve();
script.type = 'module';
script.src = src;
this.document.head.appendChild(script);
});
}
}
```
***
### What about other frameworks?
Since Cello is a Javascript library running on browser, then it works naturally with all frameworks that end up resulting in a standard HTML/Javascript application. That includes React, Angular, Vue and all similar JS/TS libraries.