# Get token
Source: https://docs.cello.so/api-reference/authentication/get-token
POST /token
Obtain accessToken & refreshToken using your accessKeyId and secretAccessKey, or obtain a new accessToken using a refreshToken.
# Send new event
Source: https://docs.cello.so/api-reference/generic-events/send-event
POST /events
Report referral-related events such as signups, purchases, and refunds.
# Introduction
Source: https://docs.cello.so/api-reference/introduction
Overview of Cello API for referral codes, authentication, and quickstart.
## Cello API
The Cello API provides endpoints to:
* Validate referral codes (`ucc`)
* Retrieve active referral links
* Send referral events for signups and purchases
***
## Base URLs
Use the URL that matches your environment:
| Environment | Base URL |
| ----------- | ------------------------------- |
| Sandbox | `https://api.sandbox.cello.so/` |
| Production | `https://api.cello.so/` |
***
## Authentication
Authenticate API requests using an `accessToken` in the Authorization header.
Obtain your `accessKeyId` and `secretAccessKey` from the [Access Keys](https://portal.cello.so/integrations/accesskeys) page in your dashboard.
# Fetch active link
Source: https://docs.cello.so/api-reference/referral-codes/fetch-active-link
GET /referral-codes/active-link/{productUserId}
Retrieve an active UCC and invite link for a given user to support contextual sharing.
# Fetch referral code info
Source: https://docs.cello.so/api-reference/referral-codes/fetch-referral-code-info
GET /referral-codes/{code}
Validate a referral code (UCC) and discover associated user/campaign.
# Mobile Signup Flow
Source: https://docs.cello.so/attribution/for-mobile
Learn how to set up mobile app referral attribution
This guide explains how to add referral tracking capabilities to your existing attribution links without creating new ones. In this guide, we'll use Branch.io as an example. The implementation is similar if you use other attribution libraries like [AppsFlyer](https://www.appsflyer.com/), [Singular](https://www.singular.net/) or [Adjust](https://www.adjust.com/).
Mobile attribution builds on top of [web attribution](/attribution/for-web) since users typically click referral links on web before downloading your app. The web setup captures the initial referral code that will later be attributed to the mobile app installation and signup.
## Overview
The referral flow works as follows:
* Existing user shares their unique referral link
* New user clicks the link and is directed to your landing page
* User then clicks on AppStore or Google Play app download
* New user installs and opens the app
* App receives referral data and attributes the installation
* Backend records the referral during signup
## Basic Concept
Instead of creating new links for each referrer, you'll append referral data to your existing Branch.io (or other attribution library) app install link:
```html
Original: https://yourbrand.app.link/abc123
With Referral: https://yourbrand.app.link/abc123?referral_ucc=A1B2C
```
## Data Persists Through Installation
When a user clicks the referral link, Branch.io stores the referral data (including the referral\_ucc) in their servers and associates it with the user's device fingerprint. This allows the data to persist through:
* App Store redirect
* App download
* First app launch
## Data Flow Sequence
#### Link Click
```html
https://yourbrand.app.link/abc123?referral_ucc=A1B2C
↓
Branch.io captures and stores:
- referral_ucc: A1B2C
- Device fingerprint
- Click timestamp
```
#### App Installation
```html
User installs app from store
↓
Branch SDK initializes on first launch
↓
Branch matches device to stored click data
↓
Delivers referral data to app
```
## Accessing Referral Data in Your App
#### iOS Implementation
```swift
import Branch
class AppDelegate: UIResponder, UIApplicationDelegate {
func application(_ application: UIApplication,
didFinishLaunchingWithOptions launchOptions: [UIApplication.LaunchOptionsKey: Any]?) -> Bool {
Branch.getInstance().initSession(launchOptions: launchOptions) { (params, error) in
// Check if the user came from a Branch link
if let clickedBranchLink = params?["+clicked_branch_link"] as? Bool,
clickedBranchLink {
// Extract referral code
if let referralCode = params?["referral_ucc"] as? String {
print("Referral Code: \(referralCode)")
// Store for use during signup
UserDefaults.standard.set(referralCode,
forKey: "pending_referral_code")
}
}
}
return true
}
}
```
#### Android Implementation
```kotlin
class MainActivity : AppCompatActivity() {
override fun onCreate(savedInstanceState: Bundle?) {
super.onCreate(savedInstanceState)
Branch.getAutoInstance(this).initSession({ branchUniversalObject, linkProperties, error ->
if (error == null) {
// Check if user came from Branch link
if (linkProperties?.has("+clicked_branch_link") == true) {
// Get referral code
val referralCode = linkProperties.get("referral_ucc")
referralCode?.let {
Log.d("Branch", "Referral Code: $it")
// Store for signup
getSharedPreferences("app_prefs", Context.MODE_PRIVATE)
.edit()
.putString("pending_referral_code", it)
.apply()
}
}
}
}, this.intent.data, this)
}
}
```
#### React Native Implementation
```javascript
import branch from 'react-native-branch';
function DeepLinkHandler() {
useEffect(() => {
// Handle deep link when app is already running
const subscription = branch.subscribe({
onNewIntent: ({ error, params, uri }) => {
if (error) {
console.error('Branch link error:', error);
return;
}
if (params['+clicked_branch_link']) {
handleDeepLink(params);
}
}
});
return () => subscription();
}, []);
const handleDeepLink = async (params) => {
const referralCode = params.referral_ucc;
if (referralCode) {
await AsyncStorage.setItem('pending_referral_code', referralCode);
// Handle navigation or other logic based on deep link
}
};
return null;
}
```
## Using the Referral Data During Signup
When the user completes signup, retrieve the stored referral code and include it in your signup API call:
#### iOS Implementation
```swift
// iOS Example
class SignupViewController: UIViewController {
func completeSignup(email: String, password: String) {
// Get stored referral code
let referralCode = UserDefaults.standard.string(forKey: "pending_referral_code")
// Include in signup API call
let signupData = [
"email": email,
"password": password,
"referral_code": referralCode
]
api.signup(signupData) { result in
if result.success {
// Clear stored referral data after successful signup
UserDefaults.standard.removeObject(forKey: "pending_referral_code")
}
}
}
}
```
#### Android Implementation
```kotlin
// Android Example
class SignupActivity : AppCompatActivity() {
private fun completeSignup(email: String, password: String) {
val prefs = getSharedPreferences("app_prefs", Context.MODE_PRIVATE)
val referralCode = prefs.getString("pending_referral_code", null)
val signupData = HashMap().apply {
put("email", email)
put("password", password)
referralCode?.let { put("referral_code", it) }
}
api.signup(signupData) { success ->
if (success) {
// Clear stored referral data
prefs.edit().remove("pending_referral_code").apply()
}
}
}
}
```
#### React Native Implementation
```javascript
function SignupScreen({ navigation }) {
const [email, setEmail] = useState('');
const [password, setPassword] = useState('');
const handleSignup = async () => {
try {
const referralCode = await AsyncStorage.getItem('pending_referral_code');
const response = await api.signup({
email,
password,
referral_code: referralCode
});
if (response.success) {
await AsyncStorage.removeItem('pending_referral_code');
navigation.navigate('Home');
}
} catch (error) {
console.error('Signup error:', error);
}
};
return (
// Your signup form JSX
);
}
```
# Web Signup Flow
Source: https://docs.cello.so/attribution/for-web
Learn how to capture referral codes on your website
When users click referral links, they land on your website first. Capture the referral code (`ucc`) on this landing page to properly attribute future conversions.
Follow these steps to set up referral code capture:
## Step 1: Set up your landing page
Create a landing page for referral traffic. Choose one approach:
* Dedicated referral landing page
* Home page with Cello New User Banner
See the [landing page optimization guide](/guides/user-experience/optimizing-landing-pages) for best practices.
## Step 2: Install attribution script
The attribution script detects the `ucc` query parameter and stores it as a first-party cookie for later attribution of conversion events.
Install the Cello attribution script - [Attribution JS](/sdk/client-side/attribution-js-introduction) - using one of these methods:
The attribution script also enables you to:
* Fetch referrer names for [landing page personalization](/guides/user-experience/personalizing-referrals)
* Get campaign parameters to [display discounts](/guides/user-experience/new-user-discounts)
* Attach `ucc` to signup forms
See the [Attribution JS reference](/sdk/client-side/attribution-js-introduction) for complete details.
## Step 3: Verify installation
Verify that the `ucc` is available on your signup page:
1. Test your website with these query parameters:
```html
https://yourwebsite.com/?productId=test&ucc=test
```
2. Verify these values are saved as cookies: `cello-product-id` and `cello-referral`
3. On your signup page, test `ucc` access from the browser console:
```javascript
window.CelloAttribution('getUcc')
```
Expected response:
```javascript
Promise {: 'test'}
```
If this test passes, the script is installed correctly.
**Using referral codes at signup**
Use `getUcc()` during user signup to retrieve the referral code, then pass it in the [signup event](/attribution/tracking-signups) to Cello.
For complex flows, save the `ucc` with your user record so it's available when sending [signup events](/attribution/tracking-signups).
# HubSpot Forms
Source: https://docs.cello.so/attribution/hubspot
Integrate the Cello attribution library with HubSpot forms to track referral conversions
## Overview
This guide shows you how to capture referral codes (`ucc`) from visitors and automatically populate them into HubSpot forms when users submit lead generation or contact forms. This enables you to track which referrals lead to qualified leads and conversions.
## Considerations when creating the `ucc` property in HubSpot
When creating a custom property in HubSpot, it is important that the internal name of the property is `ucc`. This sets up the property in either company or deal. The one to choose depends on your specific sales process and the corresponding HubSpot setup.
These instructions describe creating the `ucc` property in the object type **Company**, group **Company information**. Often, it can make sense to create the `ucc` property in the **Deal** object type. A custom property can be created following the instructions of HubSpot [here](https://knowledge.hubspot.com/properties/create-and-edit-properties).
## Step 1: Create a form with a hidden `ucc` field in HubSpot
To properly capture referral data, you need to add a `ucc` field to your HubSpot form:
1. Create a customized form in HubSpot by following the instructions [here](https://knowledge.hubspot.com/forms/create-forms).
2. In your form, create a hidden field called `ucc`. This field automatically picks up the `ucc` from the link and feeds it into the create `ucc` property in HubSpot. The result should look like this:
## Step 2: Include the Cello Attribution Library
Add the Cello attribution script to your website's `` section or before the closing `` tag:
```html
```
## Step 3: Add the Attribution Command Queue
Since HubSpot forms are loaded dynamically, include this script to handle race conditions between your code and the Cello library loading:
```html
```
**Important:** This script must be added before any calls to `window.CelloAttribution()` to prevent race conditions.
## Step 3: Integrate with HubSpot Form Creation
When creating your HubSpot form, use the `onFormReady` callback to populate the referral code. Replace the placeholder values with your actual HubSpot configuration:
```javascript
hbspt.forms.create({
region: "AAA", // Replace with your HubSpot region (e.g., "na1")
portalId: "BBB", // Replace with your HubSpot Portal ID
formId: "CCC", // Replace with your HubSpot Form ID
onFormReady(form, ctx) {
window.CelloAttribution('getUcc').then((celloUcc) => {
console.log('Incoming Referral:', celloUcc);
// Find all ucc fields and populate them
document.querySelectorAll('input[name="ucc"]').forEach(
el => {
el.value = celloUcc;
}
);
}).catch((error) => {
console.log('No referral code found or error occurred:', error);
});
}
});
```
## Test Your Implementation
### 1. Test Referral Code Capture
1. Visit your page with a referral parameter:
```
https://yoursite.com/landing-page?ucc=test123&productId=yourproduct
```
2. Open browser developer tools and check:
```javascript
// Test if ucc is available
window.CelloAttribution('getUcc')
```
Expected response: `Promise {: 'test123'}`
### 2. Test Form Integration
1. Open the page with the created form
2. Add `?ucc=demo12345687` to the link and reload the page. After the initialization of the config, this will be added automatically to the link by Cello
3. Enter some test data into the form. The result should look similar to the following
4. Submit your HubSpot form
5. HubSpot should now have created a new contact and a new company. In the new company, you should find the `ucc` property filled with the entered value `demo12345687`
6. The test was successful. You can now move ahead to the section on providing the required data to Cello.
## Troubleshooting
### Common Issues and Solutions
**1. "getReferral is not supported" error**
* Make sure you're using `getUcc()` instead of `getReferral()`
* This is the correct method for the latest attribution library
**2. Form fields not getting populated**
* Verify your form has a field with `name="ucc"`
* Check that the field selector in `querySelectorAll()` matches your form
* Ensure the `onFormReady` callback is executing
**3. Referral code is undefined**
* Test with a URL containing the `ucc` parameter: `?ucc=test123`
* Check browser cookies for `cello-referral`
* Verify the attribution script loaded properly
**4. Script loading order issues**
* Always include the command queue script before any attribution calls
* Use the `async` attribute on the attribution library script
## HubSpot Scheduling Pages Integration
You can also use the Cello attribution library with HubSpot scheduling pages to capture referral codes when prospects book meetings or demos. This is particularly useful for sales-led referral programs where referrals often lead to booked consultations or product demos.
### How it works
HubSpot scheduling pages include built-in forms that collect contact information before allowing visitors to book meetings. You can integrate Cello attribution with these forms using the same approach as regular HubSpot forms.
### Setup Steps
The integration process for scheduling pages is identical to regular forms:
1. Include the Cello Attribution Library (Steps 2-3 above remain the same)
2. Set up the `ucc` property in your HubSpot contacts/companies
3. Add a hidden `ucc` field to your scheduling page form
4. Configure the scheduling page to populate the referral code
### Adding `ucc` Field to Scheduling Pages
1. Create or edit a scheduling page ([HubSpot's scheduling page guide](https://knowledge.hubspot.com/meetings/create-scheduling-pages))
2. In the "Form" section, add the created `ucc` parameter to the form. You can't hide this field on a scheduling page. This field automatically picks up the `ucc` parameter from the link and feeds it into the created `ucc` property in HubSpot. The result should look like this:
### JavaScript Integration for Scheduling Pages
Since scheduling pages are embedded HubSpot components, you'll add the same integration code to the page where your scheduling page is embedded:
```html
```
### Testing Your Scheduling Page Integration
1. Visit your scheduling page with a referral parameter:
```
https://yoursite.com/book-demo?ucc=demo12345687
```
2. Start the booking process and fill out the form
3. Complete the booking
4. Check the created contact in HubSpot - the `ucc` field should contain `demo12345687`
### Key Differences from Regular Forms
* **Timing**: Scheduling pages load asynchronously, so we use MutationObserver to detect when the form is ready
* **Form structure**: Scheduling page forms are embedded HubSpot components with specific styling
* **Optional field**: Make the `ucc` field optional since not all meeting bookings will come from referrals
* **Meeting context**: The referral code will be associated with the contact and any resulting deals from the meeting
**For sales-led businesses**: Integrating referral tracking with scheduling pages is crucial for tracking which referrals lead to qualified sales conversations and ultimately closed deals.
# Introduction
Source: https://docs.cello.so/attribution/introduction
Learn how to implement referral attribution to track signups and purchases back to their original referrers
Referral conversion enables you to track and attribute user signups and purchases back to their original referrers and reward them for conversions.
Cello helps you capture referral codes `ucc` from landing pages and maintains attribution throughout the entire user journey, from initial visit to final purchase.
# How it works
The referral conversion process follows a four-step attribution flow:
1. **Referral Link Sharing** - Referrers share links containing unique codes (`ucc` parameters)
2. **Landing Page Capture** - Your website captures and stores referral codes `ucc` as first-party cookies
3. **Signup Tracking** - New user registrations are linked to their referrer
4. **Purchase Tracking** - Revenue events are attributed back to the original referrers
Accurate referral conversion tracking depends on properly passing the referral code `ucc` through each step of the referral journey.
**Attribution based on organization level**
If the buying persona is the organization and you want to attribute purchases on the organization level always provide the **ID of the organization** in the parameter `payload.newUserId`
# Getting started with referral conversion tracking
Learn how to track conversions with Cello in the following resources:
Capture referral code during web signup flow
Capture referral code during mobile signup
A full guide on tracking signup events
A full guide on tracking purchase events
or choose a step-by-step quickstart guide for your integration scenario:
# Track Purchases
Source: https://docs.cello.so/attribution/tracking-purchase
Learn how to track purchase events with Cello
To complete the conversion tracking and reward referrers, you will need to send Cello purchase events. A purchase event is sent when a user pays for a subscription or a product.
# Prerequisites
Before you can send Cello purchase events, make sure you are already:
* [Capturing referral code on your landing page](https://docs.cello.so/attribution/for-web)
* [Tracking signups](https://docs.cello.so/attribution/tracking-signups)
**Attribution based on organization level**
If the buying persona is the organization and you want to attribute purchases at the organization level, always provide the **ID of the organization** in the parameter `payload.newUserId`
# Track purchase events with Webhooks
Depending on which payment gateway you’re using, we offer webhooks for the following:
}
href="/integrations/webhooks/stripe-webhook"
>
Send events using Stripe Webhook
}
href="/integrations/webhooks/chargebee-webhook"
>
Send events using Chargebee Webhook
# Track purchase events with Cello API
If you’re not using any of the gateways listed above, you can also send purchase events using Cello API `POST /events` API endpoint. Here are the 2 events you will need to send:
## `invoice-paid`
This event is sent every time a transaction based on the provided subscription is successful or a new user buys a one-time plan, a license or something similar.
```bash
POST https://api.cello.so/events
{
"eventName": "ReferralUpdated",
"payload": {
"ucc": "cello-ucc",
"newUserId": "new-user-product-user-id", // or 'new-user-organization-id'
"price": 100,
"currency": "EUR"
},
"context": {
"newUser": {
"id": "new-user-product-user-id",
"email": "new-user@gmail.com",
"organizationId": "new-user-organization-id"
},
"event": {
"trigger": "invoice-paid",
"timestamp": "2022-10-05 14:14:34"
},
"subscription": {
"invoiceId": "34hsjdh34jfksd",
"interval": "one-time",
"productKey": "Pro License"
}
}
}
```
Here are the properties you can include when sending a `invoice-paid` event:
| Property | Required | Description |
| ------------------------- | -------- | --------------------------------------------------------------------------------------------------------------------------------------------------------------------------------------------------------------------------------------------------------------- |
| `ucc` | yes | A referral code (`ucc`) identifying the referrer. You can retrieve this code using [attribution script](/sdk/client-side/attribution-js-introduction) `getUcc ()` method, you have installed as a prerequisite to this guide |
| `newUserId` | yes | A unique ID in your system, identifying the **new user** who just signed up. Can also be **organization ID**, if your referrers can refer organizations and you want to **reward them for organization account expansion** |
| `price` | yes | Amount on the invoice |
| `currency` | yes | Currency of the amount |
| `newUser.id` | yes | A unique ID of the new user (not the organization, if you are rewarding on organization level). This should be the same ID (`productUserId`) you will use to boot the [Referral component](/referral-component/introduction), when this user logs into your app |
| `newUser.email` | yes | New user email |
| `newUser.organizationId` | no | Organization ID. Add this field if your referrers can **refer an organization** and you want to reward them for **organization account expansion** |
| `event.trigger` | yes | `invoice-paid` |
| `event.timestamp` | yes | Event timestamp in **ISO8601 format** |
| `subscription.invoiceId` | yes | ID of the invoice that was paid or refunded |
| `subscription.interval` | yes | Interval of the payment. Available options: `one-time`, `monthly`, `quarterly`, `yearly`, `biennial`, `triennial`, `lifetime`, `bi-weekly`, `semi-annual` |
| `subscription.productKey` | yes | Name of the product or plan purchased |
Full API referrence for `POST /events` API endpoint can be found [here](/api-reference/generic-events/send-event).
## `charge-refunded`
This event is sent if the payment of the new user was refunded.
```bash
POST https://api.cello.so/events
{
"eventName": "ReferralUpdated",
"payload": {
"ucc": "cello-ucc",
"newUserId": "new-user-product-user-id", // or 'new-user-organization-id'
"price": 1000,
"currency": "EUR"
},
"context": {
"newUser": {
"id": "new-user-product-user-id",
"email": "new-user@gmail.com",
"organizationId": "new-user-organization-id"
},
"event": {
"trigger": "charge-refunded",
"timestamp": "2022-10-05 14:14:34"
},
"subscription": {
"invoiceId": "34hsjdh34jfksd"
}
}
}
```
Here are the properties you can include when sending a `charge-refunded` event:
| Property | Required | Description |
| ------------------------ | -------- | --------------------------------------------------------------------------------------------------------------------------------------------------------------------------------------------------------------------------------------------------------------- |
| `ucc` | yes | A referral code (`ucc`) identifying the referrer. You can retrieve this code using [attribution script](/sdk/client-side/attribution-js-introduction) `getUcc ()` method, you have installed as a prerequisite to this guide |
| `newUserId` | yes | A unique ID in your system, identifying the **new user** who just signed up. Can also be **organization ID**, if your referrers can refer organizations and you want to **reward them for organization account expansion** |
| `price` | yes | Amount refunded |
| `currency` | yes | Currency of the amount |
| `newUser.id` | yes | A unique ID of the new user (not the organization, if you are rewarding on organization level). This should be the same ID (`productUserId`) you will use to boot the [Referral component](/referral-component/introduction), when this user logs into your app |
| `newUser.email` | yes | New user email |
| `newUser.organizationId` | no | Organization ID. Add this field if your referrers can **refer an organization** and you want to reward them for **organization account expansion** |
| `event.trigger` | yes | `charge-refunded` |
| `event.timestamp` | yes | Event timestamp in **ISO8601 format** |
| `subscription.invoiceId` | yes | ID of the invoice that was paid or refunded |
Full API referrence for `POST /events` API endpoint can be found [here](/api-reference/generic-events/send-event).
# Track Signups
Source: https://docs.cello.so/attribution/tracking-signups
Learn how to track signup events with Cello
When a referee signs up or otherwise shows interest in your product - like booking or attending a demo - you need to send this event to Cello. This allows Cello to attribute this conversion to the referrer, so they can be rewarded if a purchase happens later.
You can also choose to reward users for actions like signups or demos by configuring this in your [Campaign settings](/guides/campaigns/setting-up-campaigns).
# Prerequisites
Before you can send Cello signup events, you need to make sure that you are able to **capture the referral code** `ucc`**during signup or demo booking**:
* [When users sign up in your web app](/attribution/for-web)
* [When users sign up in your mobile app](/attribution/for-mobile)
* When users book a demo using [Hubspot](/attribution/hubspot) or [Typeform](/attribution/typeform) forms or scheduling
**Attribution based on organization level**
If the buying persona is the organization and you want to attribute purchases at the organization level, always provide the **ID of the organization** in the parameter `payload.newUserId`
# Tracking signup events
For a SaaS application signup flow, you will track a signup event or equivalent.
Depending on how you create a new user and which payment gateway you are using, you can choose from the following options to send Cello signup events.
## Option 1: Using Stripe - I create Stripe Customer at Signup
Use this option if your payment gateway is Stripe and you **create a Stripe customer at signup**
To track a signup, you can pass the following `metadata` to Stripe [Customer Object](https://docs.stripe.com/api/customers/object?api-version=2024-09-30.acacia#customer_object-metadata) on customer creation.
* `cello_ucc` - ucc, a referral code identifying the referrer. You can retrieve this code using [attribution script](https://docs.cello.so/sdk/client-side/attribution-lib) `getUcc ()` method, you have installed as a prerequisite to this guide.
* `new_user_id` - a unique user ID in your system, identifying the new user who just signed up. This should be the same ID (`productUserId`) you will use to boot the [Referral component](https://docs.cello.so/sdk/client-side/cello-js), when this user logs into your app
* `new_user_organization_id` (optional) - add this, if your referrers can refer an organization rather then a single user and you want to reward based on that.
Modify customer fields you send upon customer creation. Here is an example for a NodeJS App that does that:
```javascript
const stripe = require('stripe')('sk_test_51KiCYYCSMQAUBF...');
const customer = await stripe.customers.create({
description: 'New Stripe Customer',
metadata: {
cello_ucc: "hdz7afhs7",
new_user_id: "xcsdad", // product user id of the new user
new_user_organization_id: "123456" // organization id of the new user
}
});
```
Now that the customer is created in Stripe with Cello metadata, a `customer.created` event will be sent with [Stripe Webhook](/integrations/webhooks/stripe-webhook), which we will count as a signup event in Cello.
## Option 2: Using Chargebee - I create Chargebee customer at signup
Use this option if your payment gateway is Chargebee and you **create a Chargebee customer at signup**
You can pass the following metadata to Chargebee on customer creation.
You can also choose to use **Chargebee custom fields (CF\_)** to add referral data to the event. Learn more about custom fields in the [**Chargebee documentation**](https://www.chargebee.com/docs/billing/2.0/site-configuration/custom_fields)
* `cello_ucc` - ucc, a referral code identifying the referrer. You can retrieve this code using [attribution script](/sdk/client-side/attribution-js-introduction) `getUcc ()` method, you have installed as a prerequisite to this guide.
* `new_user_id` - a unique user ID in your system, identifying the new user who just signed up. This should be the same ID (`productUserId`) you will use to boot the [Referral component](/referral-component/introduction), when this user logs into your app
* `new_user_organization_id` (optional) - add organization ID, if your referrers can **refer an organization** and you want to reward them for **organization account expansion**.
Modify customer fields you send upon customer creation. Here is an example for a NodeJS App that does that:
```javascript
var chargebee = require("chargebee");
chargebee.configure({site : "getmoonly-v3-test", api_key : "test_jqXGuQLkBHUSR2PM0qgUV21W1VqSFJIU"});
chargebee.customer.create({
first_name : "Bob",
last_name : "Bobsky",
//...
// other customer fields
//...
meta_data: {
cello_ucc: "hdz7afhs7",
new_user_id: "xcsdad", // product user id of the new user
new_user_organization_id: "123456" // organization id of the new user
}
// ..
// })
```
Now that the customer is created in Chargebee with Cello metadata, a `Customer Created` event will be sent with [Chargebee Webhook](/integrations/webhooks/chargebee-webhook), which we will count as a signup event in Cello.
## Option 3: Using Cello API POST /events API endpoint
Use this option for all other use cases. For example:
* You use Stripe or Chargebee, but customer is created in the payment gateway **at purchase**.
* Your payment gateway is Paddle, Recurly or other, including in-house built payment gateways
Send a `new-signup` event to the Cello API with the following values in the payload:
* `ucc` - ucc, a referral code identifying the referrer. You can retrieve this code using [attribution script](/sdk/client-side/attribution-js-introduction) `getUcc ()` method, you have installed as a prerequisite to this guide.
* `newUserId` - a unique ID in your system, identifying the **new user** who just signed up. Can also be **organization ID**, if your referrers can refer organizations and you want to **reward them for organization account expansion**.
* `newUser.id` - unique ID of the new user (not the organization, if you are rewarding on organization level). This should be the same ID (`productUserId`) you will use to boot the [Referral component](/referral-component/introduction), when this user logs into your app
* `newUser.email` - new user email
* `newUser.name` - new user name
* `newUser.organizationId`(optional) - add organization ID, if your referrers can **refer an organization** and you want to reward them for **organization account expansion**.
Here is an example of the `POST /events` call to send a `new-signup` event:
```bash
POST https://api.cello.so/events
{
"eventName": "ReferralUpdated",
"payload": {
"ucc": "cello-ucc",
"newUserId": "new-user-product-user-id", // or "new-user-organization-id"
"price": 0,
"currency": ""
},
"context": {
"newUser": {
"id": "new-user-product-user-id",
"email": "new_user@gmail.com",
"name": "new-user-name",
"organizationId": "new-user-organization-id"
},
"event": {
"trigger": "new-signup",
"timestamp": "2022-10-05 14:14:34"
}
}
}
```
# Tracking "demo attended" event
Use this option if your product follows a sales-led model where successful conversions are driven by users attending a demo call.
Send a `demo-attended` event to the Cello API with the following values in the payload:
* `ucc` - ucc, a referral code identifying the referrer. You can retrieve this code using [attribution script](/sdk/client-side/attribution-js-introduction) `getUcc ()` method, you have installed as a prerequisite to this guide.
* `newUserId` - a unique ID in your system, identifying the **new user** who just signed up. Can also be **organization ID**, if your referrers can refer organizations and you want to **reward them for organization account expansion**.
* `newUser.id` - unique ID of the new user (not the organization, if you are rewarding on organization level). This should be the same ID (`productUserId`) you will use to boot the [Referral component](/referral-component/introduction), when this user logs into your app
* `newUser.email` - new user email
* `newUser.name` - new user name
* `newUser.organizationId`(optional) - add organization ID, if your referrers can **refer an organization** and you want to reward them for **organization account expansion**.
Here is an example of the `POST /events` call to send a `new-signup` event:
```bash
POST https://api.cello.so/events
{
"eventName": "ReferralUpdated",
"payload": {
"ucc": "cello-ucc",
"newUserId": "product-user-id" // or 'new-user-organization-id'
},
"context": {
"newUser": {
"id": "new-user-product-user-id",
"email": "new-user@gmail.com",
"name": "new-user-name",
"organizationId": "new-user-organization-id"
},
"event": {
"trigger": "demo-call-attended",
"timestamp": "2022-10-05 14:14:34"
}
}
}
```
# Typeform Forms
Source: https://docs.cello.so/attribution/typeform
Ingest Cello's referral code (ucc) into HubSpot using Typeform forms
This page guides you through the required steps to ingest **Cello's referral code (`ucc`) into HubSpot using Typeform forms**.
## Create a form with a hidden ucc field in Typeform
Create a new form in Typeform
On the initial question in your form, go to **Hidden Fields** via **Logic → Hidden Fields** on the panel on the right
Add a new field named `ucc` and click Save
## Setup of Sync from Typeform to HubSpot
Navigate to the **Connect** Section in the header of Typeform and connect HubSpot
After the authorization is done, you can select the HubSpot object to which you want to sync the `ucc`. In the below example the `ucc` is synced to a deal in HubSpot.
You can also sync the `ucc` to multiple objects at the same time: contact, company and deals.
If you sync the `ucc` to a deal, you have to specify in which pipeline at which stage the deals should be created
After finalizing the setup of the integration, save the settings and run a short test run
## Test the created Typeform and HubSpot integration
Open the created Typeform
Add either `?ucc=12341234` or `&ucc=12341234` to the link depending on if there is already a "?" present in the link
Submit the Typeform
Open HubSpot and check that the contact, company or deal was created and the `ucc` was synced correctly
## Further hints
You can also embed a Calendly in Typeform to allow customers to schedule e.g. a demo from the Typeform. Documentation can be found [here](https://www.typeform.com/connect/calendly/).
# Chargebee Webhook Quickstart
Source: https://docs.cello.so/attribution/use-cases/chargebee
Learn how to integrate Cello if you are using Chargebee JS to create Chargebee customer and Chargebee Webhook to send Cello conversion events.
This guide is **optimized for the typical freemium scenario with Chargebee**.
Use this guide if you:
* Create Chargebee customer on signup
* Use Chargebee webhook to send Cello referral conversion events
# Step 1: Integrate the Referral Component
First, integrate Cello Referral Component into your web app to provide referrers with full referral experience.
Referral Component is integrated using one of our SDKs. For your web app, use Cello JS - our client-side SDK. You can install it by:
1. Adding a script tag to the `` of your application
2. Generating a JWT token for user authentication
3. Booting the component with the provided token and user details
Follow this installation guide:
You can also integrate Referral Component into your mobile applications:
# Step 2: Capture referral codes on landing page
Next, you will need to add [Cello attribution script](https://docs.cello.so/sdk/client-side/attribution-lib) to your referral landing page:
1. Setup a [landing page](https://docs.cello.so/docs/optimize-landing) for your referral links to redirect to
2. Install attribution script. Choose one of the following installation options best suited for your setup:
3. Verify the installation
To verify, follow these steps:
1. Add `?productId=test` and `?ucc=test` to your website URL
```html
https://yourwebsite.com/?productId=test&ucc=test
```
2. Make sure that these values are saved in the cookies as `cello-product-id` and `cello-referral`
3. Navigate to your signup page and try to access the ucc using the `getUcc()` method from the browser console
```javascript
window.CelloAttribution('getUcc')
```
This method should return a promise with value `test`
```javascript
Promise {: 'test'}
```
**If this check passes, the script is installed correctly.**
For capturing referral code in your mobile signup flow, follow this guide:
# Step 3: Add Cello metadata or custom fields on Chargebee customer creation
To track a signup, you can pass the following metadata to Chargebee on customer creation.
You can also choose to use **Chargebee custom fields (CF\_)** to add referral data to the event. Learn more about custom fields in the [**Chargebee documentation**](https://www.chargebee.com/docs/billing/2.0/site-configuration/custom_fields)
* `cello_ucc` - ucc, a referral code identifying the referrer. You can retrieve this code using [attribution script](https://docs.cello.so/sdk/client-side/attribution-lib) `getUcc ()` method, you have installed as a prerequisite to this guide.
* `new_user_id` - a unique user ID in your system, identifying the new user who just signed up. This should be the same ID (`productUserId`) you will use to boot the [Referral component](https://docs.cello.so/sdk/client-side/cello-js), when this user logs into your app
* `new_user_organization_id` (optional) - add this, if your referrers can refer an organization rather then a single user and you want to reward based on that.
Modify customer data you send upon customer creation. Here is an example for a NodeJS App that does that with `meta_data`:
```javascript
var chargebee = require("chargebee");
chargebee.configure({site : "getmoonly-v3-test", api_key : "test_jqXGuQLkBHUSR2PM0qgUV21W1VqSFJIU"});
chargebee.customer.create({
first_name : "Bob",
last_name : "Bobsky",
//...
// other customer fields
//...
meta_data: {
cello_ucc: "hdz7afhs7",
new_user_id: "xcsdad", // product user id of the new user
new_user_organization_id: "123456"
}
// ..
// })
```
Now that the customer is created in Chargebee with Cello metadata, a `Customer Created` event will be sent with [Chargebee Webhook](https://docs.cello.so/integrations/webhooks/chargebee-webhook), which we will count as a signup event in Cello.
# Step 4: Connect Chargebee Webhook to send signup and purchase events
To send Cello signup and purchase events, you will need to connect Chargebee Webhook to Cello.
Follow this guide to connect the webhook:
}
href="/integrations/webhooks/chargebee-webhook"
>
Send events using Chargebee Webhook
**Congratulations!** You are done and now able to try out the full Cello referral experience 🎉
# Stripe Webhook Quickstart
Source: https://docs.cello.so/attribution/use-cases/stripe
Learn how to integrate Cello if you are using Stripe JS to create Stripe customer and Stripe Webhook to send Cello conversion events.
This guide is **optimized for the typical freemium scenario with Stripe**.
Use this guide if you:
* Create Stripe customer on signup
* Use Stripe webhook to send Cello referral conversion events
# Step 1: Integrate the Referral Component
First, integrate Cello Referral Component into your web app to provide referrers with full referral experience.
Referral Component is integrated using one of our SDKs. For your web app, use Cello JS - our client-side SDK. You can install it by:
1. Adding a script tag to the `` of your application
2. Generating a JWT token for user authentication
3. Booting the component with the provided token and user details
Follow this installation guide:
You can also integrate Referral Component into your mobile applications:
# Step 2: Capture referral codes on landing page
Next, you will need to add [Cello attribution script](https://docs.cello.so/sdk/client-side/attribution-lib) to your referral landing page:
1. Setup a [landing page](https://docs.cello.so/docs/optimize-landing) for your referral links to redirect to
2. Install attribution script. Choose one of the following installation options best suited for your setup:
3. Verify the installation
To verify, follow these steps:
1. Add `?productId=test` and `?ucc=test` to your website URL
```html
https://yourwebsite.com/?productId=test&ucc=test
```
2. Make sure that these values are saved in the cookies as `cello-product-id` and `cello-referral`
3. Navigate to your signup page and try to access the ucc using the `getUcc()` method from the browser console
```javascript
window.CelloAttribution('getUcc')
```
This method should return a promise with value `test`
```javascript
Promise {: 'test'}
```
**If this check passes, the script is installed correctly.**
For capturing referral code in your mobile signup flow, follow this guide:
# Step 3: Add Cello metadata on Stripe customer creation
To track a signup, you can pass the following `metadata` to Stripe [Customer Object](https://docs.stripe.com/api/customers/object?api-version=2024-09-30.acacia#customer_object-metadata) on customer creation.
* `cello_ucc` - ucc, a referral code identifying the referrer. You can retrieve this code using [attribution script](https://docs.cello.so/sdk/client-side/attribution-lib) `getUcc ()` method, you have installed as a prerequisite to this guide.
* `new_user_id` - a unique user ID in your system, identifying the new user who just signed up. This should be the same ID (`productUserId`) you will use to boot the [Referral component](https://docs.cello.so/sdk/client-side/cello-js), when this user logs into your app
* `new_user_organization_id` (optional) - add this, if your referrers can refer an organization rather then a single user and you want to reward based on that.
Modify customer fields you send upon customer creation. Here is an example for a NodeJS App that does that:
```javascript
const stripe = require('stripe')('sk_test_51KiCYYCSMQAUBF...');
const customer = await stripe.customers.create({
description: 'New Stripe Customer',
metadata: {
cello_ucc: "hdz7afhs7",
new_user_id: "xcsdad", // product user id of the new user
new_user_organization_id: "123456" // organization id of the new user
}
});
```
Now that the customer is created in Stripe with Cello metadata, a `customer.created` event will be sent with [Stripe Webhook](https://docs.cello.so/integrations/webhooks/stripe-webhook), which we will count as a signup event in Cello. You will connect Stripe Webhook in the next step.
# Step 4: Connect Stripe Webhook to send signup and purchase events
To send Cello signup and purchase events, you will need to connect Stripe Webhook to Cello.
Follow this guide to connect the webhook:
}
href="https://docs.cello.so/integrations/webhooks/stripe-webhook"
>
Send events using Stripe Webhook
**Congratulations!** You are done and now able to try out the full Cello referral experience 🎉
# Manual Attribution
Source: https://docs.cello.so/guides/attribution/manual-attribution
At Cello, we understand that there may be instances where automated referral attribution doesn't work as expected
At Cello, we understand that there may be instances where automated referral attribution doesn't work as expected. In such cases, our platform provides the flexibility to manually attribute referrals to ensure that your users receive the proper rewards for their efforts. This guide will walk you through the steps of manually attributing referrals within the Cello platform.
## When to Manually Attribute Referrals
1. **Technical Glitches**: If you encounter technical issues or glitches that prevent automated attribution, manual attribution allows you to override these challenges.
2. **User Disputes**: In cases where users claim they referred someone but the system did not capture it correctly, manual attribution provides a resolution path.
3. **Custom Scenarios**: For unique situations or custom referral setups, manual attribution offers a tailored solution.
## How to Manually Attribute Referrals
1. Customer gets `cello_ucc` of referrer from the Cello Portal and retrieves `cello_ucc` of referrer and `new_user_id` (former product\_user\_id) new user from their own system. If data cannot be found, please reach out to Cello.
2. Customer adds `cello_ucc` of referrer and `new_user_id` (former product\_user\_id) ID of new user to the existing Stripe customer of new user in Stripe.
3. Cello receives a `customer.updated` event from Stripe for the customer.
4. If there were already paid invoices, please resend the past `invoice.paid` events of the new user to Cello. This can be done by:
1. Go to the transaction
2. Select the `invoice.paid` event in the feed at the bottom
3. Click **View event details**
4. Check webhook attempts and resend the event
1. Customer gets `cello_ucc` of referrer from the Cello Portal and retrieves `cello_ucc` of referrer and `new_user_id` (former product\_user\_id) ID of new user from their own system. If data cannot be found, please reach out to Cello.
2. In Chargebee, you add `cello_ucc` of referrer and `new_user_id` (former product\_user\_id) of new user to the metadata of the new user's Chargebee customer.
3. We automatically receive a `customer_changed` event via the webhook.
4. If there were already payments from the new user, you need to resend the past `payment_succeeded` events via the webhook. You can trigger this inside Chargebee manually.
1. Customer gets `cello_ucc` of referrer from the Cello Portal and retrieves `new_user_id` ID of new user from their own system. If data cannot be found, please reach out to Cello.
2. Customer resends the signup event manually via the Cello API. Fields are filled as in the automated Cello API events. The detailed documentation can be found in the [Example Requests](/api-reference/generic-events/send-event).
3. To add the parameters to the metadata in your payment gateway and resend past transactions, follow step 2-4 from the tab applicable for your payment gateway.
In case Cello API events can not be resend via API, manual reports can be provided to Cello. The reports need to contain equivalent information as the specific event. The report templates will be provided by Cello Support team.
1. Customer gets `cello_ucc` of referrer from the Cello Portal and retrieves `new_user_id` ID of new user from their own system. If data cannot be found, please reach out to Cello.
2. Customer resends the signup event manually via the Cello API. Fields are filled as in the automated Cello API events. The detailed documentation can be found in the [Example Requests](/api-reference/generic-events/send-event).
3. Customer resends past transaction events manually via the Cello API. Fields are filled as in the automated Cello API events. The detailed documentation can be found in the [Example Requests](/api-reference/generic-events/send-event).
In case Cello API events can not be resend via API, manual reports can be provided to Cello. The reports need to contain equivalent information as the specific event. The report templates will be provided by Cello Support team.
## Contact Support
If you encounter challenges or have questions during the manual attribution process, our support team is here to assist you. Reach out to us via [support@cello.so](mailto:support@cello.so) with detailed information about the referral in question, and we'll promptly assist you in resolving the matter.
# Contextual Sharing
Source: https://docs.cello.so/guides/best-practices/contextual-sharing
Guide for increasing referral sharing at key moments
Increase sharing by creating referral program awareness, keeping it top of mind for users and making referrals part of your main user flow. To achieve this, we recommend utilizing **moments of delight** and regular communication.
How to encourage referrers to share at key moments in the user journey:
* [Add a CTA to refer your product](#add-a-cta-to-refer-your-product)
* [Send an instant message to introduce the referral program](#send-an-instant-message-to-introduce-the-referral-program)
* [Add referral link to regular emails](#add-referral-link-to-regular-emails)
**Contextual sharing can increase sharing rates by 3.4x**
Adding sharing prompts to just a few moments of delight can increase sharing rates more than x3.
## Add a CTA to refer your product
A product lifecycle naturally has **moments of delight** when a user would be more likely to share their satisfaction with the product within their network. Add a CTA to open the [referral component](/sdk/client-side/cello-js-usage) at such moments and make referring part of this flow.
### How to implement?
For Developers
You can add a custom button anywhere in your UI at the moment of delight and have it open the Referral Component.
1. Identify where to add the button together with your Growth manager and UX designer
2. Use [window.Cello("open")](/sdk/client-side/cello-js-usage#open-destination) method to open the Referral Component when the button is clicked.
```javascript theme={null}
window.Cello("open");
```
## Send an instant message to introduce the referral program
When your user reaches a **moment of delight** in their journey, that's the time to prompt them to share your product with an introductory in-product message i.e. [announcement](/guides/user-experience/referral-notifications-and-emails#announcement). This introduces the referral program to the user at the time they feel compelled to share their experience and effectively boost the conversion rate from users to referrers.
### How to implement?
For Developers
You can trigger [an announcement](/guides/user-experience/referral-notifications-and-emails#announcement) using [Cello.js](/sdk/client-side/cello-js-usage) client-side JS method at any point of the user journey. Here is how to do it:
1. Add [announcement to your custom launcher](/referral-component/custom-launcher#add-announcement-selector), so they are displayed when triggered.
2. Use [window.Cello("showAnnouncement")](/sdk/client-side/cello-js-usage#showannouncement-announcement) method to open the Referral Component when the button is clicked.
Below example will trigger a default [welcome announcement](/guides/user-experience/referral-notifications-and-emails#announcement):
```javascript theme={null}
window.Cello("showAnnouncement", { "type": "welcome-announcement-1" } );
```
You can also use a server-side API to trigger the announcement. Check out this guide [on behaviour-based triggers](/guides/best-practices/behavior-based-triggers).
## Add referral link to regular emails
Use regular communication with your users as an opportunity to remind them about the referral program and keep it top of mind. For example, add their personal invite link to your weekly updates or transactional emails.
### How to implement?
For Developers
Depending on your email sending service, you can add additional content to your email, in this case, a personal invite link. To get the link for each referrer, you can use our Cello API [/active-link endpoint](/api-reference/referral-codes/fetch-active-link) and enrich the emails you already send to your users with information about referral program and their personal invite link.
# Improve User Activation
Source: https://docs.cello.so/guides/best-practices/improve-user-activation
Recommendations to optimize the signup conversion of referred users
This page provides recommendations to optimize the signup conversion of referred users. Cello offers a variety of options that range from stunning new user experiences with personalized website content to easy setup solutions.
## Increase discoverability of your referral program
**Get started now:**
🔗 [Show Cello floating button](/sdk/client-side/cello-js#show) by default. Contact your CS team for adjustments to the floating button.
🔗 [Custom launcher](/referral-component/custom-launcher) to add menu integrations.
## Integrate referral ask at moments of delight
**Get started now:**
🔗 **Simple option**: Add [button or UI for opening referral widget](/sdk/client-side/cello-js#open-destination) to your existing user flows.
🔗 **Advanced option**: Set up [behavior-based triggers](/guides/best-practices/behavior-based-triggers) to send a custom message to users upon completion of a defined trigger moment.
## Enable essential notifications with Cello email campaigns
**Get started now:**
Contact your Cello CS team to activate email campaigns in Slack or at [support@cello.so](mailto:support@cello.so). Email addresses need to be provided on boot of Cello to activate certain types of emails.
### Customize Cello in-app messages
**Get started now:**
Contact your Cello CS team to activate the activation campaigns and customize messages [here](https://getcello.typeform.com/to/Np4C9iiO).
# Optimize signup conversion
Source: https://docs.cello.so/guides/best-practices/optimizing-signup-conversion
Recommendations to optimize the signup conversion of referred users
This page provides recommendations to optimize the signup conversion of referred users. Cello offers a variety of options that range from stunning new user experiences with personalized website content to super simple setup solutions.
## Increase conversion by showing discount info on website
**Get started now:**
🔗 Docs: [Personalizing referrals](/guides/user-experience/personalizing-referrals)
🔗 [Wise referral program with personalization](https://wise.com/invite/dic/tanjam2?utm_source=desktop-invite-tab-copylink\&utm_medium=invite\&utm_campaign=\&utm_content=\&referralCode=tanjam2)
🔗 [MeetGeek website with personalized new user banner](https://meetgeek.ai/meetgeek-referral?productId=app.meetgeek.ai\&ucc=vTlj7ne4Fkf\&n=VG9iaWFz)
## Increase conversion with stand-alone landing page
**Get started now:**
Once your referral landing page is ready to go, reach out to your Cello CS team in Slack or at [support@cello.so](mailto:support@cello.so) to enable forwarding new users directly to the page.
🔗 [Typeform landing page](https://www.typeform.com/refer-a-friend/invite/?utm_medium=referrerlink\&utm_source=typeform\&utm_campaign=refer_a_friend_cello\&productId=admin.typeform.com\&ucc=ARn30TGHAsq)
🔗 [Superhuman landing page with personalization](https://superhuman.com/refer?utm_source=product\&utm_medium=signature\&utm_campaign=bob%40bobinsky.me)
🔗 [Heyflow standalone landing page](https://get.heyflow.app/referral-lp?productId=go.heyflow.app\&utm_source=cello\&utm_medium=referral\&utm_campaign=Cello-RS20-C1000-D50\&ucc=2dRGoRjgP7A#start)
🔗 [Cello standalone landing page with direct signup](https://cello.so/invitation/)
# Reward structure FAQs
Source: https://docs.cello.so/guides/campaigns/faqs
Frequently asked questions about campaign setup, reward structures, and referral program management to help you optimize your program performance.
## What is a convincing reward for the referrer?
Cello provides a recommendation on how to set the reward structure during the onboarding. You can find it on your individual “Set the reward structure” page on the Onboarding Notion.
## Does Cello allow to set different reward parameters for different user segments?
Currently only one campaign can be configured. One campaign comprises both the configuration of the referral experience flow and the reward parameters specified in that flow. Cello plans to support multiple campaigns in the near future.
## Is it possible to change the reward parameters retroactively for referrals that are already completed?
Cello considers a referral as completed with the referred account becoming a paying customer of the referred product. Once a referral is completed the parameters for this referral cannot be changed anymore. Changing rewards retroactively would potentially lead to a disappointing user experience for the referrer.
## Is it possible to change the reward parameters in the future?
It is possible to change the reward parameters for the referral program for future referrals. To bring the adjustment live, both the reward parameters and the referral flow have to be updated. Once the update is live, all future completed referrals will be rewarded according to the updated reward parameters. This is also the case even if the referrer shared the referral link still seeing the previous reward structure.
## Which currencies does Cello support for rewarding users?
Currently, rewards for referrers are available in all currencies that Paypal supports. You can find more details in the Paypal documentation.
## From which reward options can a referrer choose?
Cello currently offers payouts via Paypal. The list of supported countries for payouts is ”Australia, Austria, Bahrain, Belgium, Bermuda, Botswana, Brazil, Bulgaria, Canada, Cayman Islands, Chile, Croatia, Czechia, Denmark, Dominican Republic, Estonia, Faroe Islands, Finland, France, Georgia, Germany, Gibraltar, Greece, Greenland, Guatemala, Hong Kong SAR, Hungary, Iceland, India, Ireland, Israel, Italy, Japan, Latvia, Lesotho, Liechtenstein, Lithuania, Luxembourg, Malta, Mauritius, Mozambique, Netherlands, Nicaragua, Norway, Oman, Philippines, Poland, Portugal, Qatar, Romania, San Marino, Saudi Arabia, Senegal, Slovakia, Slovenia, South Africa, Spain, Sweden, Switzerland, United Kingdom, United States, Uruguay.” Additional reward options like gift cards, bank transfers, donations are on our backlog. Venmo is available for the US.
# Setting Up Campaigns
Source: https://docs.cello.so/guides/campaigns/setting-up-campaigns
Cello makes it easy to automatically notify and reward your users for making successful referrals
Cello makes it easy to automatically notify and reward your users for making successful referrals. This is done by creating **campaigns** with specific **payout rules.**
Your rules are then automated based on confirmation of **events** and **purchases.** These can be based on transactions for referred contacts, but can also be based on free trials, demos, or events you define.
## Example: Recurring Rewards Encourage Continuous Sharing
In this typical example, a referrer is rewarded **50%** for each referral up to a **\$100 maximum reward cap** with a **\$5 signup bonus**. The referee initially purchases a **\$10** subscription for herself, and then **upgrades her team** in the following month.
The reward is paid to the referrer over a 6 month period until the referrer reaches a **maximum cap of \$100** for this referral. In the meantime, these regular rewards encourage further sharing.
It's important to note that the **new user also receives an exclusive 50% discount** from the referrer when purchasing for the first 6 months. Our research shows that **symmetric rewards** (i.e., the referrer and the referred have incentives of similar values) work best because referrers invest their social capital when recommending a product; having similar incentives makes the referral look fair to both parties involved.
## Campaign Settings
All campaigns must have one or more rules to reward referrers for the referrals they made. **Campaign** settings can be configured in the [Cello portal in the Setup section](https://portal.cello.so/setup/campaigns).
Rewards are typically based on a **percentage** of the transaction amount generated when new customers make a payment up to a **maximum** amount per referral. Additional rewards can also be set on other key events such as **signups** and **purchases** to help encourage more engagement and sharing.
| **Section** | **Rule** | **Description** |
| --------------- | ----------------------------- | --------------------------------------------------------------------------------------------------------------------------------------------------------------------------------- |
| Referrer Reward | Percentage of revenue | Percentage of attributed new revenue that will be paid as a reward |
| Referrer Reward | Maximum reward (per referrer) | The maximum reward that can be earned per referral |
| Referrer Reward | Bonus rewards | Additional rewards that can be set for signups or purchases to encourage more sharing. Bonus rewards are also recommended for products with longer free to paid conversion times. |
| New User Reward | Percent Discount and Months | The new user discount to encourage additional sharing. |
Cello uses the new user reward settings to display to the new user on your signup screens. You will need to take additional steps to implement the discount at the point of purchase. See the docs [here](referee-rewards-in-stripe) for more information.
### A note on optimizing your campaigns
In this example, while the referrer would not receive a payout beyond their 6th month, it is likely that more referrals are made within this 6-month period that are likely to convert to paid plans within the 6-month period. This is based on the actual conversion rate of this specific product.
Overall, this campaign was designed to create a rewarding experience with continuous, regular incentives that encourage referrers to continue sharing with new contacts. We recommend that you design and optimize your campaigns in a similar way to build trust and encourage continued sharing behaviors with your referrers.
# Introduction
Source: https://docs.cello.so/guides/introduction
Your complete playbook for building and optimizing successful referral programs with Cello
Welcome to the Cello Growth Guides – your comprehensive resource for maximizing the impact of your referral program. These guides are designed specifically for growth managers, marketing leaders, and customer success teams who want to turn their users into their most valuable acquisition channel.
## What You'll Find Here
Our guides are organized into strategic areas that address the full lifecycle of referral program management, from initial setup to advanced optimization techniques.
### Campaign Management
**Set up reward structures that drive results**
* [Campaign Setup](/guides/campaigns/setting-up-campaigns) – Configure reward percentages, caps, and payout rules that motivate both referrers and new users
* Master symmetric reward strategies that balance **referrer incentives** with **new user discounts**
### User Experience Optimization
**Create seamless referral experiences that users love**
* [Referral Component Overview](/guides/user-experience/overview) – Understand all the features available in your referral widget
* [Component Configuration](/guides/user-experience/configuring-referral-component) – Customize appearance, messaging, and behavior
* [Landing Page Optimization](/guides/user-experience/optimizing-landing-pages) – Design high-converting referral landing pages
* [In-app and Email Notifications](/guides/user-experience/referral-notifications-and-emails) – Keep users engaged with timely updates
* [Personalized Experiences](/guides/user-experience/personalizing-referrals) – Add referrer names and custom messages
* [New User Discounts](/guides/user-experience/new-user-discounts) – Configure discount strategies for referred users
### Growth Best Practices
**Proven strategies to increase sharing and conversions**
* [Contextual Sharing](/guides/best-practices/contextual-sharing) – Prompt referrals at high-intent moments
* [Behavior-Based Triggers](/guides/best-practices/behavior-based-triggers) – Automate referral prompts based on user actions
* [User Activation Improvement](/guides/best-practices/improve-user-activation) – Convert more referrals into active users
* [Conversion Optimization](/guides/best-practices/optimizing-signup-conversion) – Maximize signup rates from referral traffic
### Partner Program Management
**Scale beyond user referrals with strategic partnerships**
* [Partner Program Overview](/guides/partners/partner-overview) – Set up affiliate and influencer programs
* [Partner Portal](/guides/partners/partner-portal) – Provide partners with dedicated dashboards and resources
* [Partner Management](/guides/partners/manage-partners) – Invite, onboard, and manage your partner network
### Attribution & Reporting
**Track performance and prove ROI**
* [Auto-Attribution](/guides/attribution/auto-attribution) – Automatically track referral conversions
* [CRM Integration Reports](/guides/attribution/hubspot-reports) – Connect referral data to HubSpot, Salesforce
* [Payment Platform Reports](/guides/attribution/stripe-reports) – Track revenue attribution through Stripe
### Data & Integrations
**Connect Cello to your growth stack**
* [Data Exports](/guides/data-sync/cello-data-exports) – Extract referral data for analysis
* [API Data Sync](/guides/data-sync/api-data-sync) – Programmatically sync referral data
* [Event Testing](/guides/integration/event-testing) – Validate your referral tracking setup
## Getting Started
If you're new to Cello or referral programs:
1. **Start with [Campaign Setup](/guides/campaigns/setting-up-campaigns)** to configure your reward structure
2. **Review [User Experience Overview](/guides/user-experience/overview)** to understand the referral component features
3. **Implement [Contextual Sharing](/guides/best-practices/contextual-sharing)** strategies to increase sharing rates
4. **Set up [Attribution](/guides/attribution/auto-attribution)** to track and reward successful referrals
## Need Help?
Each guide includes actionable steps and real examples from successful Cello customers. For additional support:
* Contact your Customer Success team via Slack
* Email [support@cello.so](mailto:support@cello.so) for technical questions
* Schedule a strategy session to review your program performance
These guides focus on growth strategy and program optimization. For technical implementation details, visit our [Developer Documentation](/referral-component/quickstart) and [API Reference](/api-reference/introduction).
# Manage Partners
Source: https://docs.cello.so/guides/partners/manage-partners
Cello allows you to manage your partners and affiliates to provide them with a full portal experience
Cello allows you to manage your partners and affiliates, providing them with a full portal experience for accessing their affiliate links, tracking referral progress, and receiving rewards for successful referrals. Inviting partners takes only a few clicks.
## Inviting New Partners to Your Program
1. Navigate to the **Partner Users** page in the Cello Portal and click **Add New Partner** in the upper right. If you do not see this page, contact Cello support to have additional permissions applied to your account.
2. Enter the **email** and **campaign** you want to assign to the partner user. **Product User ID** is optional and should be added if you want to update an existing user to partner status.
Adding a Product User ID` ensures that the referrer's referral code (`ucc\`) will be retained if they are either: (1) moving from a user-led campaign to an affiliate campaign, or (2) moving from an old affiliate campaign to a new one.
If you do not specify the Product User ID, Cello automatically creates a new identifier, and the user will then have two separate referral links: one inside your product and one in the Cello portal.
3. Click **Send Invite**.
4. The partner user will receive a branded email invitation with instructions to register.
5. From this email, they can click a link to register quickly, either using **sign up with Google** or by providing an email and password. (Note: If a user signs up using email, they can later use Google to sign in with the same email address.)
# Overview
Source: https://docs.cello.so/guides/partners/partner-overview
Cello allows you to set up and manage all aspects of your own partner program, unifying user referrals and partners in one platform
Cello allows you to set up and manage all aspects of your own partner program, unifying user referrals and partners in one platform. All partner features are offered as part of the core Cello platform without additional technical effort needed.
Cello provides support on setting up your partner program or if you have an existing program that you would like to transfer to Cello. Feel free to contact our support team via Slack to guide you through the setup.
You can find a [walkthrough of the Partner Portal](https://www.loom.com/share/f8f5c502832b485da6ffb1186bd00d89?sid=2f71041c-ab22-4088-9c71-e19757c229d8) end-user experience here
## Steps for setup:
#### 1. Integrate Cello
If you are already using Cello for user referrals, there is no additional technical effort required to enable partners. If you are not yet using Cello, your teams will need to setup a [landing page for referrals](/guides/user-experience/optimizing-landing-pages) and [referral conversion tracking](/attribution/introduction) to automate rewarding.
#### 2. Set Reward Structure
To incentivize affiliates, influencers, and other partners to share your product, you can offer partners exclusive reward structures. Lifetime rewards and one-off compensation components increase the engagement of your partners and make the program more attractive. You can also see what other customers are doing in [this slide deck](https://app.pitch.com/app/presentation/e0b19633-db69-4984-840e-59184b90c2cf/1f57b9cf-0721-401e-89e8-f14f4f84980c/8ee44ff9-aac6-49cb-84e8-d31e1b118d89)
#### 3. Invite Partners
The Cello [Partner Portal](/guides/partners/partner-portal) provides partners with a full experience that includes details of your program, their personal sharing link, updates on the status of their referrals and rewards. You can invite new partners to your program from the [Manage Partners](/guides/partners/manage-partners) page in the Cello portal.
## Optional steps:
For an optimal partner experience, we recommend several best practices to improve performance. You can find more information [here](https://pitch.com/v/h7cf3r/99812f2e-e331-4c58-b84b-009723fc3220).
**1. Create a Media Kit (Optional)**
We recommend providing [media kits](https://pitch.com/v/h7cf3r/46528f51-d7b5-4e45-a94c-e4521d3b55b1) for partners on your ambassador page. Prewritten messages and branded assets make sharing frictionless for your partners and allows you to ensure brand consistency across all collaborations.
**2. Create an Ambassador Landing Page (Optional)**
Implementing a dedicated [ambassador landing page](https://pitch.com/v/h7cf3r/467b3ed2-b50f-4dd9-a280-e358ce2e8ea3) for your partners provides clear guidance on how they can get access to your program, what your program offers, and guidelines for collaboration. Moreover, an ambassador landing page can allow you to effortlessly collect applications from potential partners interested in joining your program.
## Transfer an existing program (optional):
It's easy to transfer an existing partner program using another product or in-house tools to Cello. Once transferred your existing partners can get rewarded on Cello and use the new links to make referrals. Cello can share details and assist upon request.
# Partner Portal
Source: https://docs.cello.so/guides/partners/partner-portal
The partner portal provides full portal experience for accessing their affiliate link, tracking progress on referrals, and getting rewarded for successful referrals
The partner portal provides full portal experience for accessing their affiliate link, tracking progress on referrals, and getting rewarded for successful referrals. Inviting partners only take a few clicks.
Accessing Program Details
Partners can access program details by clicking on **Your Sharing Link** on the left navigation. All details are provided from the Cello referrals component, in the same way your users access Cello from within your application.
## Getting Rewarded
Clicking on **Your Reward Details** opens the Cello component with details of all rewards. Partners who have not provided payment details can do so from this page.
## Partner Analytics
Cello provides partners with detailed analytics for tracking program performance on their referrals. An overview is provided on the **Home** page, with more details provided on the full funnel from the **New User Signups** and **New User Purchases** page .
# Partner Resources
Source: https://docs.cello.so/guides/partners/partner-resources
This guide is designed to help Partner Managers effectively use the Partner Resources feature to add, manage, and share guides and resources with partners
This guide is designed to help Partner Managers effectively use the Partner Resources feature to add, manage, and share guides and resources with partners.
The Partner Resources section is a dedicated space for creating and managing guides and content that can be shared with your partners. It allows you to:
1. Add new guides with detailed descriptions and cover images.
2. Organize resources for easy partner access.
3. Provide links to videos, articles, or pages to help partners promote your products or services.
### Adding a New Guide
If no resources are added yet, you'll see a placeholder message encouraging you to create your first guide.
1. **Click the "Add New Guide" Button**:
* Located at the top right of the Partner Resources dashboard.
2. **Fill Out the Form**:
* **Title**: Enter a clear and concise title for the guide.
* **Description**: Provide a brief description of the guide's purpose.
* **Cover Image**: Upload an image to visually represent the guide. Use the "Select files" area to drag and drop or browse files from your machine.
* **Link**: Add a URL to direct partners to the guide's content, such as a video, article, or webpage.
3. **Save the Guide**:
* Click the **Add** button to save the guide.
💡 **Once added, guide is instantly visible for your partners.**
### Managing Existing Guides
Once guides are added, they appear as individual cards in the Partner Resources dashboard. Each card includes:
1. **Title and Description**: A quick summary of the guide.
2. **Actions**:
* **Edit**: Use the pencil icon to update the guide's details.
* **Delete**: Use the trash icon to remove the guide.
3. **Call-to-Action Buttons**:
* Depending on the link type, buttons like "Watch Video," "Read Article," or "Go to Page" will appear, directing users to the linked resource.
## Best Practices for Creating Guides
1. **Use Descriptive Titles and Images**:
* Ensure titles are specific and relevant to the guide's content.
* Upload visually appealing and professional cover images to attract attention.
2. **Organize by Purpose**:
* Group guides by themes, such as "Overview," "Sharing Tips," or "Content Creation Examples," for easier navigation.
3. **Test Links**:
* Verify that all links lead to the correct resource and are accessible to partners.
## Example Use Cases
### Case 1: Sharing Partner Links
Create a guide titled **"Overview"** with a description like: "Share your partner link with contacts and followers." Include a video tutorial link to help partners understand how to use their referral links.
### Case 2: Promoting Your Product
Add a guide titled **"Share"** with instructions on promoting your product. Link to an article that offers best practices for sharing content on social media.
### Case 3: Content Creation Support
Provide a guide titled **"Content"** with social media post templates and examples. Link to a page where partners can download assets or view tips.
## Frequently Asked Questions (FAQs)
### Q: Can I reorder the guides?
A: Currently, guides are displayed in the order they were added. You may delete and recreate guides to adjust the sequence if necessary.
### Q: What file formats are supported for cover images?
A: Common image formats like JPG, PNG, and GIF are supported.
### Q: How do I ensure partners can access the links?
A: Use publicly accessible links or grant appropriate permissions to ensure partners can view the resources.
***
# Configuring Referral Component
Source: https://docs.cello.so/guides/user-experience/configuring-referral-component
The Referral Component is an all-in-one referral experience, easily added to your web application
The Referral Component is an all-in-one referral experience, easily added to your web application. It takes care of things like referrer first-time experience, enabling users to share links, updating them on progress, and handling rewards.
## Adding the component to your product
First, add the Referral Component into your application with the help of your developer. Simply follow the instructions on the [Referral Component integration guide](/referral-component/quickstart).
## Customize referrer experience
After adding component to your application, you now can customize referrer experience in Cello Portal.
### Choose Cello button design and position
You can use either the default Cello button (FAB) or integrate Cello into a menu via the [custom launcher](/referral-component/custom-launcher), or both as the launcher. If you do not want to use the Cello button, simply uncheck "Show Cello button".
If you are using the Cello button, you can choose on of **3 styles**, configure its position and also specify how would you like to display the [announcements](/guides/user-experience/Referral-Notifications-And-Emails#announcement).
### Choose component type
Component can be displayed as a **pop-up** or a **modal**. When you choose pop-up view, you can also configure pop-up position on the screen.
### Choose your brand colors for Component
You can choose primary color for your component, colors of the Cello button and color of [notification badge](/guides/user-experience/Referral-Notifications-And-Emails#alert-and-badge).
### Choose social sharing options
Cello provides many sharing options to choose from. Simple link copy, social sharing including Twitter, LinkedIn, and email, and transfer to mobile by using a QR-code where a user can forward the invite using all the options provided directly from their mobile device.
### Choose payment method options
Cello allows users to receive rewards via PayPal or Venmo payments. Additional payment options are planned based on user feedback.
# New User Discounts
Source: https://docs.cello.so/guides/user-experience/new-user-discounts
Offering discounts or rewards to referees is a powerful strategy for improving signup conversion
Offering discounts or rewards to referees is a powerful strategy for improving signup conversion for several reasons:
1. **Sense of Urgency:** Time-limited discounts create a sense of urgency, encouraging referees to act swiftly to take advantage of the offer. This urgency can lead to quicker decision-making and increased conversion rates.
2. **Enhancing Referral Motivation:** When referrers know that their referrals lead to tangible benefits like discounts for their contacts, they're more likely to actively promote your product. This not only increases the number of referrals but also the likelihood of signups.
3. **Overcoming Price Resistance:** Discounts can effectively lower financial barriers for potential users who are hesitant about the cost. By making the price more attractive, it can sway those who are undecided about trying your product or service.
4. **Building Initial Trust:** Offering a discount can foster goodwill and build initial trust with new users. A special deal can create a positive first impression of your brand, setting the stage for a lasting relationship.
5. **Competitive Advantage:** If your competitors do not offer similar incentives, your discount can give you a competitive edge. This unique selling point can make your product more appealing compared to others in the market.
This page describes how a **discount to the new referred account can be automated using Stripe or Chargebee** (e. g. 50% discount for the first 6 months).
## Configure discount information
Altho handling discounts needs to be done within your product and supporting systems like Stripe or Chargebee, you can specify discount information in Cello to be shown in the Referral Component and terms.
Go to [Campaign settings in Cello Portal](https://portal.cello.so/setup/campaigns) and add discount information, by specifying discount percentage and duration in months:
How do I grant discounts in Chargebee?
Chargebee uses **coupons** to apply discounts on subscriptions. To grant a discount for a new referred account, the following steps are required:
* Create a coupon either via the [Chargebee Dashboard](https://www.chargebee.com/docs/2.0/coupons.html#creating-coupons) or the [Chargebee API](https://apidocs.chargebee.com/docs/api/coupons?prod_cat_ver=2)
* Attach the coupon code to the [Customer Object](https://apidocs.chargebee.com/docs/api/customers) to `metadata` attribute or as a `CF_` custom field
## How do I grant discounts in Stripe?
Stripe uses **coupons** and **promotion codes** to apply discounts on payments. To grant a discount for new referred accounts, these coupons and promotion codes have to be set up in Stripe.
This can be done in multiple ways. For both solutions, you **must first set up a coupon and then attach the discount rules** (e.g. 10% off for 3 months).
* Manually using the [Stripe Dashboard](https://dashboard.stripe.com/coupons)
* Programmatically using the [Stripe API](https://stripe.com/docs/payments/checkout/discounts#promotion-codes).
## Using coupons for discounts
Coupons can be used to attach a discount directly to a **stripe customer** or a **subscription.** This can be achieved manually via the [Stripe Web Console](https://dashboard.stripe.com/coupons) or the [Stripe API](https://stripe.com/docs/billing/subscriptions/coupons?dashboard-or-api=api).
Attach manually via **Stripe Web Console**:
Attach the coupon during customer creation as discount field via **Stripe API:**
### Attach the coupon to the customer or subscription
To give the discount to a new user, you need to attach the coupon to a customer or subscription. There are two ways to attach the coupon, manually or via API.
If you attach the coupon to a customer, the discount is applied to every transaction or subscription. You can limit the coupon in settings with certain conditions.
### Manual attachment of the coupon to the customer in advance
This is only possible if the stripe customer is already created and no transaction has been created yet.
1. Go to your Stripe Console
2. Open the customer, go to **Actions,** and select **Apply coupon**
3. Select the coupon you want to attach
**💸 If the customer subscribes now to a plan or performs a transaction, the discount will be automatically applied during the checkout.**
### Attach the coupon during checkout with Stripe API
The prerequisite for this solution is to have implemented the [Stripe.js](https://stripe.com/docs/js) in your front end so you can modify the customer creation or subscription.
Attach the discount already while creating the customer and adding the `cello_ucc` code.
Example for a NodeJS App — attach coupon while creating the customer **(recommended)**:
```javascript theme={null}
const stripe = require('stripe')('sk_test_51KiCYYCSMQAUBF...');
const customer = await stripe.customers.create({
description: 'New Stripe Customer',
coupon: 'lHTYr6Y9',
metadata: {
'cello_ucc': 'hdz7afhs7',
'new_user_id': 'xcsdad'
}
});
```
Example for a NodeJS App — attach coupon code during the checkout and re-use an existing customer:
```javascript theme={null}
const session = await stripe.checkout.sessions.create({
mode: "subscription",
line_items: [
{
price: priceId,
quantity: 1
},
],
customer: 'cus_dbhsahd7fhsd',
discounts: [{
coupon: 'lHTYr6Y9',
}],
});
```
The Stripe UI will automatically pick up the discount and visualize it during the checkout
## Using promotion codes for discounts
A **Promotion Code** represents a customer-redeemable code for a coupon. They can be used for the **Stripe Payment Link** **or custom-built forms**. Here are their key characteristics:
* When using a **Promotion Code,** the setup of an underlying coupon is also required.
* **Promotion Codes** can be used to create multiple codes for a single coupon.
* Because **Promotion Codes** are used by customers to redeem a coupon, they are exposed to customers.
### Pre-fill the promotion code in Stripe Payment Link
With the URL parameter `prefilled_promo_code` a promo code can be automatically passed to the UI. The form automatically picks up the parameter from the URL and pre-fills the promotion code field. More details can be found [here](https://stripe.com/docs/payments/payment-links#url-parameters).
**Example:**
10% off for 3 months via promo code `CELLO`
[https://buy.stripe.com/cello?prefilled\_promo\_code=CELLO](https://buy.stripe.com/cello?prefilled_promo_code=CELLO)
# Optimizing Referral Landing Page
Source: https://docs.cello.so/guides/user-experience/optimizing-landing-pages
This guide focuses on optimizing landing pages for referrals, a critical step in the user journey
This guide focuses on optimizing landing pages for referrals, a critical step in the user journey. A referee's first interaction with your product occurs when they follow an invite link, making the page they land on a key determinant in the success of your referral program.
### In this guide
This guide walks you through the key building blocks of a referral-optimized landing page to ensure referees smoothly transition from interested to signing up.
There are a few approaches you can take when designing your referee signup flow:
* [Using a dedicated landing page](#dedicated-landing-page) Recommended
* [Using your home page as the landing page with inline personalization](#home-page-as-the-landing-page-with-inline-personalization)
* [Using your home page as the landing page with our new user banner for personalization](#home-page-as-the-landing-page-with-new-user-banner) No code
## Dedicated landing page
A dedicated page that the referee lands on when clicking on the invite link has shown to have up to **x2 higher conversion rate** if done right. Below, you can find examples of the landing pages we like along with the key building blocks to make a dedicated landing page perform.
### Key building blocks
#### Headline: Personalized Exclusivity
Craft a headline that feels exclusive and personal. [Use personalization](#add-personalization) for additional social proof like adding the referrer's name, and highlight [any special discount or reward](#add-a-new-user-discount-or-reward). This approach creates a sense of trust and urgency.
#### Key Value Proposition: Clarity in One Sentence
Distill your product's core benefit into a single, compelling sentence. This should quickly inform the visitor whether your product meets their needs, making their decision process easier and faster.
#### Content: Concise and Informative
Streamline your content compared to your main homepage. Provide just enough detail to help visitors understand your product and how it can work for them, without overwhelming them or necessitating navigation away from the page.
#### CTA Focus: Direct and Offer-Centric
Make your Call-to-Action (CTA) clear and direct, with an emphasis on the action you want the referee to take. If there's a special offer or discount, ensure your CTA highlights this to maximize conversion.
#### Social Proof: Credibility through Endorsements
Include social proofs such as G2/Capterra badges, Trustpilot ratings, customer logos, and quotes. These elements build trust and credibility, showing potential users that others have had positive experiences with your product.
#### FAQs: Contextual Information
Integrate a section for Frequently Asked Questions (FAQs) to address common queries. This helps provide referees with all the necessary information on the same page, reducing the likelihood of them leaving the page without signing up. If they return later, they can still be tracked towards the referral, but the best time to capture a new user is the first time they click the referral link.
### Add a new user discount or reward
Offering discounts to referees effectively boosts signup conversion by fostering urgency, encouraging active promotion, reducing cost concerns, and giving a competitive advantage when similar incentives aren't available from competitors. [Learn more about adding discounts 👉](/guides/user-experience/adding-discounts)
If your program offers discounts or rewards to referees, make sure to highlight it in the Headline and CTA.
💡 Our research shows that **symmetric rewards** (i.e. the referrer and the referred have incentives of similar values) are more effective. This happens because referrers invest their social capital when recommending a product; having similar incentives makes the referral look fair to both parties involved.
**Examples of dedicated landing pages**
🔗 [Heyflow stand-alone landing page](https://get.heyflow.app/referral-lp?productId=go.heyflow.app\&utm_source=cello\&utm_medium=referral\&utm_campaign=Cello-RS20-C1000-D50\&ucc=2dRGoRjgP7A#start)
🔗 [Cello stand-alone landing page with direct signup](https://cello.so/invitation/)
### Add personalization
*"The most credible advertising comes straight from the people we know and trust. More than eight-in-ten global respondents (88%) say they completely or somewhat trust the recommendations of friends and family." Nielsen Global Trust in Advertising Report, 2021*
Personalization and social proof, like using the referrer's name on the landing page, can contribute to converting referees into users. The personalization establishes trust and credibility, makes the offer more relevant and engaging, leverages an existing relationship, fosters a sense of community and belonging, reduces perceived risk, and has an emotional appeal. These elements together make the referral more compelling, encouraging referees to sign up. [Learn more about personalization 👉](/guides/user-experience/personalizing-referrals)
💡 **Leveraging existing assets -** Do you already have an optimized landing page for ads? You don't need to start from scratch. Reuse the layout and some of the content to build a dedicated referral landing page.
**Examples of personalized landing pages**
🔗 [Reword stand-alone landing page with personalization](https://reword.com/referral?productId=reword.com\&ucc=IX2FHjt1Y0Z\&celloN=Q29udGVudCBDeWJvcmc)
🔗 [Wise Referral Program with personalization](https://wise.com/invite/dic/tanjam2?utm_source=desktop-invite-tab-copylink\&utm_medium=invite\&utm_campaign=\&utm_content=\&referralCode=tanjam2)
🔗 [Superhuman landing page with personalization](https://superhuman.com/refer?utm_source=product\&utm_medium=signature\&utm_campaign=bob%40bobinsky.me)
## Home page as the landing page with inline personalization
Use your existing home page as landing page and [add a discount](/guides/user-experience/new-user-discounts) and [personalization](/guides/user-experience/personalizing-referrals) into your home page Headline and CTA.
## Home page as the landing page with New User Banner
The [New User Banner](/guides/user-experience/personalizing-referrals) is easily added to your landing page by integrating the [Cello attribution script](/sdk/client-side/attribution-js-introduction). Visitors who follow the Cello invite link will have a banner that includes the discounts, tailored CTA, and personalization on your home page.
**Examples of landing pages with new user banner**
🔗 [MeetGeek Website with personalized new user banner](https://meetgeek.ai/meetgeek-referral?productId=app.meetgeek.ai\&ucc=vTlj7ne4Fkf\&n=VG9iaWFz)
## Get started now
Once your referral landing page is ready to go, go to you product dashboard [New User Experience setup page](https://portal.cello.so/setup/new-user-experience) and switch to **Custom landing page**.
In **Custom landing page URL** field, add the URL to your new landing page and **Save**.
# Overview
Source: https://docs.cello.so/guides/user-experience/overview
The Referral Component is an all-in-one referral experience, easily added to your web application with just a few lines of code
The Referral Component is an all-in-one referral experience, easily added to your web application with just a few lines of code. It takes care of things like referrer first-time experience, enabling users to share links, updating them on progress, and handling rewards. This functionality helps to keep your users happy and engaged with your referral program.
Let's review some of the key capabilities 👉
## Adding the component to your product
Adding the Referral Component to your product is straightforward. You can get it up and running in your test environment in just a few minutes. Simply follow the instructions or the [Referral Component Quickstart](/referral-component/quickstart).
Cello provides a few different options to add the component to your product. You can use either the default Cello button (FAB) or integrate Cello into a menu via the [Custom Launcher](/referral-component/custom-launcher). Either option can open with the component appearing as a pop-up or modal view.
## First-time experience
The Cello Referral Component provides an onboarding experience for first-time users of the program. It's a way to get users excited about the opportunity and explain how the program works in 3 easy steps. All the texts of the onboarding experience can be customized to better explain your unique value proposition.
## Your offer, front and center
The referral program text and offer are fully customizable and can be translated into multiple languages.
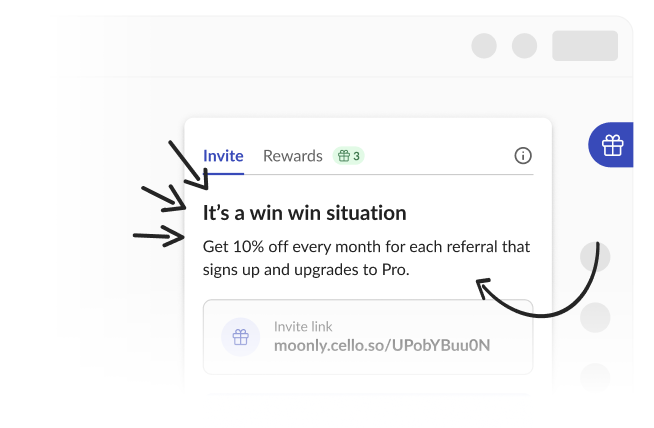
## Easy sharing
Cello provides many sharing options to choose from. Simple link copy, social sharing including Twitter, Facebook, LinkedIn, and email, and transfer to mobile by using a QR-code where a user can forward the invite using all the options provided directly from their mobile device.
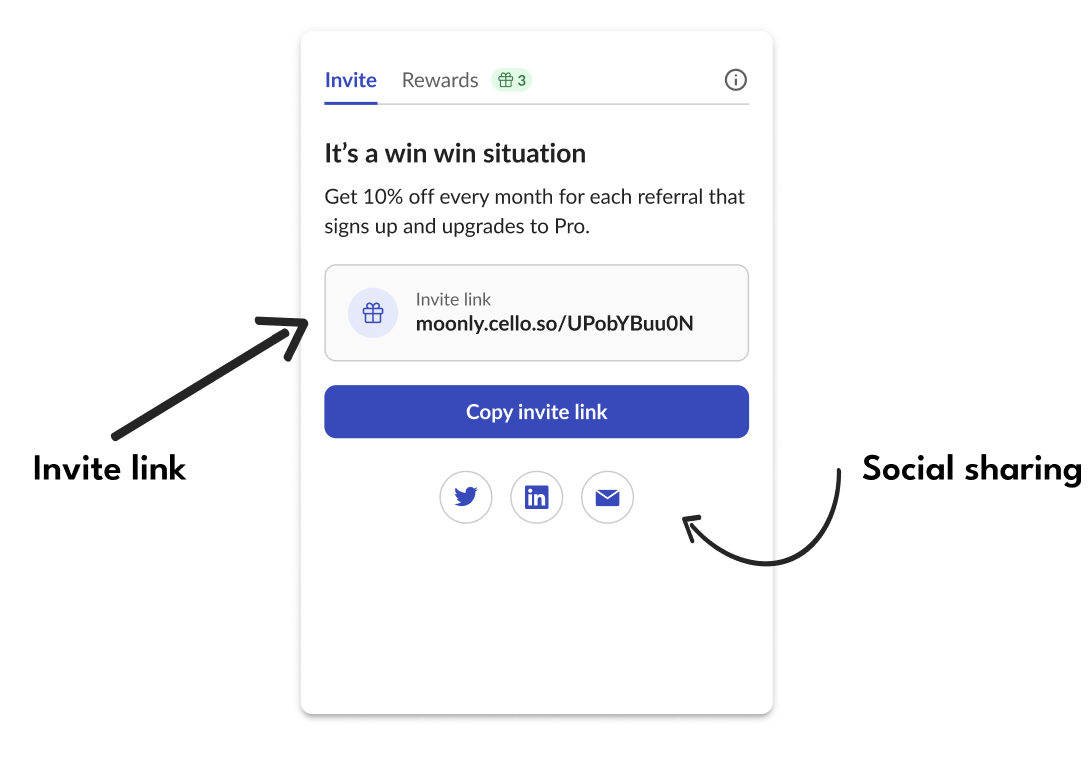
## Engaging users with announcements
The Cello Referral Component provides a robust announcement feature to activate first-time referrers, keep the referral program top of mind, encourage repeat behaviour, and keep your users up to date with important updates.
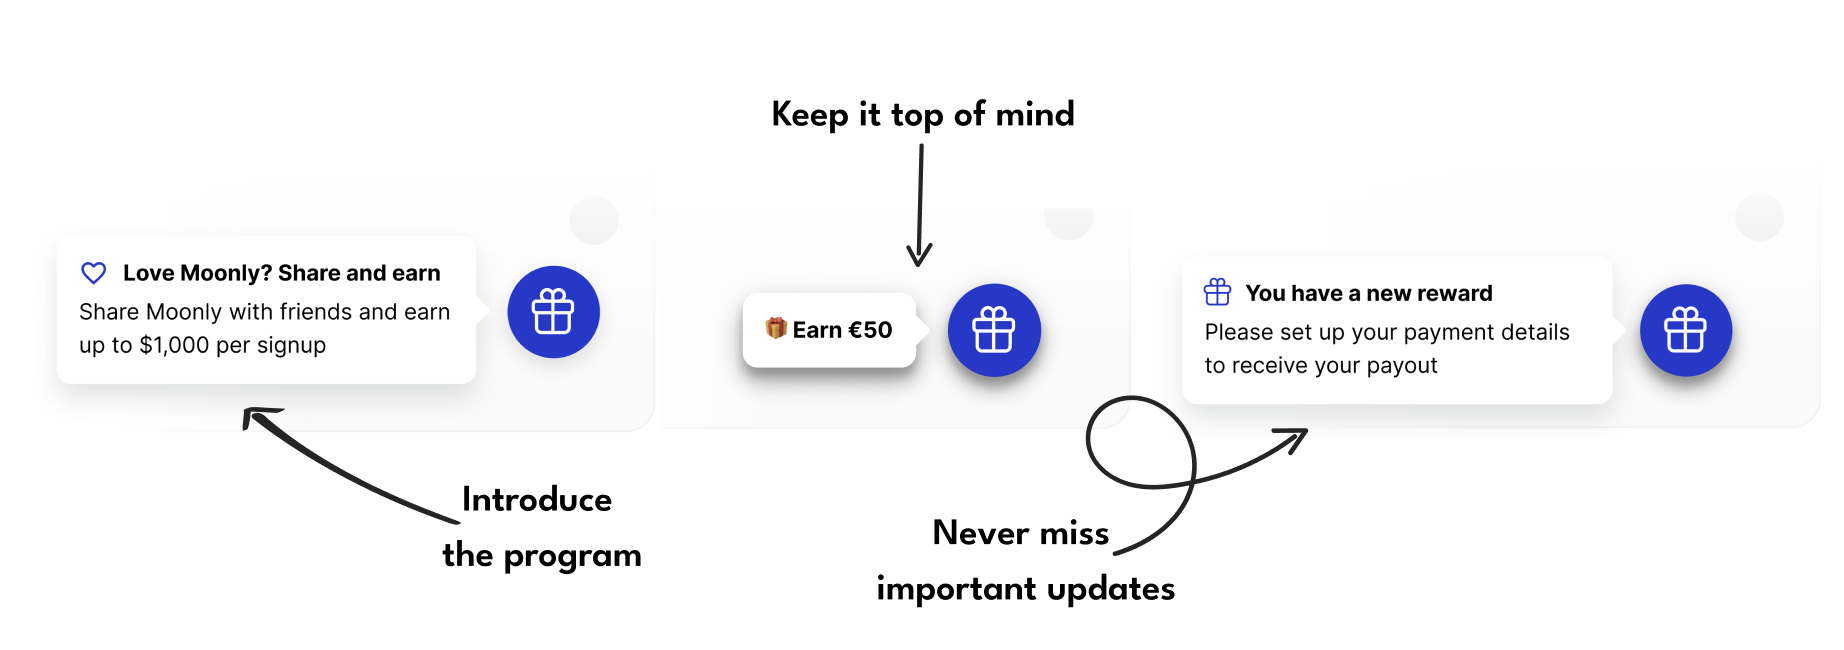
Announcements can be customized based on the Referral Component integration option you have chosen. [Anchor announcements to a specific menu item](/referral-component/custom-launcher#add-announcement-selector) or choose to have them appear as toasts or banners.
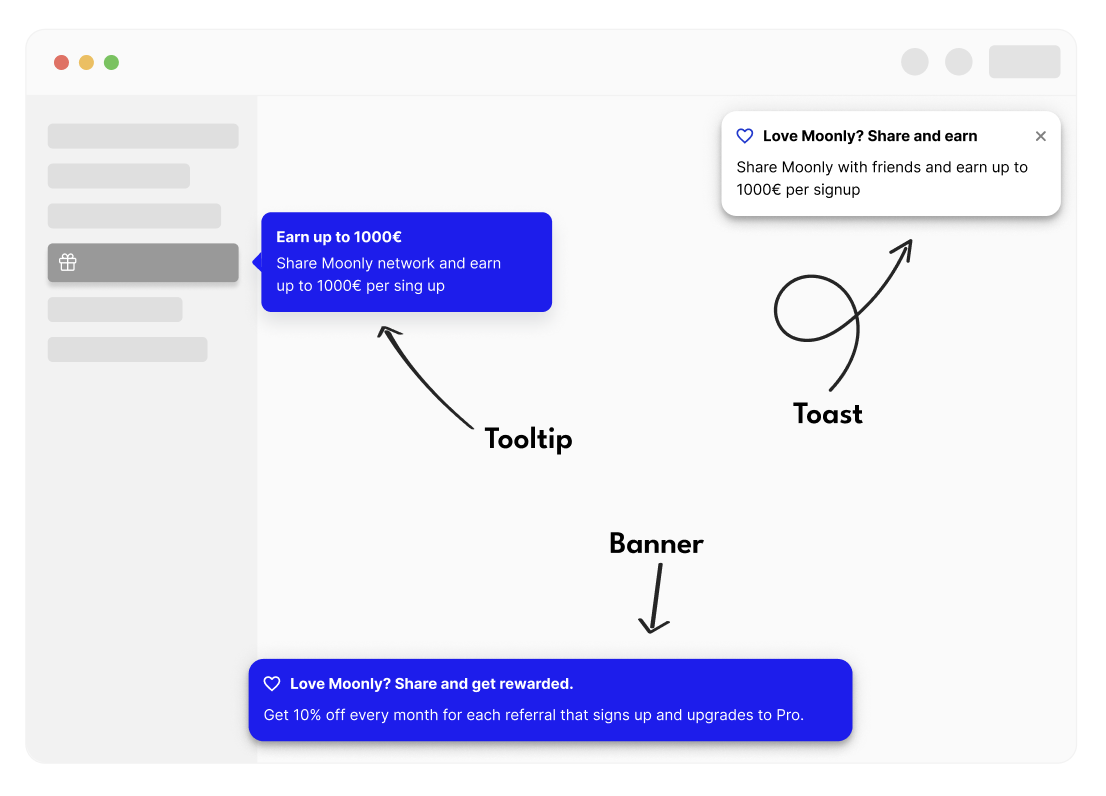
## Keeping users update with emails
Referral programs thrive on timely engagement. Knowing instantly when there's activity tied to a referrals means your users can celebrate successes and continue to share more effectively. Whether it's their first successful share, a brand-new signup or unlocking a new reward, email notifications ensure they never miss a beat in the referral journey.
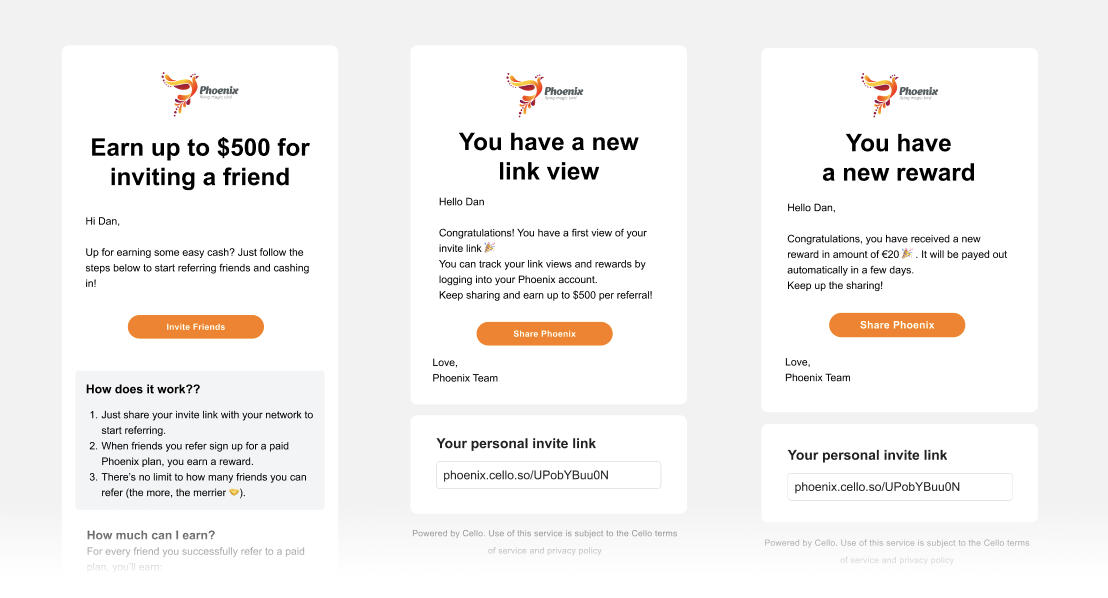
## Getting Rewarded
When users receive their first reward, they will be prompted to provide payment details and can select how they would like to receive their reward. They may also be asked to provide additional information if required to receive a payment in their specific country.
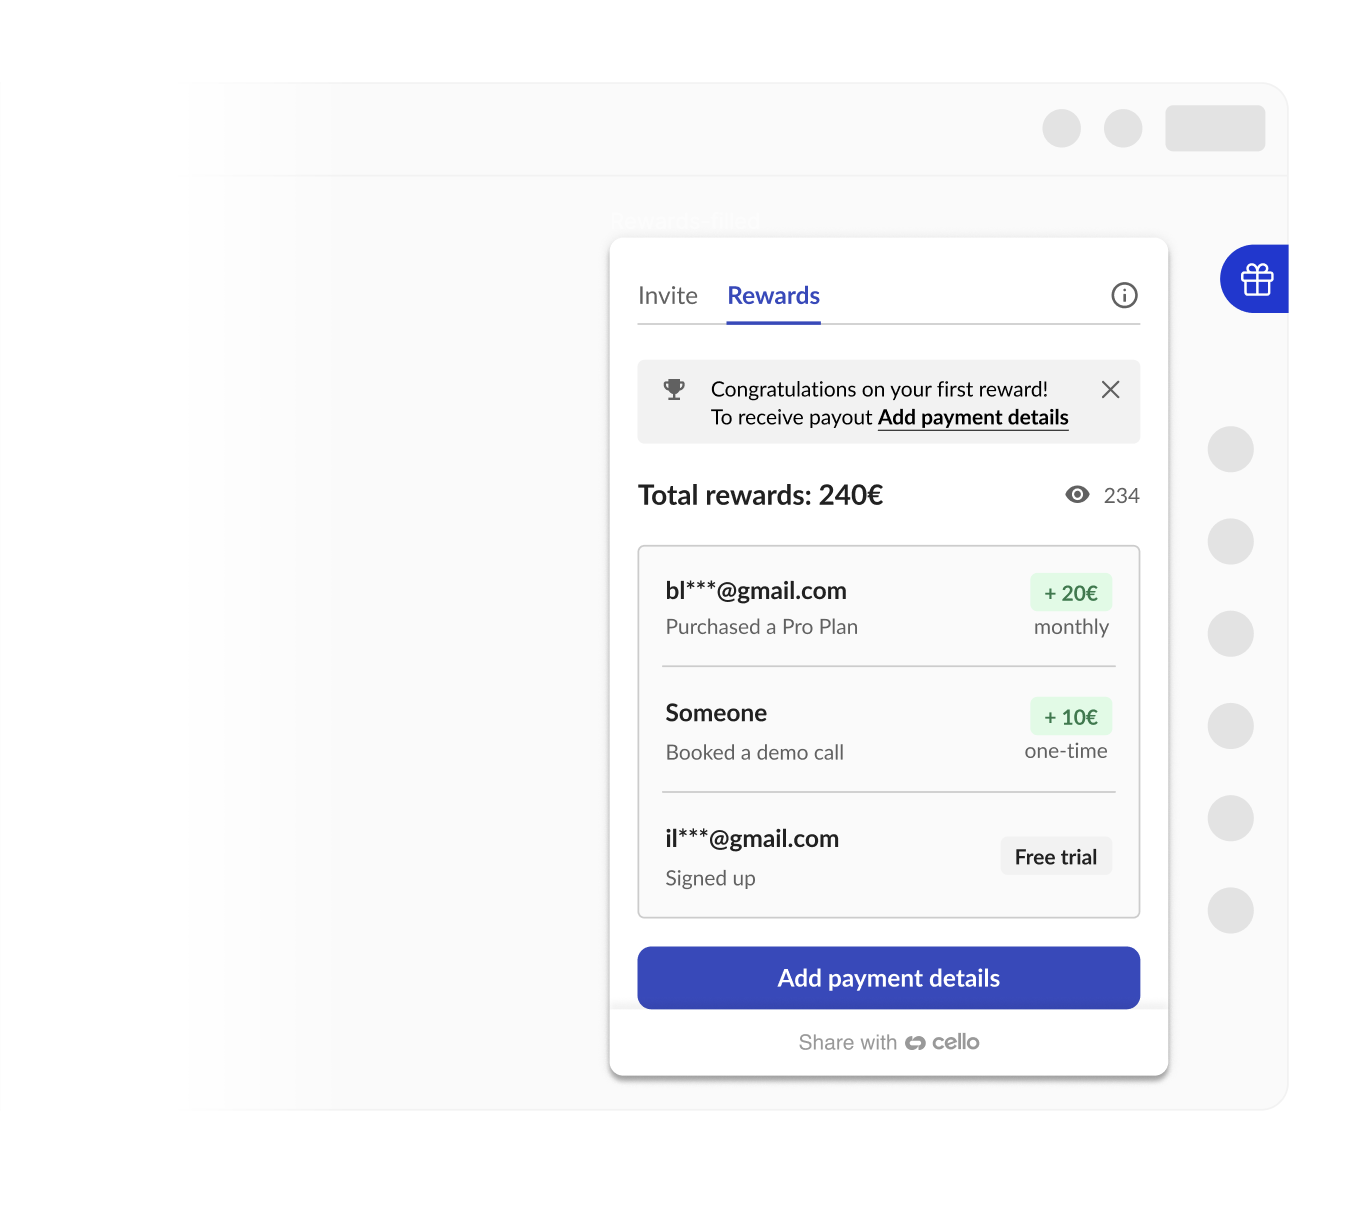
## Reward Countries and Payout Methods
Cello supports a growing list of countries\* where users can receive reward payments. Cello plans to continue expanding support for additional countries based on user feedback.
Cello can be automatically hidden for users in unsupported countries by providing country information when [integrating the Referral Component](/sdk/client-side/cello-js#celloboot). This is recommended to provide the best experience for your users.
Cello allows users to receive rewards via PayPal or Venmo payments. Additional payment options are planned based on user feedback.
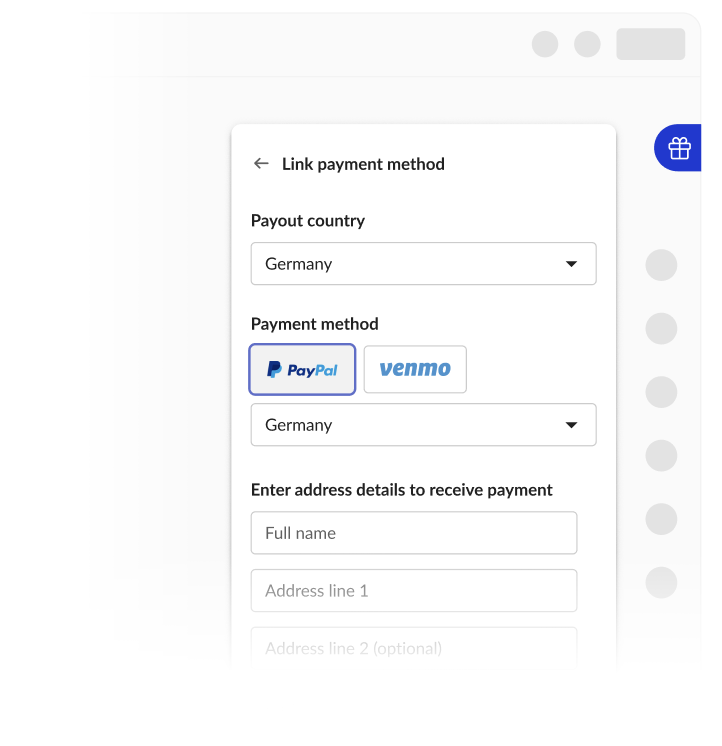
All users are subject to the Cello [Terms of Service](https://cello-growth.notion.site/Terms-of-Service-40b8093e87e04429b862a601a1d23fc1/) and [Privacy Policy](https://cello-growth.notion.site/Privacy-Policy-for-Platform-76a94bd64cb44e1f92a6cec3ec5643ca) and can access details through the links that are provided. Referrers are able to get rewarded as a business and receive invoices for tax purposes.
Users are required to provide additional taxpayer information based on the specific country of residence and local reward thresholds or choose to be paid as a business by providing their VAT number.
Cello allows users to download credit notes directly from the Cello Referral Component. If they have at least one reward, they will see a link "Tax Information" link from the rewards tab under "Update Payment Details". Users who no longer have access to the Cello component can contact [support@cello.so](mailto:support@cello.so) to receive their credit notes through a standard support process.
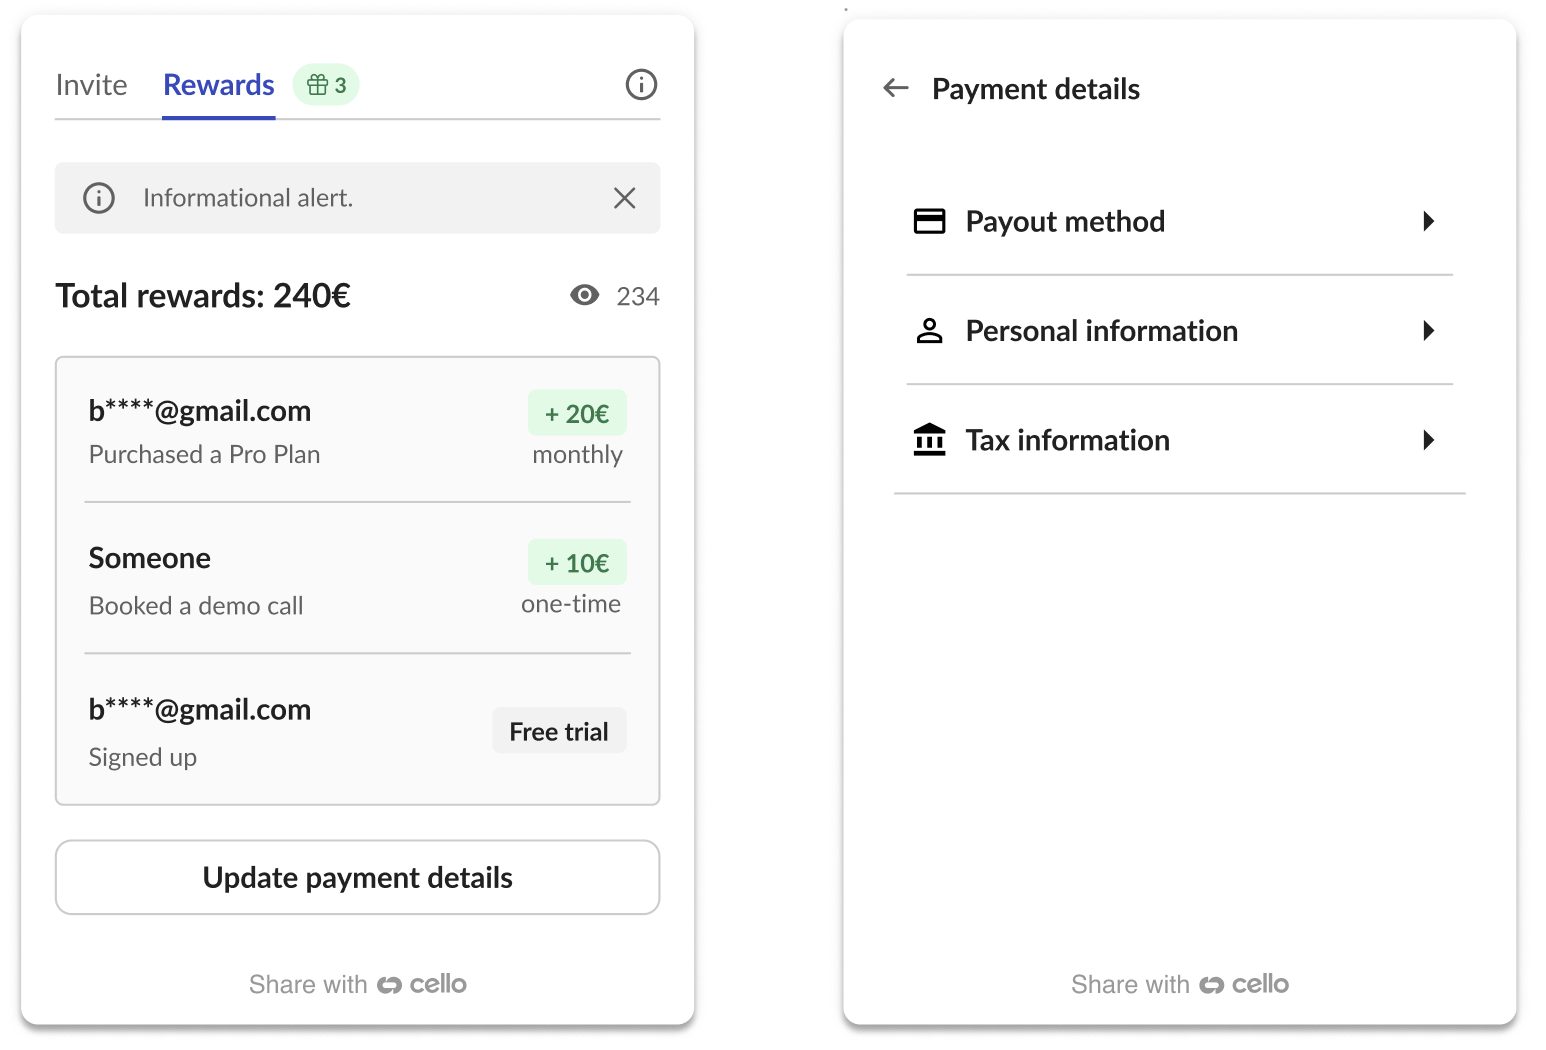
*Supported Reward Countries: Australia, Austria, Bahrain, Belgium, Bermuda, Botswana, Brazil, Bulgaria, Canada, Cayman Islands, Chile, Croatia, Czechia, Denmark, Dominican Republic, Estonia, Faroe Islands, Finland, France, Georgia, Germany, Gibraltar, Greece, Greenland, Guatemala, Hong Kong SAR, Hungary, Iceland, India, Ireland, Israel, Italy, Japan, Latvia, Lesotho, Liechtenstein, Lithuania, Luxembourg, Malta, Mauritius, Mozambique, Netherlands, Nicaragua, Norway, Oman, Philippines, Poland, Portugal, Qatar, Romania, San Marino, Saudi Arabia, Senegal, Slovakia, Slovenia, South Africa, Spain, Sweden, Switzerland, United Kingdom, United States, Uruguay.*
## Texts and language
You can customize the default text that appears on the Referral Component and provide different language options for your users. The Cello component detects a user's language automatically or you can set it [using Referral Component JS methods](/sdk/client-side/cello-js).
We provide English, German, Spanish, French, Dutch, Italian, Portuguese, Japanese, Danish and Slovak by default and Cello will help you add additional languages on request.
# Personalizing Referrals
Source: https://docs.cello.so/guides/user-experience/personalizing-referrals
Add personalized messages to your landing pages to increase conversion rates
In this guide we will go through:
* The benefits of personalization
* How to add personalization to your landing pages:
* [Inline](#add-personalization-to-the-headline-or-other-page-element) Recommended
* [Using the new user banner](#add-personalization-with-new-user-banner) No code
## Why personalization?
Personalization and social proof, such as including the referrer's name in the landing page headline, are crucial for converting referees into signed-up users due to several key reasons:
1. **Enhanced Trust and Credibility:** Seeing a familiar name like "Bob has gifted you a free month to try Moonly" immediately establishes a sense of trust. The referee recognizes the referrer, which lends credibility to the offer.
2. **Increased Relevance and Engagement:** Personalization makes the offer feel more tailored and relevant to the referee. A message that appears to be handpicked for them can create a stronger emotional connection and engagement with the content, increasing the likelihood of a positive response.
3. **Leveraging Existing Relationships:** Utilizing the referrer's name capitalizes on the existing relationship between the referrer and the referee. This relational dynamic can be a powerful motivator, as referees often value and trust the opinions and choices of their friends or contacts.
4. **Creating a Sense of Community and Belonging:** Personalized messages can give referees the feeling of being part of an exclusive group or community, especially when the message implies a gift or a special offer from someone they know. This sense of belonging can be a strong incentive to join and participate.
5. **Reducing Perceived Risk:** For new users, trying a new service involves some level of perceived risk or uncertainty. A personalized referral reduces this perceived risk, as it comes with an implicit endorsement from someone the referee trusts.
6. **Emotional Appeal:** Personalized messages can evoke an emotional response. Knowing that a friend or acquaintance has thoughtfully extended an offer can create feelings of appreciation and reciprocity, further encouraging the referee to sign up.
To show the referrer name to the new user, you need to make sure that their user details are passed in the [referral component](/referral-component/quickstart).
## Add personalization to the Headline or other page element
Recommended
To add the referrer's name to an element on the page that the new user lands on when following an invite link, you need to follow these steps:
### Turn personalization on for your product
Go to [New User Experience setup in Cello Portal -> Personalization tab](https://portal.cello.so/setup/new-user-experience) and add personalization.
When personalization is turned on, an extra parameter will be added to the URL of your landing page, e.g. `celloN=VGFuamE`
```html
https://getmoonly.com/?productId=getmoonly.com&ucc=pNRB1aYqArN&celloN=VGFuamE
```
### Use the attribution script methods to get referrer information
[Attribution script](/sdk/client-side/attribution-js-usage#getreferrername) provides a JS method `getReferrerName()` to fetch the name of the referrer.
```javascript
const referrerName = await window.CelloAttribution("getReferrerName");
console.log('Referrer name:', referrerName);
```
You can also get the referrer name from the `celloN` URL parameter. Value of parameter `celloN` is an base64 encoded name of the referrer. In this example, `VGFuamE` is decoded to `Tanya` . You can try it yourself [here](https://www.base64decode.org/). By accessing this parameter from the URL and decoding in, you can add it to any element on any landing pages which are relevant.
#### Complete Integration Example
Use attribution script methods to get referral data:
```javascript
async function initializeReferralLandingPage() {
try {
// Wait for attribution script to load
await new Promise(resolve => setTimeout(resolve, 1000));
// Get all attribution data using script methods (recommended)
const ucc = await window.CelloAttribution("getUcc");
const referrerName = await window.CelloAttribution("getReferrerName");
const campaignConfig = await window.CelloAttribution("getCampaignConfig");
// Use the data for personalization
personalizePageContent(referrerName, campaignConfig, ucc);
} catch (error) {
console.error('Failed to initialize referral landing page:', error);
// Proceed without personalization
personalizePageContent(null, null, null);
}
}
function personalizePageContent(referrerName, campaignConfig, ucc) {
// Update headline with referrer name
const headline = document.getElementById('headline');
if (headline && referrerName) {
headline.innerHTML = `${referrerName} has invited you to try our platform!`;
}
// Show discount information
const discountBanner = document.getElementById('discount-banner');
if (discountBanner && campaignConfig) {
const discountPercent = campaignConfig.newUserDiscountPercentage * 100;
const discountMonths = campaignConfig.newUserDiscountMonth;
discountBanner.innerHTML =
`🎉 Special offer: ${discountPercent}% off for your first ${discountMonths} months!`;
discountBanner.style.display = 'block';
}
// Update call-to-action button
const ctaButton = document.getElementById('cta-button');
if (ctaButton) {
if (referrerName && campaignConfig) {
const discountPercent = campaignConfig.newUserDiscountPercentage * 100;
ctaButton.textContent = `Claim ${discountPercent}% Discount`;
} else if (referrerName) {
ctaButton.textContent = `Accept ${referrerName}'s Invitation`;
}
}
// Store UCC for form submission if available
if (ucc) {
// This will be handled automatically by attribution script
// but you can also manually add to forms:
const forms = document.querySelectorAll('form');
forms.forEach(form => {
if (!form.querySelector('input[name="ucc"]')) {
const uccInput = document.createElement('input');
uccInput.type = 'hidden';
uccInput.name = 'ucc';
uccInput.value = ucc;
form.appendChild(uccInput);
}
});
}
}
// Initialize when DOM is ready
document.addEventListener('DOMContentLoaded', initializeReferralLandingPage);
```
## Add personalization with the New user banner
No code
The banner with a personalized message is easily added in a few steps:
* Add [Cello attribution script](/sdk/client-side/embedded-script-tag) to your landing page.
* Go to [New User Experience setup in Cello Portal -> Personalization tab](https://portal.cello.so/setup/new-user-experience) and turn the banner on.
Visitors who follow the Cello invite link will have a banner displayed with a custom message containing an offer and the name of their referrer.
### Testing the Banner Implementation
To verify the banner works correctly:
```javascript
// Test banner functionality
async function testPersonalizationBanner() {
// Check if attribution script loaded
if (typeof window.CelloAttribution !== 'function') {
console.error('Attribution script not loaded - banner won\'t work');
return;
}
// Test with sample referral data
const testUrl = `${window.location.origin}${window.location.pathname}?productId=test&ucc=testUcc123&celloN=VGVzdFVzZXI=`;
console.log('Test this URL for banner:', testUrl);
// Check current page data
const ucc = await window.CelloAttribution("getUcc");
const referrerName = await window.CelloAttribution("getReferrerName");
const campaignConfig = await window.CelloAttribution("getCampaignConfig");
console.log('Current page attribution data:', {
ucc,
referrerName,
campaignConfig,
bannerShouldShow: !!(ucc && (referrerName || campaignConfig))
});
}
// Run test after page load
setTimeout(testPersonalizationBanner, 2000);
```
# Referral Notifications and Emails
Source: https://docs.cello.so/guides/user-experience/referral-notifications-and-emails
Cello provides notifications that are seamlessly integrated with your product experience to inform, activate and continuously engage users with the referral program
Cello provides notifications that are seamlessly integrated with your product experience to inform, activate and continuously engage users with the referral program. This page provides details on the notifications types and how to customize based on your needs.
## Notifications types and triggers
Notifications the we support fall into 2 categories: **in-product** announcement and alert and **external** like email. These notifications and their associated triggers are designed to work in conjunction your existing product engagement touch points in a seamless way.
### Alert and Badge
**Alert** is a notification that appears under Rewards tab. It is accompanied with a **badge**.
A **badge** is a small colored dot displayed on the launcher opening the widget (Cello button or [Custom Launcher](/referral-component/custom-launcher)) to draw attention to the activity with the referral program without being too distracting from your core product experience.
| Type | Description |
| ------------------------------- | ------------------------------------------------------------------------------------------------------------------------------- |
| "New referrer activation" alert | Displayed after referrer has used the product more then 1 day after signs up to bring subtle attention to the referral program. |
| "Successful share" alert | Displayed every time referrer has a new link view. |
| "New reward" alert | Displayed every time the referrer receives a new signup or reward. |
### Announcement
Announcements are callout style message that appears anchored to the launcher, either Cello button or [Custom Launcher](/referral-component/custom-launcher). Announcements can be dismissed by clicking on them or their "X" dismiss button.
| Type | Description |
| -------------------------------------- | ----------------------------------------------------------------------------------------------------------------- |
| "New referrer activation" announcement | Sent 7 days after a ["New referrer activation" alert](#alert-and-badge) is sent and the user has not acted on it. |
| "New reward" announcement | Sent if the user has not entered their payment details after 7 days of receiving the first reward. |
### Email
Emails are a way to keep your users aware and engage with the referral program without them needing to log into the application. By default, Cello will send emails about the key events in the referral lifecycle.
Don't forget to add user email to the [boot command of the Referral component](/sdk/client-side/cello-js#3-initialize-the-library) to start sending emails to your users.
| Type | Description |
| -------------------------------------------------------------------- | ----------------------------------------------------------------------------------------------------------------------------------------------------------- |
| "Welcome" email +10% activation | By default is sent on the 6th day after new referrer first signs up to introduce the referral program and its details. |
| "Successful share" email | Sent once when the referrer gets a first successful share, i.e. someone has viewed their link, to keep the momentum and encourage more sharing. |
| "New reward" email | Sent every time the referrer receives a new reward. When referrer gets a first monetary reward this email contains information on how to claim the rewards. |
| "Unclaimed rewards" email | Sent if the user has not entered their payment details after 7 days of receiving the first reward. |
## Default notification journey
Below is an illustration of the default new referrer's journey with key milestones and how Cello uses different types of notifications to keep them informed and engaged.
## Activation campaign
In addition to the default notification journey, you can run **an activation campaign** with Cello to activate users for your referral program with recurring announcements.
**How it works:**
1. Activation campaign starts 30 days after ["New referrer activation" announcement](#announcement) is sent and the user has not acted on it.
2. The recurring announcements will be only send if the user full-fills a certain activity pattern in the product like:
* Referrer has used the app at least once after reading the last announcement.
* Last activation announcement was read.
* Referrer didn't share in the last 30 days.
## Notification settings
You can preview and configure which notifications you want Cello to send in your [Cello Portal](https://portal.cello.so/setup/notifications).
Cello distinguishes between **Essential** and **Engagement** notifications. Essential notifications are **always on** as they are required for the program to run successfully. You can choose to turn off Engagement notifications, however, they do give a significant performance improvement.
# Setup Overview
Source: https://docs.cello.so/integration-overview
Get started with Cello in 4 easy steps
## Setup Steps
If you did not find your integration guide, complete these steps to integrate Cello, regardless of your tech stack or payment gateway.
Effort: \~3-4 hours
Add referral functionality to your web application with Cello's embeddable Referral Component.
You can also integrate the Cello Referral Component into your mobile apps. Choose the appropriate SDK for your platform:
Effort: \~1-2 hours
Set up a [Referral Landing Page](/user-experience/optimizing-landing-pages) and capture referral codes (`ucc`) when users click referral links. For Web signup flow, follow this guide:
Or choose the appropriate guide for your flow:
Effort: \~1 day
When users sign up or express interest in your product, attribute these events to their referrer for potential future rewards.
Choose your preferred method to send signup events to Cello:
Complete guide for tracking signup events
API reference for sending events
Effort: \~1 day
Complete the conversion tracking by sending purchase events to Cello when users make payments.
Choose your integration method based on your payment gateway:
}
href="/integrations/webhooks/stripe-webhook"
>
Stripe webhook integration for purchase events
}
href="/integrations/webhooks/chargebee-webhook"
>
Chargebee webhook integration for purchase events
Complete guide for tracking purchase events
API reference for sending events
## Integration Guides
Effort: \~1-2 days
Ready-to-use webhook integrations for Stripe and Chargebee provide the **fastest path** to track referral conversions automatically.
These guides are **optimized for the typical freemium scenario with Stripe or Chargebee**.
Use one of these guides if you:
* Create a Stripe or Chargebee customer on signup
* Use the Stripe or Chargebee webhook to send Cello referral conversion events
# Introduction
Source: https://docs.cello.so/integrations/introduction
Connect Cello to your payment gateway, CRM, and other systems
Cello provides flexible integration options to connect with any payment provider, CRM, or custom system. Choose the approach that best fits your architecture.
## Integration Methods
### Pre-built Webhooks
Ready-to-use webhook integrations for popular payment providers. These provide the fastest path to track referral conversions automatically.
}
href="/integrations/webhooks/stripe-webhook"
>
Automatically track Stripe payments
}
href="/integrations/webhooks/chargebee-webhook"
>
Track Chargebee subscriptions
### Cello REST API
Did not find an integration for your system? Send conversion events from any system using our REST API.
Perfect for connecting payment gateways (e.g. Paddle, Recurly, etc.), CRMs (e.g. Hubspot, Salesforce, etc.), or in-house built CRMs or billing systems.
Follow 4 easy steps to get your referral program up and running with Cello using any CRM or payment gateway
Send conversion events, validate referral codes, and manage referral links programmatically
## Next steps
Choose your integration based on your setup:
Follow one of our quickstart guides for **pre-built webhook integrations** for the fastest setup.
Use the **Cello API** to send signup events and **Stripe or Chargebee webhook** to send purchase events from your payment provider.
Send signup events
}
href="/integrations/webhooks/stripe-webhook"
>
Automatically track Stripe payments
}
href="/integrations/webhooks/chargebee-webhook"
>
Track Chargebee subscriptions
**Cello API** gives you full control over when and how to track conversions. Send events from your backend whenever a signup or purchase occurs.
Follow 4 easy steps to get your referral program up and running with Cello using any CRM or payment gateway
Send conversion events, validate referral codes, and manage referral links programmatically
All integration methods support both sandbox and production environments, allowing you to test thoroughly before going live.
# Salesforce Apex Triggers + Cello API
Source: https://docs.cello.so/integrations/salesforce-apex-triggers
This documentation guides you through the process of setting up Apex triggers in Salesforce to handle specific conditions related to Opportunities
This documentation guides you through the process of setting up Apex triggers in Salesforce to handle specific conditions related to Opportunities. The exemplary trigger will be designed to execute when an Opportunity meets two criteria:
1. The opportunity moved to the stage `Proposal/Price Quote`
2. It has a value in the custom field `cello_ucc`
Adjust according to your individual Salesforce setup and referral requirements
Customize the code as needed based on your individual Salesforce setup. Cello requires at least a "demo done" event as well as a the revenue transactions of won opportunities.
### Apex Trigger Configuration
### 1. Create an Apex Trigger
Find detailed documentation on [Apex triggers in the Salesforce docs](https://developer.salesforce.com/docs/atlas.en-us.apexcode.meta/apexcode/apex_triggers.htm).
Navigate to Setup in Salesforce and follow these steps,:
* In the Quick Find box, type "Triggers" and select "Apex Triggers."
* Click "New Trigger" to create a new trigger.
```apex
trigger OpportunityTrigger on Opportunity (after update) {
OpportunityHandler.handleOpportunityUpdate(Trigger.new);
}
```
### 2. Create an Apex Class
Now, create an Apex class to handle the logic and API call. Implement the call to the [auto\$](/docs/cello-api) in the placeholder method `makeApiCall` in the below code.
This configuration ensures that the Cello API is triggered when an Opportunity meets the specified criteria. Customize the code as needed based on your individual Salesforce setup, API requirements and endpoint.
```apex
public class OpportunityHandler {
public static void handleOpportunityUpdate(List updatedOpportunities) {
for (Opportunity opp : updatedOpportunities) {
// Check criteria: Opportunity in Proposal/Price Quote stage and cello_ucc value
if (opp.StageName == 'Proposal/Price Quote' && opp.Cello_UCC__c != null) {
// Make the API call
makeApiCall(opp.Id, opp.Cello_UCC__c);
}
}
}
private static void makeApiCall(Id opportunityId, String celloUccValue) {
// Your code to make the API call using HTTP methods, e.g., HttpRequest and HttpResponse
// Example:
// HttpRequest req = new HttpRequest();
// req.setEndpoint('your API endpoint');
// req.setMethod('POST');
// req.setHeader('Content-Type', 'application/json');
// req.setBody('{"opportunityId": "' + opportunityId + '", "celloUccValue": "' + celloUccValue + '"}');
// HttpResponse res = new Http().send(req);
}
}
```
### 3. Test and Deploy
* Test your trigger and class in the sandbox environment to ensure proper functionality.
* Reach out to the Cello team to confirm that provided event data is correct.
* Deploy the trigger and class to your production environment once testing is successful.
Important Notes
* **Bulk Processing**: Ensure that your Apex trigger can handle bulk updates, as Salesforce triggers operate in bulk.
* **Error Handling**: Implement appropriate error handling in your Apex class to manage API call failures.
# Chargebee Webhook
Source: https://docs.cello.so/integrations/webhooks/chargebee-webhook
Send signup and purchase events to Cello using Chargebee Webhook
Cello makes it easy to **connect securely to your Chargebee payment provider** to automate transaction events, attribution, and payouts. Transactions are monitored and used to pay out referrers based on your campaign reward rules.
# Overview
A notification event is securely sent to Cello through the webhook endpoint every time a customer makes a purchase or a customer record is created or updated. Cello checks these events to perform the following actions:
* Determine if a reward for the referrer needs to be created and paid out
* Inform the referrer about new signups and rewards
* Cancel recurring rewards if a subscription is cancelled
If the automation of Cello detects unclear cases the automation will be paused and Cello will reach out to you to clarify the case.
# Endpoint URLs
You will find the webhook endpoint URL for both **Sandbox** and **Production** environments in the [Cello Portal Webhooks page](https://portal.cello.so/integrations/webhooks).
# Securing the webhook
To secure the webhook in Step 5, you will find credentials for both **Sandbox** and **Production** environments in [Cello Portal Webhooks page](https://portal.cello.so/integrations/webhooks).
# Connecting Chargebee
## Prerequisites
Before configuring webhooks, ensure your Chargebee customers include the required Cello attribution fields. These information enables proper attribution and reward tracking.
**When to add additional fields:**
* If you create Chargebee customers at signup → You would have already added metadata or custom fields to the customer during the [Setup Step "Track Signups"](/attribution/tracking-signups)
* If you create Chargebee customers at purchase → Make sure to add metadata or custom fields when creating the customer
### Required Chargebee Customer attribution fields
You can also choose to use **Chargebee custom fields (CF\_)** to add referral data to the event. Learn more about custom fields in the [**Chargebee documentation**](https://www.chargebee.com/docs/billing/2.0/site-configuration/custom_fields)
Pass the following fields during checkout in the [Customer Object](https://apidocs.chargebee.com/docs/api/customers) to `metadata` attribute or as a `CF_` custom field.
| Field | Description | Chargebee Object |
| -------------------------- | ----------------------------------------------------------------------------------------------------------------------------------------- | ---------------------------------------------------------------------------------------------------------------------- |
| `cello_ucc` | Referral code identifying the referrer | [Customer Object](https://apidocs.chargebee.com/docs/api/customers) to `metadata` attribute or as a `CF_` custom field |
| `new_user_id` | Your system's unique user ID. Same as `productUserId` used in [Referral Component](/referral-component/introduction) when booting the SDK | [Customer Object](https://apidocs.chargebee.com/docs/api/customers) to `metadata` attribute or as a `CF_` custom field |
| `new_user_organization_id` | Organization ID (optional). Required only for organization-level referrals and rewards | [Customer Object](https://apidocs.chargebee.com/docs/api/customers) to `metadata` attribute or as a `CF_` custom field |
| `coupon` | New user discount code | [Customer Object](https://apidocs.chargebee.com/docs/api/customers) to `metadata` attribute or as a `CF_` custom field |
## Steps
You will add a webhook to your Chargebee configuration to connect Chargebee and Cello. This can be done in both test and production environments separately.
From the sidebar, select Settings > Configure Chargebee and click on "Webhooks". Next Click on "+ Add Webhook".
Choose the Endpoint URL corresponding to the environment you are setting up: **Sandbox** or **Production**.
Select the events you want to send under "Events to Send":
1. `Customer Created`, `Customer Changed`, `Customer Deleted`
2. `Payment Succeeded`, `Payment Refunded`, `Payment Failed`
Select "Protect webhook URL with basic authentication" and add the `product_id` and `secret` provided in the Cello Portal.
Be sure to select **Exclude card Information from webhook call**
Webhook created!
# Stripe Webhook
Source: https://docs.cello.so/integrations/webhooks/stripe-webhook
Send signup and purchase events to Cello using Stripe Webhook
Cello makes it easy to **connect securely to your Stripe payment provider** to automate transaction events, attribution, and payouts. Transactions are monitored and used to pay out referrers based on your campaign reward rules.
# Overview
A notification event is securely sent to Cello through the webhook endpoint every time a customer makes a purchase or a customer record is created or updated. Cello checks these events to perform the following actions:
* Determine if a reward for the referrer needs to be created and paid out
* Inform the referrer about new signups and rewards
* Cancel recurring rewards if a subscription is cancelled
If the automation of Cello detects unclear cases the automation will be paused and Cello will reach out to you to clarify the case.
# Endpoint URLs
You will find the webhook endpoint URL in the [Cello Portal Webhooks page](https://portal.cello.so/integrations/webhooks).
# Connecting Stripe
## Prerequisites
Before configuring webhooks, ensure your Stripe customers include the required Cello metadata. This metadata enables proper attribution and reward tracking.
**When to add metadata:**
* If you create Stripe customers at signup → You would have already added metadata to the customer during the [Setup Step "Track Signups"](/attribution/tracking-signups)
* If you create Stripe customers at purchase → Make sure to add metadata when creating the customer
### Required Stripe Customer Metadata
Pass the following fields during Stripe Checkout in the [Customer Object](https://docs.stripe.com/api/customers/object?api-version=2024-09-30.acacia#customer_object-metadata) and [Checkout Session object](https://docs.stripe.com/api/checkout/sessions/object?api-version=2025-07-30.basil)
| Field | Description | Stripe Object |
| -------------------------- | ----------------------------------------------------------------------------------------------------------------------------------------- | --------------------------------------------------------------------------------------------------------------------------------------------------- |
| `cello_ucc` | Referral code identifying the referrer | Stripe [Customer Object](https://docs.stripe.com/api/customers/object?api-version=2024-09-30.acacia#customer_object-metadata), attribute:`metadata` |
| `new_user_id` | Your system's unique user ID. Same as `productUserId` used in [Referral Component](/referral-component/introduction) when booting the SDK | Stripe [Customer Object](https://docs.stripe.com/api/customers/object?api-version=2024-09-30.acacia#customer_object-metadata), attribute:`metadata` |
| `new_user_organization_id` | Organization ID (optional). Required only for organization-level referrals and rewards | Stripe [Customer Object](https://docs.stripe.com/api/customers/object?api-version=2024-09-30.acacia#customer_object-metadata), attribute:`metadata` |
| `coupon` | New user discount code | Stripe [Checkout Session object](https://docs.stripe.com/api/checkout/sessions/object?api-version=2025-07-30.basil), attribute: `discount` |
## Steps
You will add a webhook to your Stripe configuration to connect Stripe and Cello. This can be done in both test and production environments separately.
Select Developers from the upper right menu.
You can find Webhooks at the left menu. Next click Add an endpoint.
Choose the Endpoint URL corresponding to the environment you are setting up: **Sandbox** or **Production**.
To select events, do the following steps:
1. Select "Events on your account"
2. Select your latest API version
3. Choose events to send:
1. `charge.refunded`, `charge.succeeded`, `charge.updated`
2. `customer.created`, `customer.deleted`, `customer.updated`
3. `customer.subscription.created`, `customer.subscription.deleted`, `customer.subscription.updated`
4. `invoice.paid`
Webhook created!
To secure the connection, you need to add the “Signing secret” to [Stripe Webhook Configuration in Cello Portal](https://portal.cello.so/integrations/webhooks).
Stripe Webhook Signing secret starts with `whsec_`
1. Click “Reveal” and copy the Signing secret
2. Add the Signing secret to Stripe webhook settings in the [Cello portal](https://portal.cello.so/integrations/webhooks).
# Introduction
Source: https://docs.cello.so/introduction
Learn how to turn your users into your most valuable growth channel
[Cello](https://cello.so/) is a referral platform for building user and partner referral programs.
Cello enables you to:
* Embed referral components directly in your application
* Track and attribute user signups and purchases
* Process payouts in 10+ countries and currencies
# Key Features
Cello provides the following capabilities:
* [Integrated Referral Component for Web and Mobile apps](/referral-component/quickstart)
* [In-product and Email notifications](/guides/user-experience/referral-notifications-and-emails)
* [Analytics Dashboard](https://portal.cello.so/dashboard/referrer)
* [Partner Program](/guides/partners/partner-overview)
* [Integrations and Webhooks](/integrations/introduction)
* [Cello API](/api-reference/introduction)
# Getting Started
Add the Cello Referral Component to your web app in just 15 minutes with our Quickstart:
Follow 4 easy steps to get your referral program up and running with Cello
Referral component for your web and mobile applications
Track signups and purchases back to the right referrer
Webhooks for payment gateways to send conversion events to Cello
# Key Concepts
Source: https://docs.cello.so/key-concepts
Essential terms and concepts for understanding Cello's referral platform and attribution system
## Quick Reference
| Term | Description |
| ------------------------------------------------------------------------------ | ----------------------------------------------------------------- |
| [**Referrer**](#referrer) | Existing user who shares their unique referral link |
| [**New User**](#new-user-referred-user-referee) | Person who receives and uses a referral link |
| [**Referral Code (UCC)**](#referral-code-or-ucc-unique-campaign-code) | Unique 11-character identifier for tracking referrals |
| [**Partner**](#partner) | Professional referrer with exclusive rewards and dedicated portal |
| [**Landing Page Attribution**](#landing-page-attribution-referral-attribution) | Process of capturing and storing referral codes |
| [**Referral Conversion Tracking**](#referral-conversion-tracking) | Tracking when referred users complete target actions |
| [**Attribution Script**](#attribution-script-attribution-js) | JavaScript library for detecting referral parameters |
| [**Referral Component**](#referral-component-cello-js) | Embeddable UI component for referrers |
| [**Payment Gateway**](#payment-gateway-or-payment-provider) | Third-party payment processors integrated with Cello |
***
## Referrer
The existing user (or customer) who initiates the referral by sharing their unique referral link. The referrer is the source of the referral traffic and is typically eligible to receive rewards when the referred user (new user) completes the desired action (e.g., signup, purchase).
***
## New User (Referred User / Referee)
The person who receives the referral invitation or link from the referrer and engages with it. They are considered a "new user" if they have not previously registered or purchased. Often called the **referee** in referral programs.
***
## Partner
A professional referrer who promotes your product as part of a formal partnership. Unlike regular user referrers, partners typically receive:
* **Special reward structures** - Different campaigns from user referrals; can include higher rates, reward caps, or even lifetime rewards
* **Dedicated Partner Portal** - Professional dashboard for tracking referrals, conversions, and earnings
* **Marketing resources** - Media kits, branded assets, and pre-written promotional content
Partners can include affiliates, influencers, agencies, consultants, or other businesses that systematically refer customers. Cello unifies both user referrals and partner programs in a single platform, requiring no additional technical integration beyond the standard referral setup. Learn more about [managing partners](/guides/partners/partner-overview).
***
## Referral Code or UCC (Unique Campaign Code)
A unique identifier tied to the referrer. It is a unique set of 11 alphanumeric characters, composed of numbers, uppercase and lowercase letters. It always appears at the end of the referral link. When a new user uses the referral link with a referral code, it allows the system to attribute their actions back to the referrer. **Referral Code** is a more general term for the code shared by the referrer. **UCC (Unique Campaign Code)** refers to the same code but is a specific Cello term which will be used throughout this documentation and in API references.
* ucc: `pNRB1aYqArN`
* referral link: `moonly.cello.so/pNRB1aYqArN`
***
## Landing Page Attribution / Referral Attribution
The process of **capturing and storing the referral code** (`ucc`) when a referred user lands on a [website](/attribution/for-web) or [mobile app](/attribution/for-mobile) via the referral link. This step ensures the system knows **which referrer** brought the user, so later actions (signups, purchases) can be attributed correctly. This step also involves storing the code in a cookie or user record until the user completes a tracked action.
***
## Referral Conversion Tracking
The stage where a new user completes the targeted action defined by the referral program. This can include:
* [Signups / Tracking Signups](/attribution/tracking-signups): When a new user successfully creates an account. The system links this signup to the referrer.
* [Purchases / Tracking Purchases](/attribution/tracking-purchase): When a new user makes a purchase, often the ultimate revenue-driving conversion.
***
## Attribution Script / Attribution JS
[Attribution JS is a JavaScript library](/sdk/client-side/attribution-js-introduction) embedded on landing pages that automatically detects referral parameters (`ucc`, `productId`, `referrerName`), stores them in cookies for indirect signups, and provides JS methods to easily retrieve these parameters for further conversion events.
***
## Referral Component / Cello JS
The embeddable component provided by the Cello referral platform to handle referral-related functionality for the referrer in your [web or mobile application](/referral-component/introduction).
***
## Payment gateway or payment provider
Third-party services that handle payment processing and billing for your application. These platforms (such as Stripe, Chargebee, Paddle, Recurly, etc.) integrate with Cello to enable automatic tracking of referral-driven purchases and revenue attribution. When a referred user makes a purchase through your payment provider, Cello can automatically detect and attribute that conversion back to the original referrer, enabling seamless reward distribution and revenue tracking.
# Manage cookie consent
Source: https://docs.cello.so/landing-pages/manage-cookies
To ensure compliance with privacy regulations, customers handle cookies and respond to user consent preferences with care and transparency. It is your responsibility to prompt website visitors to specify their preferred tracking level.
Cookie consent is a complex legal subject, varying across different jurisdictions. While the Attribution Library offers tools for managing cookie consent, it is the responsibility of your organization to consult with legal experts to ensure compliance with specific regional laws and regulatory requirements.
# Understanding referral cookies
The [Attribution JS](/sdk/client-side/attribution-js-introduction) employs a specific first-party cookie to enable returning user to claim their referral discount. This cookie functions as a strictly necessary or essential cookie by default, but **should be configured based on your privacy guidelines**.
It's important to note that these cookies **do not directly monitor the identity of returning users.** Instead, it records the referral code, also known as the \[Unique campaign code (`ucc`), originating from the invitation link provided by a referrer and additional parameters to support returning users.
Cookies are not required to directly attribute referrals in Cello. They are used to assist in attributing a referral when a new user leaves and returns to the signup.
## List of first-party referral cookies that are set
| Cookie | Purpose | Persistent or Session | Lifespan | Default type |
| -------------------- | -------------------------------------------------------------------------------------------------------------------------------------------------------------------------------------------------------- | --------------------- | -------- | ----------------------------------------------------------------- |
| cello-referral | Cello uses `cello-referral` cookie to identify the referrer and campaign. These let us link the referrer and new users who sign up, and help us apply rewards and discounts based on the campaign terms. | Persistent | 3 months | Strictly necessary or essential cookies |
| cello-productId | Cello uses `cello-productId` cookie to identify the product (account) using Cello on this page. | Persistent | 3 months | Strictly necessary or essential cookies |
| cello-cookie-consent | Cello uses `cello-cookie-consent` cookie to store consent to managing cookies | Persistent | 3 months | Strictly necessary or essential cookie for custom cookie handling |
# Methods for Handling Consent
The [Attribution JS](/sdk/client-side/attribution-js-introduction) provides several methods for handling user consent efficiently:
## 1. Custom Method
Custom method only works if your account has been configured to use custom cookie handling. Contact Cello Support to enable it.
Utilize the [Attribution JS](/sdk/client-side/attribution-js-introduction) JavaScript API to dynamically inform it when a visitor has consented to cookie storage. This method offers full control over the timing of cookie storage, allowing you to align it with your user consent process.
### allowCookies
To allow the storage of the referral code cookie:
```javascript
window.CelloAttribution('allowCookies');
```
### deleteCookies
To halt the storage of the referral code cookie and clear it:
```javascript
window.CelloAttribution('deleteCookies');
```
## 2. Consent System Method
For users of popular cookie management and consent platforms such as OneTrust, CookieBot, and Civic Cookie Control, the [Attribution Library](/cello/v2.0/docs/connect-attribution) offers built-in support for seamless integration. Our Cello support team can assist you in configuring the right tool for your specific needs, eliminating the need for coding.
### Supported Tools
* OneTrust New
* CookieFirst Coming Soon
* CookieBot Coming Soon
* Civic Cookie Control Coming Soon
These methods allow you to handle cookie consent effectively when utilizing the [Attribution JS](/sdk/client-side/attribution-js-introduction) to track returning referees seamlessly.
# Integrate Cello with AI
Source: https://docs.cello.so/llm-quickstart
Let your AI code assistant learn from Cello documentation and automate your integration steps
Build with Cello faster using AI assistants that understand our entire documentation. This guide shows you how to give AI tools like **Cursor**, **Claude Code**, **Copilot**, etc complete context about Cello's APIs, SDKs, and integration patterns.
## Quick Start: URL Context
The fastest way to get started is to provide this URL directly to your AI tool:
```
https://docs.cello.so/llms-full.txt
```
This file contains \~73,000 tokens of comprehensive Cello documentation optimized for LLM consumption.
Start your chat with:
```
Retrieved and processed the Cello documentation
from this provided URL: https://docs.cello.so/llms-full.txt.
Use it as context in this chat to answer my questions.
```
## Method 2: Direct Content Injection
For AI tools that don't support URL fetching, you can copy the entire documentation:
1. **Download the documentation**: Open [llms-full.txt](https://docs.cello.so/llms-full.txt)
2. **Copy all content**: Select all (Ctrl/Cmd + A) and copy
3. **Paste into your AI tool**: Add as context before your questions
Some AI tools have token limits. The full documentation is \~73,000 tokens, so you may need to use tools like Claude (200k context) or GPT-4 Turbo (128k context).
## Method 3: MCP Server Integration
For advanced integrations, connect directly to our Model Context Protocol (MCP) server:
```
https://docs.cello.so/mcp
```
This provides structured access to Cello documentation for MCP-compatible AI applications.
## Example Prompts
Here are some powerful prompts to get you started:
### Basic Integration
```
Using the Cello docs, show me how to implement the referral component
with user authentication in a React app
```
### Advanced Attribution
```
Create a complete attribution tracking system that captures referral codes
from URLs, stores them in cookies, and sends conversion events to Cello using Cello API
```
### Custom Integration
```
How do I integrate our payment provider Paddle with Cello to send purchase events?
```
## Best Practices
Always mention what you're building (web app, mobile app, backend service) for more targeted assistance.
Ask for full, runnable code examples including error handling and edge cases.
Always confirm the latest API endpoints and authentication methods from the documentation.
Build and test features step-by-step rather than implementing everything at once.
## Troubleshooting
| Issue | Solution |
| -------------------- | ------------------------------------------------------------------------ |
| AI doesn't fetch URL | Use Method 2 (copy-paste) instead |
| Token limit exceeded | Focus on specific sections or use an AI with larger context window |
| Outdated information | Always verify critical details at [docs.cello.so](https://docs.cello.so) |
## Need Help?
AI sometimes makes mistakes. If you get stuck, reach out to your Customer Success Manager or our support team at [support@cello.so](mailto:support@cello.so).
# Custom Launcher
Source: https://docs.cello.so/referral-component/custom-launcher
Learn how to implement your own button to open Referral Component and display notifications.
The Cello custom launcher allows you to open the Referral Component from any element that you want to use. **It can be a button, a menu item, a link and you can use multiple places that open Cello Referral Component**. Additionally, you can choose to open it either in a popup or modal view.
**Critical Requirements for Custom Launchers:**
* The custom launcher element **MUST exist in the DOM before Cello initializes**
* The element **MUST have `position: relative` styling**
* You **MUST configure the selector in Cello Portal** to match your element
* Cello does **NOT automatically rescan the DOM** for new elements after initialization
## Implementation Guide
### Step 1: Create your launcher element
Create an HTML element that will trigger the Referral Component. The element must:
1. Exist in the DOM **before** `cello.boot()` is called
2. Have `position: relative` CSS styling
3. Use a unique identifier (ID, class, or attribute)
```jsx
// ❌ WRONG: Element created after Cello initialization
function MyComponent() {
const [celloReady, setCelloReady] = useState(false);
useEffect(() => {
initializeCello(); // Initializes Cello
setCelloReady(true);
}, []);
return (
<>
{celloReady && (
// Too late!
)}
);
}
// ✅ CORRECT: Element exists before Cello initialization
function MyComponent() {
const [celloReady, setCelloReady] = useState(false);
useEffect(() => {
// Element already exists in DOM
initializeCello(); // Now initialize Cello
setCelloReady(true);
}, []);
return (
<>
);
}
```
```html
```
```vue
```
```typescript
// ❌ WRONG: Element created after Cello initialization
@Component({
selector: 'app-my-component',
template: `
`
})
export class MyComponent implements OnInit {
celloReady = false;
ngOnInit() {
this.initializeCello();
this.celloReady = true; // Button appears after Cello init
}
}
// ✅ CORRECT: Element exists before Cello initialization
@Component({
selector: 'app-my-component',
template: `
`
})
export class MyComponent implements OnInit {
celloReady = false;
async ngOnInit() {
// Element already exists in DOM (hidden)
await this.initializeCello();
this.celloReady = true; // Now show the button
}
async initializeCello() {
// Initialize Cello here
window.cello = window.cello || { cmd: [] };
window.cello.cmd.push(async (cello) => {
try {
await cello.boot({
productId: "YOUR_PRODUCT_ID",
token: "YOUR_JWT_TOKEN",
// ... other configuration
});
console.log('Cello initialized successfully');
} catch (error) {
console.error('Failed to initialize Cello:', error);
}
});
}
}
```
### Step 2: Configure Cello Portal
1. Navigate to [Referrer Experience in Cello Portal](https://portal.cello.so/setup/referrer-experience)
2. Set the **Custom Launcher Selector** to match your element:
* For ID: `#cello-launcher`
* For class: `.cello-launcher`
* For attribute: `[cello-launcher]`
### Step 3: Initialize Cello
After the custom launcher element exists in the DOM, initialize Cello:
```javascript
window.cello = window.cello || { cmd: [] };
window.cello.cmd.push(async (cello) => {
try {
await cello.boot({
productId: "YOUR_PRODUCT_ID",
token: "USER_JWT_TOKEN",
// ... other configuration
});
console.log("Cello initialized successfully");
// Custom launcher is now active
} catch (error) {
console.error("Failed to initialize Cello:", error);
}
});
```
## Common Issues and Solutions
### Custom launcher not working
**Problem:** The custom launcher element is created after Cello has already initialized.
**Solution:** Ensure the element exists in the DOM before calling `cello.boot()`. In React/Vue, render the element with `display: none` initially, then show it after initialization.
**Problem:** The element doesn't have `position: relative` styling.
**Solution:** Add `style="position: relative"` to your launcher element. This is required for Cello to properly attach event handlers.
**Problem:** The selector in Cello Portal doesn't match your element.
**Solution:** Verify the exact selector format:
* ID selectors need `#` prefix: `#my-launcher`
* Class selectors need `.` prefix: `.my-launcher`
* Attribute selectors need brackets: `[my-attribute]`
**Problem:** In single-page applications, elements are dynamically added/removed.
**Solution:** Keep the launcher element persistent in the DOM, use CSS to control visibility instead of conditional rendering.
## Add reward in launcher
1.5x activation rate3.5x sharing rate
Increase the sharing activity of your users by highlighting the reward directly in the referral launcher inside your menu item.
You can get the text for the menu launcher from [cello.js](/sdk/client-side/cello-js). Text will be localized to the [referrer's language](/guides/user-experience/overview#texts-and-language) and the reward amount is based on the [referrer's campaign](/guides/campaigns/setting-up-campaigns).
```javascript
const labels = await window.Cello("getLabels")
const myCustomLauncherLabel = labels.customLauncher
```
## Disable Cello button
**Cello button** is a floating action button or bookmark style button provided as a default Referral Component launcher. When integrating a Customer Launcher, you may choose to disable the Cello button or keep it as an additional launcher.
You can choose to disable the default launcher, the Cello button. Go to [Referrer experience](https://portal.cello.so/setup/referrer-experience) settings in Cello Portal and **uncheck** "Show Cello Button".
## Configure notification badge
You can control the behaviour of the [notification badge](/guides/user-experience/referral-notifications-and-emails#alert-and-badge), which is attached to your Custom Launcher Selector by default:
This is the default behavior - the element opens the Referral Component on click and shows notification badges.
```html
```
Add `data-cello-badge="false"` to hide the notification badge while keeping the element clickable.
Use this when you have multiple launchers but only want badges on some of them.
```html
```
Add `data-cello-click="false"` to show the notification badge but prevent clicks from opening the panel.
Use this to show badge notifications on parent menu items for better visibility.
```html
Settings Menu
```
The `data-cello-badge` and `data-cello-click` attributes are **optional modifiers**. If you want the default behavior (clickable with badge), you don't need these attributes at all.
**Testing notification badge position**
To trigger a notification badge to be shown on your Custom Launcher simply visit the referral link, of the same user you are testing with, e.g. `moonly.cello.so/pNRB1aYqArN` . A link visit will trigger a [view notification](/guides/user-experience/referral-notifications-and-emails#alert-and-badge) and a badge will be displayed.
## Add announcement selector
Announcement are callout style notifications used to [communicate important information](/guides/user-experience/referral-notifications-and-emails#announcement) to the user if we need to grab their attention and direct them to the Referral Component.
If the Cello button is disabled, the announcement needs to be anchored to one of your Custom Launchers.
Depending on the implementation, the Announcement Selector can be the same as for Custom Launcher, i.e. you can use exactly the same class ID, attribute selector or element ID.
Add this identifier as Announcement Selector under [Referrer Experience in Cello Portal](https://portal.cello.so/setup/referrer-experience).
Here you can also configure where you want announcement to be shown relative to the Announcement Selector by specifying **Announcement position** and **Announcement position offset.**
**Testing Announcement position**
While choosing Announcement Selector and choosing its position, you will want to see how it looks and make necessary adjustments. You can trigger an [announcement](/guides/user-experience/referral-notifications-and-emails#announcement) using [Cello JS](/sdk/client-side/cello-js-usage#showannouncement-announcement) `showAnnouncement(announcement)` method.
Example below will trigger the default welcome announcement:
```javascript
window.Cello("showAnnouncement", { "type": "welcome-announcement-1" })
```
# Introduction
Source: https://docs.cello.so/referral-component/introduction
Add a referral program to your application with Cello's embeddable referral component
The Cello Referral Component is an all-in-one referral experience that integrates directly into your web and mobile applications with just a few lines of code, enabling users to share referral links, track progress, and receive rewards.
## What is the Referral Component?
The Referral Component provides a complete referral experience within your product through:
* **First-time onboarding** that explains how your referral program works
* **Multiple sharing options** including link copy, social media, email, and QR codes
* **Progress tracking** showing clicks, signups, and earned rewards in real-time
* **Automated reward payouts** via PayPal, Venmo, and other payment methods
* **In-app and Email notifications** to keep users engaged with referral activity
Learn more about the [complete user experience](/guides/user-experience/overview).
## Key Features
* **Easy Integration** - Add as a floating button to launch the Referral Component or integrate into your existing menu with [custom launcher](/referral-component/custom-launcher)
* **Customizable Offer** - [Configure reward amounts, text, and program details](/guides/campaigns/setting-up-campaigns)
* **In-app Notifications** - [Alerts and announcements](/guides/user-experience/referral-notifications-and-emails) to keep users engaged with updates, promotions, and milestones
* **Email Notifications** - [Automated emails for signups, rewards, and milestones](/guides/user-experience/referral-notifications-and-emails)
* **Multi-language Support** - Available in 10+ languages with automatic detection
* **Cross-platform** - Native SDKs [for Web](/sdk/client-side/cello-js), [iOS, Android, and React Native](/sdk/mobile/introduction)
## Installation Options
JavaScript library for React, Vue, Angular, and vanilla JS applications
Native Swift/Objective-C SDK with CocoaPods and SPM support
Native Kotlin/Java SDK with Gradle integration
Cross-platform mobile SDK for React Native apps
## How to Use
### Basic Implementation
1. **Load the SDK** - Add Cello script or SDK to your application
2. **Generate JWT Token** - Create server-side authentication token
3. **Initialize Component** - Boot with your product ID and user details
### Quick Example (Web)
```javascript
// Load and initialize Cello
window.cello.cmd.push(async function (cello) {
await cello.boot({
productId: "YOUR_PRODUCT_ID",
token: "JWT_TOKEN",
productUserDetails: {
email: "user@example.com",
firstName: "John"
}
});
});
```
## Next Steps
Get started with the [Quickstart guide](/referral-component/quickstart) to integrate the Referral Component in under 15 minutes.
# Quickstart
Source: https://docs.cello.so/referral-component/quickstart
Learn how to install Cello Referral Component into your web application
This guide follows basic steps to **integrate Referral Component into your web application** using [Cello JS SDK](/sdk/client-side/cello-js-introduction).
[Cello JS SDK](/sdk/client-side/cello-js-introduction) is a browser-based JavaScript library compatible with all web frameworks that output HTML/JavaScript, including React, Next.js, Vue, and Angular.
For server-side rendering frameworks like Next.js, Cello interactions must occur client-side, not server-side.
## Prerequisites
First, you'll need your `productId` and `PRODUCT_SECRET` from your Cello dashboard's [Access Keys page](https://portal.cello.so/integrations/accesskeys) for the right environment (Sandbox or Production)
## Installation Steps
Follow these steps to integrate the Referral Component:
1. Load the Cello script from our CDN
2. Generate a JWT token server-side for user authentication
3. Initialize the component with the token to connect your user session
## Step 1: Load the script
Add the Cello script to your HTML. The script loads asynchronously to avoid blocking page rendering and can be included anywhere on your website. This approach is recommended for optimal SEO performance.
**Avoiding CORS Issues**: When loading third-party scripts like Cello at runtime, ensure your Content Security Policy (CSP) allows loading from `*.cello.so` domains. If your application has strict CSP headers, add `script-src 'unsafe-inline' https://assets.cello.so https://assets.sandbox.cello.so` to your CSP configuration to prevent CORS-related loading issues.
Add this script to the `head` tag of your HTML:
```javascript theme={null}
```
```javascript theme={null}
```
Once loaded, the script:
1. Registers `window.Cello` for communication between your page and Cello
2. Processes any queued commands from `window.cello.cmd` and maintains the command interface
## Step 2: Generate a JWT token
Create a JWT token to securely connect your user's session to Cello. The token authenticates your application and provides user identity for generating unique referral links.
Generate JWT tokens server-side only. Never create tokens in the browser.
See [User Authentication](/sdk/client-side/user-authentication) for complete JWT token generation instructions.
## Step 3: Initialize the library
Initialize Cello with a single function call that includes your **product ID**, **JWT token**, and configuration options.
User details (email, first name) are required for fraud detection and features like email notifications and personalized messaging.
```javascript JavaScript theme={null}
window.cello = window.cello || { cmd: [] };
window.cello.cmd.push(async function (cello) {
try {
await cello.boot({
productId: "CELLO_PRODUCT_ID",
token: "REPLACE_ME",
language: "en",
productUserDetails: {
firstName: "Bob",
lastName: "Bobsky",
fullName: "Bob B Bobsky",
email: "bob@gmail.com",
},
});
} catch (error) {
console.error("Failed to boot cello:", error);
// Handle the error appropriately
}
});
```
This implementation works with asynchronous script loading. For complete configuration options, see [SDK Reference](/sdk/client-side/cello-js-usage#cello-boot-options).
After initialization, the library:
1. Adds a Cello button to your page or [connects to your custom element](https://docs.cello.so/referral-component/custom-launcher)
2. Creates a session to handle configured callbacks
**Congratulations!** You have successfully integrated Cello Referral Component!
Next, you can integrate Referral Component into your mobile applications:
***
## Controlling access to Referral component
If you want to enable the Cello referral component only to selected users or control its visibility dynamically, we provide the following options:
During the new referral program rollout with Cello, you may want to pilot with a small cohort of selected users. This can be achieved using our Named user whitelist.
All you need to do is to provide a list of selected users UIDs (productUserIds) to Cello. After they are added to the whitelist, only these users will have access to the Referral component until you are ready to rollout to your entire user base.
To control dynamically when and who sees the Referral component, you can use `show()` and `hide()` methods.
For example, you may decide to only show the Referral component after the user has completed onboarding. In that case, when a user first logs in, boot the component with `hideDefaultLauncher = true` configuration option. Then, when the onboarding is complete, use `cello.show()` to show the Cello button.
## Opening the Referral Component with a Link
You can automatically open the Referral Component with a link to your product by adding a `cello-open=true` param to your URL.
For example, add a link to the referral component to your email communication to help your users access the sharing options directly from the email.
If a user is redirected between URLs on login, make sure to re-attach this param to the final URL the user lands on in order to automatically open the Cello Referral Component.
You may also pass one of `invite`, `rewards` and `edit-payments` values to the param for the Referral Component to open a specific tab automatically e.g.:
```html theme={null}
https://your-product.com?cello-open=edit-payments
```
## Troubleshooting
### `Error 1200: Invalid Tenant`
The main cause for this error is that the used URL for the referral component, the product ID, and the Product Secret do not fit together. Make sure that you are using all three components of the same environment.
### `Error 1100: Invalid JWT token`
This means that the token is not valid and the main cause is that some of the attributes for constructing the token are not correct. You can decode your token using [https://jwt.io/](https://jwt.io/). After decoding, please check all the attributes against the requirements in User Authentication, specifically make sure that productUserId is a string, iat is valid, algorithm is H512 and the secret is the correct one for the environment you are using (Sandbox or Production)
### `Failed to load resource: the server responded with a status of 401 () [Cello]: "User is not authorized to load the widget"`
Most likely, the created JWT token is not valid. Common causes for this error are:
* The use of an incorrect `PRODUCT_SECRET`.
* The `productUserId` is not passed as a `string` in the payload for the JWT token creation.
* The use of an incorrect `productId`.
* `issuedAt` (`iat`) date cannot be older than 24h or set in the future.
### `Error: User is not authorized to load the widget`
Most likely you are not passing the `productUserId` as a `string` into the payload for the JWT token creation.
### `[Cello]: Cannot read properties of null (reading ‘__H')`
Most likely, you are using `http` in your script’s source: `src="http://assets.cello.so/app/latest/cello.js"` . Please use `https`.
## Frequently asked questions
### How much effort on tech side is the integration of Cello?
The complexity of integrating Cello can vary greatly, depending on your individual setup. Integration generally consists of frontend integration and user authentication. For our typical customer, setting up these components on a development environment requires hours, not days. The integration of attribution and reward automation is also relatively straightforward, though it depends on your existing setup.
### The Cello Floating Action Button is overlaying or covering another component within my product. What can I do?
Sometimes, the Cello Floating Action Button or the Referral Component might overlay another component in your product. Here's what you can do:
* **Adjust the z-index**: Cello can modify the z-index of the Floating Action Button or the Referral Component. This ensures that your other components can cover the Cello elements.
* **Hide the element**: Using the `cello.hide()` function, you can hide the Floating Action Button or the Referral Component when other components are open. Implement this function in your frontend.
You can also use the `cello.hide()` function to hide the Cello Floating Action Button on specific pages.
### Is it possible to hide the Cello Floating Action Button on certain pages?
You can hide the Cello Floating Action Button using the [cello.hide()](/sdk/client-side/cello-js-usage#hide) function when other components open. The implementation has to be done in your frontend.
### What exactly is the `productUserId` that is required in the user authentication?
The `productUserId` is the internal user id that you are using inside your product to uniquely identify users.
### Do you support server-side rendering?
Yes, for server-side rendering frameworks like Next.js, Cello interactions must occur client-side, not server-side.
### Do you support Angular?
As mentioned before, the Cello Referral Component is being loaded independently from your angular app and appends itself to `` tag. That being said, you need to just make sure that the injected HTML code is not being overridden by your angular app. This can be achieved in various ways. The safest choice would be not to use `` as your AppRoot element as it would create a race condition.
```typescript theme={null}
@Component({
selector: 'app-root',
...
})
```
```html theme={null}
```
The other option that we have seen customers implement is to load the cello javascript dynamically from your angular app, making sure that it is being loaded after angular is finished rendering its own components.
Here is an example that has been provided by one of our customers:
```typescript theme={null}
export interface CelloReferralPayload {
productId: string;
token: string;
showOnBoot: boolean;
productUserId: string;
language: string;
iat: string;
}
@Injectable({ providedIn: 'root' })
export class CelloReferralAdapter {
constructor(@Inject(DOCUMENT) private document: Document, @Inject(WINDOW) private window: Window) {}
async init(payload: CelloReferralPayload, isProd: boolean){
await this.loadScript(isProd
? 'https://assets.cello.so/app/latest/cello.js'
: 'https://assets.sandbox.cello.so/app/latest/cello.js');
await this.wait(1000);
(this.window as Window & {Cello: any}).Cello('boot', payload);
}
async wait(timeout: number) {
// due to a race condition a timeout is needed after initializing the script.
return new Promise(resolve => setTimeout(() => resolve(), timeout));
}
async loadScript(src: string): Promise {
return new Promise(resolve => {
const script = this.document.createElement('script');
script.onload = () => resolve();
script.type = 'module';
script.src = src;
this.document.head.appendChild(script);
});
}
}
```
***
### What about other frameworks?
Since Cello is a Javascript library running on browser, then it works naturally with all frameworks that end up resulting in a standard HTML/Javascript application. That includes React, Angular, Vue and all similar JS/TS libraries.
# Introduction
Source: https://docs.cello.so/sdk/client-side/attribution-js-introduction
JavaScript library for capturing and tracking referral codes throughout the conversion funnel
## What is Attribution JS?
Attribution JS is a lightweight JavaScript library that captures referral codes (`ucc`) from landing pages and maintains attribution throughout the user journey. When users click referral links and land on your website, this library ensures their referral source is properly tracked through signup and purchase events.
The library automatically:
* Detects referral code (`ucc`) query parameters from referral links
* Stores referral code (`ucc`) as first-party cookies for persistent tracking
* Attaches referral code (`ucc`) to signup forms
* Provides APIs to retrieve referrer information for personalization
## Installation Options
Choose your preferred installation method:
Add directly to your HTML pages with a script tag
Deploy through GTM without code changes
## Key Capabilities
Attribution JS enables you to:
### Referral Tracking
* **Capture referral codes** - Automatically detect and store `ucc` parameters from referral links
* **Retrieve referral data** - Access referral codes programmatically with `getUcc()`. Returns data from URL parameters or stored cookies (persisted for 3 months)
* **Form integration** - Auto-inject hidden referral fields into signup forms for seamless attribution
### Personalization & Campaigns
* **Get referrer names** - Display personalized messages using `getReferrerName()` to retrieve the name of the person who sent the referral
* **Access campaign config** - Use `getCampaignConfig()` to retrieve discount percentages (in decimal format: 0.1 = 10%) and duration in months for referred users
* **Dynamic discount display** - Show referral incentives based on campaign parameters with proper percentage conversion for user display
### Cookie Management
* **Privacy compliance** - [Manage cookie consent](/landing-pages/manage-cookies) with built-in methods
* **Allow cookies** - Enable cookie storage after user consent
* **Delete cookies** - Remove stored data when consent is withdrawn
* **Custom handling** - Implement your own consent flow with full API control
## How It Works
1. **User clicks referral link** - Link contains referral code (`ucc`) parameter (e.g., `yoursite.com?ucc=ABC123`)
2. **Script captures code** - Attribution JS detects referral code (`ucc`) and makes it accessible via `window.CelloAttribution("getUcc")` method
3. **Code persists** - Stored as first-party cookie for 3 months to handle return visits and cross-session attribution
4. **Methods available** - All attribution methods (`getUcc`, `getReferrerName`, `getCampaignConfig`) become available asynchronously after script initialization
5. **Signup attribution** - Referral code (`ucc`) is automatically attached to forms or retrieved programmatically for user registration
6. **Referral conversion tracking** - Pass the referral code (`ucc`) to Cello when tracking signups and purchases for complete attribution
## Next Steps
Choose between [embedded script](/sdk/client-side/embedded-script-tag) or [GTM installation](/sdk/client-side/google-tag-manager)
Test that referral codes are being captured correctly
Review all [available methods](/sdk/client-side/attribution-js-usage) for advanced functionality
## API Method Calls
All Cello Attribution methods use the unified `CelloAttribution` function syntax:
```javascript
const ucc = await window.CelloAttribution("getUcc");
const referrerName = await window.CelloAttribution("getReferrerName");
const campaignConfig = await window.CelloAttribution("getCampaignConfig");
```
Attribution JS works alongside [Cello JS](/sdk/client-side/cello-js-introduction) for complete referral program functionality. While Attribution JS handles tracking and data retrieval, Cello JS provides the referral component interface.
# Usage
Source: https://docs.cello.so/sdk/client-side/attribution-js-usage
Below is the full list of commands to call the Cello Attribution JS SDK with.
## Script Initialization and Timing
The attribution script loads asynchronously. To avoid race conditions between script loading and your application calls, you have two options:
### Option 1: Queue Function (Recommended)
Add this JavaScript code before any calls to the library to queue commands until the script loads:
```javascript expandable
window.CelloAttribution=window.CelloAttribution||function(t,...o){if("getReferral"===t)throw new Error("getReferral is not supported in this context. Use getUcc instead.");let e,n;const i=new Promise((t,o)=>{e=t,n=o});return window.CelloAttributionCmd=window.CelloAttributionCmd||[],window.CelloAttributionCmd.push({command:t,args:o,resolve:e,reject:n}),i}
```
### Option 2: Wait for Script Initialization
Alternatively, wait for the script to load before making calls:
```javascript
document.addEventListener('DOMContentLoaded', async function() {
// Wait for script initialization
await new Promise(resolve => setTimeout(resolve, 1000));
if (typeof window.CelloAttribution === 'function') {
// Now safe to call methods
const ucc = await window.CelloAttribution("getUcc");
console.log('UCC:', ucc);
} else {
console.error('Cello Attribution script failed to load');
}
});
```
## `attachTo(formElement)`
Attaches hidden input to the passed `HTMLFormElement` node, or array of nodes.
```javascript
window.CelloAttribution("attachTo", formElement);
```
### Accepts
Form(s) to attach the hidden input to
### Example
```javascript
window.CelloAttribution("attachTo", document.querySelector("form"));
```
***
## `getCampaignConfig()`
Returns campaign configuration for new users, including discount information.
```javascript
const campaignConfig = await window.CelloAttribution("getCampaignConfig");
```
### Returns
The campaign config object:
Duration of discount in months (e.g., 12 for 12 months)
Discount as decimal format (0.1 = 10%, 0.25 = 25%)
### Complete Example
```javascript
const config = await window.CelloAttribution("getCampaignConfig");
console.log(config);
// Output:
// {
// newUserDiscountPercentage: 0.1, // 10% discount
// newUserDiscountMonth: 12 // For 12 months
// }
// Convert to display format:
const displayPercentage = config.newUserDiscountPercentage * 100; // 10
const message = `${displayPercentage}% off for ${config.newUserDiscountMonth} months`;
console.log(message); // "10% off for 12 months"
// Use in your UI:
document.getElementById('discount-banner').innerHTML =
`🎉 Special offer: ${displayPercentage}% off your first ${config.newUserDiscountMonth} months!`;
```
## `getReferrerName()`
Returns the referrer's name, if provided in the referral link.
```javascript
const name = await window.CelloAttribution("getReferrerName");
```
### Returns
Referrer's name or `undefined`
## `getUcc()`
Retrieves the referral code `ucc` from the URL or the cookie (if cookies are enabled).
```javascript
const ucc = await window.CelloAttribution("getUcc");
```
### Returns
Unique campaign code/referral code
## ~~`attachAll()`~~
> ⚠️ **Deprecated**: forms are now auto-detected and the hidden `ucc` input is injected automatically.
> Use [`attachTo(formElement)`](#attachto-formelement) for targeted cases instead.
```javascript
window.CelloAttribution("attachAll");
```
***
## Troubleshooting
### Attribution Script Not Loading
```javascript
// Check if script loaded correctly
if (typeof window.CelloAttribution !== 'function') {
console.error('Cello Attribution script failed to load');
// Implement fallback logic
// For example, proceed without attribution or show error message
}
```
### Methods Returning undefined or null
**Common causes:**
* Script not fully initialized - wait for DOM load or use the queue function
* Incorrect method syntax - ensure you use `window.CelloAttribution("methodName")`
* No referral data available - user didn't come from a referral link
**Solutions:**
```javascript
// Always check return values
const ucc = await window.CelloAttribution("getUcc");
if (ucc) {
console.log('Referral code found:', ucc);
} else {
console.log('No referral code - user came directly');
}
// Handle missing referrer names gracefully
const referrerName = await window.CelloAttribution("getReferrerName");
const greeting = referrerName
? `Welcome! ${referrerName} referred you`
: 'Welcome to our platform';
```
### Testing Attribution Methods
Test all methods in your browser console:
```javascript
// Test UCC retrieval
await window.CelloAttribution("getUcc");
// Returns: string (referral code) or null
// Test referrer name
await window.CelloAttribution("getReferrerName");
// Returns: string (referrer name) or undefined
// Test campaign config
await window.CelloAttribution("getCampaignConfig");
// Returns: { newUserDiscountPercentage: number, newUserDiscountMonth: number }
```
### Network and Loading Issues
```javascript
// Check if attribution script is blocked
fetch('https://assets.cello.so/attribution/latest/cello-attribution.js')
.then(response => {
if (!response.ok) {
console.error('Attribution script blocked or unavailable');
}
})
.catch(error => {
console.error('Network error loading attribution script:', error);
});
```
### Common Integration Patterns
```javascript
// Safe attribution check with fallbacks
async function initializeWithAttribution() {
try {
// Wait for script if needed
let retries = 0;
while (typeof window.CelloAttribution !== 'function' && retries < 10) {
await new Promise(resolve => setTimeout(resolve, 500));
retries++;
}
if (typeof window.CelloAttribution === 'function') {
const ucc = await window.CelloAttribution("getUcc");
const referrerName = await window.CelloAttribution("getReferrerName");
const campaignConfig = await window.CelloAttribution("getCampaignConfig");
return { ucc, referrerName, campaignConfig };
} else {
throw new Error('Attribution script not available');
}
} catch (error) {
console.warn('Attribution initialization failed:', error);
return { ucc: null, referrerName: null, campaignConfig: null };
}
}
// Use in your application
initializeWithAttribution().then(({ ucc, referrerName, campaignConfig }) => {
// Proceed with or without attribution data
if (ucc) {
console.log('Referral detected:', { ucc, referrerName, campaignConfig });
}
});
```
***
## ~~`getReferral()`~~
> ⚠️ **Deprecated**: use [`getUcc()`](#getucc) instead.
```javascript
const ucc = window.CelloAttribution("getReferral");
```
### Returns
Unique campaign code/referral code
# Introduction
Source: https://docs.cello.so/sdk/client-side/cello-js-introduction
JavaScript SDK for embedding the Cello Referral Component in web applications
## What is Cello JS?
Cello JS is a browser-based JavaScript SDK that enables you to embed a fully-featured referral component directly into your web application. It provides a seamless way for your users to share referral links, track their performance, and receive rewards—all without leaving your product.
The SDK works with any web framework that outputs HTML/JavaScript, including:
* React, Next.js, and Gatsby
* Vue and Nuxt
* Angular
* Vanilla JavaScript applications
* Server-rendered applications (with client-side initialization)
## Getting Started
Follow our quickstart guide to integrate Cello JS in under 15 minutes:
Step-by-step instructions to add the Referral Component to your web app
## Key Capabilities
With Cello JS, you can:
### Core Functionality
* **Initialize the component** - Boot with user authentication and configuration
* **Manage visibility** - Show, hide, or programmatically open the component
* **Handle user sessions** - Update user details and manage authentication tokens
### Customization & Control
* **Change language** - Switch languages dynamically without re-initialization
* **Custom launchers** - Replace the default button with your own UI elements
* **Event callbacks** - React to component events like open, close, and token expiration
### Data & Communication
* **Retrieve referral links** - Get active referral codes and URLs programmatically
* **Access campaign config** - Fetch reward amounts and program details
* **Display announcements** - Show targeted messages and updates to users
### Advanced Features
* **Localization** - Access and customize all UI text labels
* **Country restrictions** - Automatically handle unsupported regions
* **Graceful shutdown** - Clean component removal when needed
## Mobile Applications
Looking to add referral functionality to your mobile app? Check out our native mobile SDKs:
Swift/Objective-C SDK for iOS apps
Kotlin/Java SDK for Android apps
Cross-platform mobile SDK
## Next Steps
[Follow the quickstart](/referral-component/quickstart) to add Cello JS to your application
[Set up JWT authentication](/sdk/client-side/user-authentication) for secure user sessions
[View all available methods](/sdk/client-side/cello-js-usage) in the usage documentation
# Usage
Source: https://docs.cello.so/sdk/client-side/cello-js-usage
Below is the full list of commands to call the Cello JS SDK with.
## `cello.boot(options)`
Initializes Cello Referral Component in your product.
Returns a promise that is resolved once the whole initialization process is finished or rejected if the boot command failed.
```javascript
window.cello = window.cello || { cmd: [] };
window.cello.cmd.push(async (cello) => {
try {
await cello.boot(options);
} catch (error) {
// Handle the error appropriately
}
});
```
The solution above is designed so that you don't have to wait for the library to finish loading before you call the command - follow it and use the `window.cello` object to avoid that particular race condition.
For any other commands, or when you are sure that the command is called after the library has finished loading, you can opt to use the regular command syntax:
```javascript
await window.Cello("boot", options);
```
### Accepts
The initialization options object:
Identifier of the product your users will refer.
You can obtain this in your Cello Portal.
Access token generated for the given user.
More in [User Authentication](/referral-component/user-authentication).
Product user details object. Required for select features
Email of the product user. This data is used in the personalization of the referral
experience, e.g. email notifications. Required for select features
First name of the product user.
This data is used in the personalization of the referral experience, e.g. email notifications and the [personalized message to referees](/docs/add-personalized-message).
Required for select features
Last name of the product user
Full name of the product user.
Use this option if you do not have first name and last name separately.
Product user country, if known. ISO 3166 Alpha-2 standard e.g. `DE`.
If the user is from an [unsupported country](/docs/component-overview#getting-rewarded), the Cello Referral Component will not be booted for this user and an error will be returned.
If no country is passed, Cello will still be booted.
The language, in which the Referral Component will be loaded in ISO 639-1.
Default: `undefined`. If undefined, we use default language set for your product.
Show or hide the Cello button, launching the Referral Component when it's first initialized.
Default: `false`
Callback event for when Referral Component widget is opened.
Callback event for when Referral Component widget is closed.
### Example
```javascript
window.cello = window.cello || { cmd: [] };
window.cello.cmd.push(async (cello) => {
try {
const options = {
productId: "REPLACE_WITH_PRODUCT_ID",
token: "REPLACE_WITH_TOKEN",
language: "en",
productUserDetails: {
firstName: "Bob",
lastName: "Bobsky",
fullName: "Bob B Bobsky",
email: "bob@gmail.com",
},
};
await cello.boot(options);
// Call other Cello commands, if necessary
} catch (error) {
console.error("Failed to boot cello:", error);
}
});
```
***
## `changeLanguage(language)`
Changes the Referral Component language at runtime without re-initializing it.
```javascript
window.Cello("changeLanguage", "de");
```
### Accepts
The language string in ISO 639-1
## `close()`
Closes Referral Component.
```javascript
window.Cello.close();
```
***
## `getActiveUcc()`
Returns active `ucc` and invite `link` for the currently logged-in user.
```javascript
const { ucc, link } = await window.Cello("getActiveUcc");
```
### Returns
The active ucc object:
Active unique campaign code or referral code for the current logged-in user
Personal invite link for the current logged-in user
## `getCampaignConfig()`
Returns campaign config values for the currently logged-in user.
```javascript
const campaignConfig = await window.Cello("getCampaignConfig");
```
### Returns
The campaign config object:
Primary currency code
Percentage of attributed new revenue that will be paid as a reward
Maximum reward that can be earned per referral
Additional reward for signups to encourage more sharing
Additional reward for purchases to encourage more sharing
How long new users get a discount
The discount new users get
## `getLabels()`
Returns select labels used in our Referral Component.
```javascript
const labels = await window.Cello("getLabels");
```
### Returns
The labels object:
A welcome text useful for building custom launchers
## `hide()`
Hides the Cello button or bookmark that launches the Referral Component.
```javascript
window.Cello("hide");
```
***
## `open(destination)`
Opens Referral Component.
```javascript
window.Cello("open", destination);
```
### Accepts
Optional destination string to open Referral Component on a specific tab or page:
* `"rewards"` - open Referral Component on the rewards tab
* `"edit-payments"` - open Referral Component on the payment details page
## `show()`
Shows the Cello button or bookmark that launches the Referral Component.
```javascript
window.Cello("show");
```
***
## `showAnnouncement(announcement)`
Triggers an [announcement](/docs/notifications#announcement).
```javascript
window.Cello("showAnnouncement", announcement);
```
### Accepts
### Example
Example below triggers a default welcome announcement:
```javascript
const announcement = { type: "welcome-announcement-1" };
window.Cello("showAnnouncement", announcement);
```
## `shutdown()`
Shuts down connection to Cello and unmounts the Referral Component.
```javascript
window.Cello("shutdown");
```
***
## `updateProductUserDetails(productUserDetails)`
Updates user details at runtime without re-initializing the Referral Component.
```javascript
window.Cello("updateProductUserDetails", productUserDetails);
```
### Accepts
The product user details object
Email of the product user. This data is used in the personalization of the referral
experience, e.g. email notifications. Required for select features
First name of the product user.
This data is used in the personalization of the referral experience, e.g. email notifications and the [personalized message to referees](/docs/add-personalized-message).
Required for select features
Last name of the product user
Full name of the product user.
Use this option if you do not have first name and last name separately.
### Example
```javascript
const productUserDetails = {
email: "bob@gmail.com",
firstName: "Bob",
lastName: "Bobsky",
fullName: "Bob Bobsky",
};
window.Cello("updateProductUserDetails", productUserDetails);
```
# Embedded Script Tag
Source: https://docs.cello.so/sdk/client-side/embedded-script-tag
Learn how to add Cello attribution script to your website
Attribution script helps you to capture referral code on your landing pages and make it available at signup to attribute referral conversions to the right referrers. In addition, it helps you to personalize messages for referees on the landing page, get discount information and detect potential fraud and abuse of your referral program.
**Script Loading Context:** The attribution script loads asynchronously and methods become available shortly after page load. All attribution methods use the unified `window.CelloAttribution("methodName")` syntax.
# Adding the script
You can add attribution script to your website like any other third party JavaScript code by inserting the following code snippet into the `` tag of **each page** on your website.
Make sure to use `type="module"` and `async` html params in the script tag
```javascript
```
```javascript
```
# Verifying the installation
Now that you have added the attribution script to your website, make sure that the `ucc` is available on the signup page. To verify, follow these steps:
## Step 1: Test with URL parameters
Add `?productId=test` and `?ucc=test` to your website URL:
```html
https://yourwebsite.com/?productId=test&ucc=test
```
## Step 2: Check cookie storage
Open browser developer tools (F12) and verify these values are saved in cookies:
* `cello-product-id` should contain `test`
* `cello-referral` should contain `test`
## Step 3: Test method access
Navigate to your signup page and test the attribution methods from the browser console:
```javascript
// Wait for script to load if needed
setTimeout(async () => {
try {
const ucc = await window.CelloAttribution('getUcc');
console.log('UCC test result:', ucc); // Should return 'test'
// Test other methods
const referrerName = await window.CelloAttribution('getReferrerName');
const campaignConfig = await window.CelloAttribution('getCampaignConfig');
console.log('Attribution methods working:', {
ucc,
referrerName,
campaignConfig
});
} catch (error) {
console.error('Attribution test failed:', error);
}
}, 2000);
```
Expected result:
```javascript
Promise {: 'test'}
```
## Troubleshooting Installation Issues
### Script not loading
```javascript
// Check if script loaded
if (typeof window.CelloAttribution !== 'function') {
console.error('Attribution script failed to load');
// Check network tab for loading errors
// Verify script URL is accessible
}
```
### Methods return undefined
* Wait longer for script initialization (try 3-5 seconds)
* Check browser console for JavaScript errors
* Verify script tag has `type="module"` and `async` attributes
* Ensure no ad blockers are interfering
### Cookie issues
* Check if cookies are enabled in browser
* Verify no GDPR/cookie consent is blocking storage
* Test in incognito mode to rule out extensions
**Installation successful** if methods return expected values and cookies are stored properly.
**Need help?** Check the [troubleshooting guide](/sdk/client-side/attribution-js-usage#troubleshooting) for common issues and solutions.
# Google Tag Manager
Source: https://docs.cello.so/sdk/client-side/google-tag-manager
How to add the Cello attribution script to your site using Google Tag Manager
Learn how to install the Cello attribution script on your website using Google Tag Manager (GTM). This method is ideal for teams who want to manage tracking scripts without direct code changes.
## Prerequisites
Before you begin, ensure you have:
* A Google Tag Manager account and container set up on your website
* Admin access to your GTM container
* Your Cello product ID from the Cello Portal
## Step 1: Create a New Tag
1. Log in to your Google Tag Manager account
2. Select the container for your website
3. Click **Tags** in the left sidebar
4. Click the **New** button to create a new tag
5. Click the **Tag Configuration** area
## Step 2: Add the Cello Attribution Script
1. Select **Custom HTML** as the tag type
2. In the HTML field, paste the following code:
```html theme={null}
```
3. Name your tag (e.g., "Cello Attribution Script")
## Step 3: Configure the Trigger
1. Click the **Triggering** area
2. Choose when you want the Cello attribution script to load:
### Option A: All Pages (Recommended)
* Select **All Pages** trigger
* This ensures referral codes are captured on any landing page
### Option B: Specific Pages Only
If you only want to track attribution on specific pages:
1. Click the **+** to create a new trigger
2. Select **Page View → Some Page Views**
3. Configure conditions (e.g., Page URL contains "landing" or "signup")
## Step 4: Save and Publish
1. Click **Save** to save your tag
2. Give your tag a descriptive name (e.g., "Cello Attribution - All Pages")
3. Click **Submit** to create a new version
4. Add a version description (e.g., "Added Cello referral attribution tracking")
5. Click **Publish** to make the changes live
## Step 5: Test Your Installation
### Method 1: Browser Console Test
1. Open your website in a new browser tab
2. Open the browser's developer console (F12)
3. Type the following command:
```javascript theme={null}
window.CelloAttribution('getUcc')
```
If the script is installed correctly, you should see a Promise response:
```javascript theme={null}
Promise {}
```
### Method 2: Test with Referral Parameters
1. Add the `?ucc=test123&productId=test` query parameters to your website URL:
```
https://yourwebsite.com/?ucc=test123&productId=test
```
2. Check that the referral cookies are being set in your browser:
* Open Developer Tools → Application → Cookies
* Look for `cello-referral` and `cello-product-id` cookies
3. Test `ucc` retrieval in the console:
```javascript theme={null}
window.CelloAttribution('getUcc').then(ucc => console.log('ucc:', ucc))
```
Expected output: `ucc: test123`
### Method 3: GTM Preview Mode
1. In GTM, click **Preview** to enter debug mode
2. Visit your website - you should see the GTM debug panel
3. Verify that your "Cello Attribution Script" tag is firing on the correct pages
**Success indicators:**
* Cello attribution tag fires in GTM preview
* `window.CelloAttribution` function is available in console
* `ucc` cookies are set when visiting with referral parameters
* `getUcc()` method returns referral codes correctly
# User Authentication
Source: https://docs.cello.so/sdk/client-side/user-authentication
The Cello Referral Component contains sensitive data such as the identity of the referee, amounts of payouts and details regarding your user's referral flow e.g. notifications.
We use JWT (JSON Web token) to authenticate the user and authorize access to the data in the Referral Component.
The expected flow is as follows:
1. User logs into your system.
2. Your **backend** provides your frontend code with a **Cello JWT token**.
3. Your frontend code initializes the Referral Component with the **token**.
## Generating the token
Keep your credentials safe. **Never** generate a token or store your secret on the client side!
To generate a valid Cello JWT token, you'll need:
1. Your Cello credentials: **productId** and **product secret**
2. A **productUserId** that uniquely identifies the logged-in user
3. A token signing library for your tech stack of choice. A good variety can be found in the [JWT community](https://jwt.io/libraries)
For more resources on **server-side token** generation see [JWT community](https://jwt.io/introduction).
### Credentials
You will require both **productId** and **product secret** to generate tokens for your users.
You can find these in your [Cello Portal](https://portal.cello.so/integrations/accesskeys):
### User identity
Cello requires a **productUserId** - a unique user identifier to be passed when initializing the Referral Component.
This can be a user id that you already use to identify users in your product.
It can also be any other new unique identifier you generate - the main requirement is that it is unique per user accross your application.
It is important that this ID is **unique per user**, rather than organisation.
### JWT signing library
Regardless of the signing library you choose, make sure you use the `HS512` signing algorithm:
```json
{
"alg": "HS512",
"typ": "JWT"
}
```
### Token generation
Token payload attributes:
Identifier of the product your users will refer
Your logged-in user's unique identifier within your system
A token issuing Unix timestamp. Example: `1661876739`
Note that some libraries do not require you to pass `iat` in the payload and default to the current time if you don't.
### Example
Example of token generation in a NodeJS backend with JavaScript:
```javascript
import { sign } from 'jsonwebtoken';
const tokenPayload = {
productId: 'REPLACE_WITH_PRODUCT_ID',
productUserId: 'REPLACE_WITH_CURRENT_USER_ID',
};
const secret = 'REPLACE_WITH_PRODUCT_SECRET';
const token = sign(tokenPayload, secret, {
algorithm: 'HS512',
});
```
Creating a JWT token should **always** be done in your backend code and **not in the browser**!
Below is an example content of the generated JWT token.
```json
{
"productId": "acme.com",
"productUserId": "123456",
"iat": 1662712365
}
```
## Using the token
Finally, provide the server side-generated token in the `token` property when initializing the Referral Component.
```javascript
window.cello = window.cello || { cmd: [] };
window.cello.cmd.push(async (cello) => {
await cello.boot({
productId: "REPLACE_WITH_PRODUCT_ID",
token: "REPLACE_WITH_TOKEN",
...otherOptions,
});
});
```
# Introduction
Source: https://docs.cello.so/sdk/introduction
Explore our SDKs for adding referrals to your web and mobile apps.
# Web SDKs
Referral component for your web app
Script for tracking referrals on landing pages
# Mobile SDKs
Referral component for your iOS app
Referral component for your Android app
Referral component for iOS and Android
# Cello for Android
Source: https://docs.cello.so/sdk/mobile/android
The Cello SDK for Android enables you to add a referral program into your Android app. With a plug-n-play mobile component, your users can easily share their invite link with their friends and network using mobile sharing options convenient for them, receive rewards and get paid out.
## Installation
You can install Cello for Android using Gradle or manually. A basic installation takes around 15 minutes but will take a little longer if you want to customize the way the Cello Referral Component is launched.
### Compatibility
Cello SDK for Android is compatible with API 21 and up.
### SDK size
The size of Cello for Android once installed varies depending on your app’s configuration. Around 7MB is the average size increase we would expect to see if you're minifying your app correctly.
## Setup
Install Cello to see and give your users the option to spread the word from your Android app. Cello for Android supports API 21 and above.
**Note:** We recommend using the latest available `compileSdkVersion`.
### Install Cello
Add the following dependency to your app’s `build.gradle` file:
#### Groovy (or Kotlin DSL)
```gradle
dependencies {
implementation("so.cello.android:cello-sdk:0.9.1")
}
```
Also, ensure that Maven Central is added to your root `build.gradle`:
```gradle
allprojects {
repositories {
mavenCentral()
}
}
```
### Choose an Environment
In your Cello SDK setup, you have the flexibility to select the environment in which your application will run. This feature is especially useful for different stages of development, such as testing in a development or staging environment before going live in production. The available environments are:
* `prod` (Production) – *default*
* `sandbox` (Sandbox)
#### Configuration Steps
In your Android project, open or create `res/values/config.xml`, then add:
```xml
prod
```
To change the environment, simply replace the value of `cello_env`. For instance, to set the environment to sandbox:
```xml
sandbox
```
Save and rebuild your project to apply.
Using this configuration, the Cello SDK will adapt to the specified environment, allowing for more controlled development and testing processes.
## Initialize Cello
In this step, you will need your **product ID** and a **token** you have generated for the user, similar when [**implementing the web based Referral component**](https://docs.cello.so/docs/user-authentication).
Then, initialize Cello by calling the following in the `onCreate()` method of your application class:
```kotlin
Cello.initialize(this, "YOUR_PRODUCT_ID", token)
```
> **Note:** If you don't currently implement a custom application, you’ll need to create one. A custom application looks like this:
#### Kotlin
```kotlin
class CustomApplication : Application() {
override fun onCreate() {
super.onCreate()
Cello.initialize(this, "YOUR_PRODUCT_ID", token)
}
}
```
#### Java
```java
public class CustomApplication extends Application {
@Override
public void onCreate() {
super.onCreate();
Cello.initialize(this, "YOUR_PRODUCT_ID", token);
}
}
```
> **Note:** Cello SDK must be initialized inside the application `onCreate()` method. Initializing anywhere else will result in the SDK not behaving as expected and could even result in the host app crashing.
## Customize the Cello Referral Component
The Cello SDK allows for various levels of customization to better fit into your app's design and flow. One of the main components you might want to customize is the [**Referral component**](https://docs.cello.so/docs/component-overview)
You have two options to launch the referral component:
### Default Launcher
If you choose to go with the default launcher, you can call the `showFab()` method from the Cello SDK to present a Floating Action Button (FAB) within your app. This FAB is pre-styled but may not perfectly match your app's look and feel.
```kotlin
Cello.client().showFab()
```
### Custom Launcher
If the default launcher does not fit your needs, you can implement your own custom launcher. This could be any UI element like a button, menu item, or even a gesture. To open the Referral component using a custom launcher, you can call `Cello.openWidget()`.
```kotlin
Cello.client().openWidget()
```
Example using Compose:
```kotlin
Button(onClick = { Cello.client().openWidget() }) {
Text("Open Referral")
}
```
## Android API
### `Cello.initialize()`
Initializes the Cello referral component.
| Name | Type | Description | Required |
| ------------------ | ------------------ | ----------------------------------------------- | -------- |
| activity | Activity | This is the reference to the MainActivity | Yes |
| productId | String | Identifier of the product your users will refer | Yes |
| token | String | Access token generated for the given user | Yes |
| productUserDetails | ProductUserDetails | Product user details | No |
```kotlin
import com.cello.cello_sdk.ProductUserDetails
val productUserDetails = ProductUserDetails(
firstName = "John",
lastName = "Doe",
fullName = "John Doe",
email = "john.doe@example.com"
)
Cello.initialize(this, "YOUR_PRODUCT_ID", token, productUserDetails = productUserDetails)
```
### `Cello.showFab()`
Shows the Floating action button or bookmark that launches the Referral Component
```kotlin
Cello.client().showFab()
```
### `Cello.hideFab()`
Hides the Floating action button or bookmark that launches the Referral Component
```kotlin
Cello.client().hideFab()
```
### `Cello.openWidget()`
Opens the referral component.
```kotlin
Cello.client().openWidget()
```
### `Cello.hideWidget()`
Hides the referral component.
```kotlin
Cello.client().hideWidget()
```
### `Cello.getActiveUcc()`
A method to get an active `ucc` and invite link for the currently logged in user.
```kotlin
val result = Cello.client().getActiveUcc()
```
## `getCampaignConfig()`
Returns campaign config values for the currently logged-in user.
```kotlin
let result = Cello.client().getCampaignConfig()
```
### Returns
The campaign config object:
Primary currency code
Percentage of attributed new revenue that will be paid as a reward
Maximum reward that can be earned per referral
Additional reward for signups to encourage more sharing
Additional reward for purchases to encourage more sharing
How long new users get a discount
The discount new users get
### `Cello.changeLanguage()`
A method to change the language of the Referral component at runtime without re-initialising it.
```kotlin
Cello.client().changeLanguage("de")
```
### `Cello.shutdown()`
Shuts down connection to Cello and unmounts the component
```kotlin
Cello.client().shutdown()
```
# Introduction
Source: https://docs.cello.so/sdk/mobile/introduction
Native mobile SDKs for embedding referral functionality in iOS and Android applications
## Available Mobile SDKs
Cello provides native mobile SDKs that embed a complete referral experience directly into your mobile applications, enabling users to share referral links, track rewards, and receive payouts—all without leaving your app.
Native Swift/Objective-C SDK for iOS apps
Native Kotlin/Java SDK for Android apps
Cross-platform SDK for React Native apps
## What Do Mobile SDKs Do?
The mobile SDKs provide the same comprehensive referral functionality as our web component, optimized for mobile experiences:
### Referral Component Features
* **In-app sharing interface** with native mobile sharing options (Messages, email, social media)
* **Real-time tracking** of referral performance and earned rewards
* **Reward management** with payout setup and history
* **Multi-language support** with automatic device language detection
### Native Mobile Integrations
* **Platform-specific UI** that follows iOS and Android design guidelines
* **Native sharing** using platform share sheets and messaging apps
* **Deep linking support** for seamless user journeys
* **Performance optimized** for mobile device constraints
### Customizations
You can customize the mobile Referral Component in the following ways:
* **Launcher** – Use the default button or implement a custom launcher to open the Referral component.
* **Hero Image** – Set a custom image for the sharing screen.
* **Copy** – Customize the text displayed in the component.
* **Brand Color** – Apply your brand’s primary color to match your app’s style.
* **Notification images** - Choose which image is displayed in the new view and new reward notification.
## Complete Mobile Referral Setup
After integrating the mobile SDK, you'll need to set up mobile attribution and referral conversion tracking:
### 1. Set Up Mobile Attribution
Configure deep linking and referral code capture for mobile app installs:
Learn how to capture referral codes through app store installs using Branch.io or similar services
### 2. Track Referral Conversions
Implement signup and purchase event tracking to reward referrers:
Send signup events when users create accounts
Send purchase events for subscription or one-time payments
## Getting Started
Select the appropriate SDK for your mobile platform
Follow the installation guide for your chosen SDK
[Configure mobile attribution](/attribution/for-mobile) to capture referral codes from app installs
Implement referral events for [signups](/attribution/tracking-signups) and [purchases](/attribution/tracking-purchases) to complete the referral flow
Mobile SDKs work independently but can be used alongside [Cello JS](/sdk/client-side/cello-js-introduction) if you have both web and mobile versions of your product.
# Cello for iOS
Source: https://docs.cello.so/sdk/mobile/ios
The Cello SDK for iOS enables you to add a referral program into your iOS app. With a plug-n-play mobile component, your users can easily share their invite link with their friends and network using mobile sharing options convenient for them, receive rewards and get paid out.
## Installation
A basic installation takes around 15 minutes but will take a little longer if you want to customize the way the Cello Referral Component is launched.
**Compatibility**
Cello for iOS is compatible with iOS 15 and up.
### SDK size
The size of Cello for iOS varies depending on your app’s configuration. For most installations, it’s around 3 MB in size.
## Setup
Install Cello to see and give your users the option to spread the word from your iOS app. The Cello for iOS library supports iOS **15+** and requires **Xcode 14** to build.
### Install Cello
#### Option 1: CocoaPods
Using the [latest version of Cocoapods](https://github.com/CocoaPods/CocoaPods/releases/latest), add CelloSDK to your Podfile and run `pod install`
```ruby
target :YourTargetName do
pod 'CelloSDK'
end
```
#### Option 2: Swift Package Manager
Add [**https://github.com/getcello/cello-ios-sp**](https://github.com/getcello/cello-ios-sp) as a Swift Package Repository in Xcode and follow the instructions to add CelloSDK as a Swift Package.
#### Option 3: Install Cello manually
1. Download Cello for iOS and extract the zip. (👉 [**Cello iOS zip download**](https://github.com/getcello/cello-ios-sp/releases))
2. Drag `CelloSDK.xcframework` into your project. Make sure **Copy items if needed** is selected and click Finish.
3. In the target settings for your app, set the `CelloSDK.xcframework` to **Embed & Sign** in the **Frameworks, Libraries, and Embedded Content** section of the **General** tab.
### Choose an Environment
In your Cello SDK setup, you have the flexibility to select the environment in which your application will run. This feature is especially useful for different stages of development, such as testing in a development or staging environment before going live in production. The available environments are:
Available environments:
* `prod` (Production)
* `sandbox` (Sandbox)
*`Default environment: prod`*
#### Configuration Steps
* Open your iOS project in Xcode.
* Navigate to the `Info.plist` file.
* Add a new key-value pair:
```xml
CELLO_ENVprod
```
* To switch to sandbox, change the string value to `sandbox`.
* Save your changes. The next build will use the selected environment.
Using this setup, the Cello SDK on iOS can adapt to the chosen environment, allowing a smoother and more controlled development and testing process.
## Initialize Cello
You’ll need your **product ID** and a user-specific **token** (similar to [the web-based Referral component flow](https://docs.cello.so/docs/user-authentication)):
```swift
import CelloSDK
Cello.initialize(for: "YOUR_PRODUCT_ID", with: token) { result in
switch result {
case .success(let configuration):
print("Initialization successful with config:", configuration)
case .failure(let error):
print("Initialization failed with error:", error)
}
}
```
## Customize the Cello Referral Component
The Cello SDK allows for various levels of customization to better fit into your app's design and flow. One of the main components you might want to customize is the [**Referral component**](https://docs.cello.so/docs/component-overview)
### Choose your launcher
* **Default launcher**: Use `Cello.showFab()` to present a pre-styled Floating Action Button (FAB).
```swift
import CelloSDK
Cello.showFab()
```
* **Custom launcher**: Use any UI element (button, menu item, gesture) and call `Cello.openWidget()` when you want to open it.
```swift
import CelloSDK
class YourViewController: UIViewController {
override func viewDidLoad() {
super.viewDidLoad()
let myButton = UIButton(type: .system)
myButton.setTitle("Open Referral", for: .normal)
myButton.addTarget(self, action: #selector(didTapMyButton), for: .touchUpInside)
// Add 'myButton' to your view
}
@objc func didTapMyButton() {
Cello.openWidget()
}
}
```
### Advanced: Custom Callbacks
For even more control, you can implement your own delegate conforming to the `CelloDelegate` protocol. This allows you to get callbacks for significant events in the Referral component.
```swift
class YourViewController: UIViewController, CelloDelegate {
func celloWidgetDidOpen() {
print("Cello widget opened")
}
func celloWidgetDidClose() {
print("Cello widget closed")
}
override func viewDidLoad() {
super.viewDidLoad()
Cello.delegate = self
}
}
```
## iOS API
### Cello.initialize()
Initializes the Cello referral component.
| Name | Type | Description | Required |
| ------------------ | ------------------------ | ---------------------------------------------------------------------------- | -------- |
| productId | string | Identifier of the product your users will refer. Found in your Cello Portal. | Yes |
| token | string | Access token generated for the given user. | Yes |
| productUserDetails | Cello.productUserDetails | Product User details | No |
| completion | callback | Receives success or failure with configuration or error. | |
```swift
import CelloSDK
let productUserDetails = CelloSDK.ProductUserDetails(
firstName: "John",
lastName: "Doe",
fullName: "John Doe",
email: "john.doe@example.com"
)
Cello.initialize(for: "dev.cello.so", with: token, productUserDetails: productUserDetails) { result in
switch result {
case .success(let configuration):
print("Initialization successful with config:", configuration)
case .failure(let error):
print("Initialization failed with error:", error)
}
}
```
### Cello.showFab()
Shows the Floating action button or bookmark that launches the Referral Component
```swift
import CelloSDK
Cello.showFab()
```
### Cello.hideFab()
Hides the Floating action button or bookmark that launches the Referral Component
```swift
import CelloSDK
Cello.hideFab()
```
### Cello.openWidget()
Opens the referral component.
```swift
import CelloSDK
Cello.openWidget()
```
### Cello.hideWidget()
Hides the referral component.
```swift
import CelloSDK
Cello.hideWidget()
```
### Cello.getActiveUcc()
A method to get an active `ucc` and invite link for the currently logged in user.
```swift
import CelloSDK
let result = Cello.getActiveUcc()
```
## `getCampaignConfig()`
Returns campaign config values for the currently logged-in user.
```swift
import CelloSDK
let result = Cello.getCampaignConfig()
```
### Returns
The campaign config object:
Primary currency code
Percentage of attributed new revenue that will be paid as a reward
Maximum reward that can be earned per referral
Additional reward for signups to encourage more sharing
Additional reward for purchases to encourage more sharing
How long new users get a discount
The discount new users get
### Cello.changeLanguage()
A method to change the language of the Referral component at runtime without re-initialising it.
```swift
import CelloSDK
Cello.changeLanguage(to: .de)
```
### Cello.shutdown()
Shuts down connection to Cello and unmounts the component
```swift
import CelloSDK
Cello.shutdown()
```
# Cello for React Native
Source: https://docs.cello.so/sdk/mobile/react-native
The Cello React Native wrapper allows you to use Cello for iOS and Cello for Android in your React Native apps. With a plug-n-play mobile component, your users can easily share their invite link with their friends and network using mobile sharing options convenient for them, receive rewards and get paid out.
## Installation
A basic installation takes around 15 minutes, but will take a little longer if you want to customize the way the Cello Referral Component is launched.
**Compatibility**
* The Cello React Native wrapper supports React Native **0.59** and above.
* Cello for iOS supports **iOS 15+**.
* Cello for Android supports **API 21+**.
### Install Cello
```bash theme={null}
yarn add @getcello/cello-react-native
# or
npm install @getcello/cello-react-native
```
### Android Setup
#### Automatic Linking (RN v0.60+)
Library is automatically linked after installation.
#### React Native v0.59 (Automatic Linking)
```bash theme={null}
react-native link @getcello/cello-react-native
```
#### React Native v0.59 (Manual Linking)
**`android/settings.gradle`**
```groovy theme={null}
include ':cello-react-native'
project(':cello-react-native').projectDir = new File(rootProject.projectDir, '../node_modules/@getcello/cello-react-native/android')
```
**`android/app/build.gradle`**
```groovy theme={null}
dependencies {
implementation project(':cello-react-native')
}
```
### Android Initialization
Update your `MainApplication.java`:
```java theme={null}
import com.celloreactnative.CelloReactNativeModule;
@Override
public void onCreate() {
super.onCreate();
SoLoader.init(this, /* native exopackage */ false);
CelloReactNativeModule.initialize(this, "productId", "token");
}
```
Also include internet permission in `android/app/src/main/AndroidManifest.xml`:
```xml theme={null}
```
### iOS Setup
#### Automatic Linking (RN v0.60+)
Library links automatically after `pod install`.
#### Manual Linking (RN v0.59)
1. Open `.xcworkspace` or `.xcodeproj`.
2. Insert the `CelloSDK.xcframework` into your project (enable "Copy items if needed").
3. In target settings, set it to **Embed & Sign** under *Frameworks, Libraries, and Embedded Content*.
For additional information on iOS manual linking please refer to the [**React Native developer docs**](https://reactnative.dev/docs/linking-libraries-ios).
### iOS Initialization
In `AppDelegate.m`, add:
```objc theme={null}
#import "AppDelegate.h"
#import
#import
#import
// ...
#import // <-- Add This
```
Next, in the method `didFinishLaunchingWithOptions` you'll need to initialize Cello. Add the snippet below using the `productId` and `token`
```
// ...
self.window.rootViewController = rootViewController;
[CelloReactNative initialize:for@"productId" with:@"token"]; // <-- Add this (Remember to replace strings with your product id and token)
return YES;
}
```
## Choose an Environment
In your Cello SDK setup, you have the flexibility to select the environment in which your application will run. This feature is especially useful for different stages of development, such as testing in a development or staging environment before going live in production. The available environments are:
* `prod` (Production) *(default)*
* `sandbox` (Sandbox)
For iOS follow [**Cello for iOS configurational steps**](https://docs.cello.so/docs/cello-for-ios#choose-an-environment)
For Android follow Cello for [**Android configurational steps**](https://docs.cello.so/docs/cello-for-android#choose-an-environment)
## Using Cello with Expo
If you are using Expo, you can use the built-in plugin. After installing the **@getcello/cello-react-native** package, add the [**config plugin**](https://docs.expo.io/guides/config-plugins/) to the `plugins` array of your `app.json` or `app.config.js`:
```json theme={null}
{
"expo": {
"plugins": ["@getcello/cello-react-native"]
}
}
```
The plugin provides props to set environment. Every time you change the props or plugins, you'll need to rebuild (and `prebuild`) the native app. If no extra properties are added, defaults will be used.
* `env` (*string*): Set to your desired environment, such as `prod`, `sandbox`. Optional. Defaults to `prod`.
```json theme={null}
{
"expo": {
"plugins": [
[
"@getcello/cello-react-native",
{
"env": "sandbox"
}
]
]
}
}
```
Next, rebuild your app as described in the [**"Adding custom native code"**](https://docs.expo.io/workflow/customizing/) guide.
## Customize the Cello Referral Component
The Cello React Native allows for various levels of customization to better fit into your app's design and flow. One of the main components you might want to customize is the [**Referral component**](https://docs.cello.so/docs/component-overview)
### Choose Your Launcher
The library provides two ways to launch the Referral component:
**Default launcher**
If you choose to go with the default launcher, you can call the `showFab()` method from the Cello library to present a Floating Action Button (FAB) within your app. This FAB is pre-styled but may not perfectly match your app's look and feel.
```js theme={null}
import Cello from '@getcello/cello-react-native';
Cello.showFab();
```
**Custom launcher**
If the default launcher does not fit your needs, you can implement your own custom launcher. This could be any UI element like a button, menu item, or even a gesture. To open the Referral component using a custom launcher, you can call `Cello.openWidget()`.
```js theme={null}
import Cello from '@getcello/cello-react-native';
const MyButton = () => {
return (
);
}
```
## React Native API
### `Cello.initialize(InitializeOptions): Promise`
Initializes the Cello referral component.
### InitializeOptions
| Property | Type | Required | Description |
| ------------------ | ------------------ | -------- | --------------------------------- |
| productId | string | yes | Your product ID from Cello Portal |
| token | string | yes | User authentication token |
| productUserDetails | ProductUserDetails | no | User details object (see below) |
### ProductUserDetails
Optional object with user information:
| Property | Type | Description |
| --------- | ------ | -------------------- |
| firstName | string | User's first name |
| lastName | string | User's last name |
| fullName | string | User's full name |
| email | string | User's email address |
```ts theme={null}
Cello.initialize({
productId: 'your-product-id',
token: 'your-token',
productUserDetails: {
firstName: 'John',
lastName: 'Doe',
fullName: 'John Doe',
email: 'john.doe@example.com',
},
});
```
### `Cello.showFab(): void`
Shows the default Cello button that launches the Referral Component
```ts theme={null}
Cello.showFab();
```
### `Cello.hideFab(): void`
Hides the default Cello button that launches the Referral Component
```ts theme={null}
Cello.hideFab();
```
### `Cello.openWidget(): void`
Opens the referral component.
```ts theme={null}
Cello.openWidget();
```
### `Cello.hideWidget(): void`
Hides the referral component.
```ts theme={null}
Cello.hideWidget();
```
### `Cello.getActiveUcc(): Promise<{ ucc: string; inviteLink: string; } | null>`
A method to get an active `ucc` and invite link for the currently logged in user.
```ts theme={null}
const data = await Cello.getActiveUcc();
```
### `Cello.changeLanguage(langCode: string): void`
A method to change the language of the Referral component at runtime without re-initialising it.
```ts theme={null}
Cello.changeLanguage("de");
```
### `Cello.shutdown(): void`
Shuts down connection to Cello and unmounts the component
```ts theme={null}
Cello.shutdown();
```
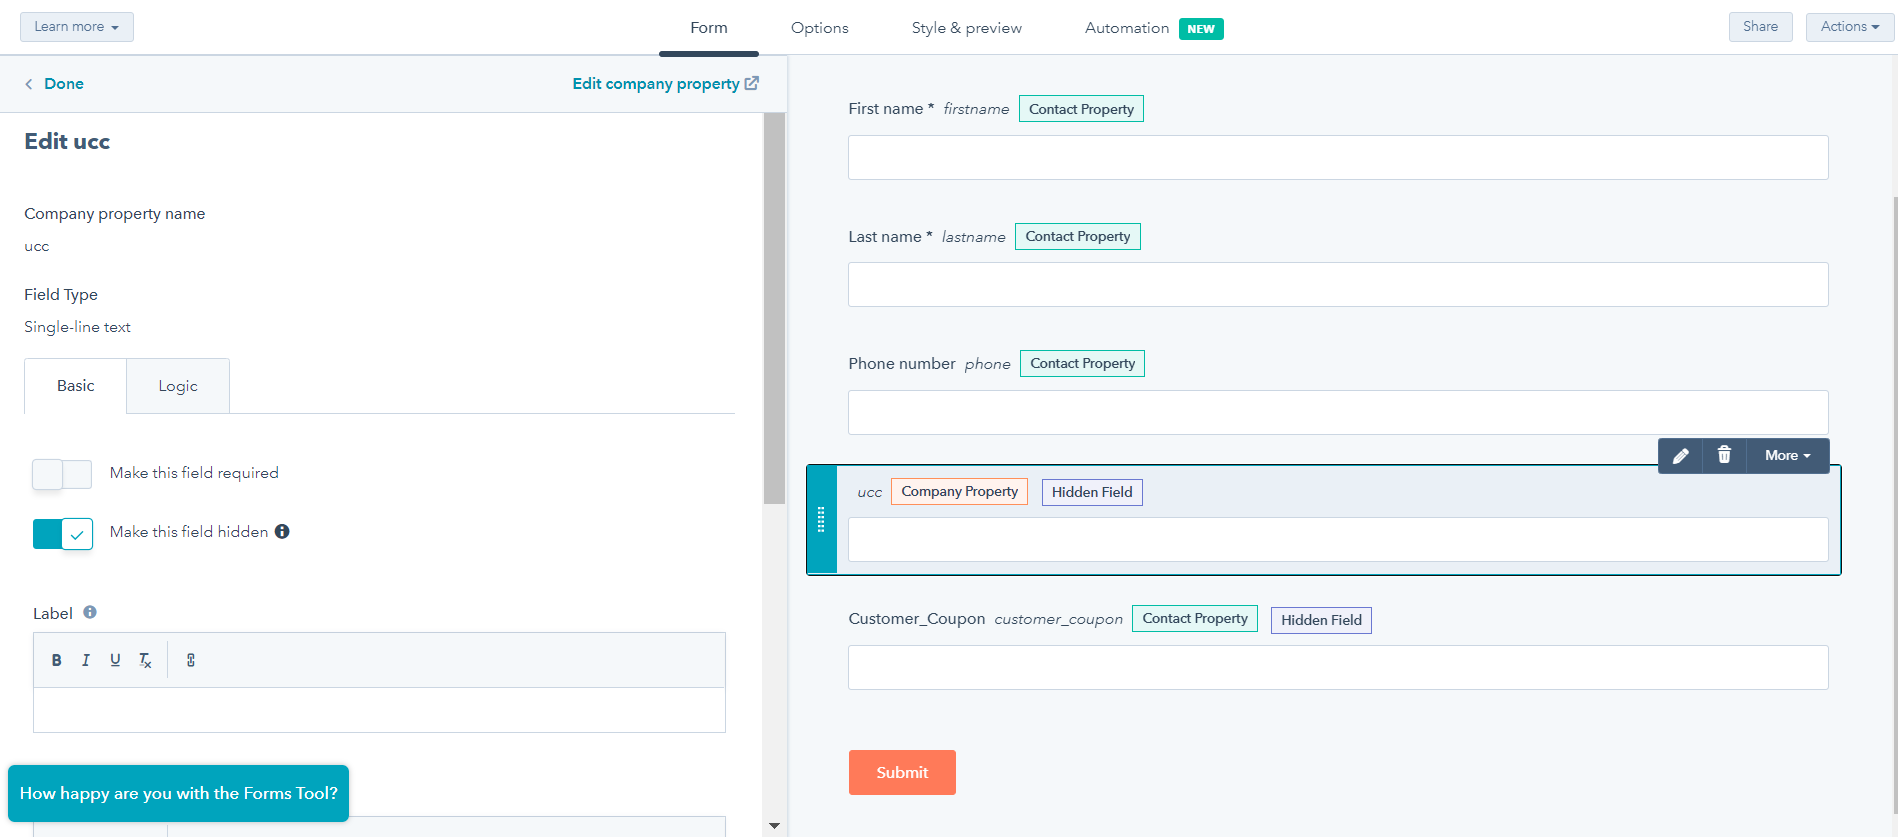 ## Step 2: Include the Cello Attribution Library
Add the Cello attribution script to your website's `` section or before the closing `` tag:
```html
```
## Step 3: Add the Attribution Command Queue
Since HubSpot forms are loaded dynamically, include this script to handle race conditions between your code and the Cello library loading:
```html
```
## Step 2: Include the Cello Attribution Library
Add the Cello attribution script to your website's `` section or before the closing `` tag:
```html
```
## Step 3: Add the Attribution Command Queue
Since HubSpot forms are loaded dynamically, include this script to handle race conditions between your code and the Cello library loading:
```html
```
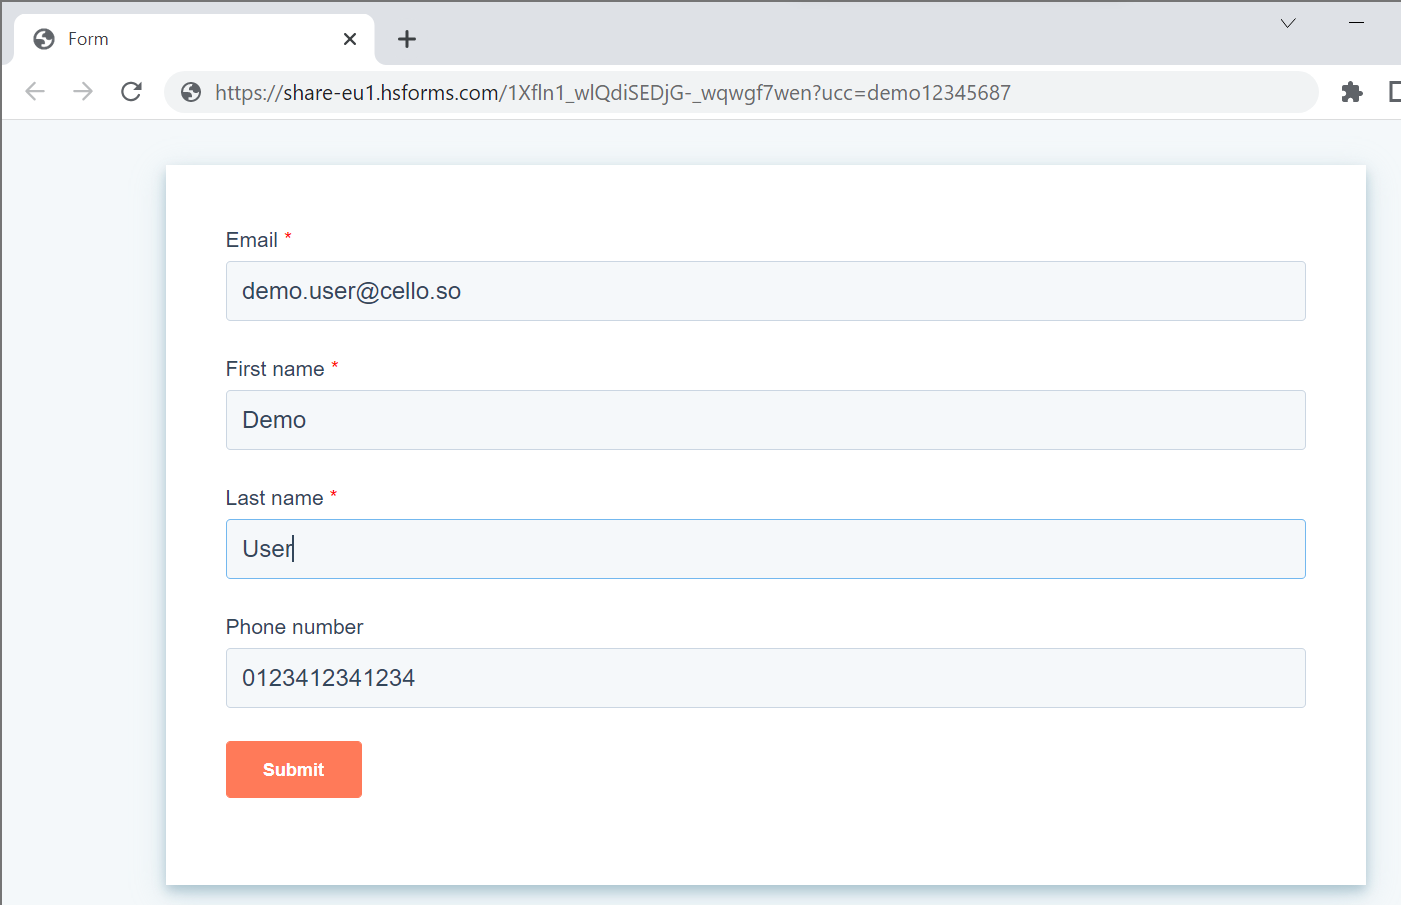 4. Submit your HubSpot form
5. HubSpot should now have created a new contact and a new company. In the new company, you should find the `ucc` property filled with the entered value `demo12345687`
6. The test was successful. You can now move ahead to the section on providing the required data to Cello.
4. Submit your HubSpot form
5. HubSpot should now have created a new contact and a new company. In the new company, you should find the `ucc` property filled with the entered value `demo12345687`
6. The test was successful. You can now move ahead to the section on providing the required data to Cello.
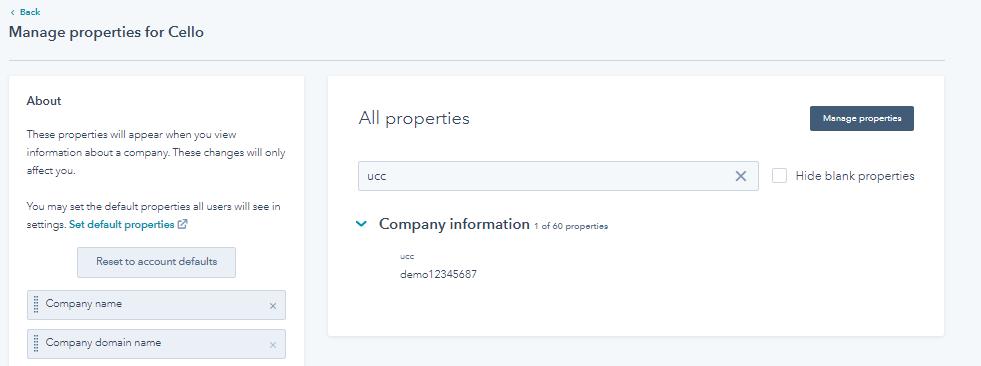 ## Troubleshooting
### Common Issues and Solutions
**1. "getReferral is not supported" error**
* Make sure you're using `getUcc()` instead of `getReferral()`
* This is the correct method for the latest attribution library
**2. Form fields not getting populated**
* Verify your form has a field with `name="ucc"`
* Check that the field selector in `querySelectorAll()` matches your form
* Ensure the `onFormReady` callback is executing
**3. Referral code is undefined**
* Test with a URL containing the `ucc` parameter: `?ucc=test123`
* Check browser cookies for `cello-referral`
* Verify the attribution script loaded properly
**4. Script loading order issues**
* Always include the command queue script before any attribution calls
* Use the `async` attribute on the attribution library script
## HubSpot Scheduling Pages Integration
You can also use the Cello attribution library with HubSpot scheduling pages to capture referral codes when prospects book meetings or demos. This is particularly useful for sales-led referral programs where referrals often lead to booked consultations or product demos.
### How it works
HubSpot scheduling pages include built-in forms that collect contact information before allowing visitors to book meetings. You can integrate Cello attribution with these forms using the same approach as regular HubSpot forms.
### Setup Steps
The integration process for scheduling pages is identical to regular forms:
1. Include the Cello Attribution Library (Steps 2-3 above remain the same)
2. Set up the `ucc` property in your HubSpot contacts/companies
3. Add a hidden `ucc` field to your scheduling page form
4. Configure the scheduling page to populate the referral code
### Adding `ucc` Field to Scheduling Pages
1. Create or edit a scheduling page ([HubSpot's scheduling page guide](https://knowledge.hubspot.com/meetings/create-scheduling-pages))
2. In the "Form" section, add the created `ucc` parameter to the form. You can't hide this field on a scheduling page. This field automatically picks up the `ucc` parameter from the link and feeds it into the created `ucc` property in HubSpot. The result should look like this:
## Troubleshooting
### Common Issues and Solutions
**1. "getReferral is not supported" error**
* Make sure you're using `getUcc()` instead of `getReferral()`
* This is the correct method for the latest attribution library
**2. Form fields not getting populated**
* Verify your form has a field with `name="ucc"`
* Check that the field selector in `querySelectorAll()` matches your form
* Ensure the `onFormReady` callback is executing
**3. Referral code is undefined**
* Test with a URL containing the `ucc` parameter: `?ucc=test123`
* Check browser cookies for `cello-referral`
* Verify the attribution script loaded properly
**4. Script loading order issues**
* Always include the command queue script before any attribution calls
* Use the `async` attribute on the attribution library script
## HubSpot Scheduling Pages Integration
You can also use the Cello attribution library with HubSpot scheduling pages to capture referral codes when prospects book meetings or demos. This is particularly useful for sales-led referral programs where referrals often lead to booked consultations or product demos.
### How it works
HubSpot scheduling pages include built-in forms that collect contact information before allowing visitors to book meetings. You can integrate Cello attribution with these forms using the same approach as regular HubSpot forms.
### Setup Steps
The integration process for scheduling pages is identical to regular forms:
1. Include the Cello Attribution Library (Steps 2-3 above remain the same)
2. Set up the `ucc` property in your HubSpot contacts/companies
3. Add a hidden `ucc` field to your scheduling page form
4. Configure the scheduling page to populate the referral code
### Adding `ucc` Field to Scheduling Pages
1. Create or edit a scheduling page ([HubSpot's scheduling page guide](https://knowledge.hubspot.com/meetings/create-scheduling-pages))
2. In the "Form" section, add the created `ucc` parameter to the form. You can't hide this field on a scheduling page. This field automatically picks up the `ucc` parameter from the link and feeds it into the created `ucc` property in HubSpot. The result should look like this:
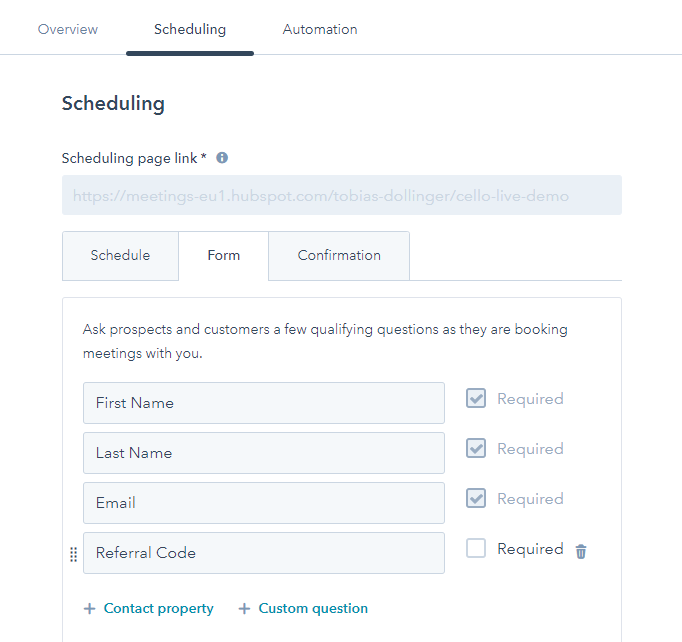 ### JavaScript Integration for Scheduling Pages
Since scheduling pages are embedded HubSpot components, you'll add the same integration code to the page where your scheduling page is embedded:
```html
```
### Testing Your Scheduling Page Integration
1. Visit your scheduling page with a referral parameter:
```
https://yoursite.com/book-demo?ucc=demo12345687
```
2. Start the booking process and fill out the form
3. Complete the booking
4. Check the created contact in HubSpot - the `ucc` field should contain `demo12345687`
### Key Differences from Regular Forms
* **Timing**: Scheduling pages load asynchronously, so we use MutationObserver to detect when the form is ready
* **Form structure**: Scheduling page forms are embedded HubSpot components with specific styling
* **Optional field**: Make the `ucc` field optional since not all meeting bookings will come from referrals
* **Meeting context**: The referral code will be associated with the contact and any resulting deals from the meeting
### JavaScript Integration for Scheduling Pages
Since scheduling pages are embedded HubSpot components, you'll add the same integration code to the page where your scheduling page is embedded:
```html
```
### Testing Your Scheduling Page Integration
1. Visit your scheduling page with a referral parameter:
```
https://yoursite.com/book-demo?ucc=demo12345687
```
2. Start the booking process and fill out the form
3. Complete the booking
4. Check the created contact in HubSpot - the `ucc` field should contain `demo12345687`
### Key Differences from Regular Forms
* **Timing**: Scheduling pages load asynchronously, so we use MutationObserver to detect when the form is ready
* **Form structure**: Scheduling page forms are embedded HubSpot components with specific styling
* **Optional field**: Make the `ucc` field optional since not all meeting bookings will come from referrals
* **Meeting context**: The referral code will be associated with the contact and any resulting deals from the meeting
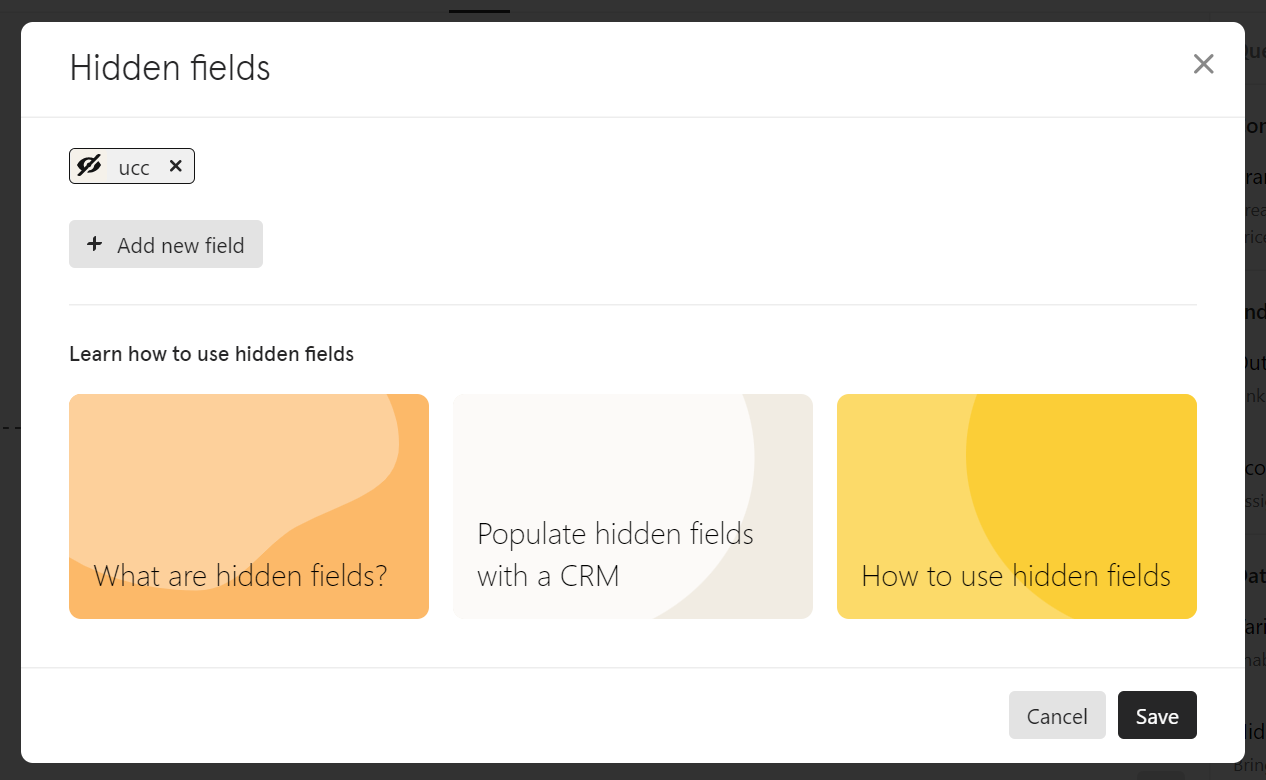 ## Setup of Sync from Typeform to HubSpot
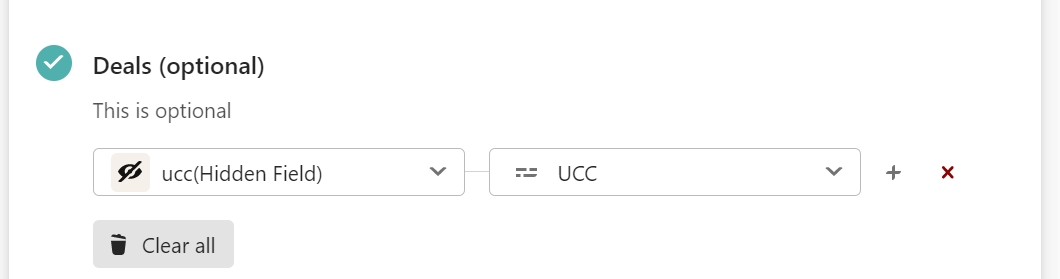 ## Test the created Typeform and HubSpot integration

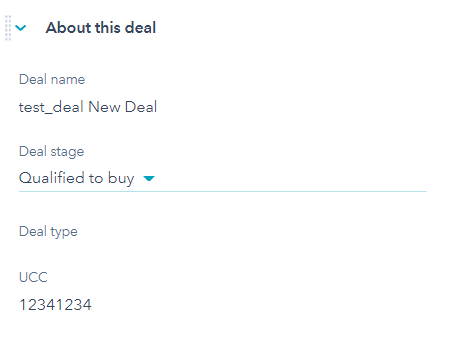
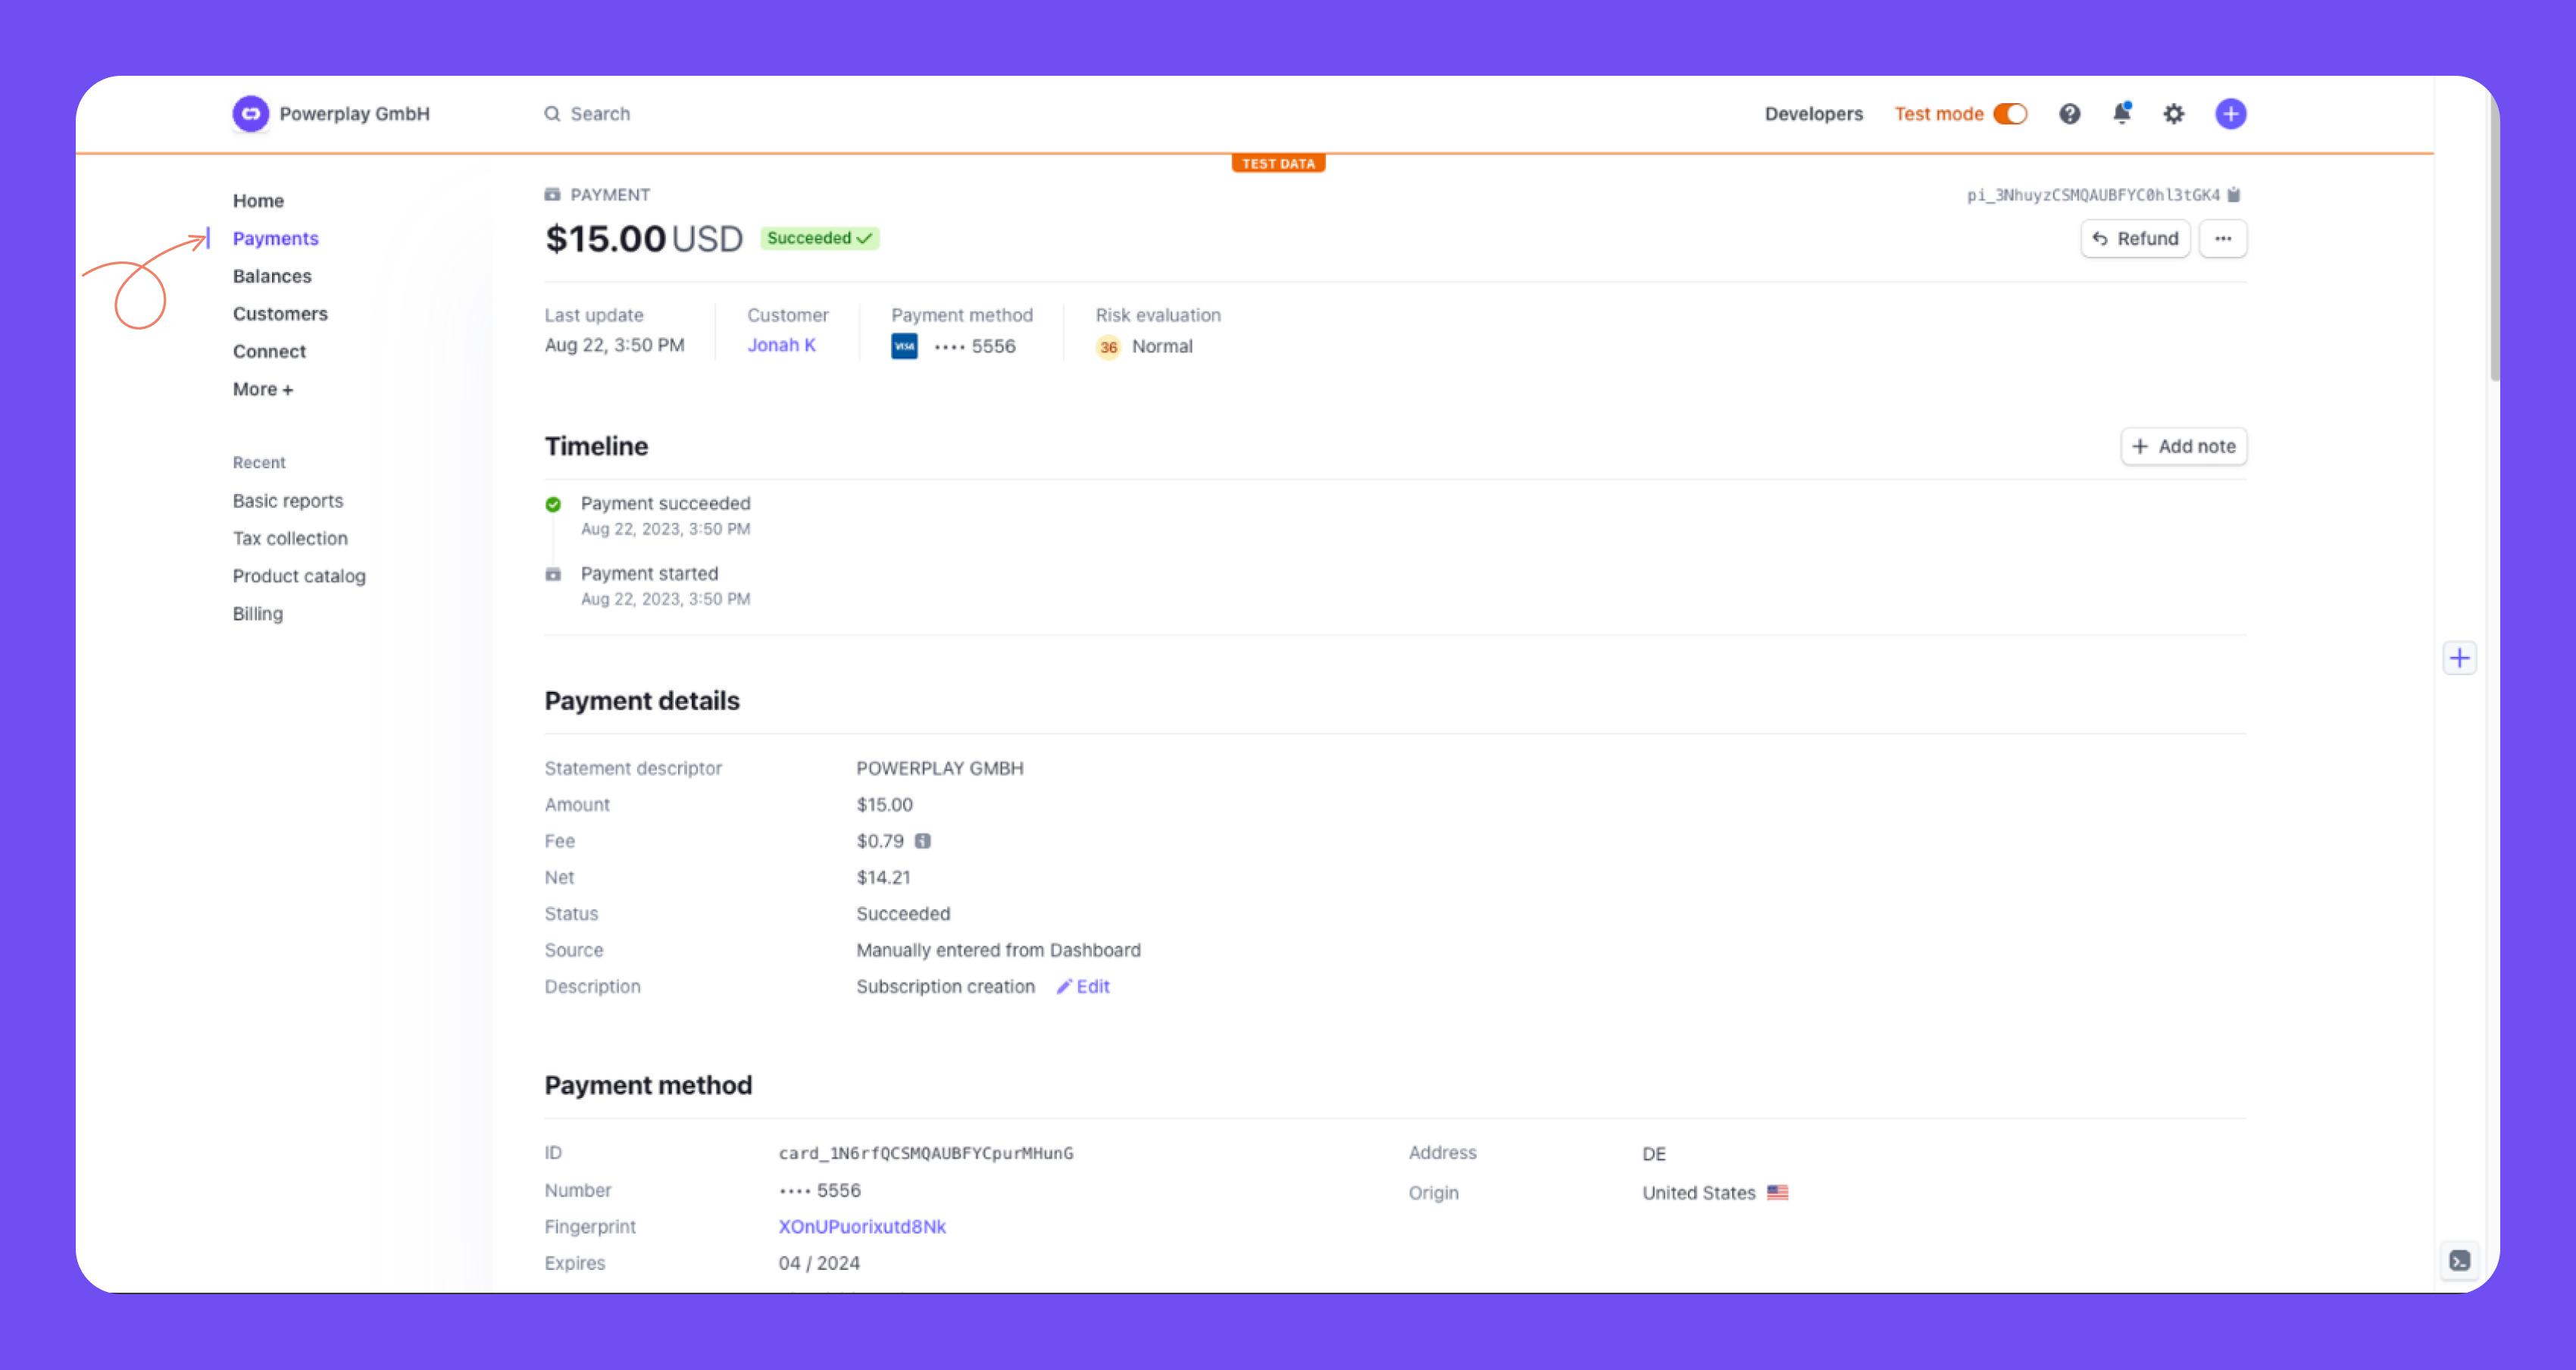
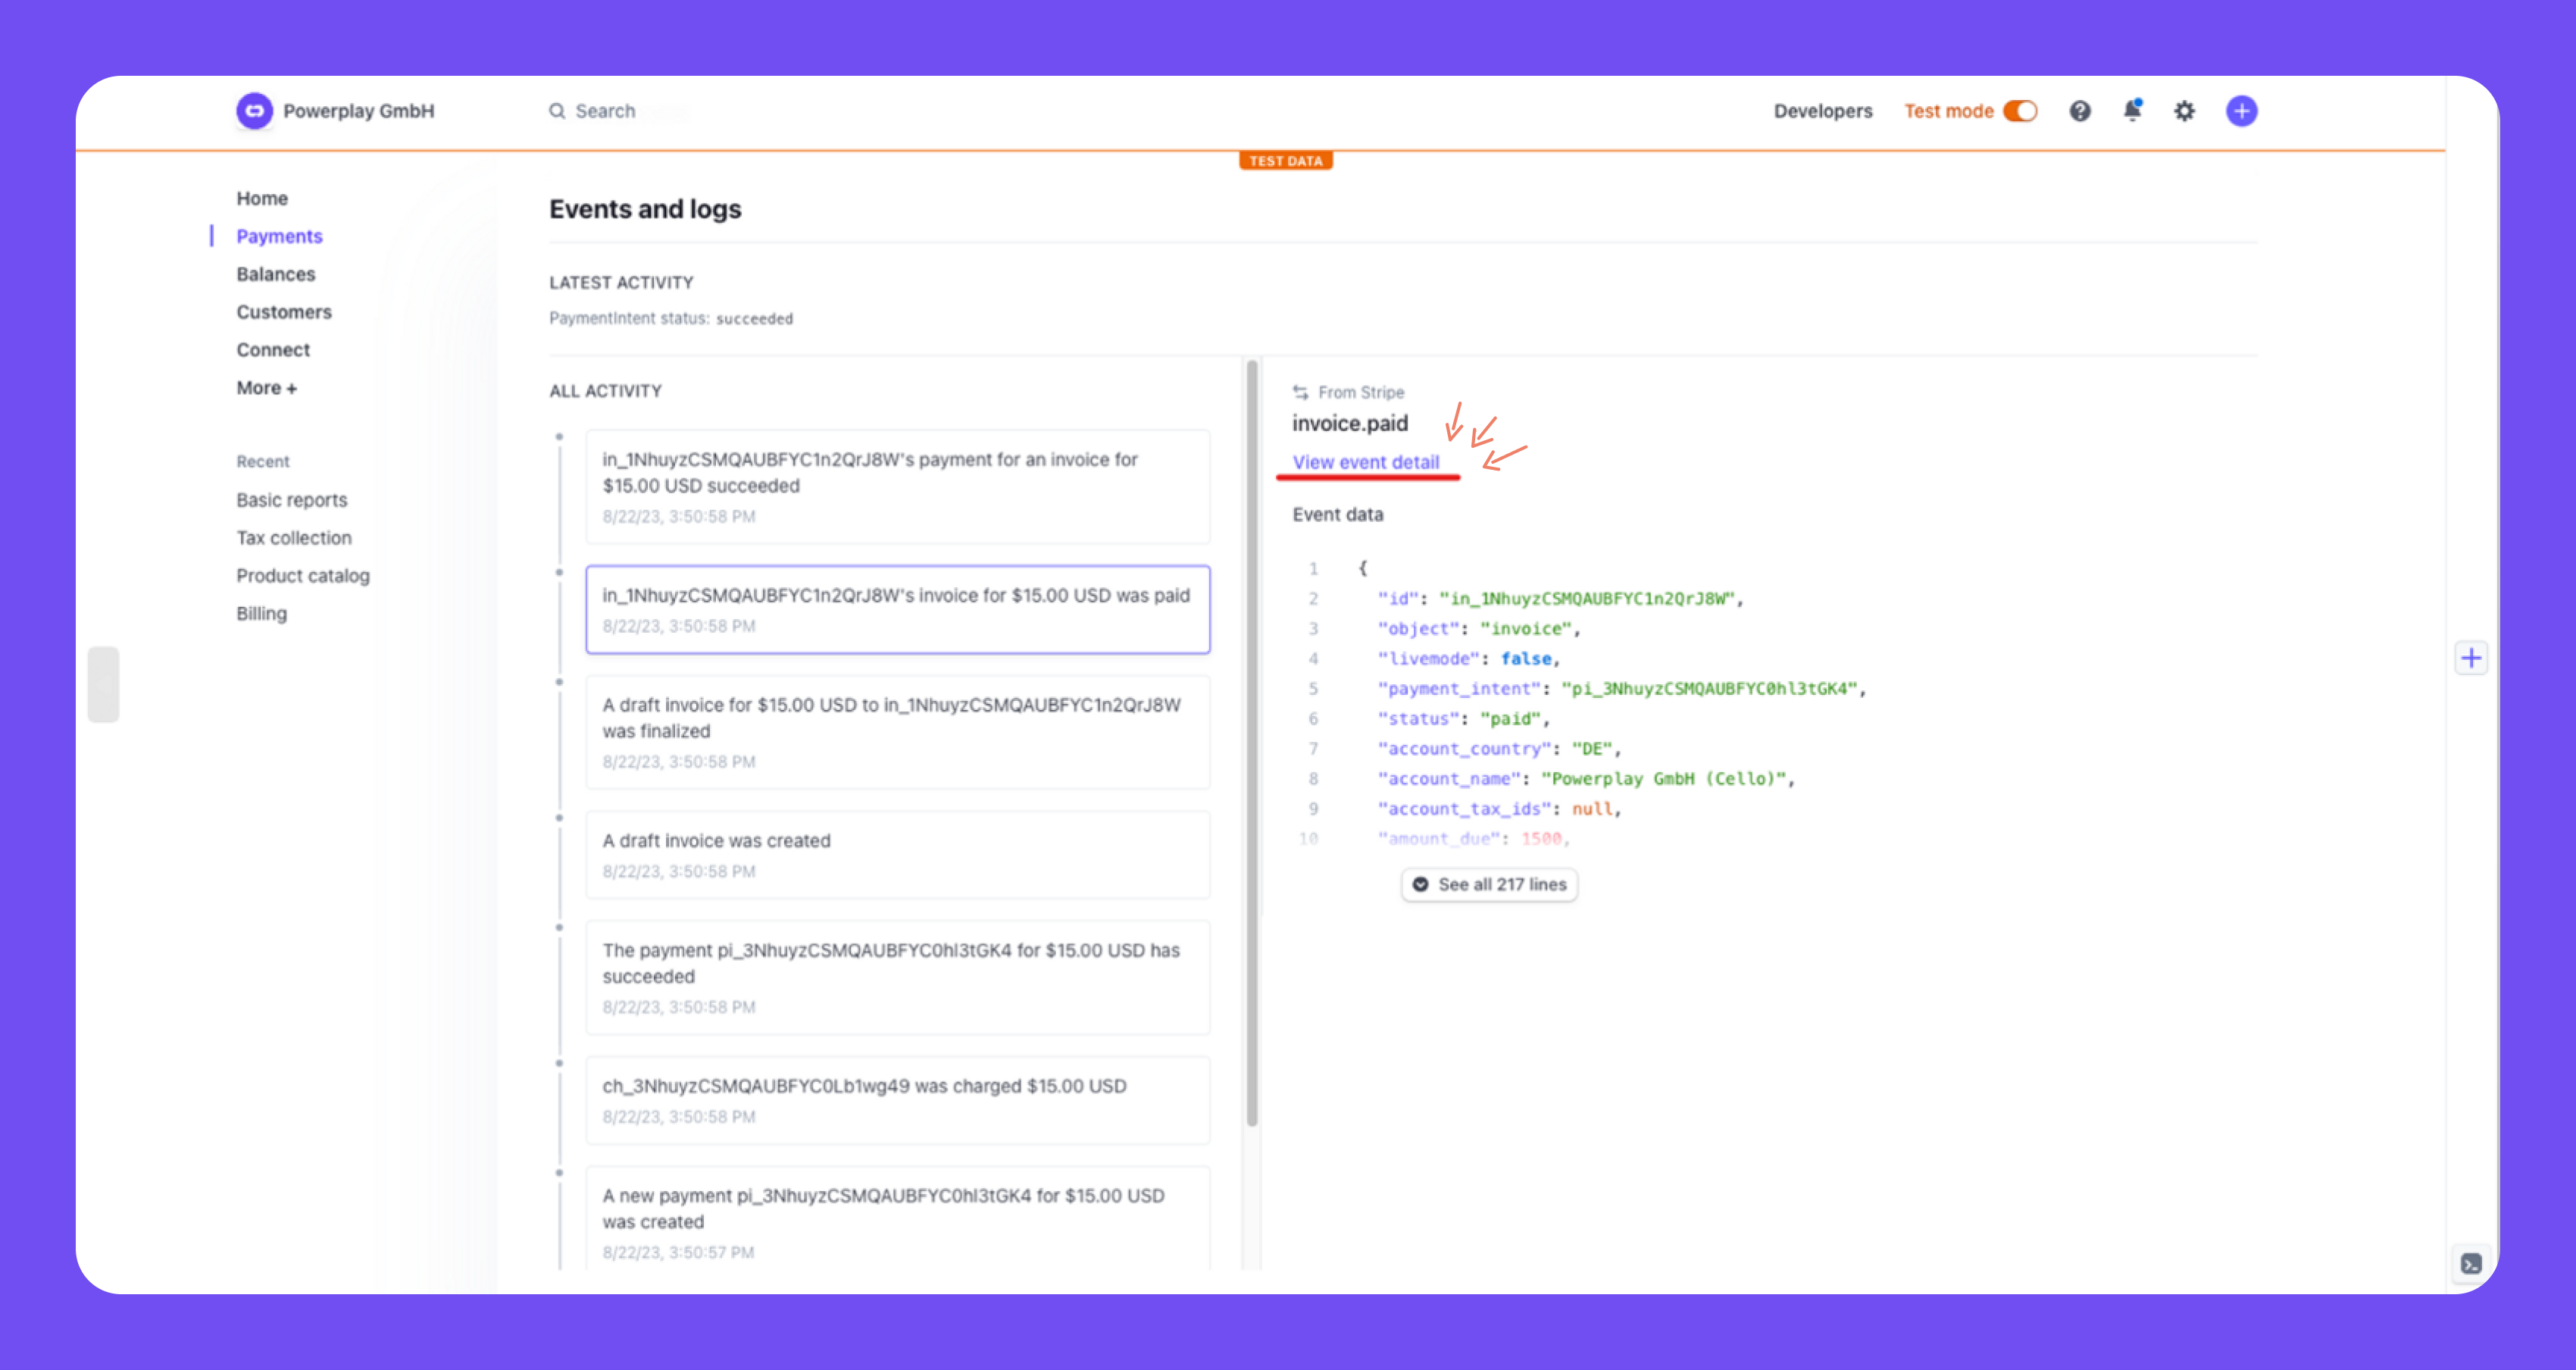
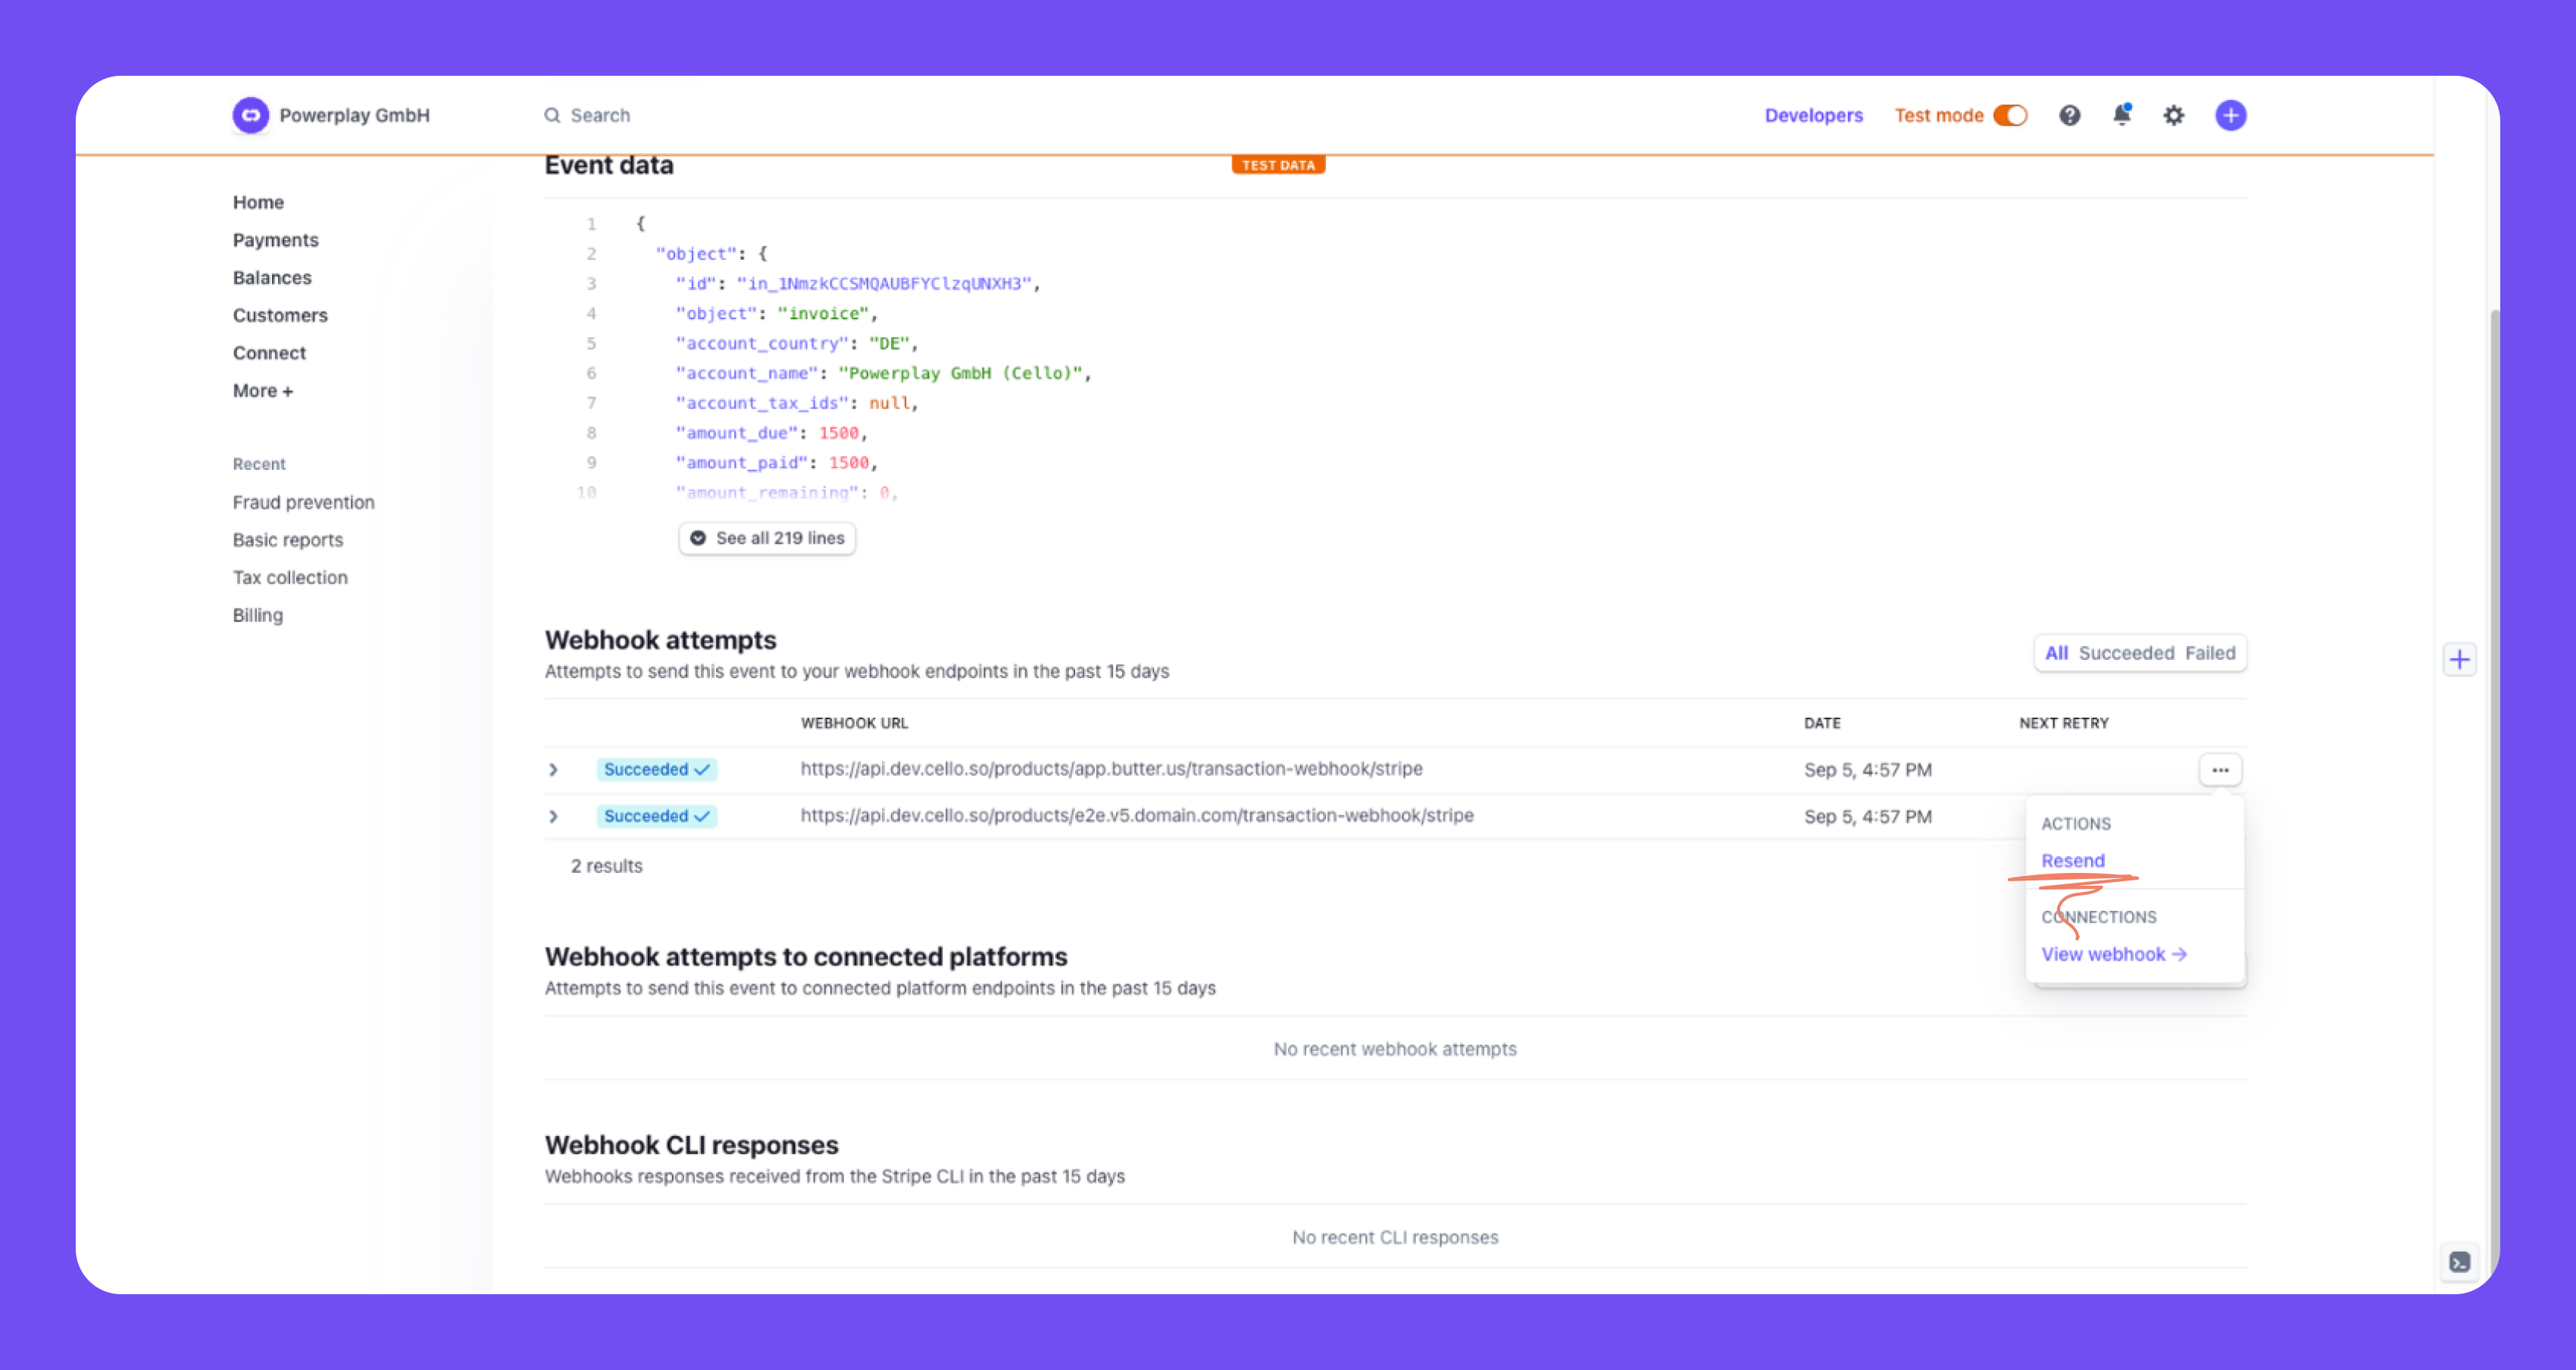
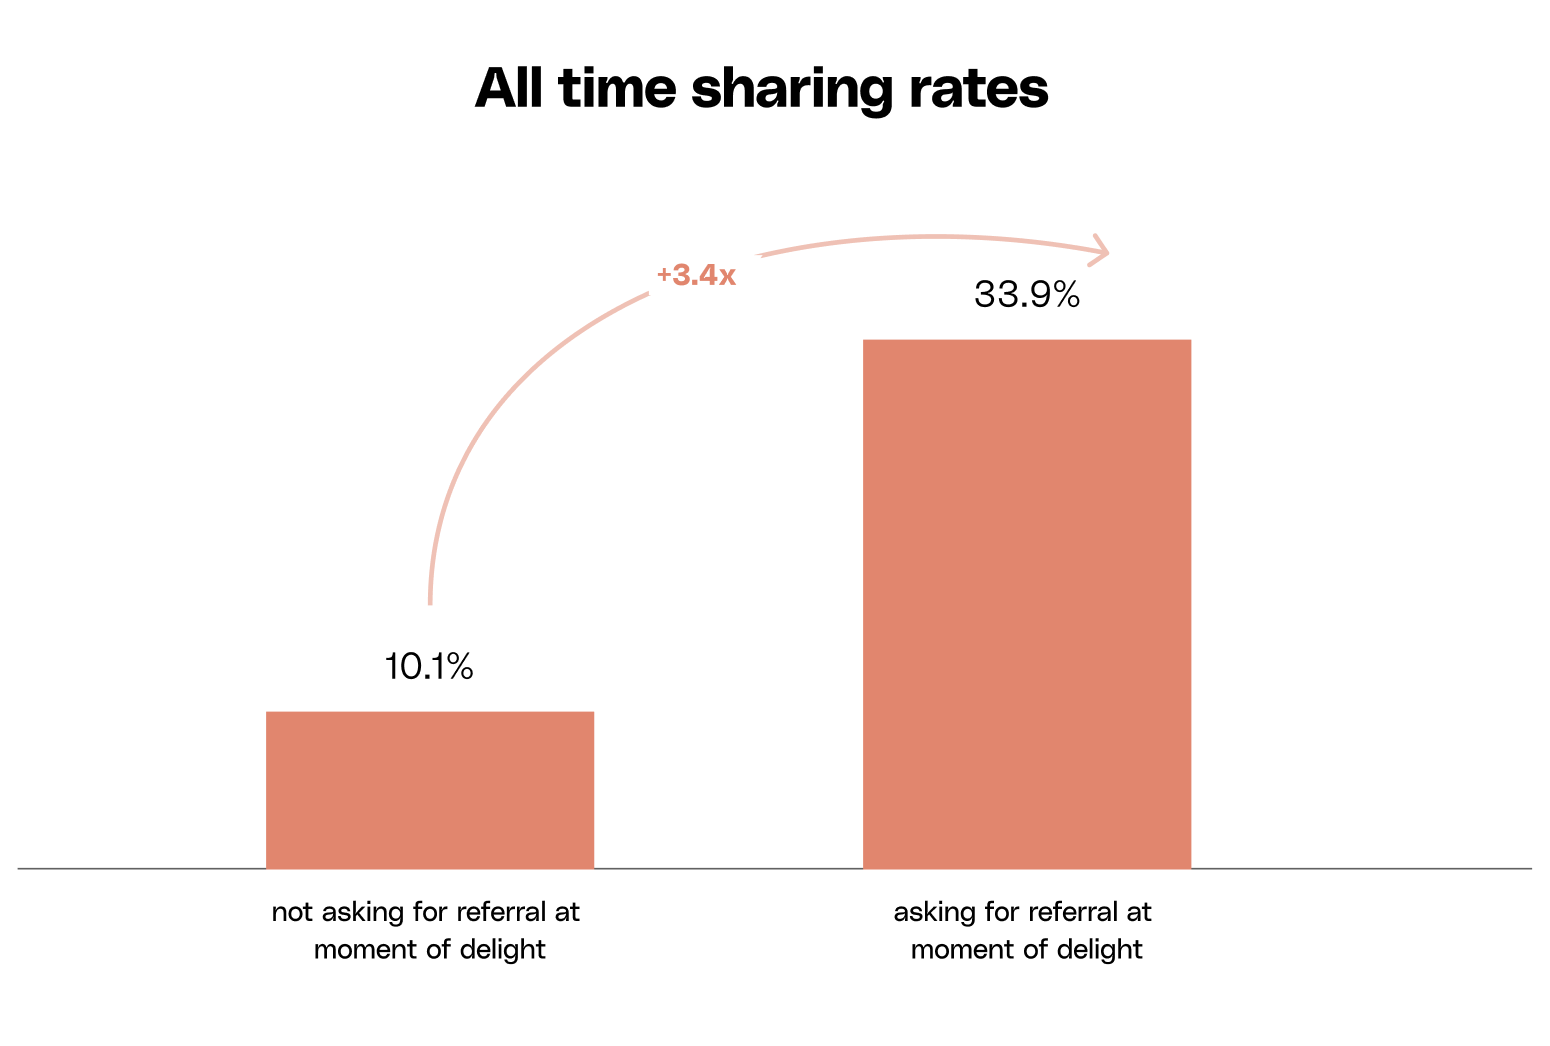 ## Add a CTA to refer your product
A product lifecycle naturally has **moments of delight** when a user would be more likely to share their satisfaction with the product within their network. Add a CTA to open the [referral component](/sdk/client-side/cello-js-usage) at such moments and make referring part of this flow.
## Add a CTA to refer your product
A product lifecycle naturally has **moments of delight** when a user would be more likely to share their satisfaction with the product within their network. Add a CTA to open the [referral component](/sdk/client-side/cello-js-usage) at such moments and make referring part of this flow.
 ### How to implement?
For Developers
You can add a custom button anywhere in your UI at the moment of delight and have it open the Referral Component.
1. Identify where to add the button together with your Growth manager and UX designer
2. Use [window.Cello("open")](/sdk/client-side/cello-js-usage#open-destination) method to open the Referral Component when the button is clicked.
```javascript theme={null}
window.Cello("open");
```
## Send an instant message to introduce the referral program
When your user reaches a **moment of delight** in their journey, that's the time to prompt them to share your product with an introductory in-product message i.e. [announcement](/guides/user-experience/referral-notifications-and-emails#announcement). This introduces the referral program to the user at the time they feel compelled to share their experience and effectively boost the conversion rate from users to referrers.
### How to implement?
For Developers
You can add a custom button anywhere in your UI at the moment of delight and have it open the Referral Component.
1. Identify where to add the button together with your Growth manager and UX designer
2. Use [window.Cello("open")](/sdk/client-side/cello-js-usage#open-destination) method to open the Referral Component when the button is clicked.
```javascript theme={null}
window.Cello("open");
```
## Send an instant message to introduce the referral program
When your user reaches a **moment of delight** in their journey, that's the time to prompt them to share your product with an introductory in-product message i.e. [announcement](/guides/user-experience/referral-notifications-and-emails#announcement). This introduces the referral program to the user at the time they feel compelled to share their experience and effectively boost the conversion rate from users to referrers.
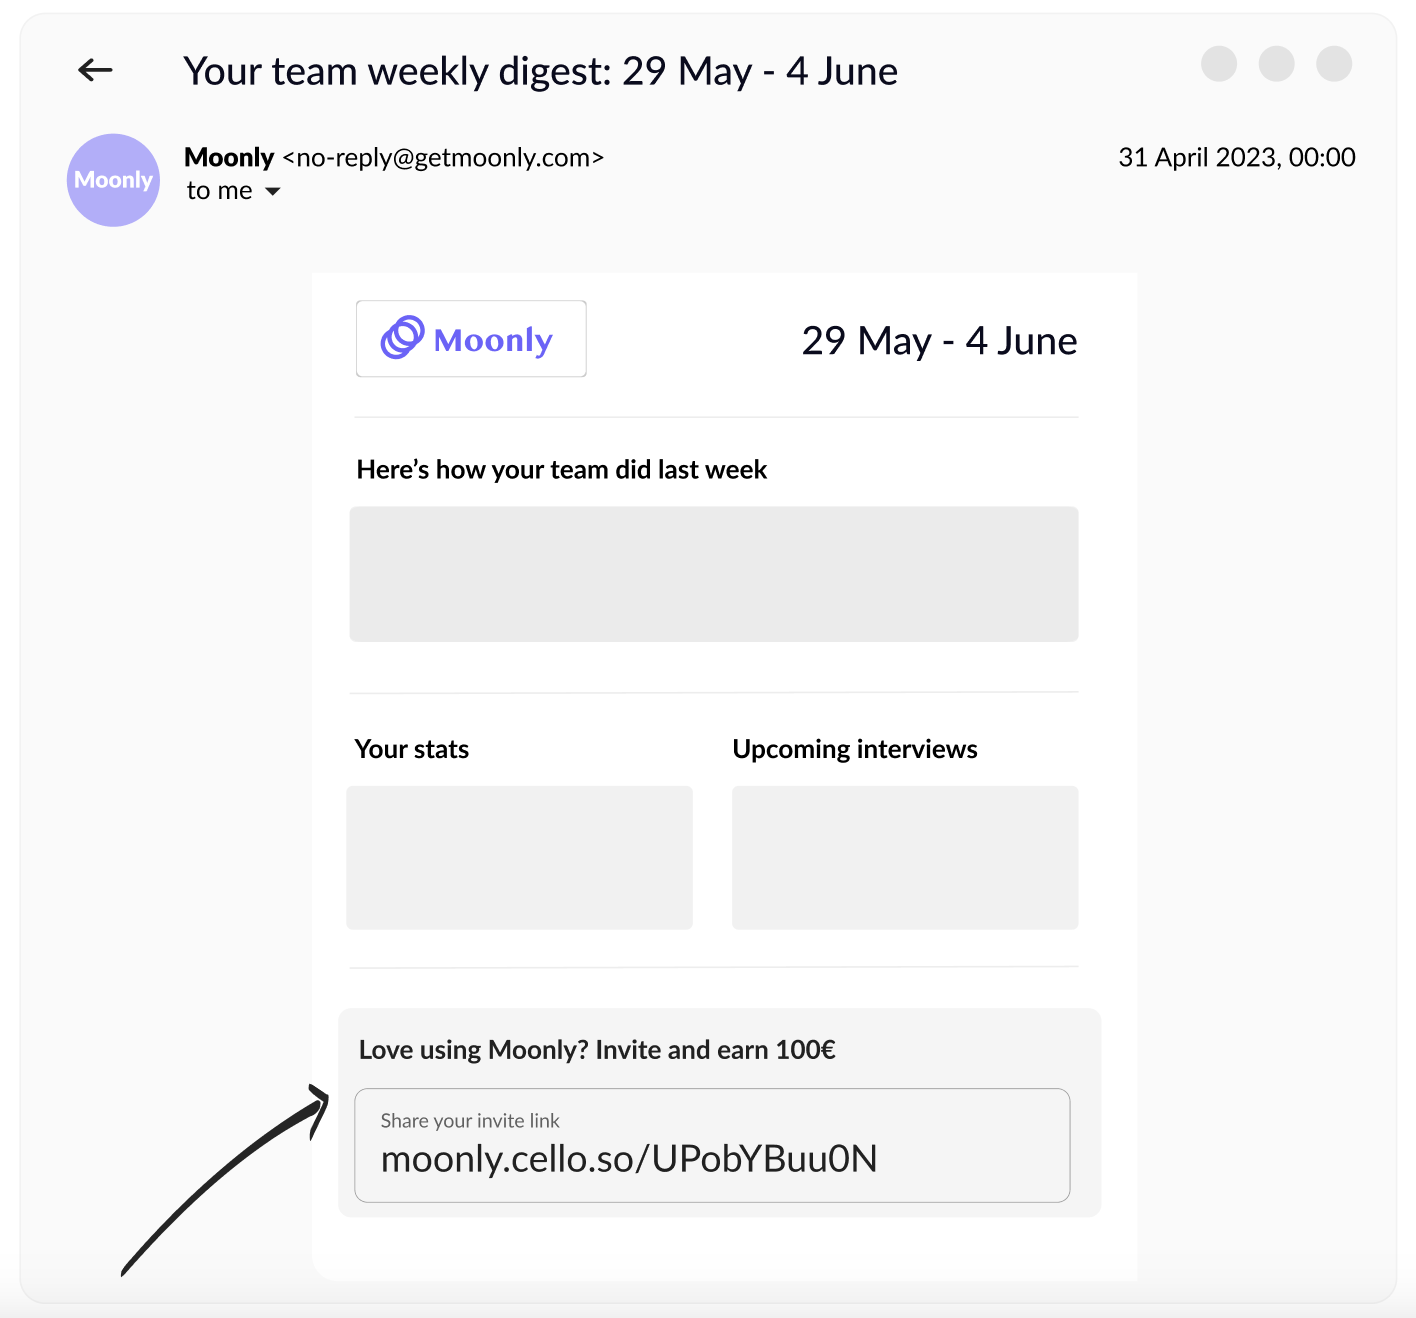 ### How to implement?
For Developers
You can trigger [an announcement](/guides/user-experience/referral-notifications-and-emails#announcement) using [Cello.js](/sdk/client-side/cello-js-usage) client-side JS method at any point of the user journey. Here is how to do it:
1. Add [announcement to your custom launcher](/referral-component/custom-launcher#add-announcement-selector), so they are displayed when triggered.
2. Use [window.Cello("showAnnouncement")](/sdk/client-side/cello-js-usage#showannouncement-announcement) method to open the Referral Component when the button is clicked.
Below example will trigger a default [welcome announcement](/guides/user-experience/referral-notifications-and-emails#announcement):
```javascript theme={null}
window.Cello("showAnnouncement", { "type": "welcome-announcement-1" } );
```
### How to implement?
For Developers
You can trigger [an announcement](/guides/user-experience/referral-notifications-and-emails#announcement) using [Cello.js](/sdk/client-side/cello-js-usage) client-side JS method at any point of the user journey. Here is how to do it:
1. Add [announcement to your custom launcher](/referral-component/custom-launcher#add-announcement-selector), so they are displayed when triggered.
2. Use [window.Cello("showAnnouncement")](/sdk/client-side/cello-js-usage#showannouncement-announcement) method to open the Referral Component when the button is clicked.
Below example will trigger a default [welcome announcement](/guides/user-experience/referral-notifications-and-emails#announcement):
```javascript theme={null}
window.Cello("showAnnouncement", { "type": "welcome-announcement-1" } );
```
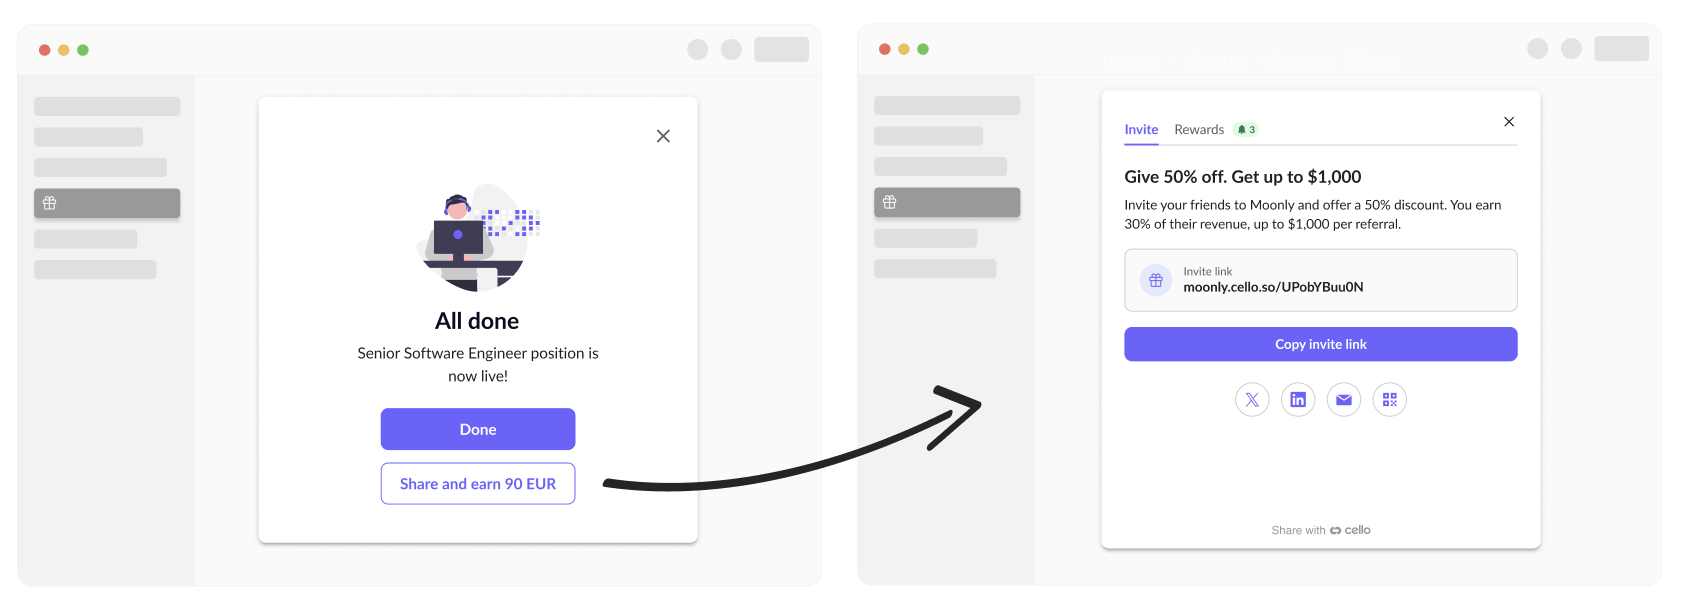 ### How to implement?
For Developers
Depending on your email sending service, you can add additional content to your email, in this case, a personal invite link. To get the link for each referrer, you can use our Cello API [/active-link endpoint](/api-reference/referral-codes/fetch-active-link) and enrich the emails you already send to your users with information about referral program and their personal invite link.
# Improve User Activation
Source: https://docs.cello.so/guides/best-practices/improve-user-activation
Recommendations to optimize the signup conversion of referred users
This page provides recommendations to optimize the signup conversion of referred users. Cello offers a variety of options that range from stunning new user experiences with personalized website content to easy setup solutions.
## Increase discoverability of your referral program
### How to implement?
For Developers
Depending on your email sending service, you can add additional content to your email, in this case, a personal invite link. To get the link for each referrer, you can use our Cello API [/active-link endpoint](/api-reference/referral-codes/fetch-active-link) and enrich the emails you already send to your users with information about referral program and their personal invite link.
# Improve User Activation
Source: https://docs.cello.so/guides/best-practices/improve-user-activation
Recommendations to optimize the signup conversion of referred users
This page provides recommendations to optimize the signup conversion of referred users. Cello offers a variety of options that range from stunning new user experiences with personalized website content to easy setup solutions.
## Increase discoverability of your referral program
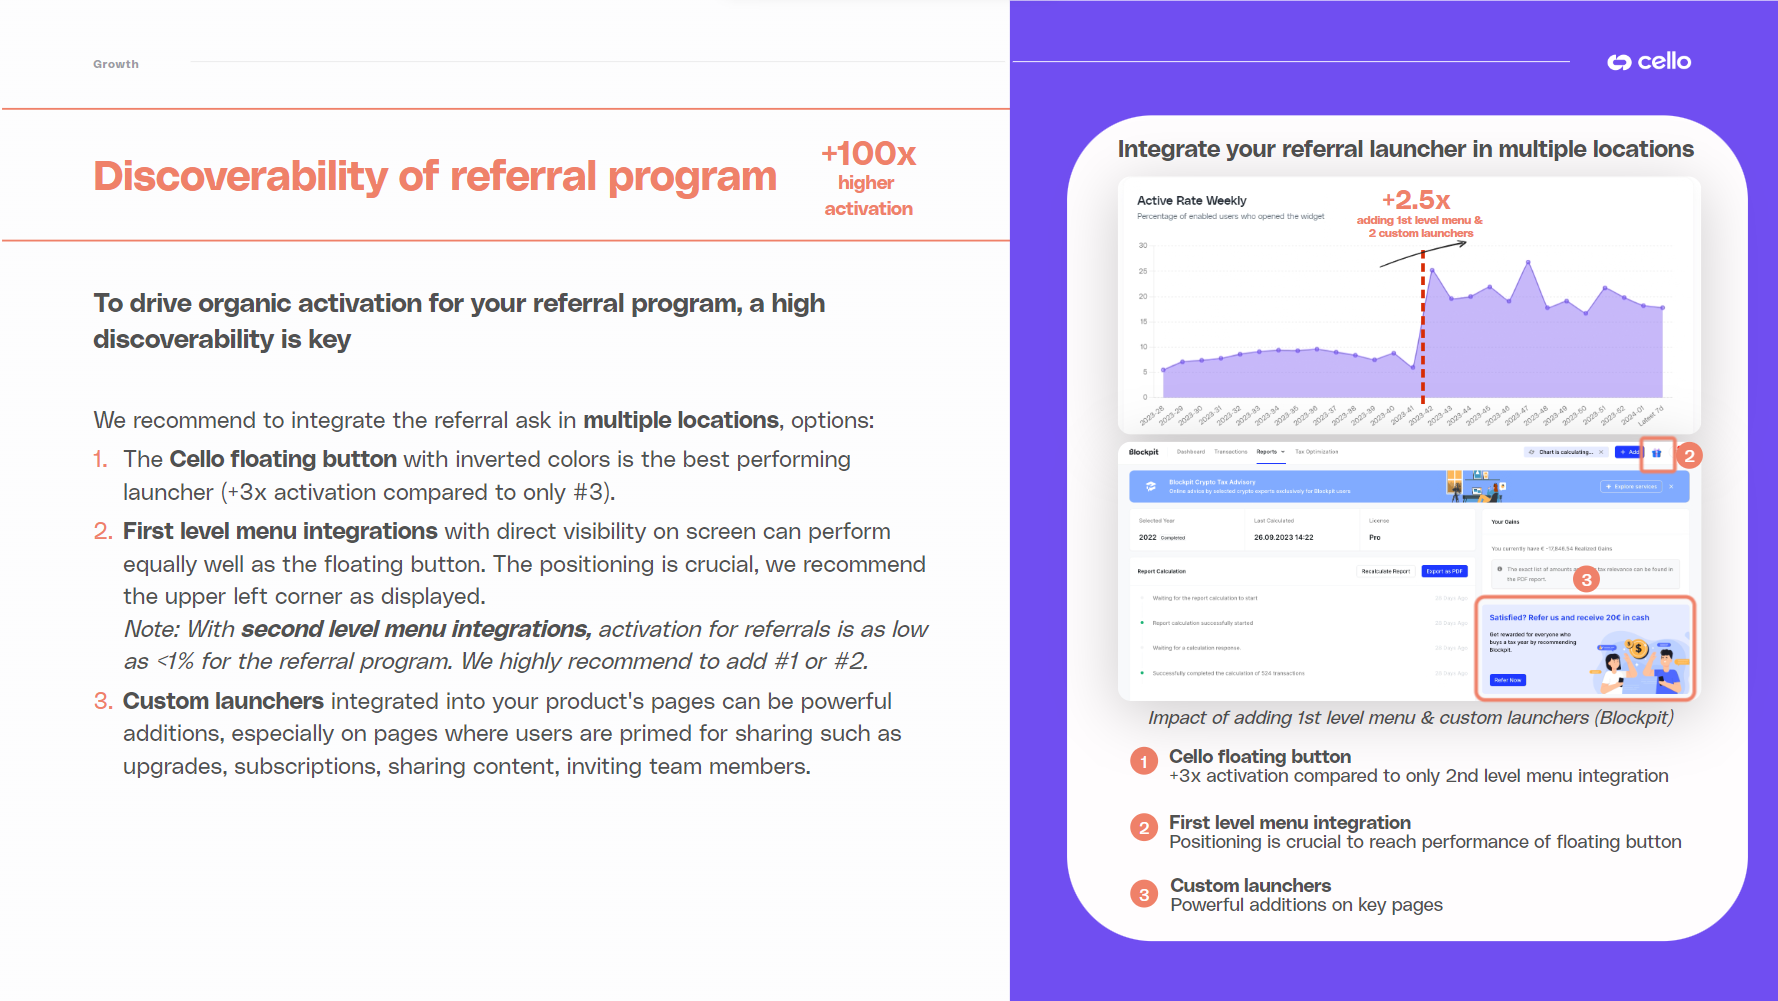 **Get started now:**
🔗 [Show Cello floating button](/sdk/client-side/cello-js#show) by default. Contact your CS team for adjustments to the floating button.
🔗 [Custom launcher](/referral-component/custom-launcher) to add menu integrations.
## Integrate referral ask at moments of delight
**Get started now:**
🔗 [Show Cello floating button](/sdk/client-side/cello-js#show) by default. Contact your CS team for adjustments to the floating button.
🔗 [Custom launcher](/referral-component/custom-launcher) to add menu integrations.
## Integrate referral ask at moments of delight
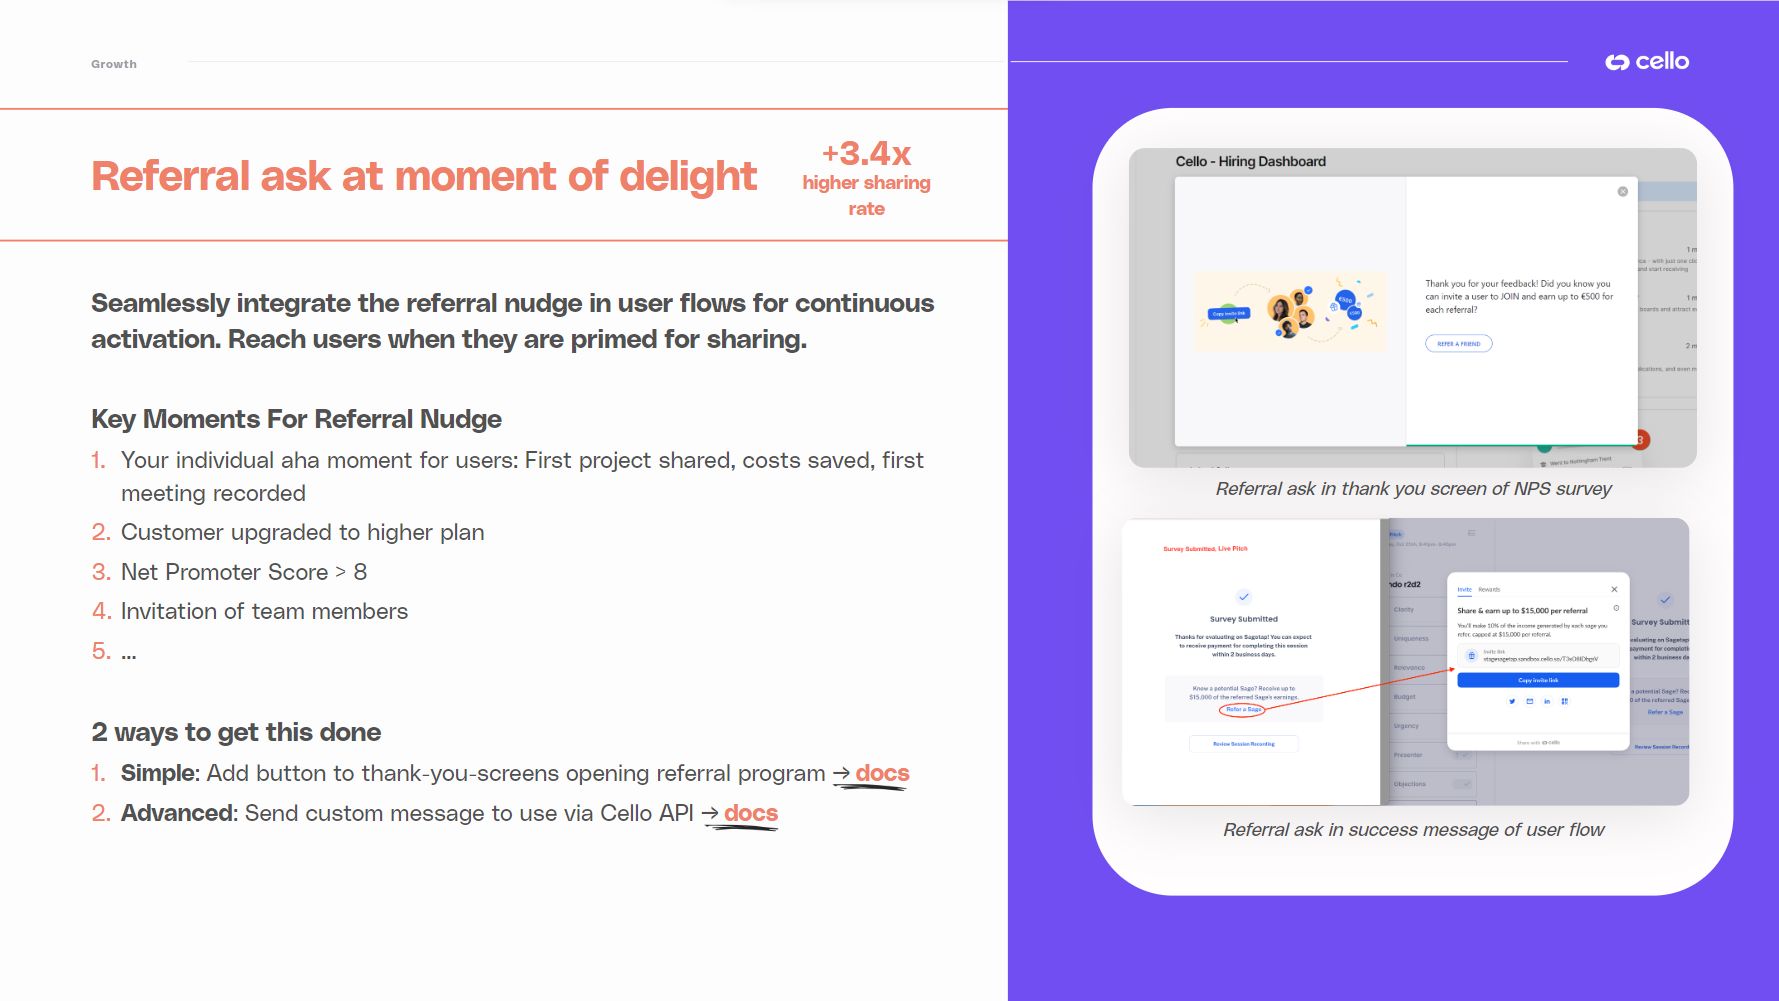 **Get started now:**
🔗 **Simple option**: Add [button or UI for opening referral widget](/sdk/client-side/cello-js#open-destination) to your existing user flows.
🔗 **Advanced option**: Set up [behavior-based triggers](/guides/best-practices/behavior-based-triggers) to send a custom message to users upon completion of a defined trigger moment.
**Get started now:**
🔗 **Simple option**: Add [button or UI for opening referral widget](/sdk/client-side/cello-js#open-destination) to your existing user flows.
🔗 **Advanced option**: Set up [behavior-based triggers](/guides/best-practices/behavior-based-triggers) to send a custom message to users upon completion of a defined trigger moment.
 ## Enable essential notifications with Cello email campaigns
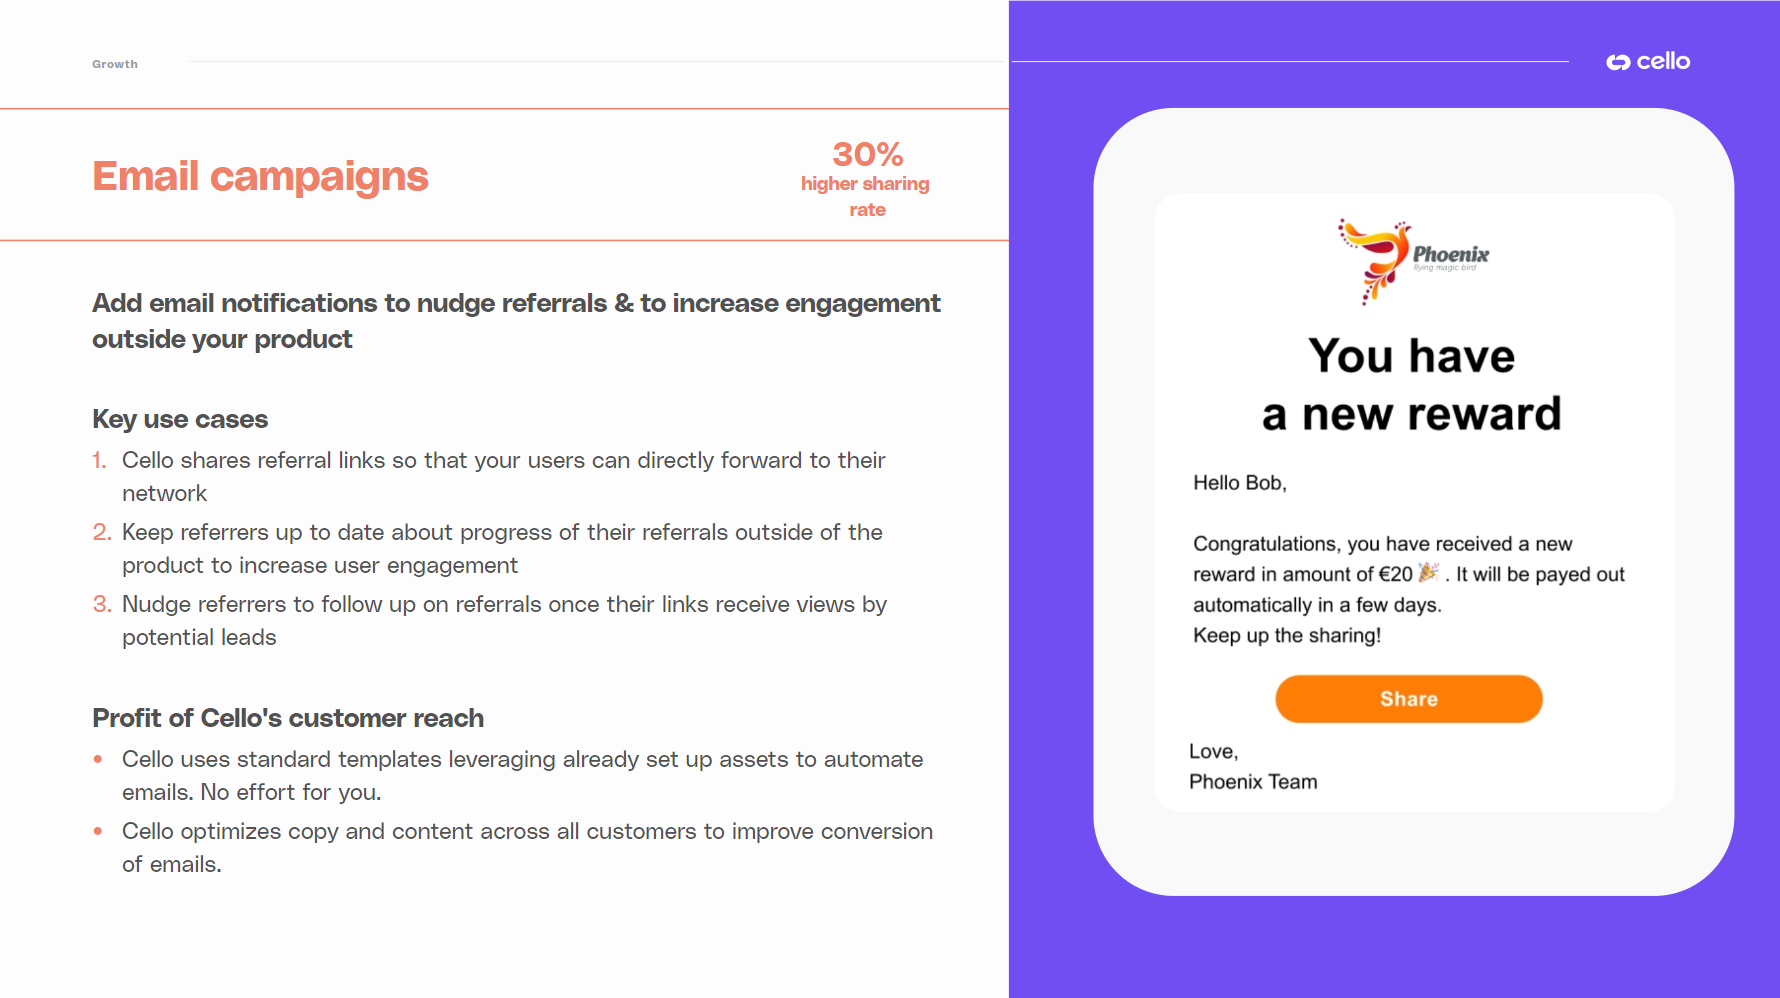 **Get started now:**
Contact your Cello CS team to activate email campaigns in Slack or at [support@cello.so](mailto:support@cello.so). Email addresses need to be provided on boot of Cello to activate certain types of emails.
### Customize Cello in-app messages
**Get started now:**
Contact your Cello CS team to activate email campaigns in Slack or at [support@cello.so](mailto:support@cello.so). Email addresses need to be provided on boot of Cello to activate certain types of emails.
### Customize Cello in-app messages
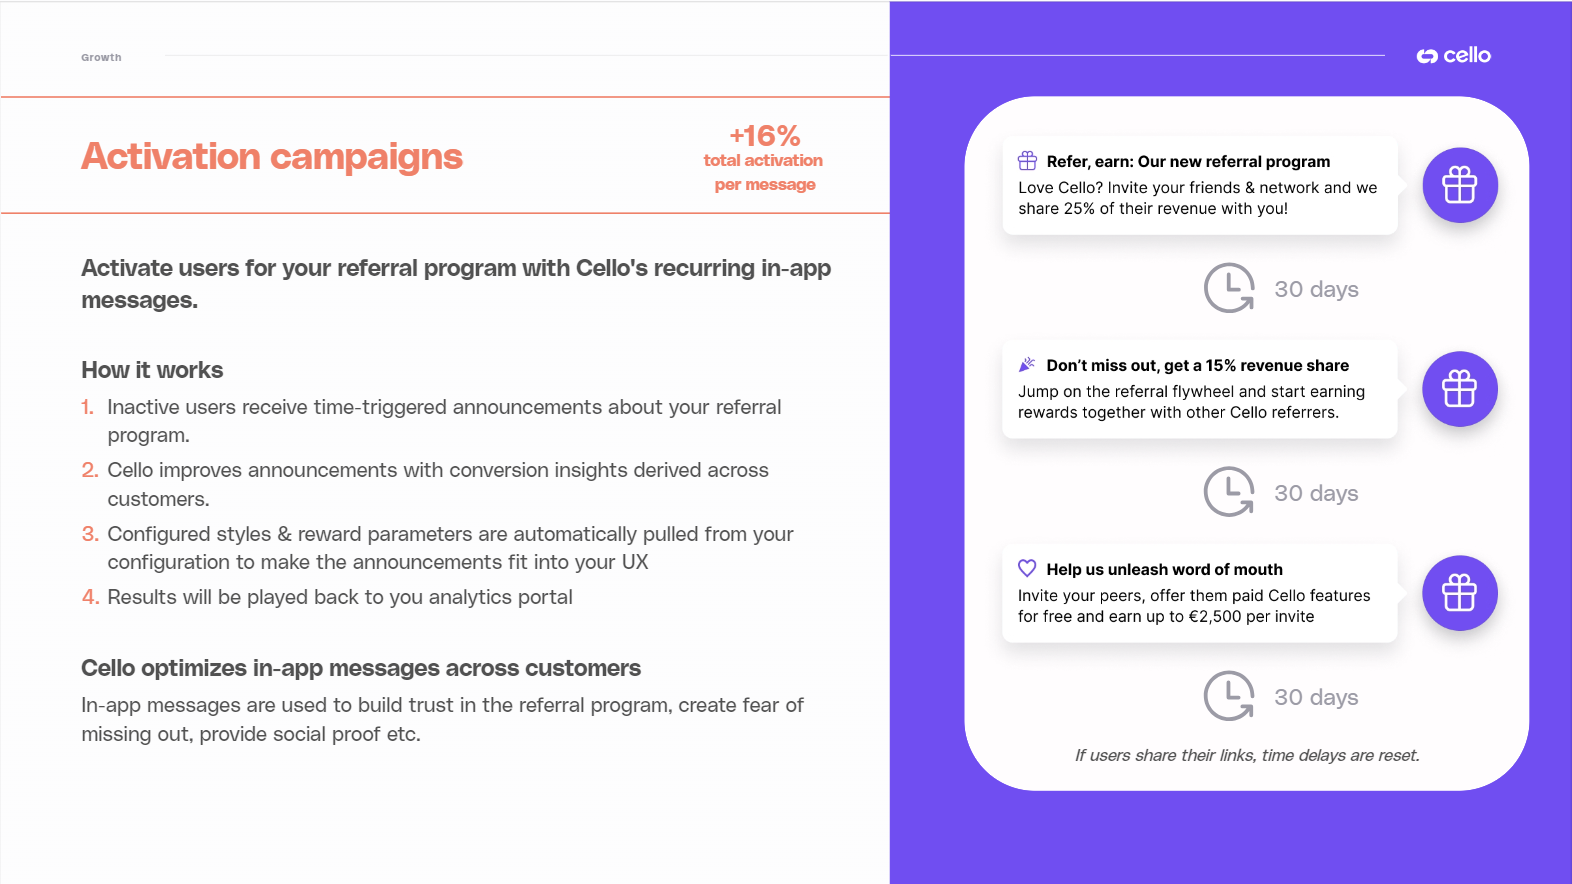 **Get started now:**
Contact your Cello CS team to activate the activation campaigns and customize messages [here](https://getcello.typeform.com/to/Np4C9iiO).
# Optimize signup conversion
Source: https://docs.cello.so/guides/best-practices/optimizing-signup-conversion
Recommendations to optimize the signup conversion of referred users
This page provides recommendations to optimize the signup conversion of referred users. Cello offers a variety of options that range from stunning new user experiences with personalized website content to super simple setup solutions.
## Increase conversion by showing discount info on website
**Get started now:**
Contact your Cello CS team to activate the activation campaigns and customize messages [here](https://getcello.typeform.com/to/Np4C9iiO).
# Optimize signup conversion
Source: https://docs.cello.so/guides/best-practices/optimizing-signup-conversion
Recommendations to optimize the signup conversion of referred users
This page provides recommendations to optimize the signup conversion of referred users. Cello offers a variety of options that range from stunning new user experiences with personalized website content to super simple setup solutions.
## Increase conversion by showing discount info on website
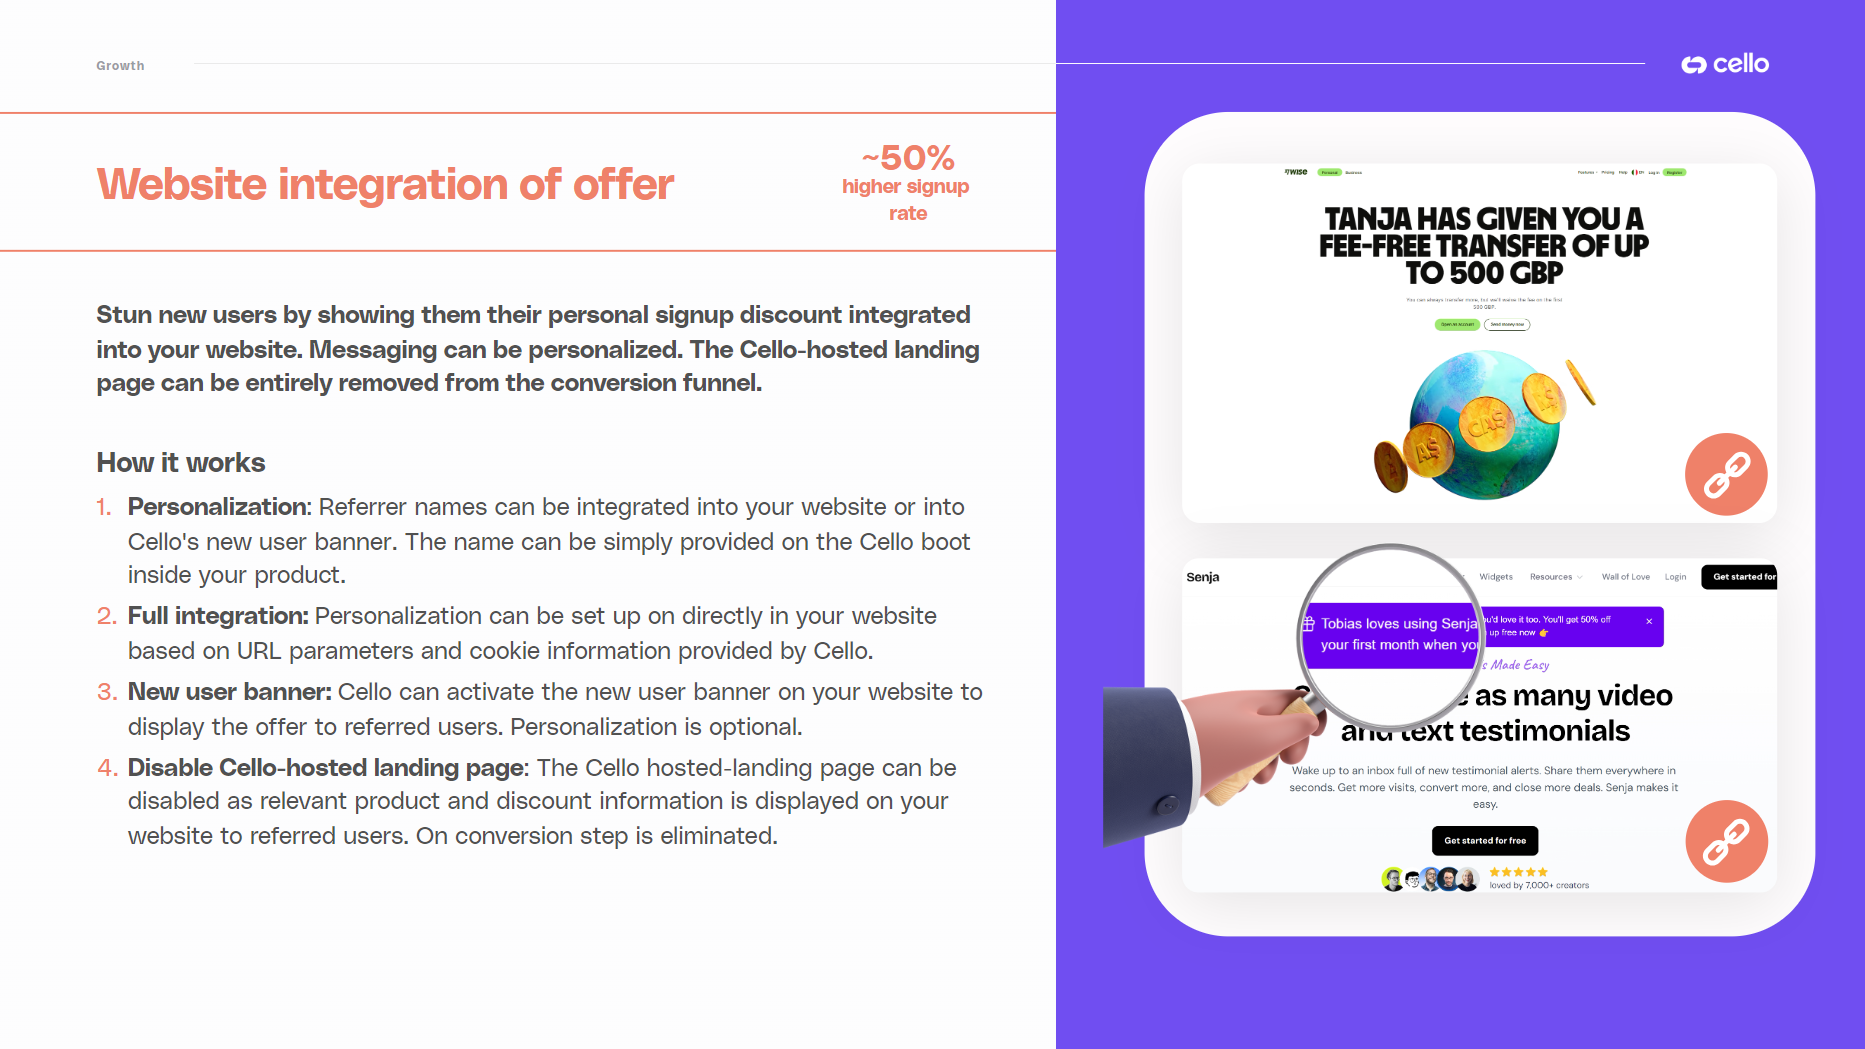 **Get started now:**
🔗 Docs: [Personalizing referrals](/guides/user-experience/personalizing-referrals)
🔗 [Wise referral program with personalization](https://wise.com/invite/dic/tanjam2?utm_source=desktop-invite-tab-copylink\&utm_medium=invite\&utm_campaign=\&utm_content=\&referralCode=tanjam2)
🔗 [MeetGeek website with personalized new user banner](https://meetgeek.ai/meetgeek-referral?productId=app.meetgeek.ai\&ucc=vTlj7ne4Fkf\&n=VG9iaWFz)
**Get started now:**
🔗 Docs: [Personalizing referrals](/guides/user-experience/personalizing-referrals)
🔗 [Wise referral program with personalization](https://wise.com/invite/dic/tanjam2?utm_source=desktop-invite-tab-copylink\&utm_medium=invite\&utm_campaign=\&utm_content=\&referralCode=tanjam2)
🔗 [MeetGeek website with personalized new user banner](https://meetgeek.ai/meetgeek-referral?productId=app.meetgeek.ai\&ucc=vTlj7ne4Fkf\&n=VG9iaWFz)
 ## Increase conversion with stand-alone landing page
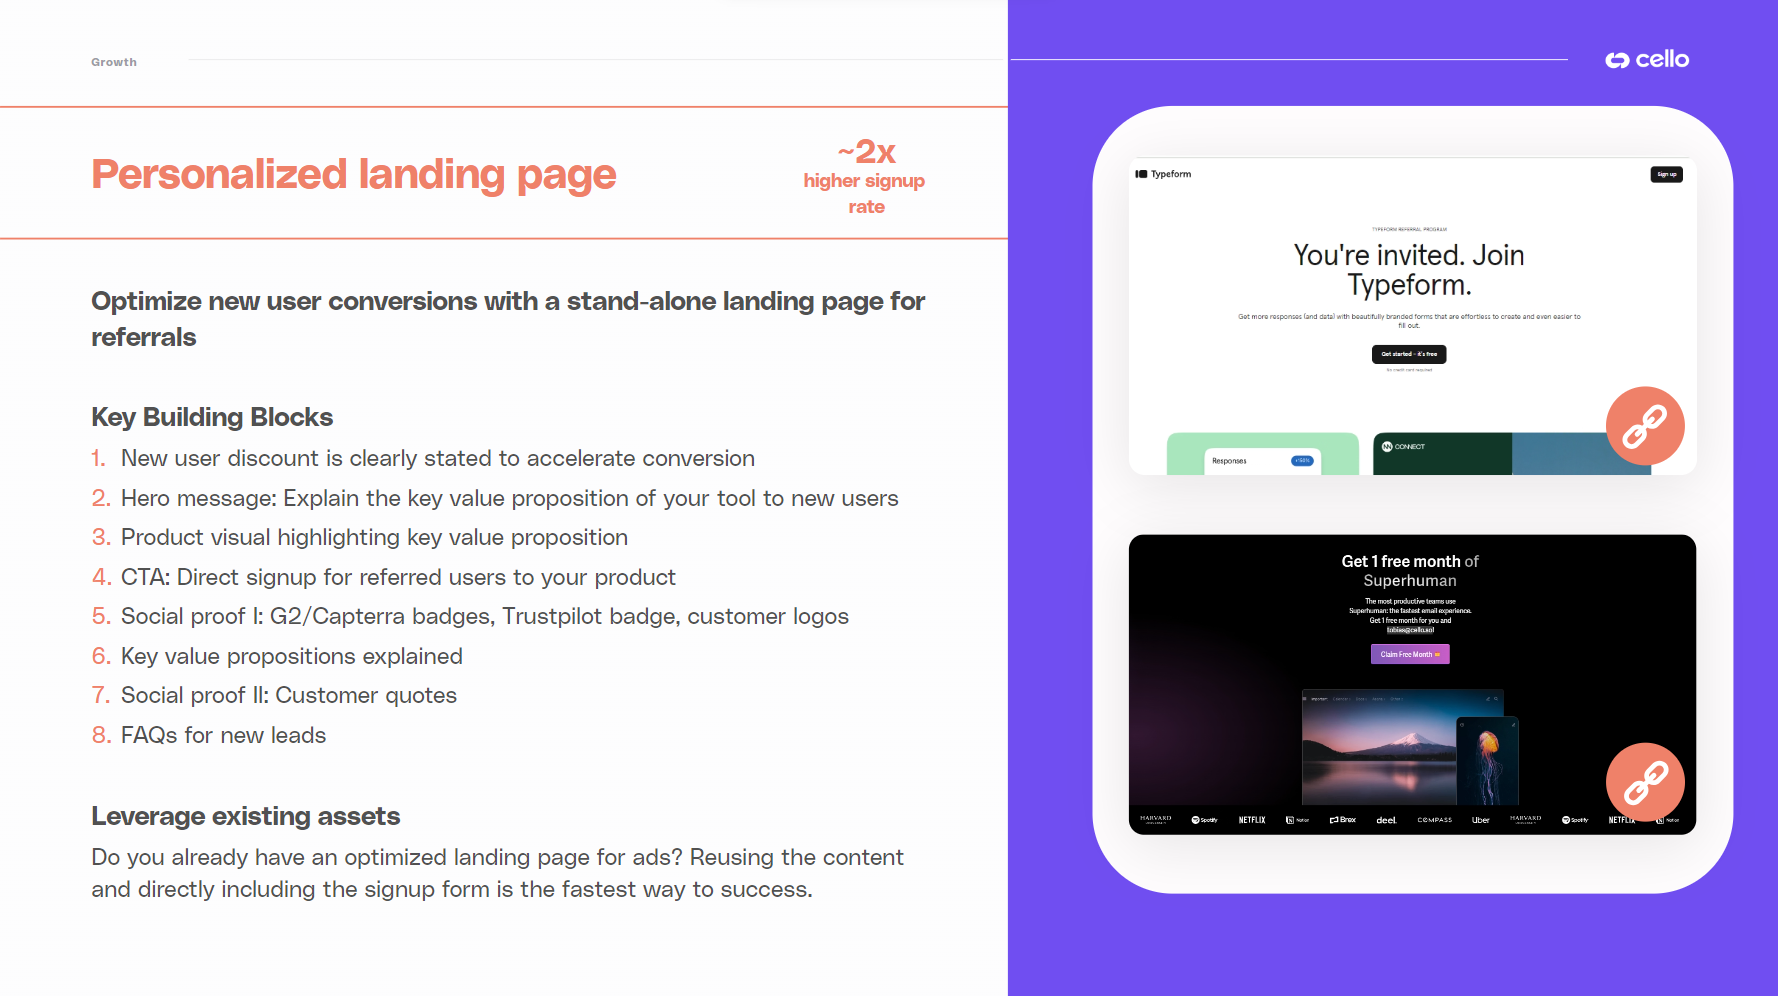 **Get started now:**
Once your referral landing page is ready to go, reach out to your Cello CS team in Slack or at [support@cello.so](mailto:support@cello.so) to enable forwarding new users directly to the page.
🔗 [Typeform landing page](https://www.typeform.com/refer-a-friend/invite/?utm_medium=referrerlink\&utm_source=typeform\&utm_campaign=refer_a_friend_cello\&productId=admin.typeform.com\&ucc=ARn30TGHAsq)
🔗 [Superhuman landing page with personalization](https://superhuman.com/refer?utm_source=product\&utm_medium=signature\&utm_campaign=bob%40bobinsky.me)
🔗 [Heyflow standalone landing page](https://get.heyflow.app/referral-lp?productId=go.heyflow.app\&utm_source=cello\&utm_medium=referral\&utm_campaign=Cello-RS20-C1000-D50\&ucc=2dRGoRjgP7A#start)
🔗 [Cello standalone landing page with direct signup](https://cello.so/invitation/)
# Reward structure FAQs
Source: https://docs.cello.so/guides/campaigns/faqs
Frequently asked questions about campaign setup, reward structures, and referral program management to help you optimize your program performance.
## What is a convincing reward for the referrer?
Cello provides a recommendation on how to set the reward structure during the onboarding. You can find it on your individual “Set the reward structure” page on the Onboarding Notion.
## Does Cello allow to set different reward parameters for different user segments?
Currently only one campaign can be configured. One campaign comprises both the configuration of the referral experience flow and the reward parameters specified in that flow. Cello plans to support multiple campaigns in the near future.
## Is it possible to change the reward parameters retroactively for referrals that are already completed?
Cello considers a referral as completed with the referred account becoming a paying customer of the referred product. Once a referral is completed the parameters for this referral cannot be changed anymore. Changing rewards retroactively would potentially lead to a disappointing user experience for the referrer.
## Is it possible to change the reward parameters in the future?
It is possible to change the reward parameters for the referral program for future referrals. To bring the adjustment live, both the reward parameters and the referral flow have to be updated. Once the update is live, all future completed referrals will be rewarded according to the updated reward parameters. This is also the case even if the referrer shared the referral link still seeing the previous reward structure.
## Which currencies does Cello support for rewarding users?
Currently, rewards for referrers are available in all currencies that Paypal supports. You can find more details in the Paypal documentation.
## From which reward options can a referrer choose?
Cello currently offers payouts via Paypal. The list of supported countries for payouts is ”Australia, Austria, Bahrain, Belgium, Bermuda, Botswana, Brazil, Bulgaria, Canada, Cayman Islands, Chile, Croatia, Czechia, Denmark, Dominican Republic, Estonia, Faroe Islands, Finland, France, Georgia, Germany, Gibraltar, Greece, Greenland, Guatemala, Hong Kong SAR, Hungary, Iceland, India, Ireland, Israel, Italy, Japan, Latvia, Lesotho, Liechtenstein, Lithuania, Luxembourg, Malta, Mauritius, Mozambique, Netherlands, Nicaragua, Norway, Oman, Philippines, Poland, Portugal, Qatar, Romania, San Marino, Saudi Arabia, Senegal, Slovakia, Slovenia, South Africa, Spain, Sweden, Switzerland, United Kingdom, United States, Uruguay.” Additional reward options like gift cards, bank transfers, donations are on our backlog. Venmo is available for the US.
# Setting Up Campaigns
Source: https://docs.cello.so/guides/campaigns/setting-up-campaigns
Cello makes it easy to automatically notify and reward your users for making successful referrals
Cello makes it easy to automatically notify and reward your users for making successful referrals. This is done by creating **campaigns** with specific **payout rules.**
Your rules are then automated based on confirmation of **events** and **purchases.** These can be based on transactions for referred contacts, but can also be based on free trials, demos, or events you define.
## Example: Recurring Rewards Encourage Continuous Sharing
In this typical example, a referrer is rewarded **50%** for each referral up to a **\$100 maximum reward cap** with a **\$5 signup bonus**. The referee initially purchases a **\$10** subscription for herself, and then **upgrades her team** in the following month.
The reward is paid to the referrer over a 6 month period until the referrer reaches a **maximum cap of \$100** for this referral. In the meantime, these regular rewards encourage further sharing.
**Get started now:**
Once your referral landing page is ready to go, reach out to your Cello CS team in Slack or at [support@cello.so](mailto:support@cello.so) to enable forwarding new users directly to the page.
🔗 [Typeform landing page](https://www.typeform.com/refer-a-friend/invite/?utm_medium=referrerlink\&utm_source=typeform\&utm_campaign=refer_a_friend_cello\&productId=admin.typeform.com\&ucc=ARn30TGHAsq)
🔗 [Superhuman landing page with personalization](https://superhuman.com/refer?utm_source=product\&utm_medium=signature\&utm_campaign=bob%40bobinsky.me)
🔗 [Heyflow standalone landing page](https://get.heyflow.app/referral-lp?productId=go.heyflow.app\&utm_source=cello\&utm_medium=referral\&utm_campaign=Cello-RS20-C1000-D50\&ucc=2dRGoRjgP7A#start)
🔗 [Cello standalone landing page with direct signup](https://cello.so/invitation/)
# Reward structure FAQs
Source: https://docs.cello.so/guides/campaigns/faqs
Frequently asked questions about campaign setup, reward structures, and referral program management to help you optimize your program performance.
## What is a convincing reward for the referrer?
Cello provides a recommendation on how to set the reward structure during the onboarding. You can find it on your individual “Set the reward structure” page on the Onboarding Notion.
## Does Cello allow to set different reward parameters for different user segments?
Currently only one campaign can be configured. One campaign comprises both the configuration of the referral experience flow and the reward parameters specified in that flow. Cello plans to support multiple campaigns in the near future.
## Is it possible to change the reward parameters retroactively for referrals that are already completed?
Cello considers a referral as completed with the referred account becoming a paying customer of the referred product. Once a referral is completed the parameters for this referral cannot be changed anymore. Changing rewards retroactively would potentially lead to a disappointing user experience for the referrer.
## Is it possible to change the reward parameters in the future?
It is possible to change the reward parameters for the referral program for future referrals. To bring the adjustment live, both the reward parameters and the referral flow have to be updated. Once the update is live, all future completed referrals will be rewarded according to the updated reward parameters. This is also the case even if the referrer shared the referral link still seeing the previous reward structure.
## Which currencies does Cello support for rewarding users?
Currently, rewards for referrers are available in all currencies that Paypal supports. You can find more details in the Paypal documentation.
## From which reward options can a referrer choose?
Cello currently offers payouts via Paypal. The list of supported countries for payouts is ”Australia, Austria, Bahrain, Belgium, Bermuda, Botswana, Brazil, Bulgaria, Canada, Cayman Islands, Chile, Croatia, Czechia, Denmark, Dominican Republic, Estonia, Faroe Islands, Finland, France, Georgia, Germany, Gibraltar, Greece, Greenland, Guatemala, Hong Kong SAR, Hungary, Iceland, India, Ireland, Israel, Italy, Japan, Latvia, Lesotho, Liechtenstein, Lithuania, Luxembourg, Malta, Mauritius, Mozambique, Netherlands, Nicaragua, Norway, Oman, Philippines, Poland, Portugal, Qatar, Romania, San Marino, Saudi Arabia, Senegal, Slovakia, Slovenia, South Africa, Spain, Sweden, Switzerland, United Kingdom, United States, Uruguay.” Additional reward options like gift cards, bank transfers, donations are on our backlog. Venmo is available for the US.
# Setting Up Campaigns
Source: https://docs.cello.so/guides/campaigns/setting-up-campaigns
Cello makes it easy to automatically notify and reward your users for making successful referrals
Cello makes it easy to automatically notify and reward your users for making successful referrals. This is done by creating **campaigns** with specific **payout rules.**
Your rules are then automated based on confirmation of **events** and **purchases.** These can be based on transactions for referred contacts, but can also be based on free trials, demos, or events you define.
## Example: Recurring Rewards Encourage Continuous Sharing
In this typical example, a referrer is rewarded **50%** for each referral up to a **\$100 maximum reward cap** with a **\$5 signup bonus**. The referee initially purchases a **\$10** subscription for herself, and then **upgrades her team** in the following month.
The reward is paid to the referrer over a 6 month period until the referrer reaches a **maximum cap of \$100** for this referral. In the meantime, these regular rewards encourage further sharing.
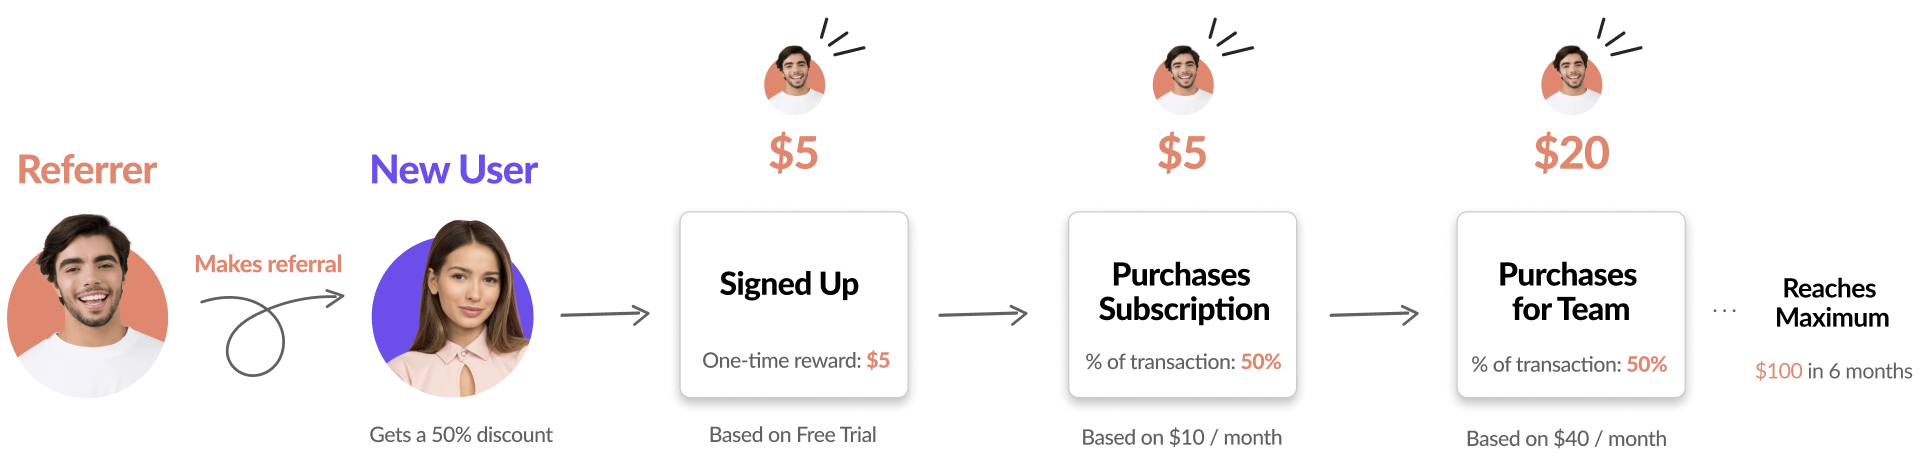 It's important to note that the **new user also receives an exclusive 50% discount** from the referrer when purchasing for the first 6 months. Our research shows that **symmetric rewards** (i.e., the referrer and the referred have incentives of similar values) work best because referrers invest their social capital when recommending a product; having similar incentives makes the referral look fair to both parties involved.
## Campaign Settings
All campaigns must have one or more rules to reward referrers for the referrals they made. **Campaign** settings can be configured in the [Cello portal in the Setup section](https://portal.cello.so/setup/campaigns).
It's important to note that the **new user also receives an exclusive 50% discount** from the referrer when purchasing for the first 6 months. Our research shows that **symmetric rewards** (i.e., the referrer and the referred have incentives of similar values) work best because referrers invest their social capital when recommending a product; having similar incentives makes the referral look fair to both parties involved.
## Campaign Settings
All campaigns must have one or more rules to reward referrers for the referrals they made. **Campaign** settings can be configured in the [Cello portal in the Setup section](https://portal.cello.so/setup/campaigns).
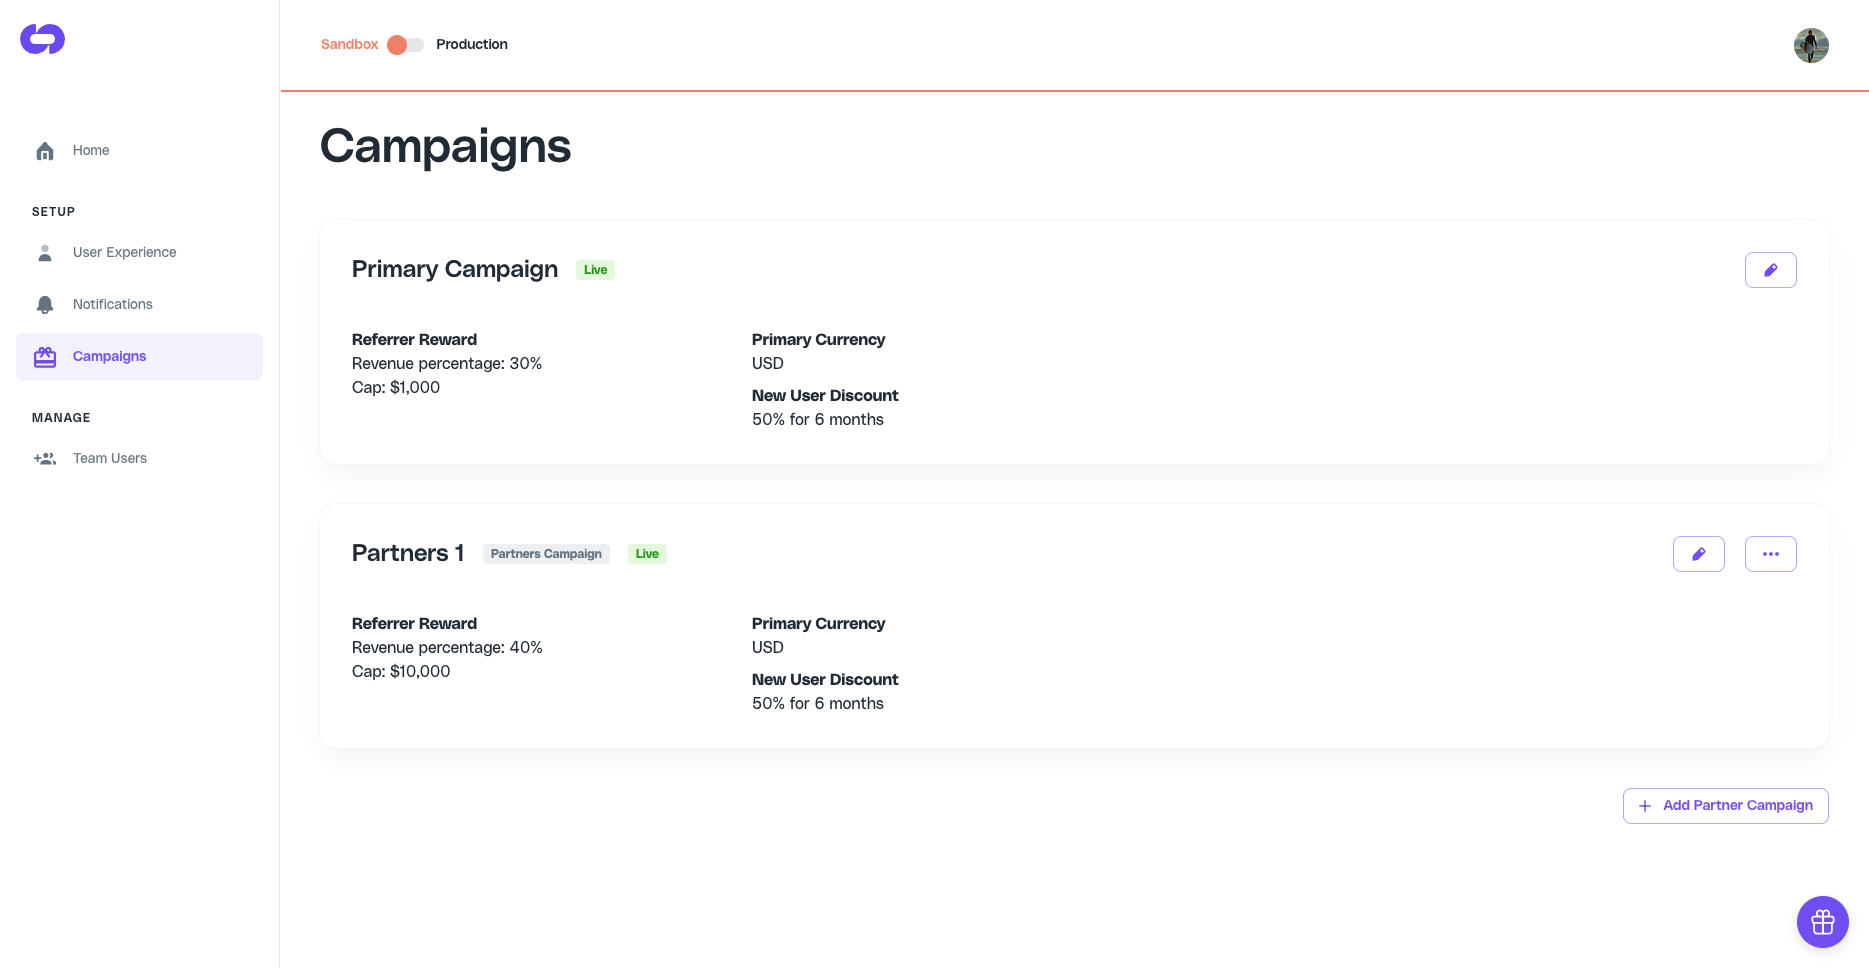 Rewards are typically based on a **percentage** of the transaction amount generated when new customers make a payment up to a **maximum** amount per referral. Additional rewards can also be set on other key events such as **signups** and **purchases** to help encourage more engagement and sharing.
| **Section** | **Rule** | **Description** |
| --------------- | ----------------------------- | --------------------------------------------------------------------------------------------------------------------------------------------------------------------------------- |
| Referrer Reward | Percentage of revenue | Percentage of attributed new revenue that will be paid as a reward |
| Referrer Reward | Maximum reward (per referrer) | The maximum reward that can be earned per referral |
| Referrer Reward | Bonus rewards | Additional rewards that can be set for signups or purchases to encourage more sharing. Bonus rewards are also recommended for products with longer free to paid conversion times. |
| New User Reward | Percent Discount and Months | The new user discount to encourage additional sharing. |
Rewards are typically based on a **percentage** of the transaction amount generated when new customers make a payment up to a **maximum** amount per referral. Additional rewards can also be set on other key events such as **signups** and **purchases** to help encourage more engagement and sharing.
| **Section** | **Rule** | **Description** |
| --------------- | ----------------------------- | --------------------------------------------------------------------------------------------------------------------------------------------------------------------------------- |
| Referrer Reward | Percentage of revenue | Percentage of attributed new revenue that will be paid as a reward |
| Referrer Reward | Maximum reward (per referrer) | The maximum reward that can be earned per referral |
| Referrer Reward | Bonus rewards | Additional rewards that can be set for signups or purchases to encourage more sharing. Bonus rewards are also recommended for products with longer free to paid conversion times. |
| New User Reward | Percent Discount and Months | The new user discount to encourage additional sharing. |
 2. Enter the **email** and **campaign** you want to assign to the partner user. **Product User ID** is optional and should be added if you want to update an existing user to partner status.
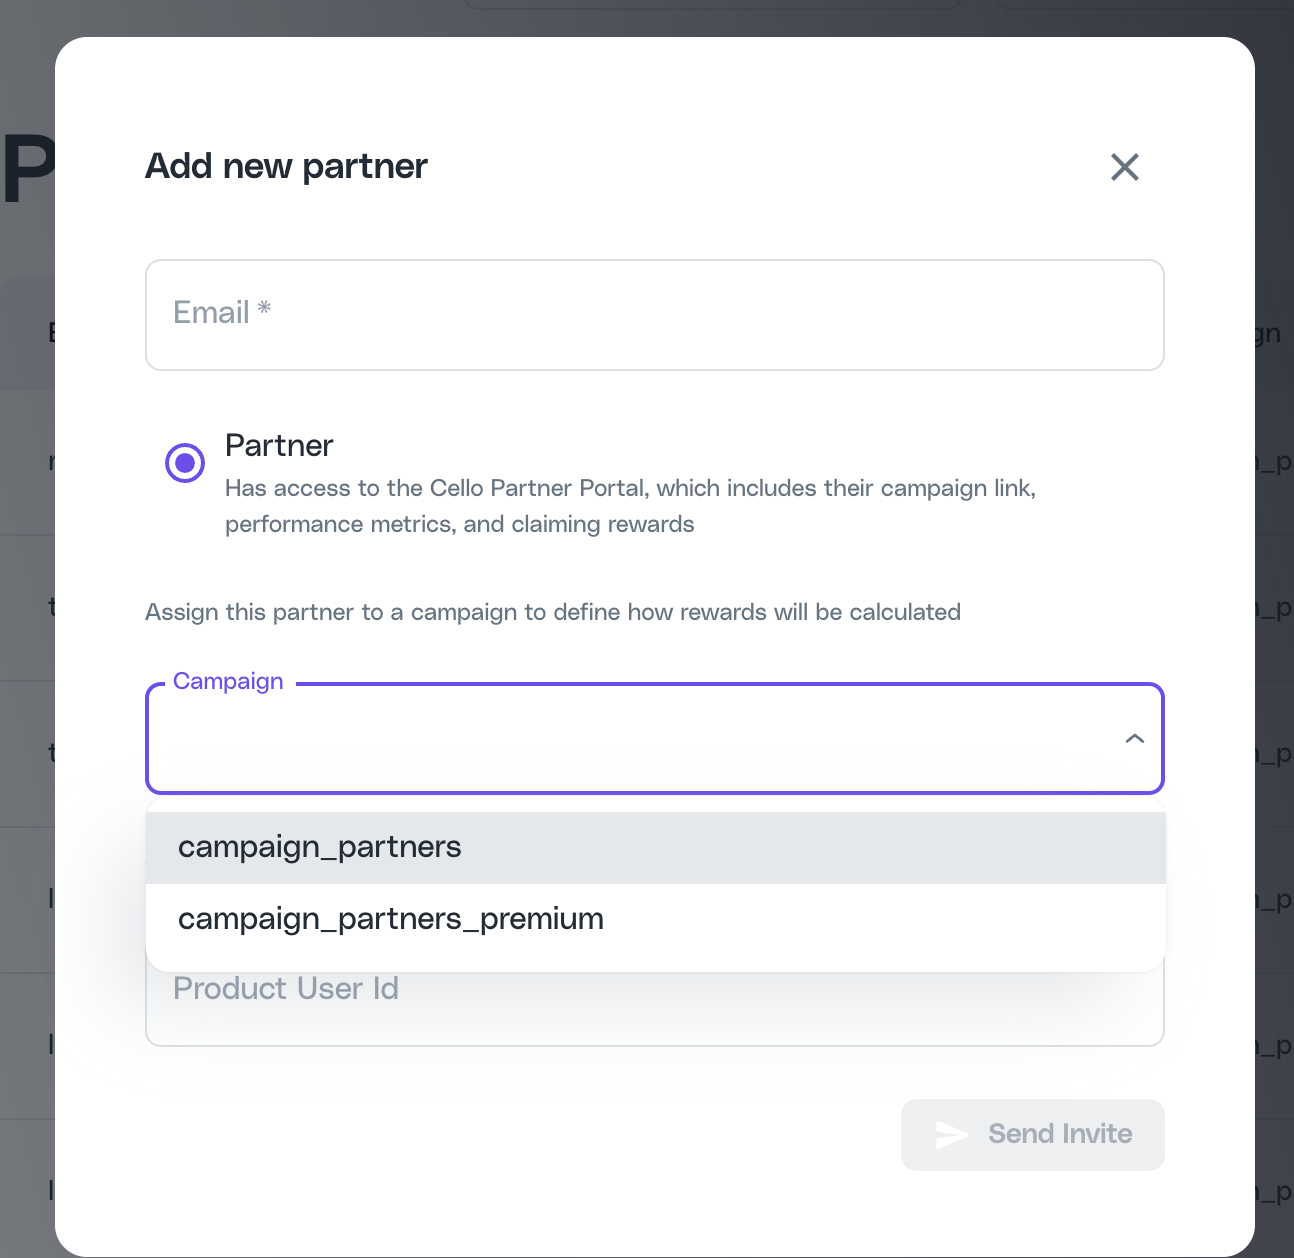
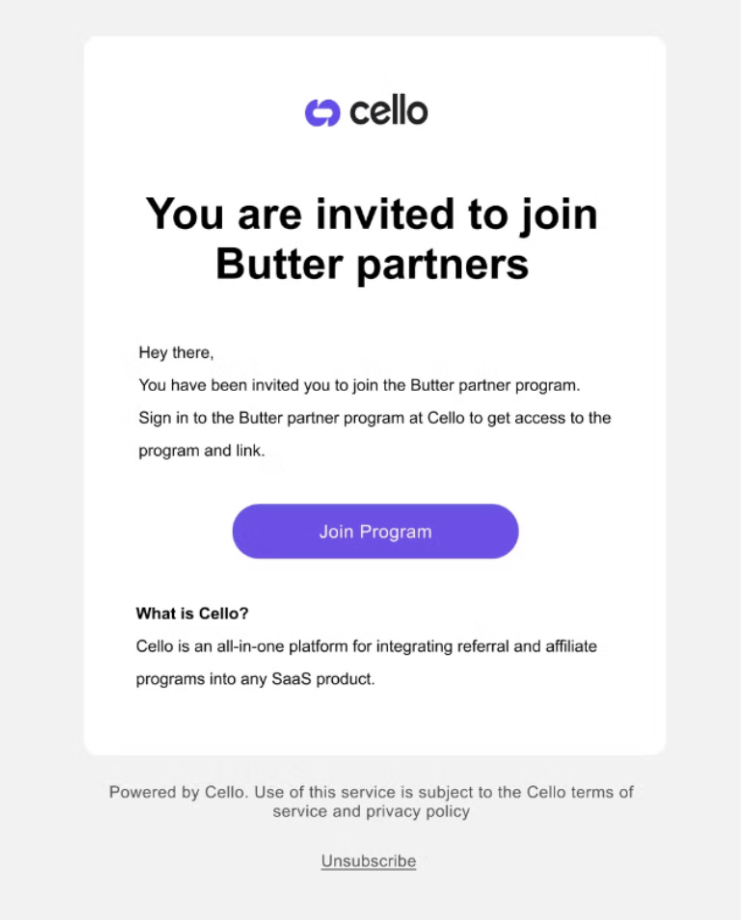 # Overview
Source: https://docs.cello.so/guides/partners/partner-overview
Cello allows you to set up and manage all aspects of your own partner program, unifying user referrals and partners in one platform
Cello allows you to set up and manage all aspects of your own partner program, unifying user referrals and partners in one platform. All partner features are offered as part of the core Cello platform without additional technical effort needed.
# Overview
Source: https://docs.cello.so/guides/partners/partner-overview
Cello allows you to set up and manage all aspects of your own partner program, unifying user referrals and partners in one platform
Cello allows you to set up and manage all aspects of your own partner program, unifying user referrals and partners in one platform. All partner features are offered as part of the core Cello platform without additional technical effort needed.
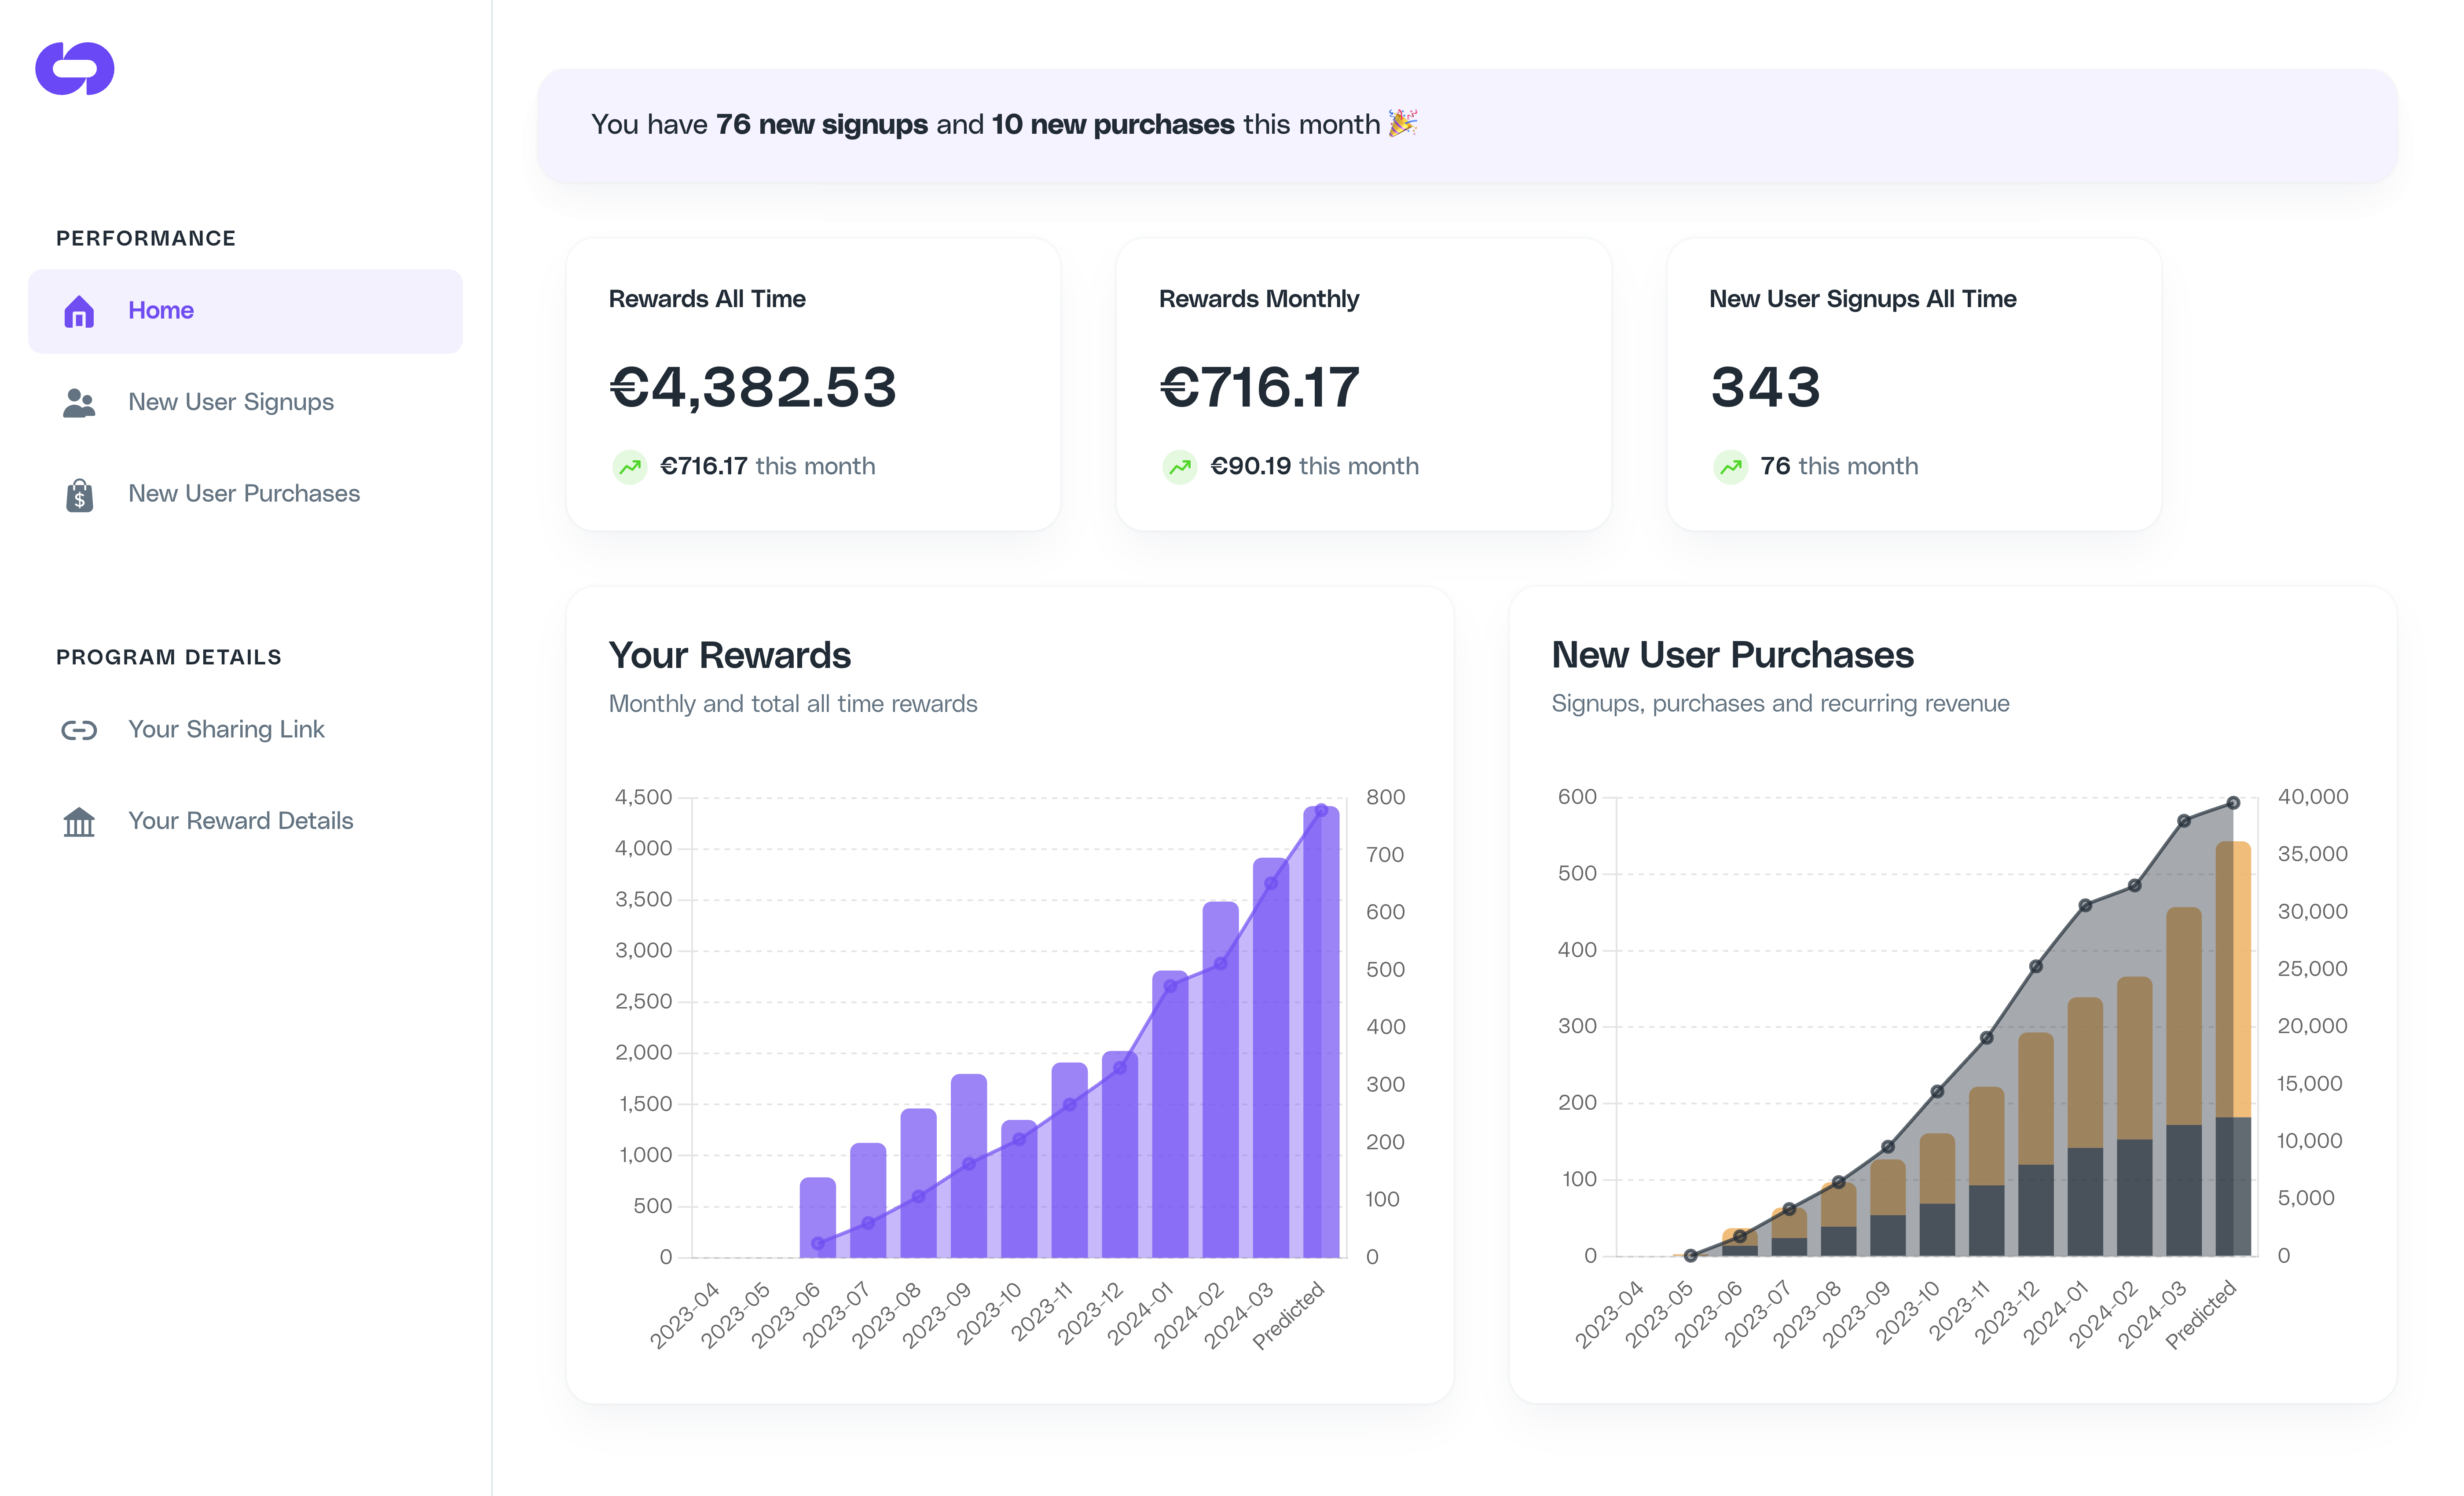
 Accessing Program Details
Partners can access program details by clicking on **Your Sharing Link** on the left navigation. All details are provided from the Cello referrals component, in the same way your users access Cello from within your application.
## Getting Rewarded
Clicking on **Your Reward Details** opens the Cello component with details of all rewards. Partners who have not provided payment details can do so from this page.
## Partner Analytics
Cello provides partners with detailed analytics for tracking program performance on their referrals. An overview is provided on the **Home** page, with more details provided on the full funnel from the **New User Signups** and **New User Purchases** page .
# Partner Resources
Source: https://docs.cello.so/guides/partners/partner-resources
This guide is designed to help Partner Managers effectively use the Partner Resources feature to add, manage, and share guides and resources with partners
This guide is designed to help Partner Managers effectively use the Partner Resources feature to add, manage, and share guides and resources with partners.
Accessing Program Details
Partners can access program details by clicking on **Your Sharing Link** on the left navigation. All details are provided from the Cello referrals component, in the same way your users access Cello from within your application.
## Getting Rewarded
Clicking on **Your Reward Details** opens the Cello component with details of all rewards. Partners who have not provided payment details can do so from this page.
## Partner Analytics
Cello provides partners with detailed analytics for tracking program performance on their referrals. An overview is provided on the **Home** page, with more details provided on the full funnel from the **New User Signups** and **New User Purchases** page .
# Partner Resources
Source: https://docs.cello.so/guides/partners/partner-resources
This guide is designed to help Partner Managers effectively use the Partner Resources feature to add, manage, and share guides and resources with partners
This guide is designed to help Partner Managers effectively use the Partner Resources feature to add, manage, and share guides and resources with partners.
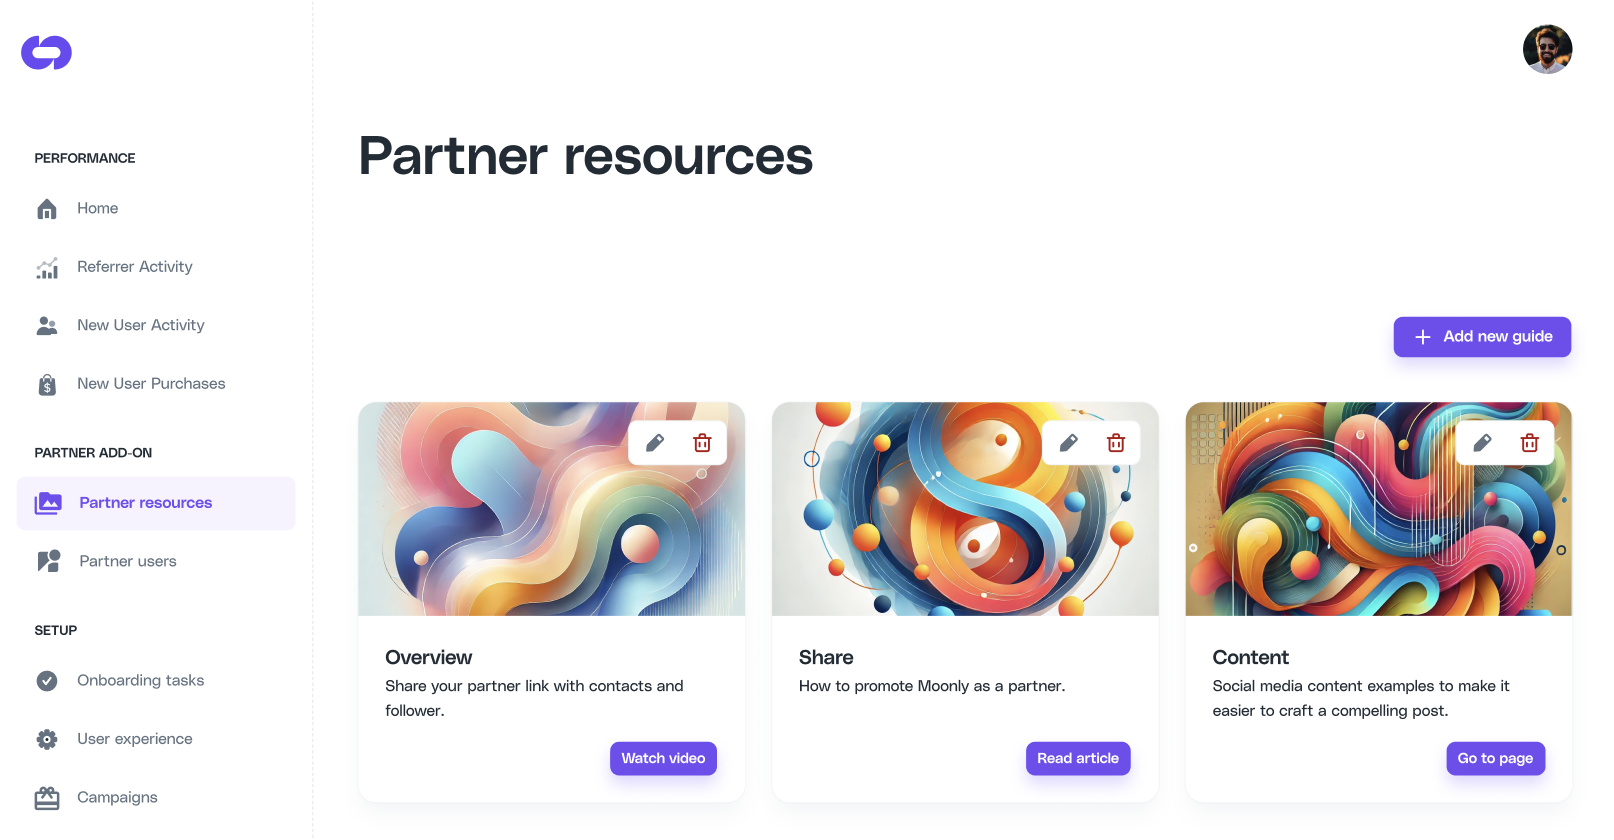 The Partner Resources section is a dedicated space for creating and managing guides and content that can be shared with your partners. It allows you to:
1. Add new guides with detailed descriptions and cover images.
2. Organize resources for easy partner access.
3. Provide links to videos, articles, or pages to help partners promote your products or services.
### Adding a New Guide
The Partner Resources section is a dedicated space for creating and managing guides and content that can be shared with your partners. It allows you to:
1. Add new guides with detailed descriptions and cover images.
2. Organize resources for easy partner access.
3. Provide links to videos, articles, or pages to help partners promote your products or services.
### Adding a New Guide
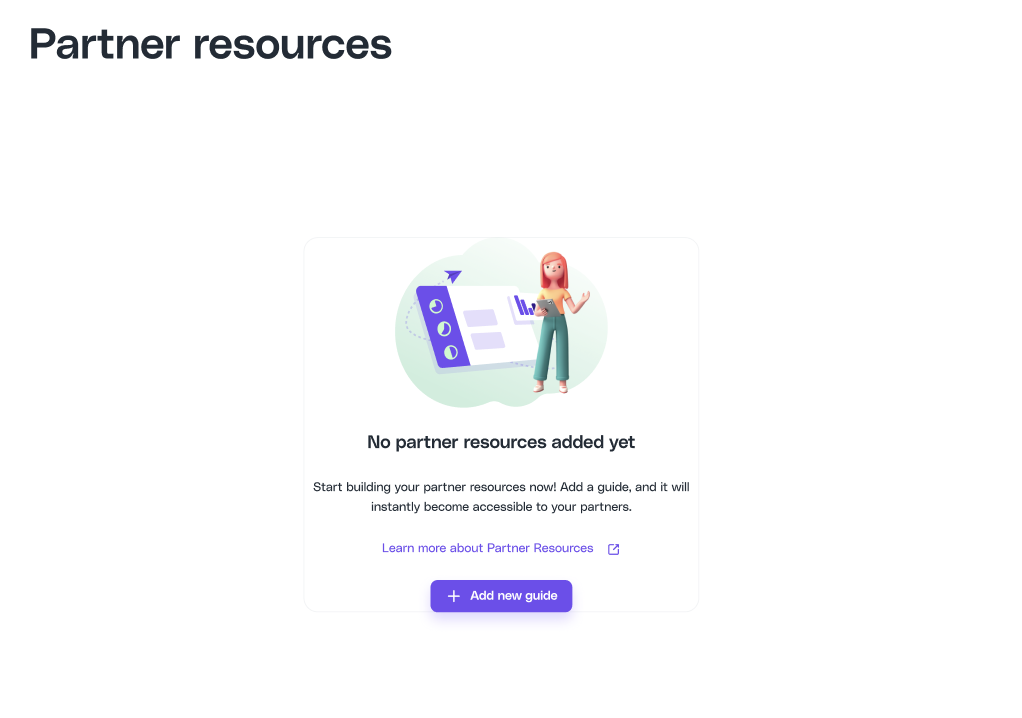 If no resources are added yet, you'll see a placeholder message encouraging you to create your first guide.
1. **Click the "Add New Guide" Button**:
* Located at the top right of the Partner Resources dashboard.
2. **Fill Out the Form**:
* **Title**: Enter a clear and concise title for the guide.
* **Description**: Provide a brief description of the guide's purpose.
* **Cover Image**: Upload an image to visually represent the guide. Use the "Select files" area to drag and drop or browse files from your machine.
* **Link**: Add a URL to direct partners to the guide's content, such as a video, article, or webpage.
3. **Save the Guide**:
* Click the **Add** button to save the guide.
💡 **Once added, guide is instantly visible for your partners.**
If no resources are added yet, you'll see a placeholder message encouraging you to create your first guide.
1. **Click the "Add New Guide" Button**:
* Located at the top right of the Partner Resources dashboard.
2. **Fill Out the Form**:
* **Title**: Enter a clear and concise title for the guide.
* **Description**: Provide a brief description of the guide's purpose.
* **Cover Image**: Upload an image to visually represent the guide. Use the "Select files" area to drag and drop or browse files from your machine.
* **Link**: Add a URL to direct partners to the guide's content, such as a video, article, or webpage.
3. **Save the Guide**:
* Click the **Add** button to save the guide.
💡 **Once added, guide is instantly visible for your partners.**
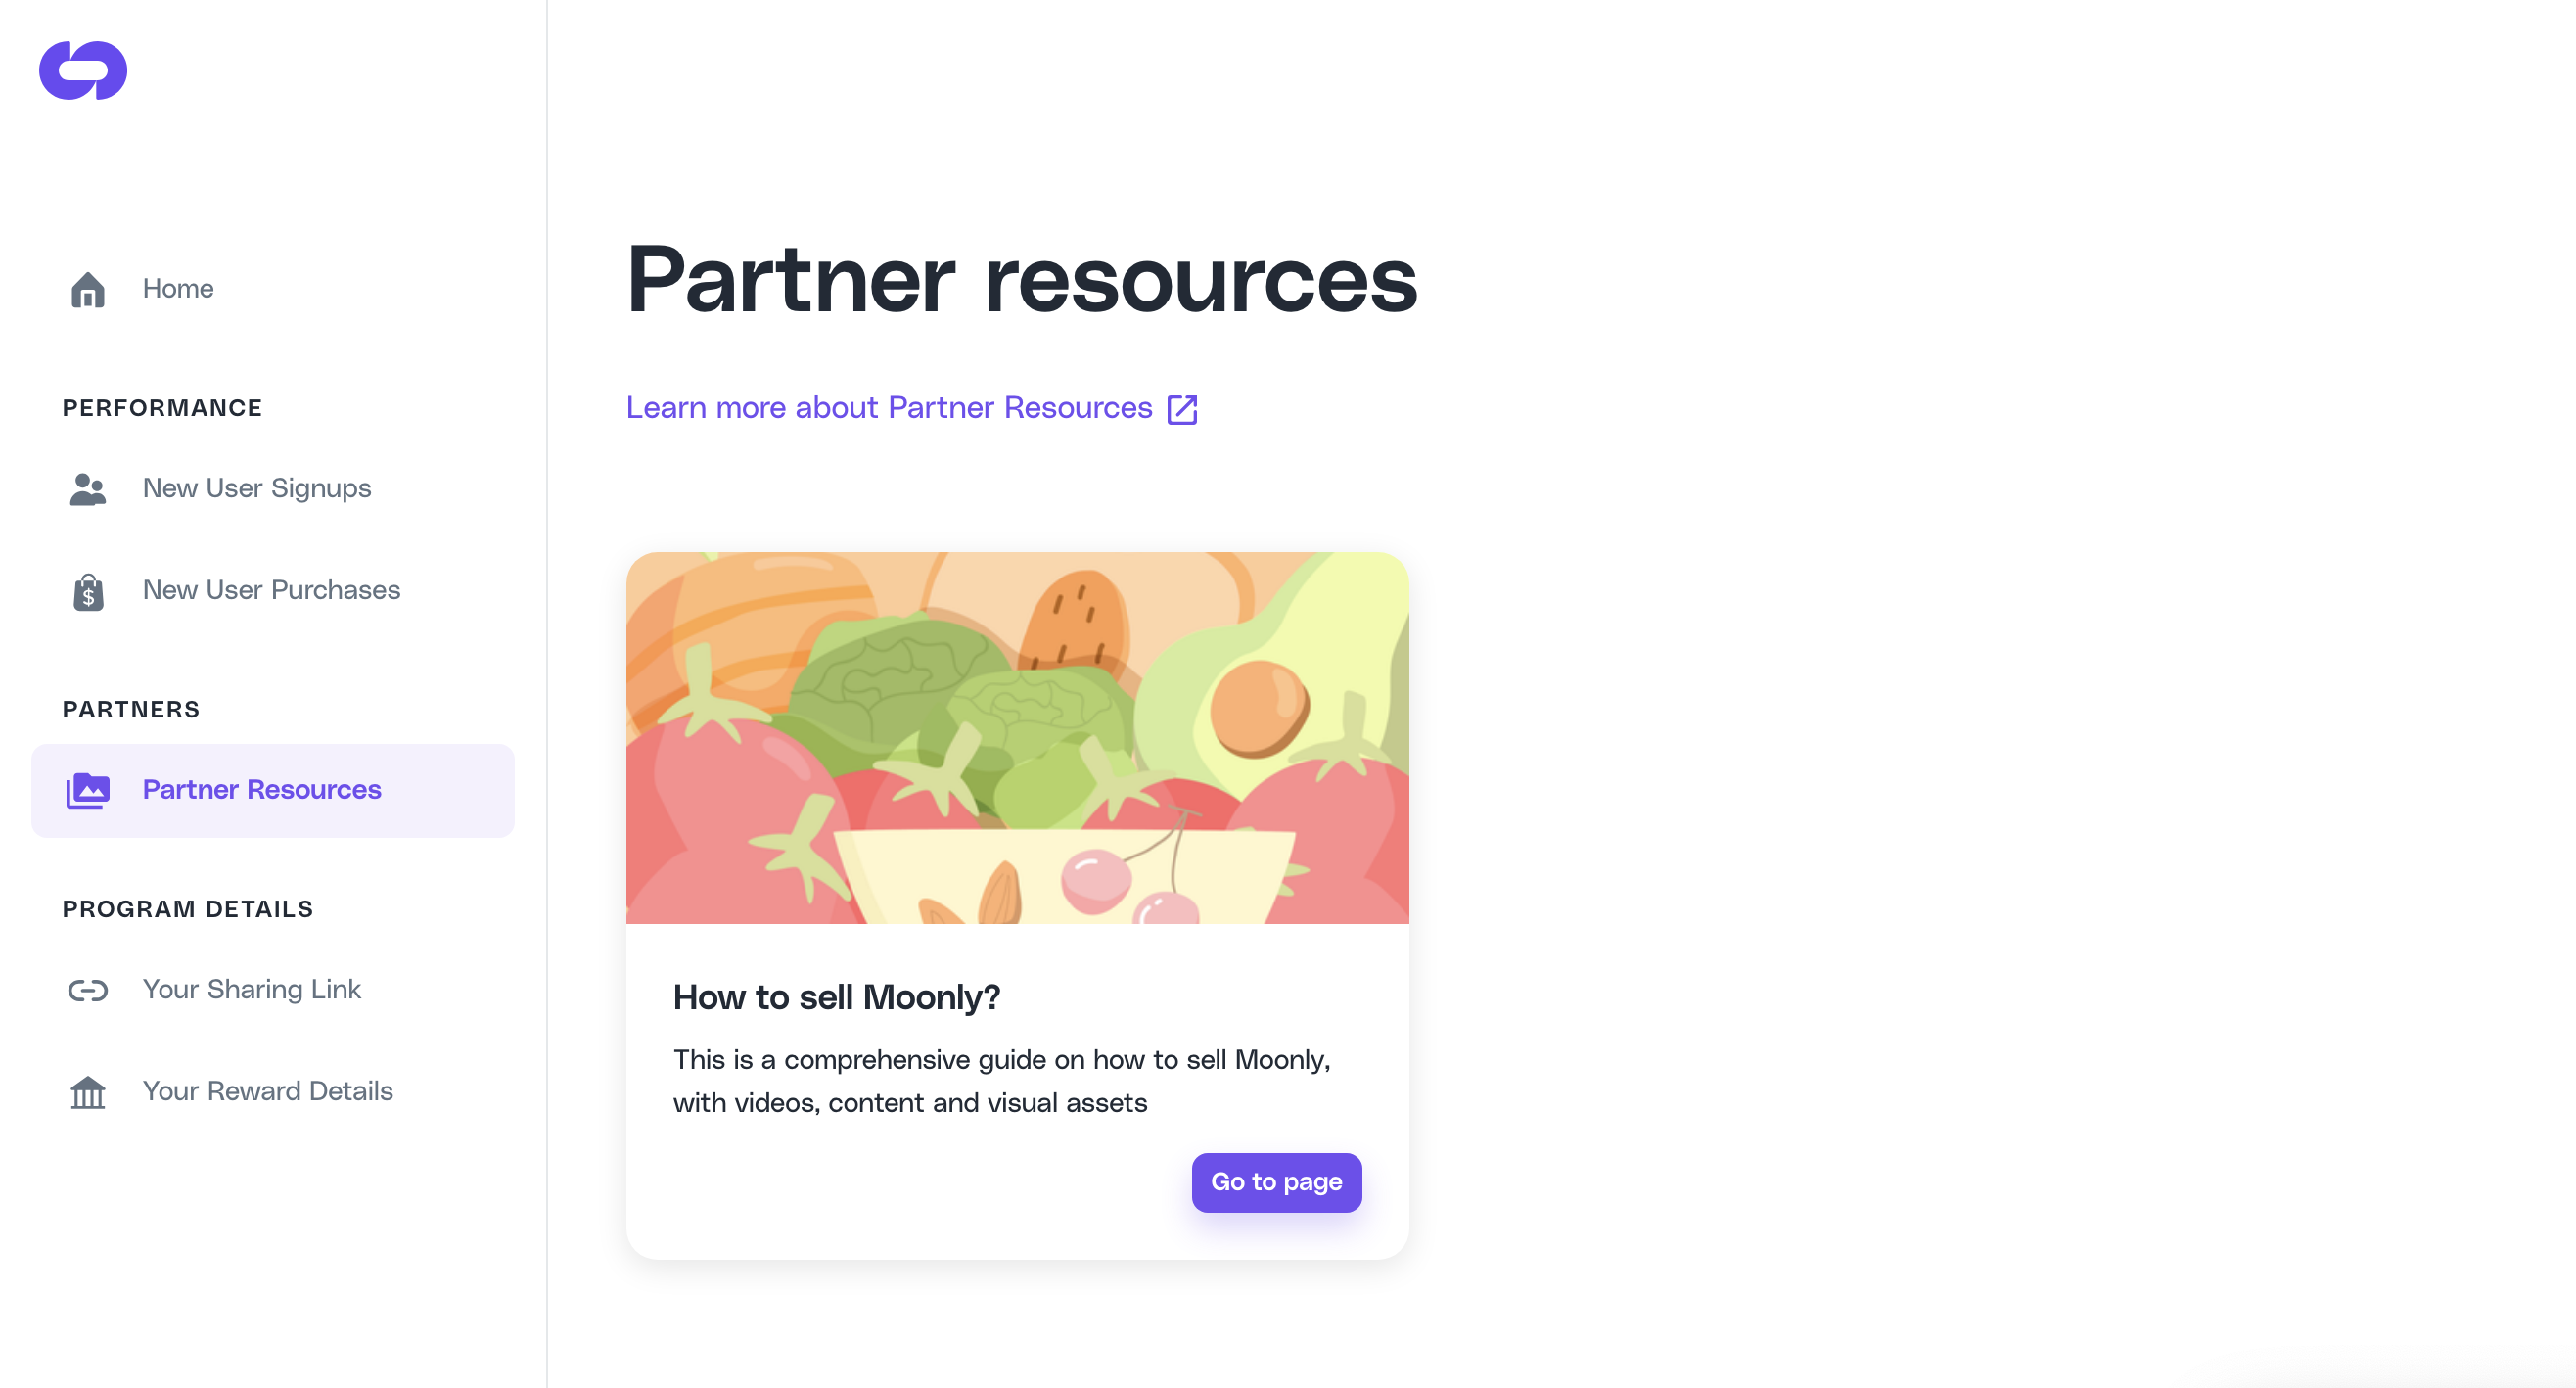 ### Managing Existing Guides
Once guides are added, they appear as individual cards in the Partner Resources dashboard. Each card includes:
1. **Title and Description**: A quick summary of the guide.
2. **Actions**:
* **Edit**: Use the pencil icon to update the guide's details.
* **Delete**: Use the trash icon to remove the guide.
3. **Call-to-Action Buttons**:
* Depending on the link type, buttons like "Watch Video," "Read Article," or "Go to Page" will appear, directing users to the linked resource.
## Best Practices for Creating Guides
1. **Use Descriptive Titles and Images**:
* Ensure titles are specific and relevant to the guide's content.
* Upload visually appealing and professional cover images to attract attention.
2. **Organize by Purpose**:
* Group guides by themes, such as "Overview," "Sharing Tips," or "Content Creation Examples," for easier navigation.
3. **Test Links**:
* Verify that all links lead to the correct resource and are accessible to partners.
## Example Use Cases
### Case 1: Sharing Partner Links
Create a guide titled **"Overview"** with a description like: "Share your partner link with contacts and followers." Include a video tutorial link to help partners understand how to use their referral links.
### Case 2: Promoting Your Product
Add a guide titled **"Share"** with instructions on promoting your product. Link to an article that offers best practices for sharing content on social media.
### Case 3: Content Creation Support
Provide a guide titled **"Content"** with social media post templates and examples. Link to a page where partners can download assets or view tips.
## Frequently Asked Questions (FAQs)
### Q: Can I reorder the guides?
A: Currently, guides are displayed in the order they were added. You may delete and recreate guides to adjust the sequence if necessary.
### Q: What file formats are supported for cover images?
A: Common image formats like JPG, PNG, and GIF are supported.
### Q: How do I ensure partners can access the links?
A: Use publicly accessible links or grant appropriate permissions to ensure partners can view the resources.
***
# Configuring Referral Component
Source: https://docs.cello.so/guides/user-experience/configuring-referral-component
The Referral Component is an all-in-one referral experience, easily added to your web application
The Referral Component is an all-in-one referral experience, easily added to your web application. It takes care of things like referrer first-time experience, enabling users to share links, updating them on progress, and handling rewards.
## Adding the component to your product
First, add the Referral Component into your application with the help of your developer. Simply follow the instructions on the [Referral Component integration guide](/referral-component/quickstart).
## Customize referrer experience
After adding component to your application, you now can customize referrer experience in Cello Portal.
### Choose Cello button design and position
You can use either the default Cello button (FAB) or integrate Cello into a menu via the [custom launcher](/referral-component/custom-launcher), or both as the launcher. If you do not want to use the Cello button, simply uncheck "Show Cello button".
If you are using the Cello button, you can choose on of **3 styles**, configure its position and also specify how would you like to display the [announcements](/guides/user-experience/Referral-Notifications-And-Emails#announcement).
### Managing Existing Guides
Once guides are added, they appear as individual cards in the Partner Resources dashboard. Each card includes:
1. **Title and Description**: A quick summary of the guide.
2. **Actions**:
* **Edit**: Use the pencil icon to update the guide's details.
* **Delete**: Use the trash icon to remove the guide.
3. **Call-to-Action Buttons**:
* Depending on the link type, buttons like "Watch Video," "Read Article," or "Go to Page" will appear, directing users to the linked resource.
## Best Practices for Creating Guides
1. **Use Descriptive Titles and Images**:
* Ensure titles are specific and relevant to the guide's content.
* Upload visually appealing and professional cover images to attract attention.
2. **Organize by Purpose**:
* Group guides by themes, such as "Overview," "Sharing Tips," or "Content Creation Examples," for easier navigation.
3. **Test Links**:
* Verify that all links lead to the correct resource and are accessible to partners.
## Example Use Cases
### Case 1: Sharing Partner Links
Create a guide titled **"Overview"** with a description like: "Share your partner link with contacts and followers." Include a video tutorial link to help partners understand how to use their referral links.
### Case 2: Promoting Your Product
Add a guide titled **"Share"** with instructions on promoting your product. Link to an article that offers best practices for sharing content on social media.
### Case 3: Content Creation Support
Provide a guide titled **"Content"** with social media post templates and examples. Link to a page where partners can download assets or view tips.
## Frequently Asked Questions (FAQs)
### Q: Can I reorder the guides?
A: Currently, guides are displayed in the order they were added. You may delete and recreate guides to adjust the sequence if necessary.
### Q: What file formats are supported for cover images?
A: Common image formats like JPG, PNG, and GIF are supported.
### Q: How do I ensure partners can access the links?
A: Use publicly accessible links or grant appropriate permissions to ensure partners can view the resources.
***
# Configuring Referral Component
Source: https://docs.cello.so/guides/user-experience/configuring-referral-component
The Referral Component is an all-in-one referral experience, easily added to your web application
The Referral Component is an all-in-one referral experience, easily added to your web application. It takes care of things like referrer first-time experience, enabling users to share links, updating them on progress, and handling rewards.
## Adding the component to your product
First, add the Referral Component into your application with the help of your developer. Simply follow the instructions on the [Referral Component integration guide](/referral-component/quickstart).
## Customize referrer experience
After adding component to your application, you now can customize referrer experience in Cello Portal.
### Choose Cello button design and position
You can use either the default Cello button (FAB) or integrate Cello into a menu via the [custom launcher](/referral-component/custom-launcher), or both as the launcher. If you do not want to use the Cello button, simply uncheck "Show Cello button".
If you are using the Cello button, you can choose on of **3 styles**, configure its position and also specify how would you like to display the [announcements](/guides/user-experience/Referral-Notifications-And-Emails#announcement).
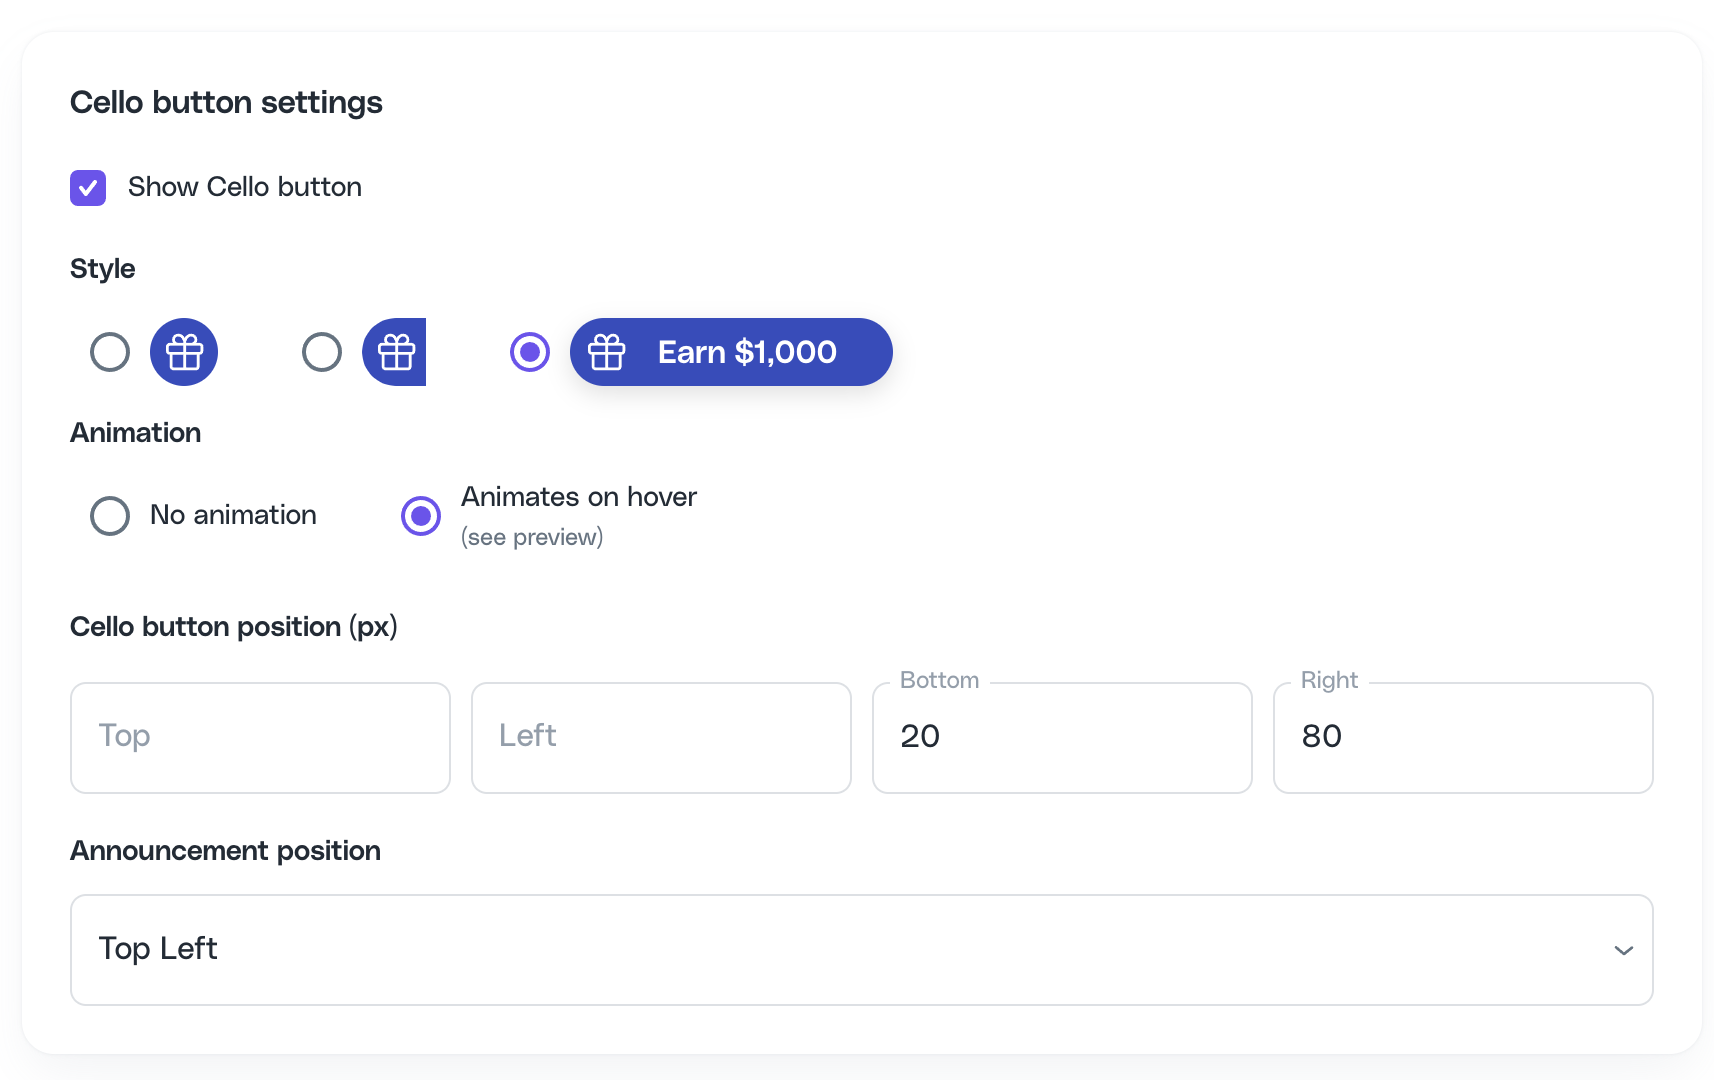 ### Choose component type
Component can be displayed as a **pop-up** or a **modal**. When you choose pop-up view, you can also configure pop-up position on the screen.
### Choose component type
Component can be displayed as a **pop-up** or a **modal**. When you choose pop-up view, you can also configure pop-up position on the screen.
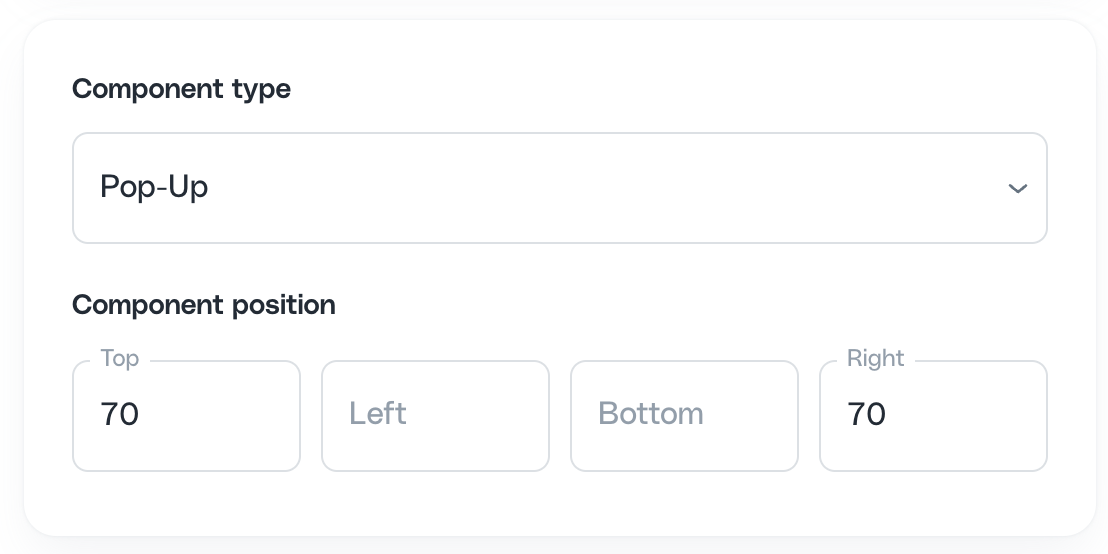 ### Choose your brand colors for Component
You can choose primary color for your component, colors of the Cello button and color of [notification badge](/guides/user-experience/Referral-Notifications-And-Emails#alert-and-badge).
### Choose your brand colors for Component
You can choose primary color for your component, colors of the Cello button and color of [notification badge](/guides/user-experience/Referral-Notifications-And-Emails#alert-and-badge).
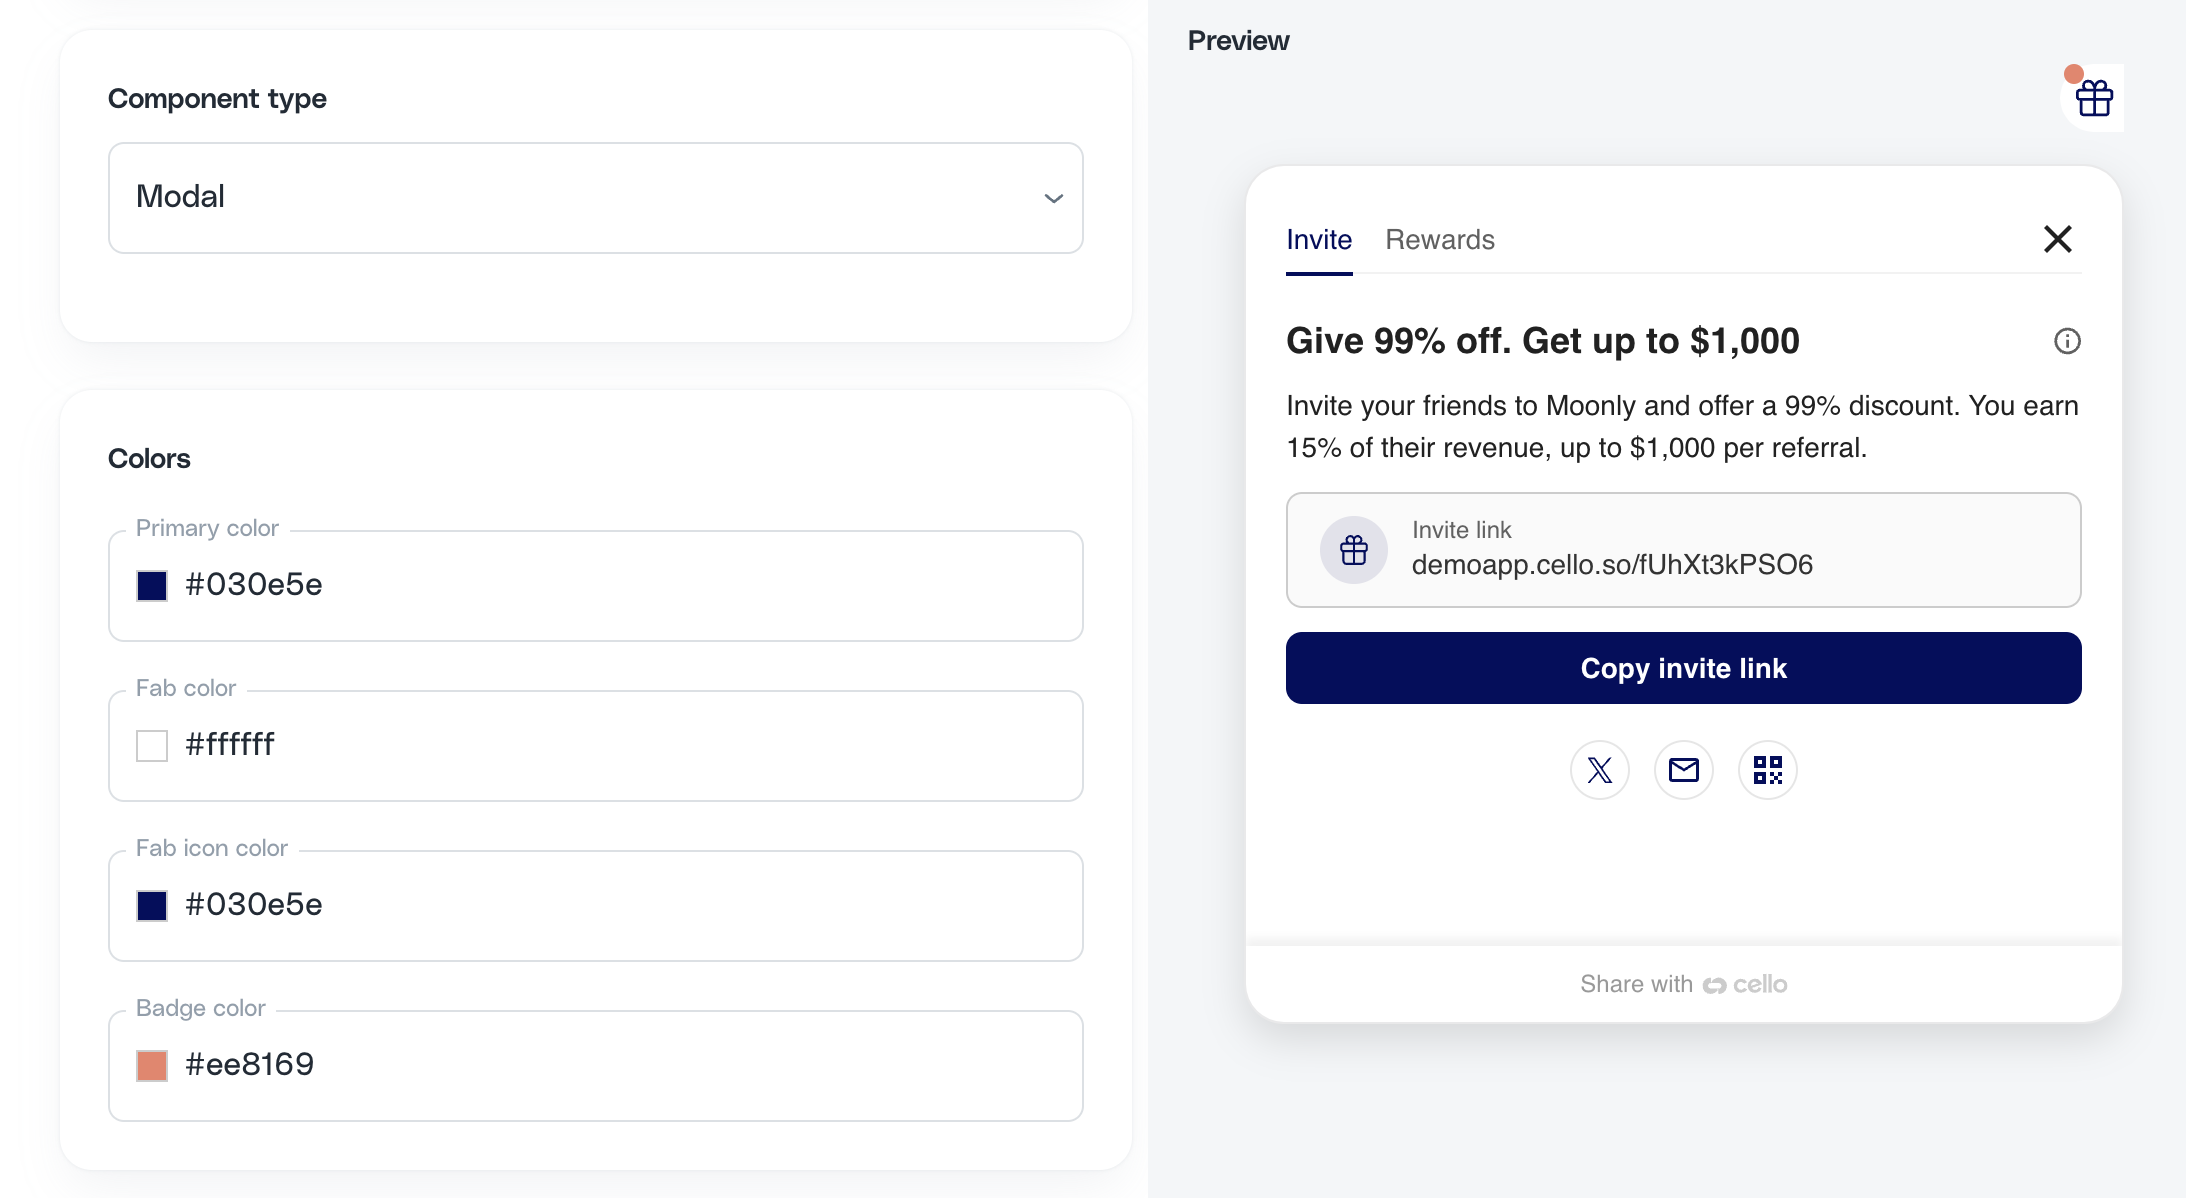 ### Choose social sharing options
Cello provides many sharing options to choose from. Simple link copy, social sharing including Twitter, LinkedIn, and email, and transfer to mobile by using a QR-code where a user can forward the invite using all the options provided directly from their mobile device.
### Choose social sharing options
Cello provides many sharing options to choose from. Simple link copy, social sharing including Twitter, LinkedIn, and email, and transfer to mobile by using a QR-code where a user can forward the invite using all the options provided directly from their mobile device.
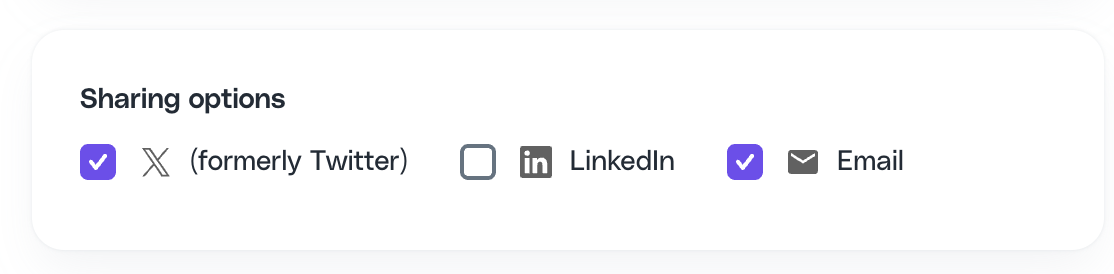 ### Choose payment method options
Cello allows users to receive rewards via PayPal or Venmo payments. Additional payment options are planned based on user feedback.
### Choose payment method options
Cello allows users to receive rewards via PayPal or Venmo payments. Additional payment options are planned based on user feedback.
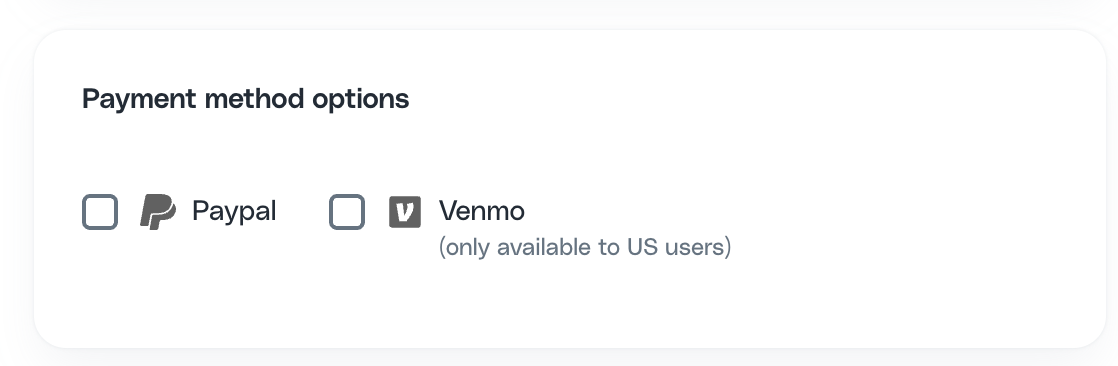 # New User Discounts
Source: https://docs.cello.so/guides/user-experience/new-user-discounts
Offering discounts or rewards to referees is a powerful strategy for improving signup conversion
Offering discounts or rewards to referees is a powerful strategy for improving signup conversion for several reasons:
1. **Sense of Urgency:** Time-limited discounts create a sense of urgency, encouraging referees to act swiftly to take advantage of the offer. This urgency can lead to quicker decision-making and increased conversion rates.
2. **Enhancing Referral Motivation:** When referrers know that their referrals lead to tangible benefits like discounts for their contacts, they're more likely to actively promote your product. This not only increases the number of referrals but also the likelihood of signups.
3. **Overcoming Price Resistance:** Discounts can effectively lower financial barriers for potential users who are hesitant about the cost. By making the price more attractive, it can sway those who are undecided about trying your product or service.
4. **Building Initial Trust:** Offering a discount can foster goodwill and build initial trust with new users. A special deal can create a positive first impression of your brand, setting the stage for a lasting relationship.
5. **Competitive Advantage:** If your competitors do not offer similar incentives, your discount can give you a competitive edge. This unique selling point can make your product more appealing compared to others in the market.
This page describes how a **discount to the new referred account can be automated using Stripe or Chargebee** (e. g. 50% discount for the first 6 months).
## Configure discount information
Altho handling discounts needs to be done within your product and supporting systems like Stripe or Chargebee, you can specify discount information in Cello to be shown in the Referral Component and terms.
Go to [Campaign settings in Cello Portal](https://portal.cello.so/setup/campaigns) and add discount information, by specifying discount percentage and duration in months:
# New User Discounts
Source: https://docs.cello.so/guides/user-experience/new-user-discounts
Offering discounts or rewards to referees is a powerful strategy for improving signup conversion
Offering discounts or rewards to referees is a powerful strategy for improving signup conversion for several reasons:
1. **Sense of Urgency:** Time-limited discounts create a sense of urgency, encouraging referees to act swiftly to take advantage of the offer. This urgency can lead to quicker decision-making and increased conversion rates.
2. **Enhancing Referral Motivation:** When referrers know that their referrals lead to tangible benefits like discounts for their contacts, they're more likely to actively promote your product. This not only increases the number of referrals but also the likelihood of signups.
3. **Overcoming Price Resistance:** Discounts can effectively lower financial barriers for potential users who are hesitant about the cost. By making the price more attractive, it can sway those who are undecided about trying your product or service.
4. **Building Initial Trust:** Offering a discount can foster goodwill and build initial trust with new users. A special deal can create a positive first impression of your brand, setting the stage for a lasting relationship.
5. **Competitive Advantage:** If your competitors do not offer similar incentives, your discount can give you a competitive edge. This unique selling point can make your product more appealing compared to others in the market.
This page describes how a **discount to the new referred account can be automated using Stripe or Chargebee** (e. g. 50% discount for the first 6 months).
## Configure discount information
Altho handling discounts needs to be done within your product and supporting systems like Stripe or Chargebee, you can specify discount information in Cello to be shown in the Referral Component and terms.
Go to [Campaign settings in Cello Portal](https://portal.cello.so/setup/campaigns) and add discount information, by specifying discount percentage and duration in months:
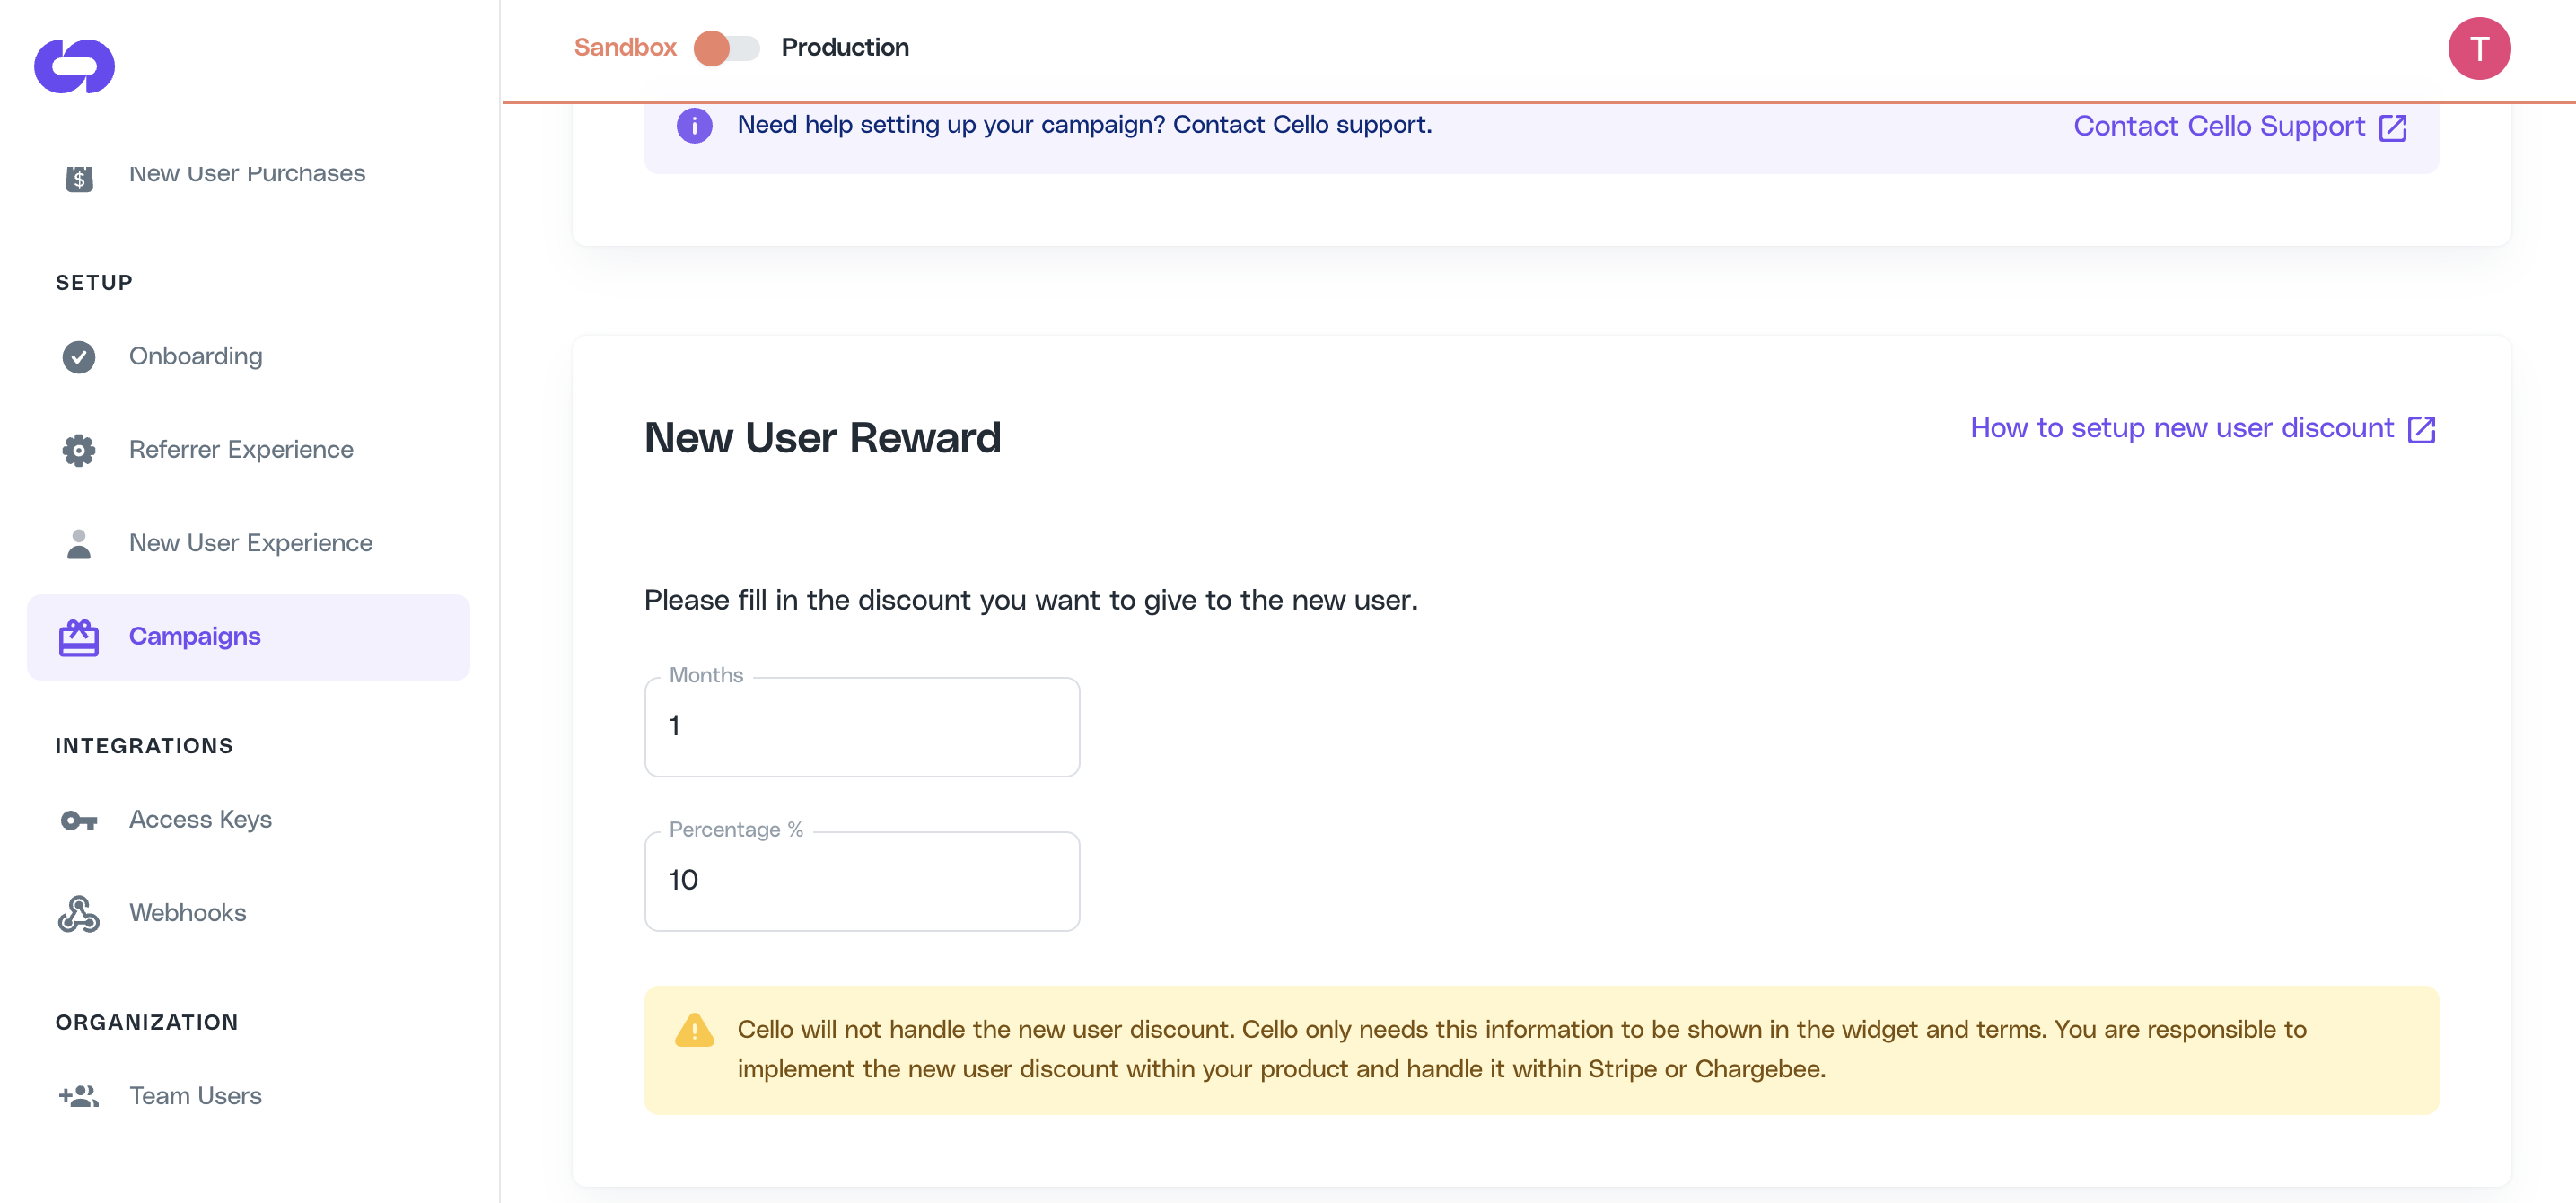 How do I grant discounts in Chargebee?
Chargebee uses **coupons** to apply discounts on subscriptions. To grant a discount for a new referred account, the following steps are required:
* Create a coupon either via the [Chargebee Dashboard](https://www.chargebee.com/docs/2.0/coupons.html#creating-coupons) or the [Chargebee API](https://apidocs.chargebee.com/docs/api/coupons?prod_cat_ver=2)
* Attach the coupon code to the [Customer Object](https://apidocs.chargebee.com/docs/api/customers) to `metadata` attribute or as a `CF_` custom field
## How do I grant discounts in Stripe?
Stripe uses **coupons** and **promotion codes** to apply discounts on payments. To grant a discount for new referred accounts, these coupons and promotion codes have to be set up in Stripe.
This can be done in multiple ways. For both solutions, you **must first set up a coupon and then attach the discount rules** (e.g. 10% off for 3 months).
* Manually using the [Stripe Dashboard](https://dashboard.stripe.com/coupons)
* Programmatically using the [Stripe API](https://stripe.com/docs/payments/checkout/discounts#promotion-codes).
## Using coupons for discounts
Coupons can be used to attach a discount directly to a **stripe customer** or a **subscription.** This can be achieved manually via the [Stripe Web Console](https://dashboard.stripe.com/coupons) or the [Stripe API](https://stripe.com/docs/billing/subscriptions/coupons?dashboard-or-api=api).
Attach manually via **Stripe Web Console**:
How do I grant discounts in Chargebee?
Chargebee uses **coupons** to apply discounts on subscriptions. To grant a discount for a new referred account, the following steps are required:
* Create a coupon either via the [Chargebee Dashboard](https://www.chargebee.com/docs/2.0/coupons.html#creating-coupons) or the [Chargebee API](https://apidocs.chargebee.com/docs/api/coupons?prod_cat_ver=2)
* Attach the coupon code to the [Customer Object](https://apidocs.chargebee.com/docs/api/customers) to `metadata` attribute or as a `CF_` custom field
## How do I grant discounts in Stripe?
Stripe uses **coupons** and **promotion codes** to apply discounts on payments. To grant a discount for new referred accounts, these coupons and promotion codes have to be set up in Stripe.
This can be done in multiple ways. For both solutions, you **must first set up a coupon and then attach the discount rules** (e.g. 10% off for 3 months).
* Manually using the [Stripe Dashboard](https://dashboard.stripe.com/coupons)
* Programmatically using the [Stripe API](https://stripe.com/docs/payments/checkout/discounts#promotion-codes).
## Using coupons for discounts
Coupons can be used to attach a discount directly to a **stripe customer** or a **subscription.** This can be achieved manually via the [Stripe Web Console](https://dashboard.stripe.com/coupons) or the [Stripe API](https://stripe.com/docs/billing/subscriptions/coupons?dashboard-or-api=api).
Attach manually via **Stripe Web Console**:
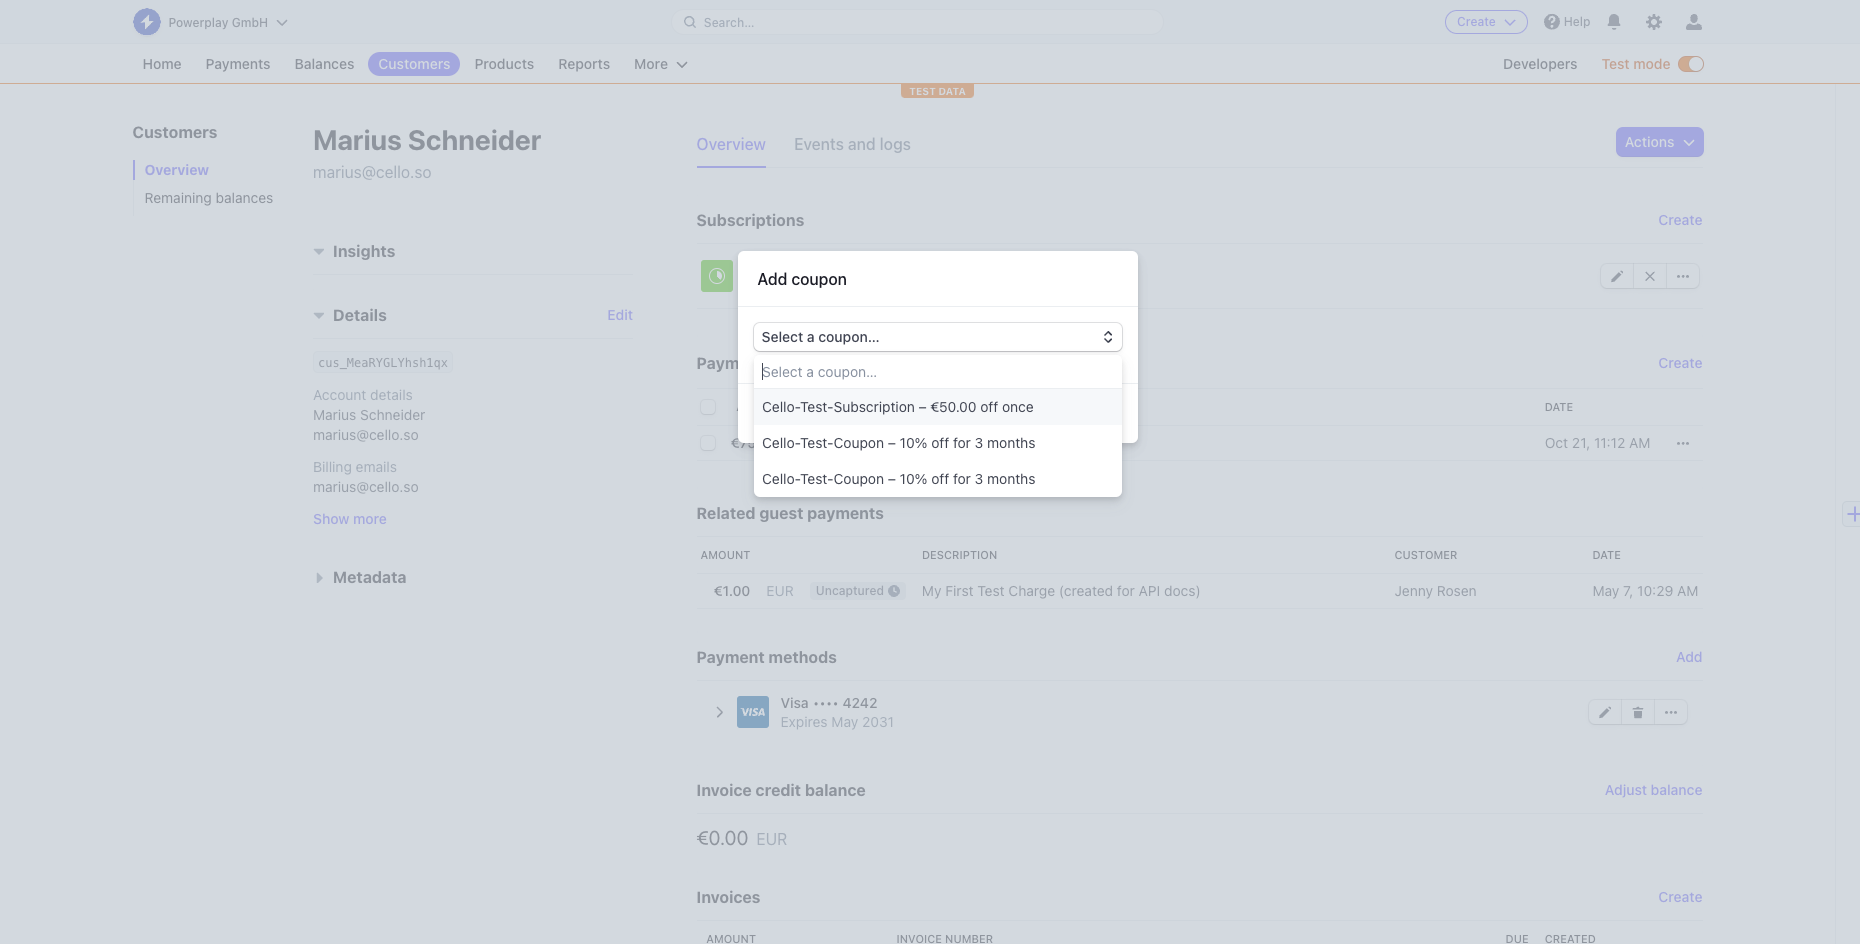 Attach the coupon during customer creation as discount field via **Stripe API:**
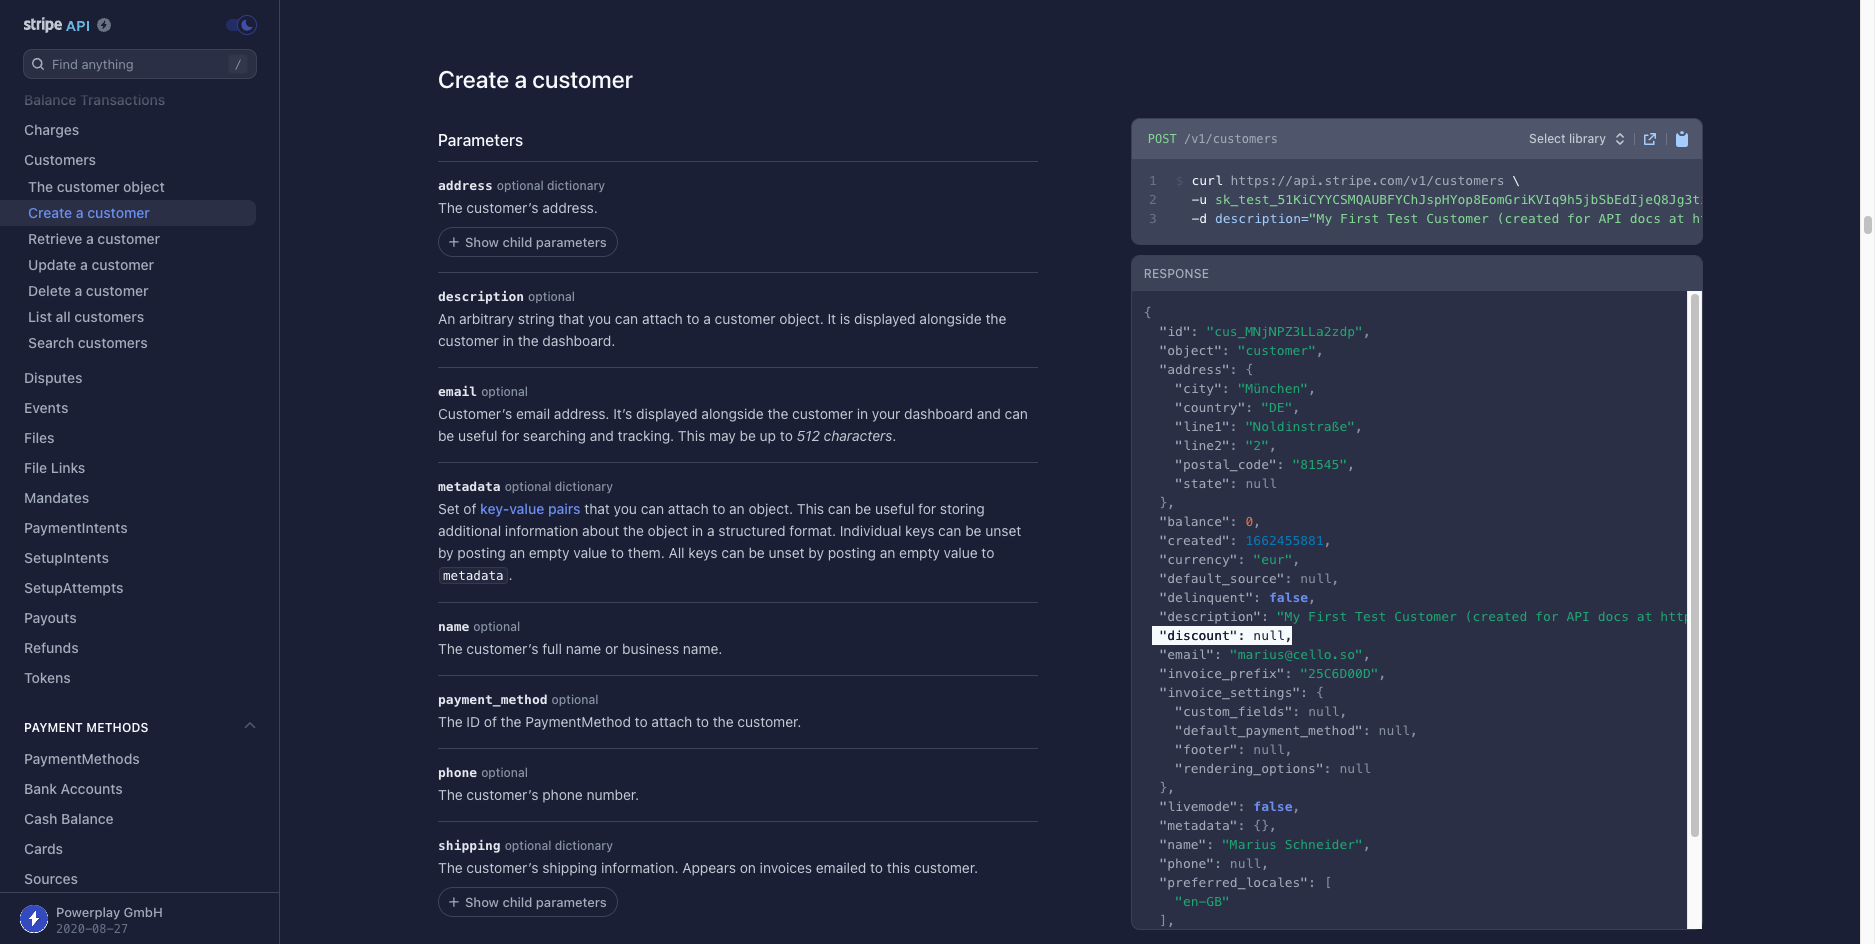 ### Attach the coupon to the customer or subscription
 3. Select the coupon you want to attach
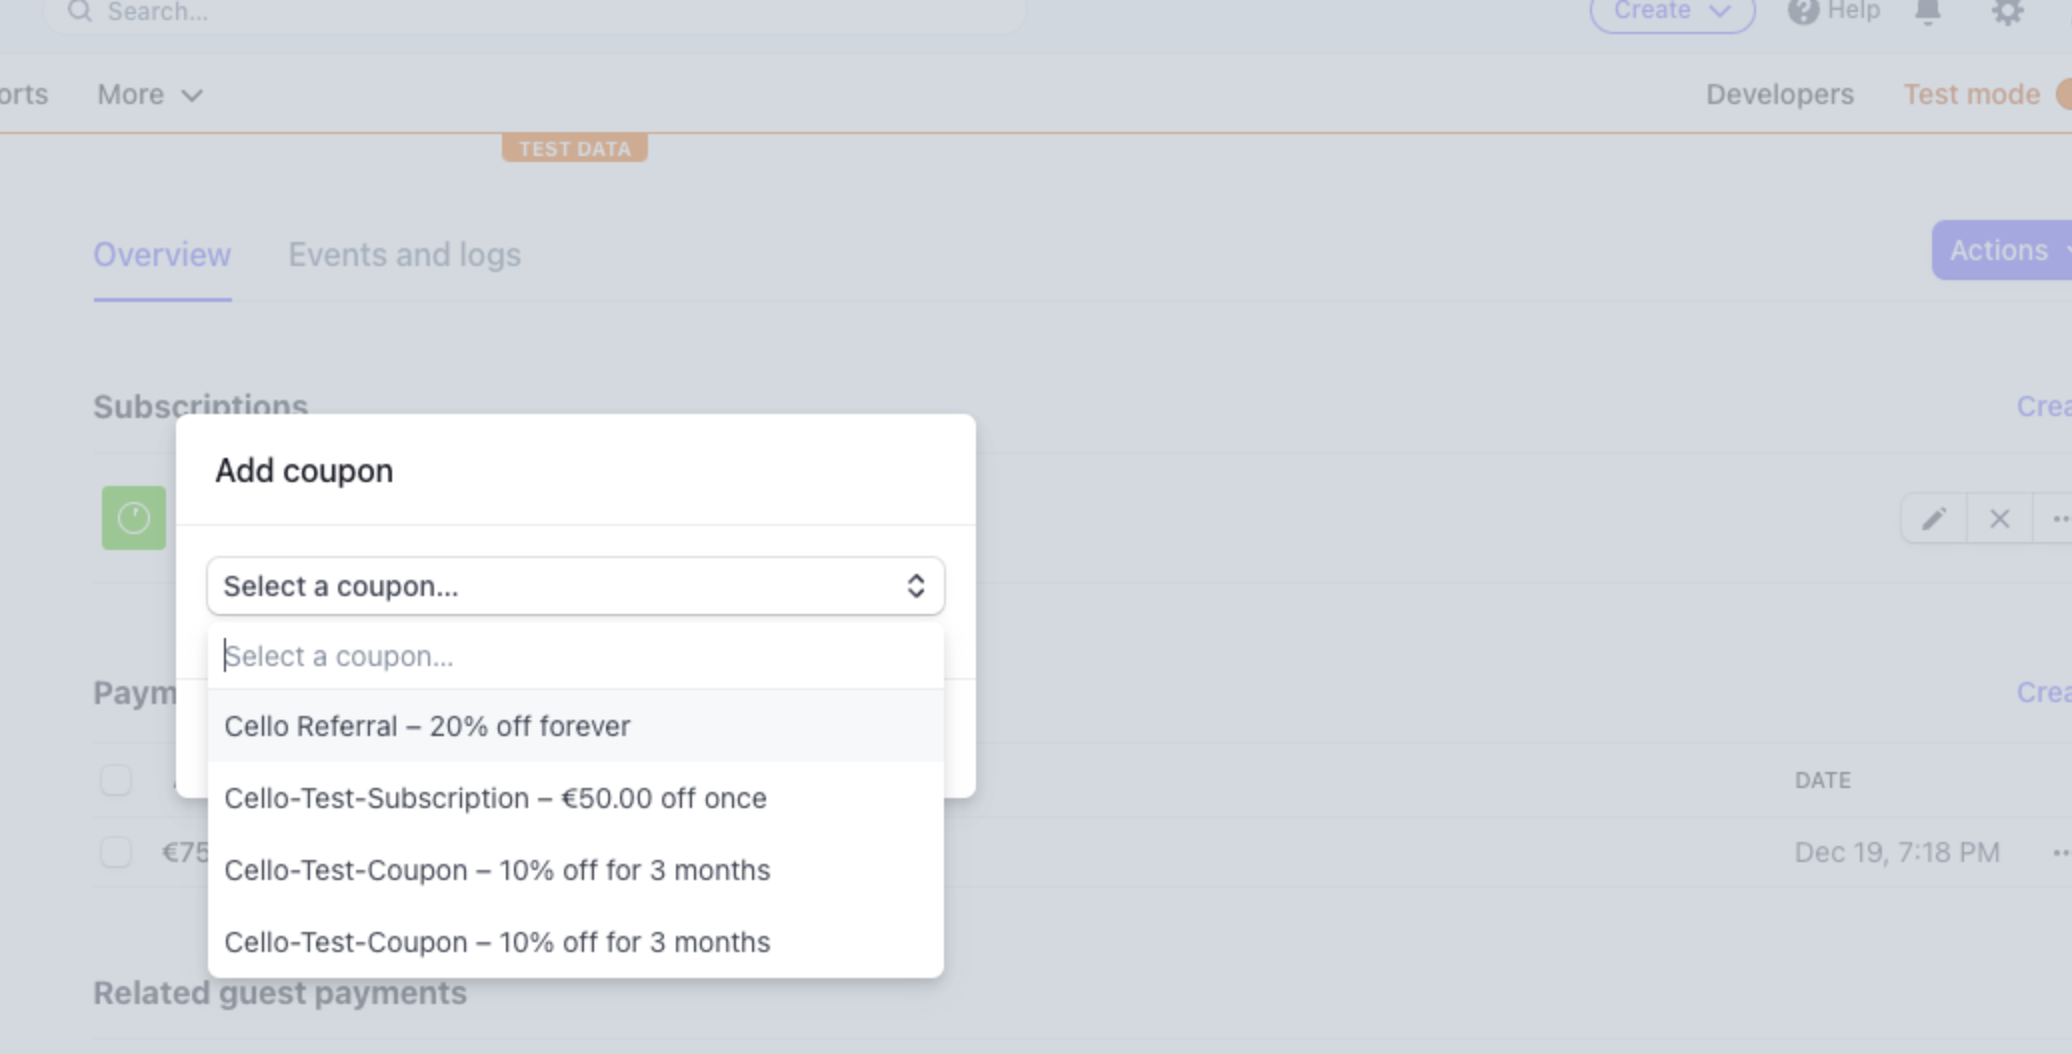 **💸 If the customer subscribes now to a plan or performs a transaction, the discount will be automatically applied during the checkout.**
### Attach the coupon during checkout with Stripe API
The prerequisite for this solution is to have implemented the [Stripe.js](https://stripe.com/docs/js) in your front end so you can modify the customer creation or subscription.
**💸 If the customer subscribes now to a plan or performs a transaction, the discount will be automatically applied during the checkout.**
### Attach the coupon during checkout with Stripe API
The prerequisite for this solution is to have implemented the [Stripe.js](https://stripe.com/docs/js) in your front end so you can modify the customer creation or subscription.
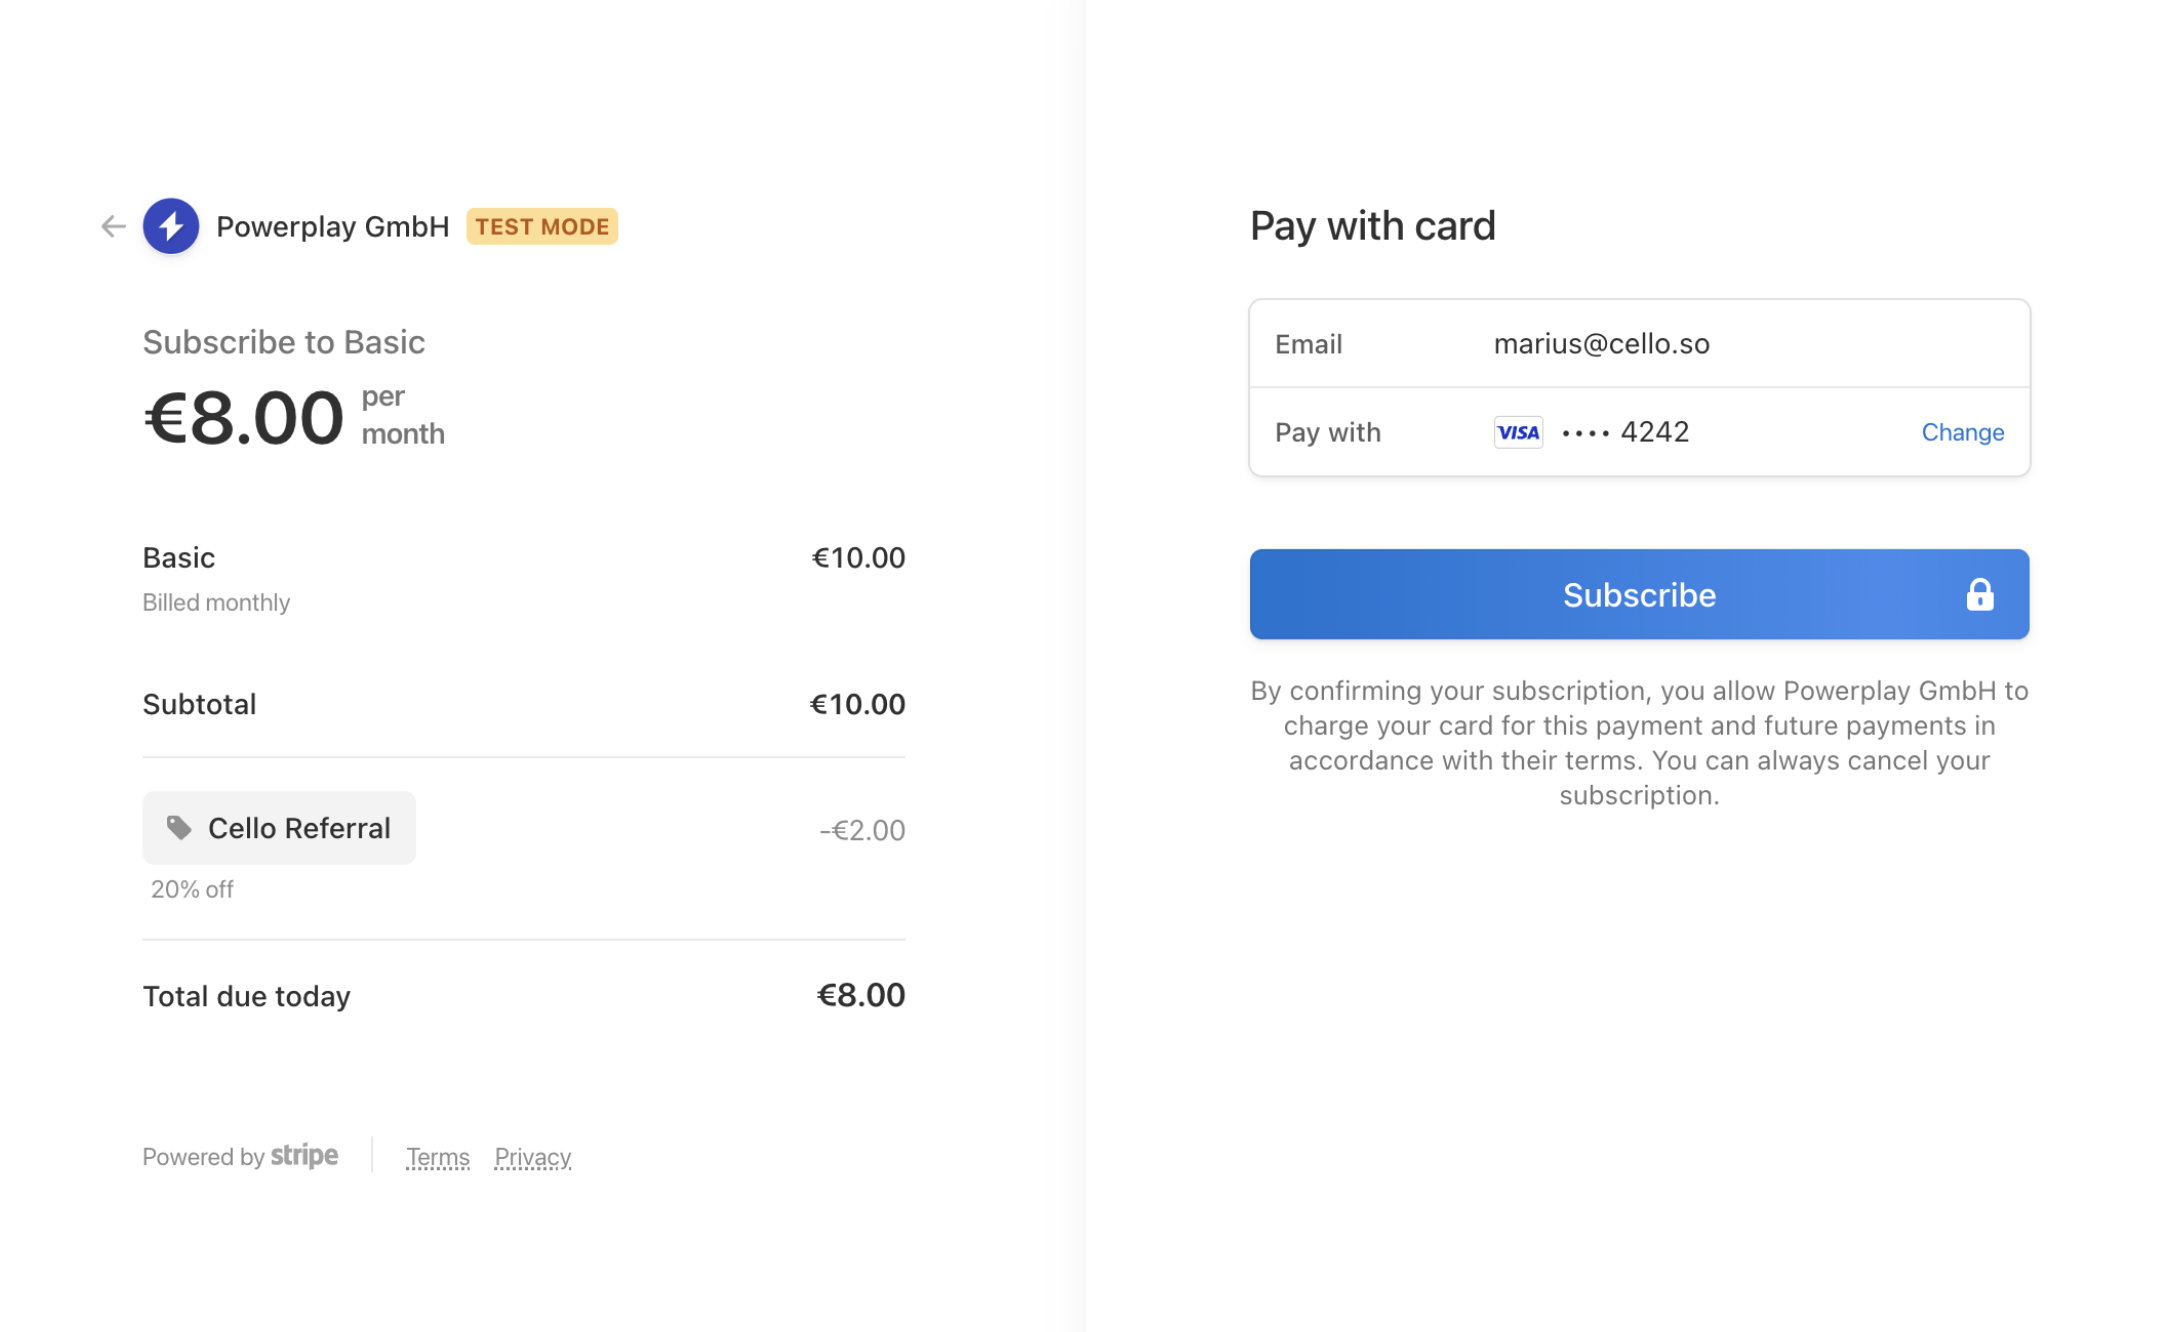 ## Using promotion codes for discounts
A **Promotion Code** represents a customer-redeemable code for a coupon. They can be used for the **Stripe Payment Link** **or custom-built forms**. Here are their key characteristics:
* When using a **Promotion Code,** the setup of an underlying coupon is also required.
* **Promotion Codes** can be used to create multiple codes for a single coupon.
* Because **Promotion Codes** are used by customers to redeem a coupon, they are exposed to customers.
### Pre-fill the promotion code in Stripe Payment Link
With the URL parameter `prefilled_promo_code` a promo code can be automatically passed to the UI. The form automatically picks up the parameter from the URL and pre-fills the promotion code field. More details can be found [here](https://stripe.com/docs/payments/payment-links#url-parameters).
**Example:**
10% off for 3 months via promo code `CELLO`
[https://buy.stripe.com/cello?prefilled\_promo\_code=CELLO](https://buy.stripe.com/cello?prefilled_promo_code=CELLO)
## Using promotion codes for discounts
A **Promotion Code** represents a customer-redeemable code for a coupon. They can be used for the **Stripe Payment Link** **or custom-built forms**. Here are their key characteristics:
* When using a **Promotion Code,** the setup of an underlying coupon is also required.
* **Promotion Codes** can be used to create multiple codes for a single coupon.
* Because **Promotion Codes** are used by customers to redeem a coupon, they are exposed to customers.
### Pre-fill the promotion code in Stripe Payment Link
With the URL parameter `prefilled_promo_code` a promo code can be automatically passed to the UI. The form automatically picks up the parameter from the URL and pre-fills the promotion code field. More details can be found [here](https://stripe.com/docs/payments/payment-links#url-parameters).
**Example:**
10% off for 3 months via promo code `CELLO`
[https://buy.stripe.com/cello?prefilled\_promo\_code=CELLO](https://buy.stripe.com/cello?prefilled_promo_code=CELLO)
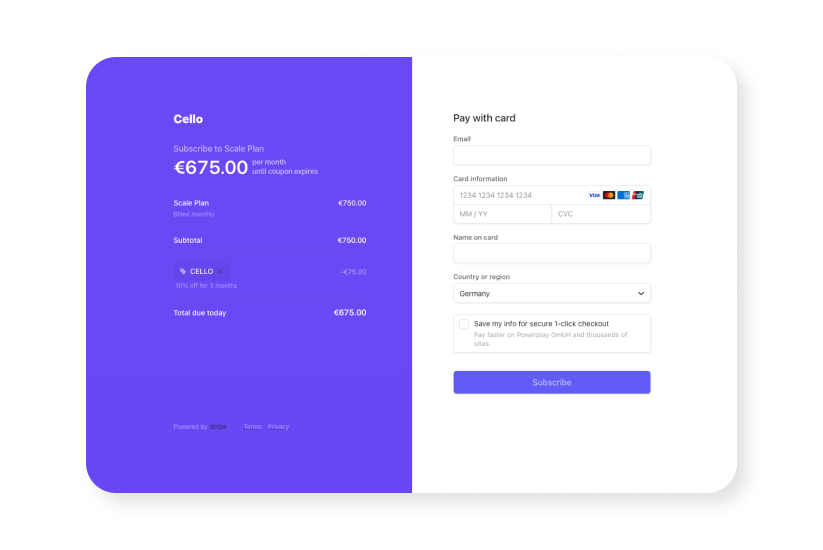 # Optimizing Referral Landing Page
Source: https://docs.cello.so/guides/user-experience/optimizing-landing-pages
This guide focuses on optimizing landing pages for referrals, a critical step in the user journey
This guide focuses on optimizing landing pages for referrals, a critical step in the user journey. A referee's first interaction with your product occurs when they follow an invite link, making the page they land on a key determinant in the success of your referral program.
### In this guide
This guide walks you through the key building blocks of a referral-optimized landing page to ensure referees smoothly transition from interested to signing up.
There are a few approaches you can take when designing your referee signup flow:
* [Using a dedicated landing page](#dedicated-landing-page) Recommended
* [Using your home page as the landing page with inline personalization](#home-page-as-the-landing-page-with-inline-personalization)
* [Using your home page as the landing page with our new user banner for personalization](#home-page-as-the-landing-page-with-new-user-banner) No code
## Dedicated landing page
A dedicated page that the referee lands on when clicking on the invite link has shown to have up to **x2 higher conversion rate** if done right. Below, you can find examples of the landing pages we like along with the key building blocks to make a dedicated landing page perform.
# Optimizing Referral Landing Page
Source: https://docs.cello.so/guides/user-experience/optimizing-landing-pages
This guide focuses on optimizing landing pages for referrals, a critical step in the user journey
This guide focuses on optimizing landing pages for referrals, a critical step in the user journey. A referee's first interaction with your product occurs when they follow an invite link, making the page they land on a key determinant in the success of your referral program.
### In this guide
This guide walks you through the key building blocks of a referral-optimized landing page to ensure referees smoothly transition from interested to signing up.
There are a few approaches you can take when designing your referee signup flow:
* [Using a dedicated landing page](#dedicated-landing-page) Recommended
* [Using your home page as the landing page with inline personalization](#home-page-as-the-landing-page-with-inline-personalization)
* [Using your home page as the landing page with our new user banner for personalization](#home-page-as-the-landing-page-with-new-user-banner) No code
## Dedicated landing page
A dedicated page that the referee lands on when clicking on the invite link has shown to have up to **x2 higher conversion rate** if done right. Below, you can find examples of the landing pages we like along with the key building blocks to make a dedicated landing page perform.
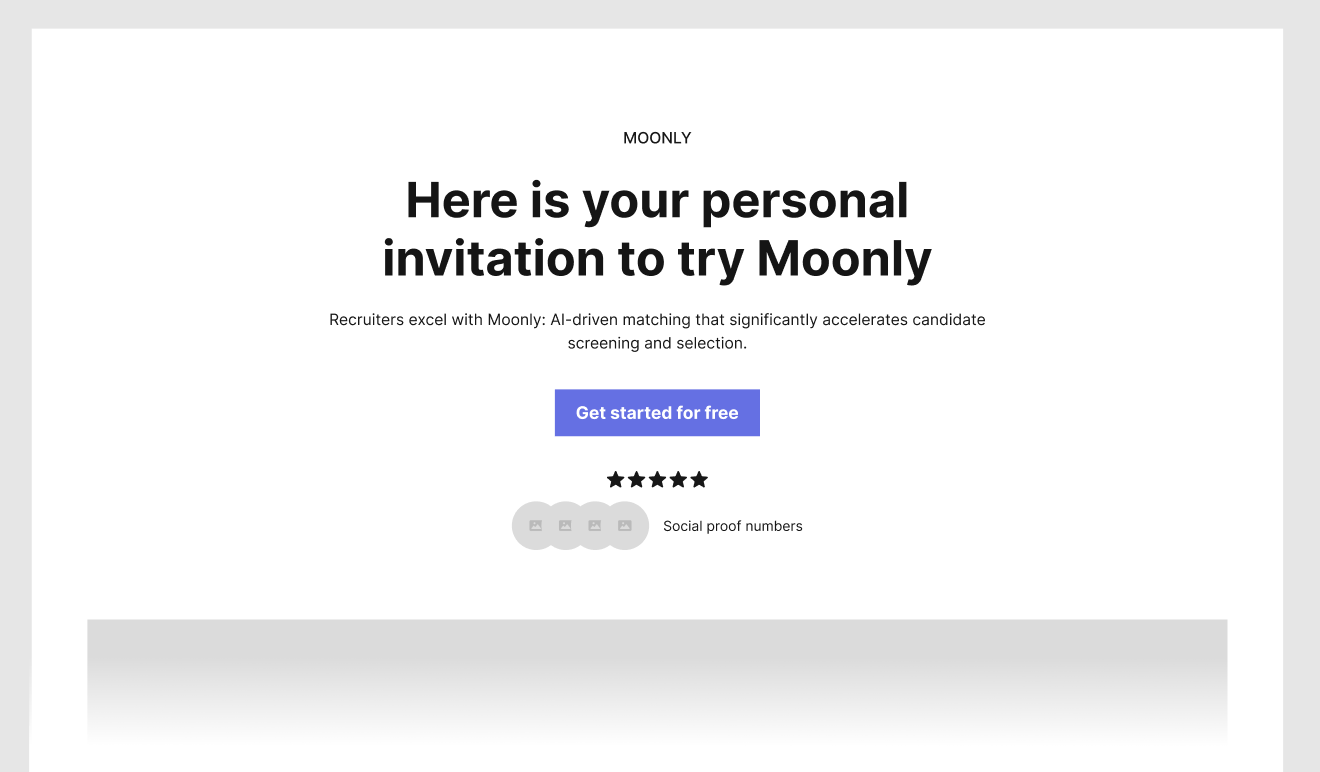 ### Key building blocks
#### Headline: Personalized Exclusivity
Craft a headline that feels exclusive and personal. [Use personalization](#add-personalization) for additional social proof like adding the referrer's name, and highlight [any special discount or reward](#add-a-new-user-discount-or-reward). This approach creates a sense of trust and urgency.
#### Key Value Proposition: Clarity in One Sentence
Distill your product's core benefit into a single, compelling sentence. This should quickly inform the visitor whether your product meets their needs, making their decision process easier and faster.
#### Content: Concise and Informative
Streamline your content compared to your main homepage. Provide just enough detail to help visitors understand your product and how it can work for them, without overwhelming them or necessitating navigation away from the page.
#### CTA Focus: Direct and Offer-Centric
Make your Call-to-Action (CTA) clear and direct, with an emphasis on the action you want the referee to take. If there's a special offer or discount, ensure your CTA highlights this to maximize conversion.
#### Social Proof: Credibility through Endorsements
Include social proofs such as G2/Capterra badges, Trustpilot ratings, customer logos, and quotes. These elements build trust and credibility, showing potential users that others have had positive experiences with your product.
#### FAQs: Contextual Information
Integrate a section for Frequently Asked Questions (FAQs) to address common queries. This helps provide referees with all the necessary information on the same page, reducing the likelihood of them leaving the page without signing up. If they return later, they can still be tracked towards the referral, but the best time to capture a new user is the first time they click the referral link.
### Add a new user discount or reward
Offering discounts to referees effectively boosts signup conversion by fostering urgency, encouraging active promotion, reducing cost concerns, and giving a competitive advantage when similar incentives aren't available from competitors. [Learn more about adding discounts 👉](/guides/user-experience/adding-discounts)
If your program offers discounts or rewards to referees, make sure to highlight it in the Headline and CTA.
### Key building blocks
#### Headline: Personalized Exclusivity
Craft a headline that feels exclusive and personal. [Use personalization](#add-personalization) for additional social proof like adding the referrer's name, and highlight [any special discount or reward](#add-a-new-user-discount-or-reward). This approach creates a sense of trust and urgency.
#### Key Value Proposition: Clarity in One Sentence
Distill your product's core benefit into a single, compelling sentence. This should quickly inform the visitor whether your product meets their needs, making their decision process easier and faster.
#### Content: Concise and Informative
Streamline your content compared to your main homepage. Provide just enough detail to help visitors understand your product and how it can work for them, without overwhelming them or necessitating navigation away from the page.
#### CTA Focus: Direct and Offer-Centric
Make your Call-to-Action (CTA) clear and direct, with an emphasis on the action you want the referee to take. If there's a special offer or discount, ensure your CTA highlights this to maximize conversion.
#### Social Proof: Credibility through Endorsements
Include social proofs such as G2/Capterra badges, Trustpilot ratings, customer logos, and quotes. These elements build trust and credibility, showing potential users that others have had positive experiences with your product.
#### FAQs: Contextual Information
Integrate a section for Frequently Asked Questions (FAQs) to address common queries. This helps provide referees with all the necessary information on the same page, reducing the likelihood of them leaving the page without signing up. If they return later, they can still be tracked towards the referral, but the best time to capture a new user is the first time they click the referral link.
### Add a new user discount or reward
Offering discounts to referees effectively boosts signup conversion by fostering urgency, encouraging active promotion, reducing cost concerns, and giving a competitive advantage when similar incentives aren't available from competitors. [Learn more about adding discounts 👉](/guides/user-experience/adding-discounts)
If your program offers discounts or rewards to referees, make sure to highlight it in the Headline and CTA.
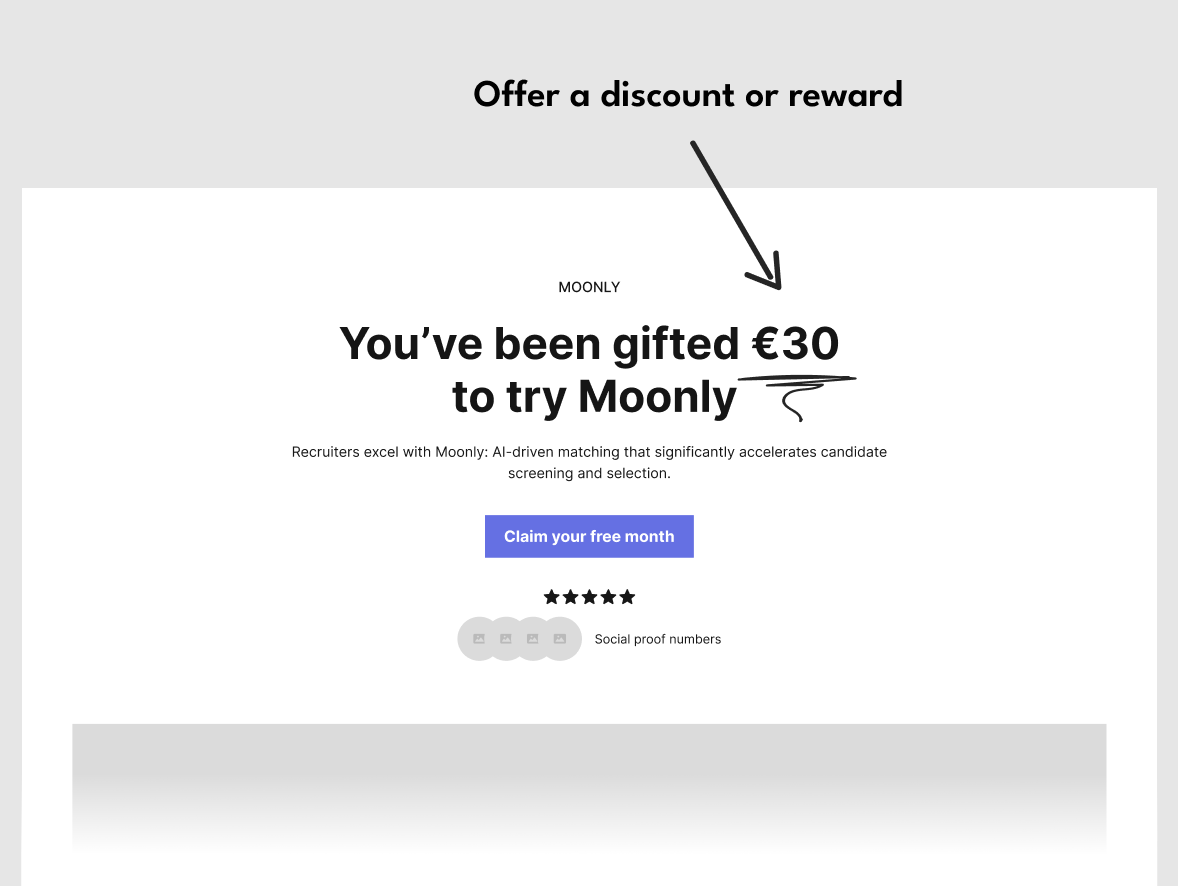 💡 Our research shows that **symmetric rewards** (i.e. the referrer and the referred have incentives of similar values) are more effective. This happens because referrers invest their social capital when recommending a product; having similar incentives makes the referral look fair to both parties involved.
**Examples of dedicated landing pages**
🔗 [Heyflow stand-alone landing page](https://get.heyflow.app/referral-lp?productId=go.heyflow.app\&utm_source=cello\&utm_medium=referral\&utm_campaign=Cello-RS20-C1000-D50\&ucc=2dRGoRjgP7A#start)
🔗 [Cello stand-alone landing page with direct signup](https://cello.so/invitation/)
### Add personalization
*"The most credible advertising comes straight from the people we know and trust. More than eight-in-ten global respondents (88%) say they completely or somewhat trust the recommendations of friends and family." Nielsen Global Trust in Advertising Report, 2021*
Personalization and social proof, like using the referrer's name on the landing page, can contribute to converting referees into users. The personalization establishes trust and credibility, makes the offer more relevant and engaging, leverages an existing relationship, fosters a sense of community and belonging, reduces perceived risk, and has an emotional appeal. These elements together make the referral more compelling, encouraging referees to sign up. [Learn more about personalization 👉](/guides/user-experience/personalizing-referrals)
💡 Our research shows that **symmetric rewards** (i.e. the referrer and the referred have incentives of similar values) are more effective. This happens because referrers invest their social capital when recommending a product; having similar incentives makes the referral look fair to both parties involved.
**Examples of dedicated landing pages**
🔗 [Heyflow stand-alone landing page](https://get.heyflow.app/referral-lp?productId=go.heyflow.app\&utm_source=cello\&utm_medium=referral\&utm_campaign=Cello-RS20-C1000-D50\&ucc=2dRGoRjgP7A#start)
🔗 [Cello stand-alone landing page with direct signup](https://cello.so/invitation/)
### Add personalization
*"The most credible advertising comes straight from the people we know and trust. More than eight-in-ten global respondents (88%) say they completely or somewhat trust the recommendations of friends and family." Nielsen Global Trust in Advertising Report, 2021*
Personalization and social proof, like using the referrer's name on the landing page, can contribute to converting referees into users. The personalization establishes trust and credibility, makes the offer more relevant and engaging, leverages an existing relationship, fosters a sense of community and belonging, reduces perceived risk, and has an emotional appeal. These elements together make the referral more compelling, encouraging referees to sign up. [Learn more about personalization 👉](/guides/user-experience/personalizing-referrals)
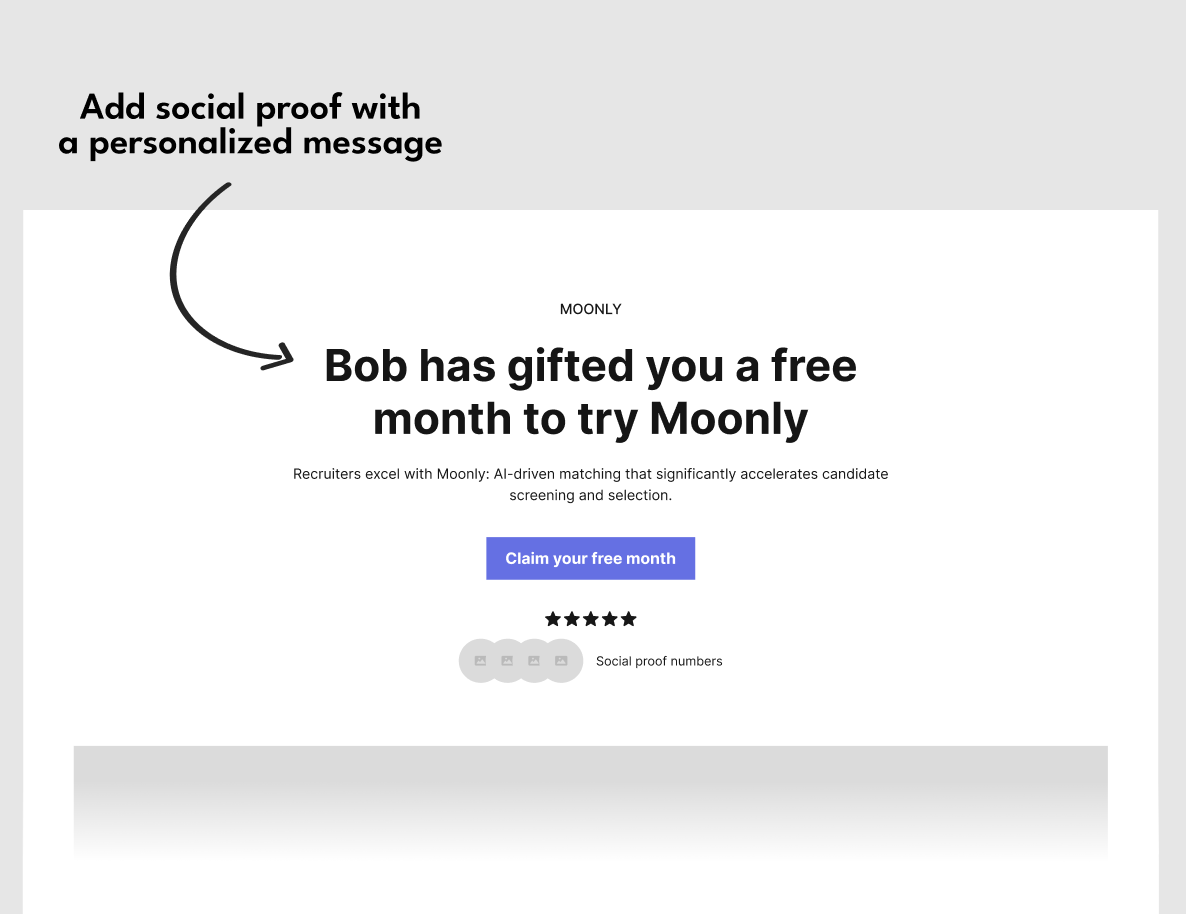 💡 **Leveraging existing assets -** Do you already have an optimized landing page for ads? You don't need to start from scratch. Reuse the layout and some of the content to build a dedicated referral landing page.
**Examples of personalized landing pages**
🔗 [Reword stand-alone landing page with personalization](https://reword.com/referral?productId=reword.com\&ucc=IX2FHjt1Y0Z\&celloN=Q29udGVudCBDeWJvcmc)
🔗 [Wise Referral Program with personalization](https://wise.com/invite/dic/tanjam2?utm_source=desktop-invite-tab-copylink\&utm_medium=invite\&utm_campaign=\&utm_content=\&referralCode=tanjam2)
🔗 [Superhuman landing page with personalization](https://superhuman.com/refer?utm_source=product\&utm_medium=signature\&utm_campaign=bob%40bobinsky.me)
## Home page as the landing page with inline personalization
Use your existing home page as landing page and [add a discount](/guides/user-experience/new-user-discounts) and [personalization](/guides/user-experience/personalizing-referrals) into your home page Headline and CTA.
💡 **Leveraging existing assets -** Do you already have an optimized landing page for ads? You don't need to start from scratch. Reuse the layout and some of the content to build a dedicated referral landing page.
**Examples of personalized landing pages**
🔗 [Reword stand-alone landing page with personalization](https://reword.com/referral?productId=reword.com\&ucc=IX2FHjt1Y0Z\&celloN=Q29udGVudCBDeWJvcmc)
🔗 [Wise Referral Program with personalization](https://wise.com/invite/dic/tanjam2?utm_source=desktop-invite-tab-copylink\&utm_medium=invite\&utm_campaign=\&utm_content=\&referralCode=tanjam2)
🔗 [Superhuman landing page with personalization](https://superhuman.com/refer?utm_source=product\&utm_medium=signature\&utm_campaign=bob%40bobinsky.me)
## Home page as the landing page with inline personalization
Use your existing home page as landing page and [add a discount](/guides/user-experience/new-user-discounts) and [personalization](/guides/user-experience/personalizing-referrals) into your home page Headline and CTA.
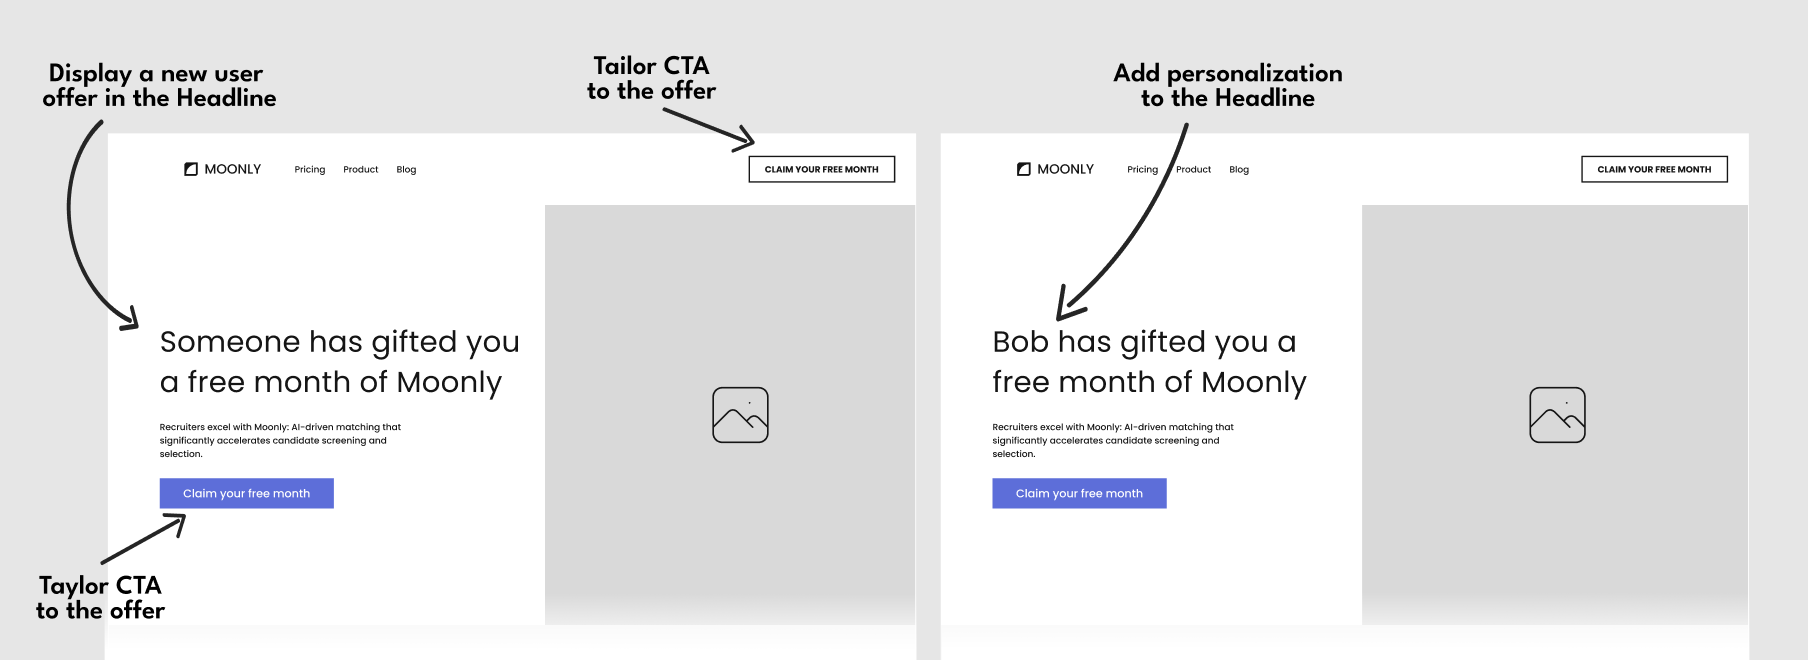 ## Home page as the landing page with New User Banner
The [New User Banner](/guides/user-experience/personalizing-referrals) is easily added to your landing page by integrating the [Cello attribution script](/sdk/client-side/attribution-js-introduction). Visitors who follow the Cello invite link will have a banner that includes the discounts, tailored CTA, and personalization on your home page.
## Home page as the landing page with New User Banner
The [New User Banner](/guides/user-experience/personalizing-referrals) is easily added to your landing page by integrating the [Cello attribution script](/sdk/client-side/attribution-js-introduction). Visitors who follow the Cello invite link will have a banner that includes the discounts, tailored CTA, and personalization on your home page.
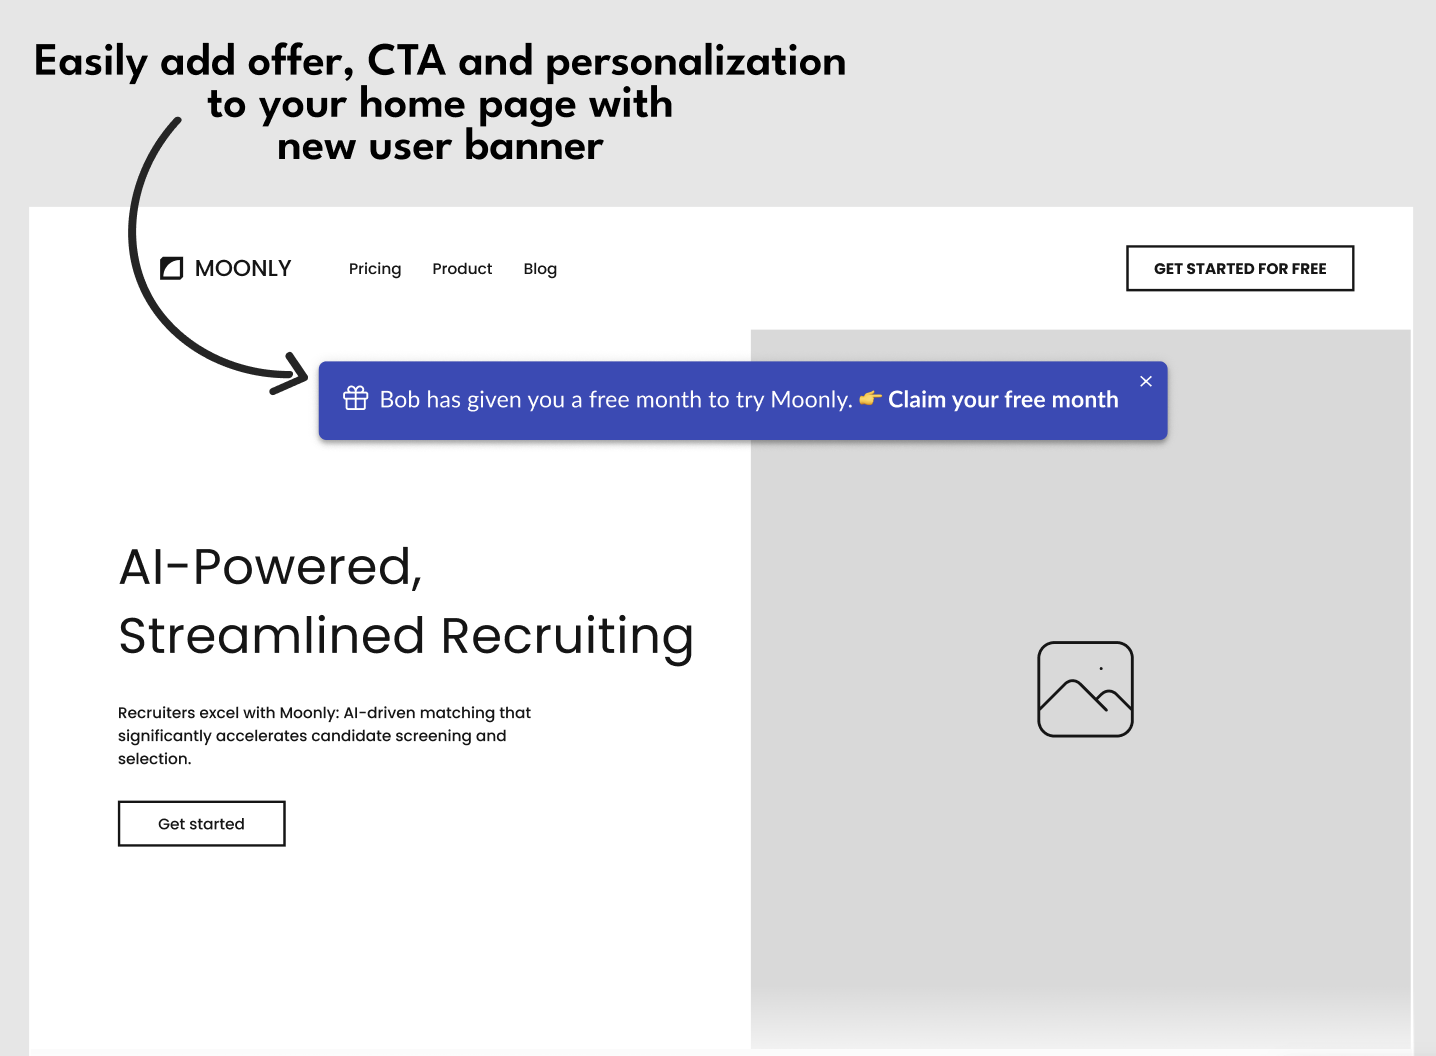 **Examples of landing pages with new user banner**
🔗 [MeetGeek Website with personalized new user banner](https://meetgeek.ai/meetgeek-referral?productId=app.meetgeek.ai\&ucc=vTlj7ne4Fkf\&n=VG9iaWFz)
## Get started now
Once your referral landing page is ready to go, go to you product dashboard [New User Experience setup page](https://portal.cello.so/setup/new-user-experience) and switch to **Custom landing page**.
In **Custom landing page URL** field, add the URL to your new landing page and **Save**.
**Examples of landing pages with new user banner**
🔗 [MeetGeek Website with personalized new user banner](https://meetgeek.ai/meetgeek-referral?productId=app.meetgeek.ai\&ucc=vTlj7ne4Fkf\&n=VG9iaWFz)
## Get started now
Once your referral landing page is ready to go, go to you product dashboard [New User Experience setup page](https://portal.cello.so/setup/new-user-experience) and switch to **Custom landing page**.
In **Custom landing page URL** field, add the URL to your new landing page and **Save**.
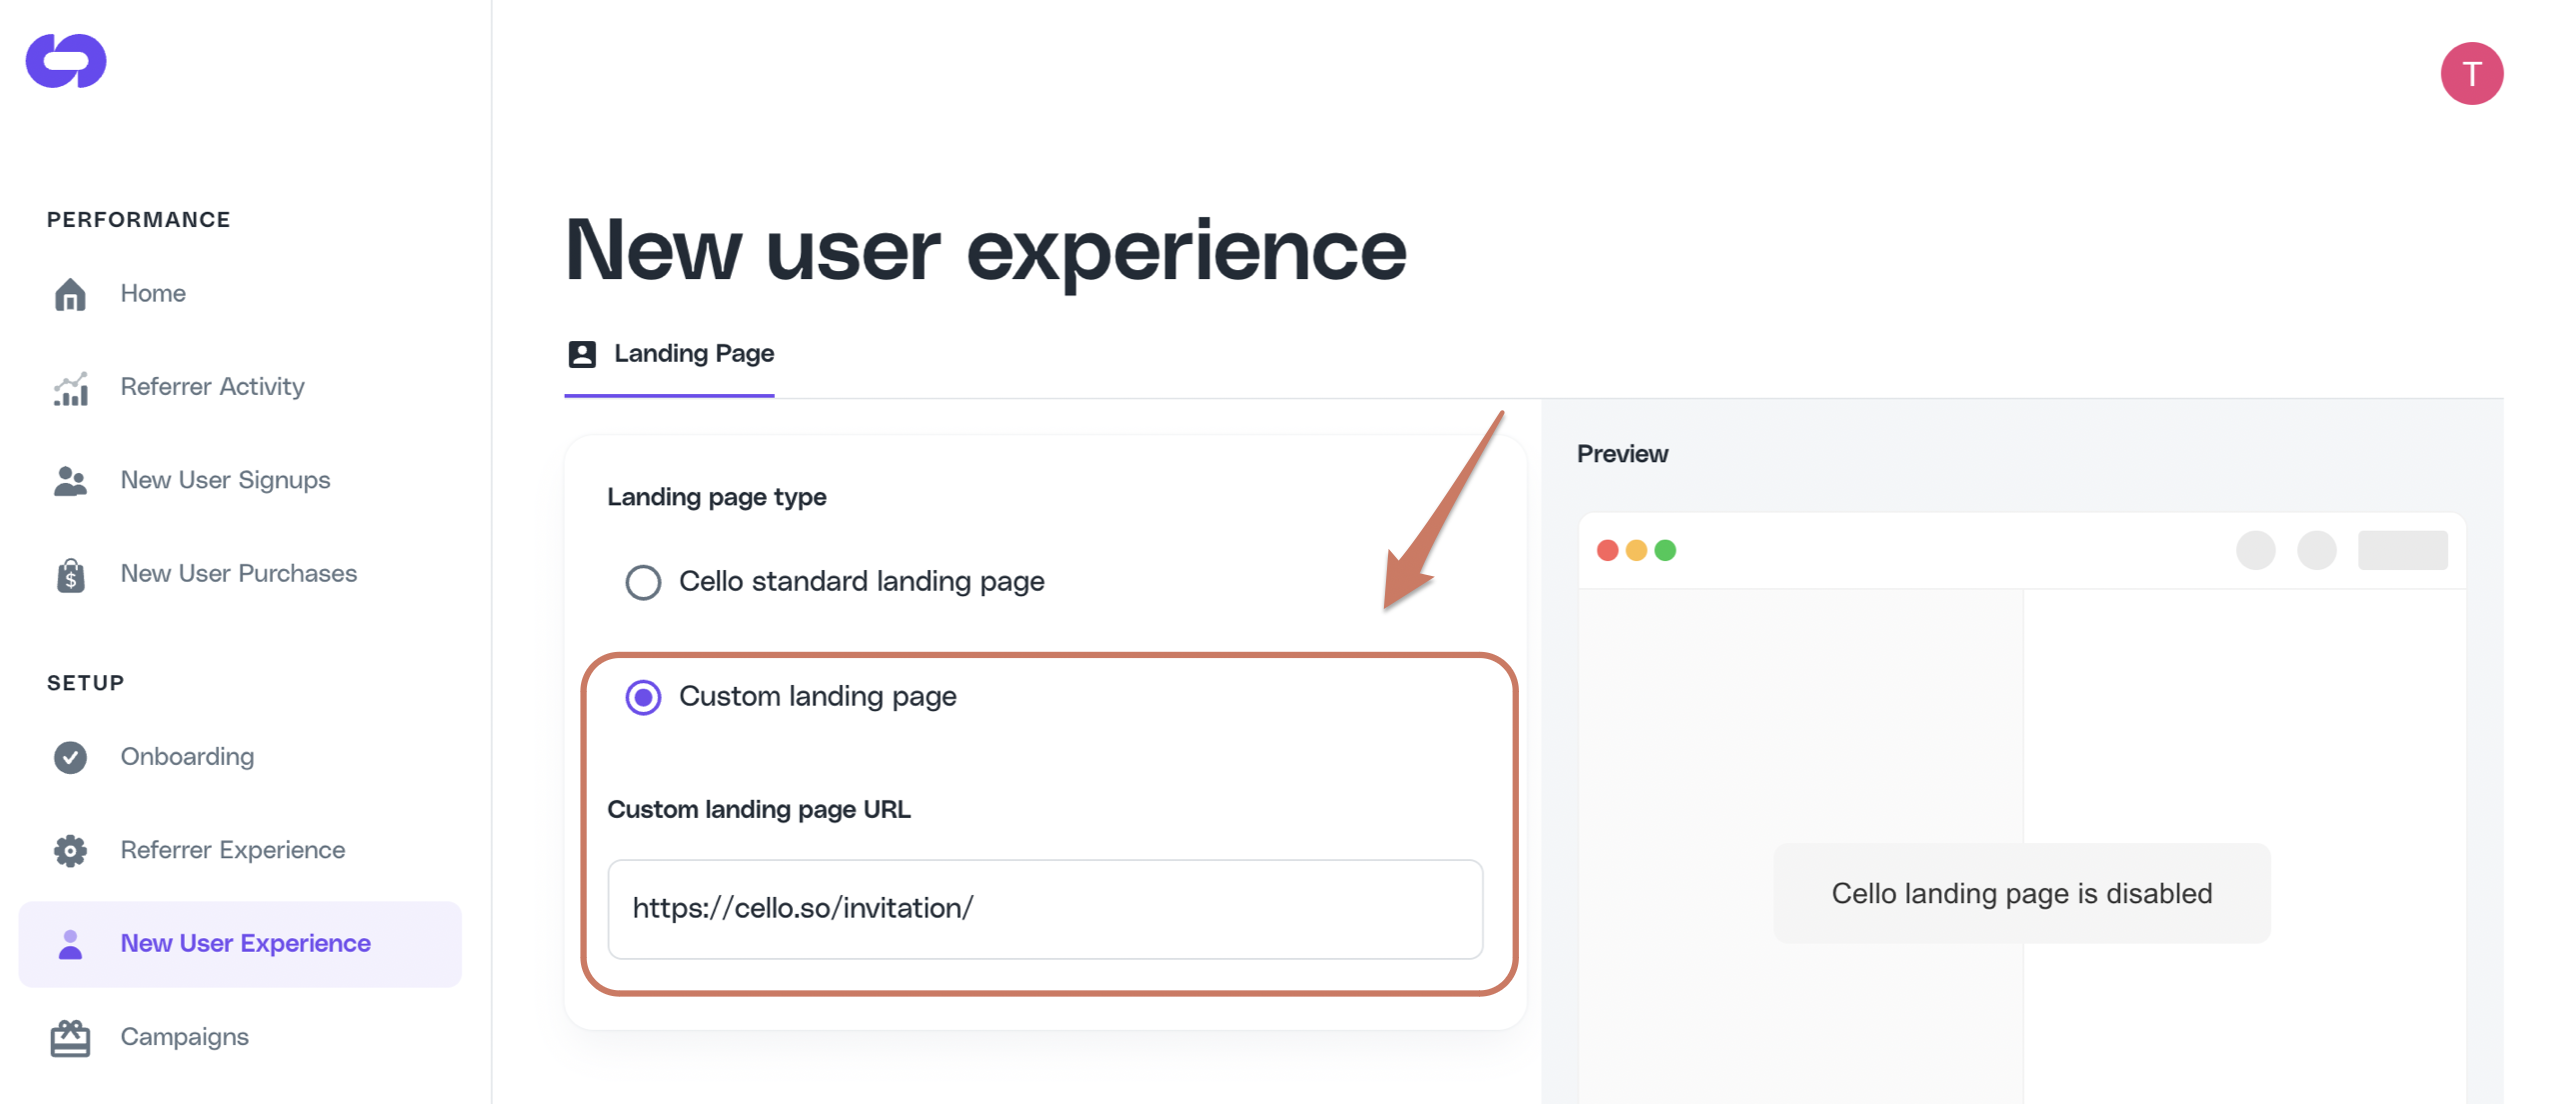 # Overview
Source: https://docs.cello.so/guides/user-experience/overview
The Referral Component is an all-in-one referral experience, easily added to your web application with just a few lines of code
The Referral Component is an all-in-one referral experience, easily added to your web application with just a few lines of code. It takes care of things like referrer first-time experience, enabling users to share links, updating them on progress, and handling rewards. This functionality helps to keep your users happy and engaged with your referral program.
Let's review some of the key capabilities 👉
## Adding the component to your product
Adding the Referral Component to your product is straightforward. You can get it up and running in your test environment in just a few minutes. Simply follow the instructions or the [Referral Component Quickstart](/referral-component/quickstart).
Cello provides a few different options to add the component to your product. You can use either the default Cello button (FAB) or integrate Cello into a menu via the [Custom Launcher](/referral-component/custom-launcher). Either option can open with the component appearing as a pop-up or modal view.
# Overview
Source: https://docs.cello.so/guides/user-experience/overview
The Referral Component is an all-in-one referral experience, easily added to your web application with just a few lines of code
The Referral Component is an all-in-one referral experience, easily added to your web application with just a few lines of code. It takes care of things like referrer first-time experience, enabling users to share links, updating them on progress, and handling rewards. This functionality helps to keep your users happy and engaged with your referral program.
Let's review some of the key capabilities 👉
## Adding the component to your product
Adding the Referral Component to your product is straightforward. You can get it up and running in your test environment in just a few minutes. Simply follow the instructions or the [Referral Component Quickstart](/referral-component/quickstart).
Cello provides a few different options to add the component to your product. You can use either the default Cello button (FAB) or integrate Cello into a menu via the [Custom Launcher](/referral-component/custom-launcher). Either option can open with the component appearing as a pop-up or modal view.
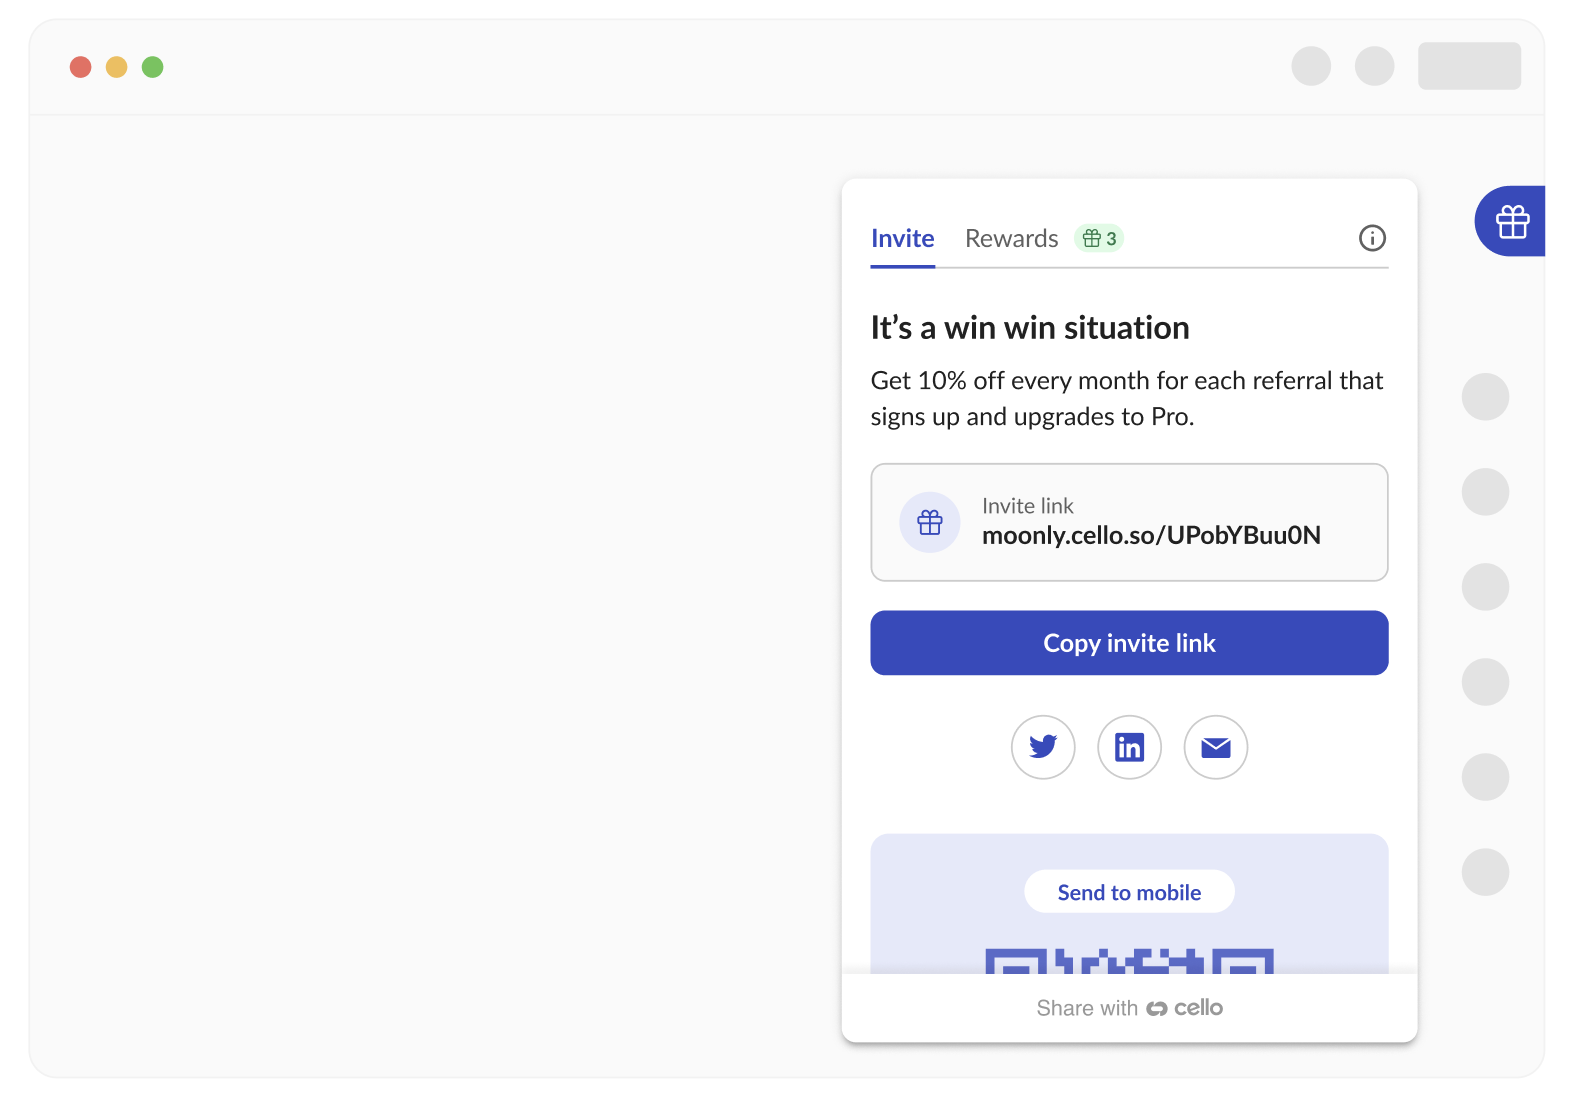 ## First-time experience
The Cello Referral Component provides an onboarding experience for first-time users of the program. It's a way to get users excited about the opportunity and explain how the program works in 3 easy steps. All the texts of the onboarding experience can be customized to better explain your unique value proposition.
## First-time experience
The Cello Referral Component provides an onboarding experience for first-time users of the program. It's a way to get users excited about the opportunity and explain how the program works in 3 easy steps. All the texts of the onboarding experience can be customized to better explain your unique value proposition.
 ## Your offer, front and center
The referral program text and offer are fully customizable and can be translated into multiple languages.

## Easy sharing
Cello provides many sharing options to choose from. Simple link copy, social sharing including Twitter, Facebook, LinkedIn, and email, and transfer to mobile by using a QR-code where a user can forward the invite using all the options provided directly from their mobile device.

## Engaging users with announcements
The Cello Referral Component provides a robust announcement feature to activate first-time referrers, keep the referral program top of mind, encourage repeat behaviour, and keep your users up to date with important updates.

Announcements can be customized based on the Referral Component integration option you have chosen. [Anchor announcements to a specific menu item](/referral-component/custom-launcher#add-announcement-selector) or choose to have them appear as toasts or banners.

## Keeping users update with emails
Referral programs thrive on timely engagement. Knowing instantly when there's activity tied to a referrals means your users can celebrate successes and continue to share more effectively. Whether it's their first successful share, a brand-new signup or unlocking a new reward, email notifications ensure they never miss a beat in the referral journey.

## Getting Rewarded
When users receive their first reward, they will be prompted to provide payment details and can select how they would like to receive their reward. They may also be asked to provide additional information if required to receive a payment in their specific country.

## Reward Countries and Payout Methods
Cello supports a growing list of countries\* where users can receive reward payments. Cello plans to continue expanding support for additional countries based on user feedback.
Cello can be automatically hidden for users in unsupported countries by providing country information when [integrating the Referral Component](/sdk/client-side/cello-js#celloboot). This is recommended to provide the best experience for your users.
Cello allows users to receive rewards via PayPal or Venmo payments. Additional payment options are planned based on user feedback.

All users are subject to the Cello [Terms of Service](https://cello-growth.notion.site/Terms-of-Service-40b8093e87e04429b862a601a1d23fc1/) and [Privacy Policy](https://cello-growth.notion.site/Privacy-Policy-for-Platform-76a94bd64cb44e1f92a6cec3ec5643ca) and can access details through the links that are provided. Referrers are able to get rewarded as a business and receive invoices for tax purposes.
Users are required to provide additional taxpayer information based on the specific country of residence and local reward thresholds or choose to be paid as a business by providing their VAT number.
Cello allows users to download credit notes directly from the Cello Referral Component. If they have at least one reward, they will see a link "Tax Information" link from the rewards tab under "Update Payment Details". Users who no longer have access to the Cello component can contact [support@cello.so](mailto:support@cello.so) to receive their credit notes through a standard support process.

*Supported Reward Countries: Australia, Austria, Bahrain, Belgium, Bermuda, Botswana, Brazil, Bulgaria, Canada, Cayman Islands, Chile, Croatia, Czechia, Denmark, Dominican Republic, Estonia, Faroe Islands, Finland, France, Georgia, Germany, Gibraltar, Greece, Greenland, Guatemala, Hong Kong SAR, Hungary, Iceland, India, Ireland, Israel, Italy, Japan, Latvia, Lesotho, Liechtenstein, Lithuania, Luxembourg, Malta, Mauritius, Mozambique, Netherlands, Nicaragua, Norway, Oman, Philippines, Poland, Portugal, Qatar, Romania, San Marino, Saudi Arabia, Senegal, Slovakia, Slovenia, South Africa, Spain, Sweden, Switzerland, United Kingdom, United States, Uruguay.*
## Texts and language
You can customize the default text that appears on the Referral Component and provide different language options for your users. The Cello component detects a user's language automatically or you can set it [using Referral Component JS methods](/sdk/client-side/cello-js).
We provide English, German, Spanish, French, Dutch, Italian, Portuguese, Japanese, Danish and Slovak by default and Cello will help you add additional languages on request.
# Personalizing Referrals
Source: https://docs.cello.so/guides/user-experience/personalizing-referrals
Add personalized messages to your landing pages to increase conversion rates
## Your offer, front and center
The referral program text and offer are fully customizable and can be translated into multiple languages.

## Easy sharing
Cello provides many sharing options to choose from. Simple link copy, social sharing including Twitter, Facebook, LinkedIn, and email, and transfer to mobile by using a QR-code where a user can forward the invite using all the options provided directly from their mobile device.

## Engaging users with announcements
The Cello Referral Component provides a robust announcement feature to activate first-time referrers, keep the referral program top of mind, encourage repeat behaviour, and keep your users up to date with important updates.

Announcements can be customized based on the Referral Component integration option you have chosen. [Anchor announcements to a specific menu item](/referral-component/custom-launcher#add-announcement-selector) or choose to have them appear as toasts or banners.

## Keeping users update with emails
Referral programs thrive on timely engagement. Knowing instantly when there's activity tied to a referrals means your users can celebrate successes and continue to share more effectively. Whether it's their first successful share, a brand-new signup or unlocking a new reward, email notifications ensure they never miss a beat in the referral journey.

## Getting Rewarded
When users receive their first reward, they will be prompted to provide payment details and can select how they would like to receive their reward. They may also be asked to provide additional information if required to receive a payment in their specific country.

## Reward Countries and Payout Methods
Cello supports a growing list of countries\* where users can receive reward payments. Cello plans to continue expanding support for additional countries based on user feedback.
Cello can be automatically hidden for users in unsupported countries by providing country information when [integrating the Referral Component](/sdk/client-side/cello-js#celloboot). This is recommended to provide the best experience for your users.
Cello allows users to receive rewards via PayPal or Venmo payments. Additional payment options are planned based on user feedback.

All users are subject to the Cello [Terms of Service](https://cello-growth.notion.site/Terms-of-Service-40b8093e87e04429b862a601a1d23fc1/) and [Privacy Policy](https://cello-growth.notion.site/Privacy-Policy-for-Platform-76a94bd64cb44e1f92a6cec3ec5643ca) and can access details through the links that are provided. Referrers are able to get rewarded as a business and receive invoices for tax purposes.
Users are required to provide additional taxpayer information based on the specific country of residence and local reward thresholds or choose to be paid as a business by providing their VAT number.
Cello allows users to download credit notes directly from the Cello Referral Component. If they have at least one reward, they will see a link "Tax Information" link from the rewards tab under "Update Payment Details". Users who no longer have access to the Cello component can contact [support@cello.so](mailto:support@cello.so) to receive their credit notes through a standard support process.

*Supported Reward Countries: Australia, Austria, Bahrain, Belgium, Bermuda, Botswana, Brazil, Bulgaria, Canada, Cayman Islands, Chile, Croatia, Czechia, Denmark, Dominican Republic, Estonia, Faroe Islands, Finland, France, Georgia, Germany, Gibraltar, Greece, Greenland, Guatemala, Hong Kong SAR, Hungary, Iceland, India, Ireland, Israel, Italy, Japan, Latvia, Lesotho, Liechtenstein, Lithuania, Luxembourg, Malta, Mauritius, Mozambique, Netherlands, Nicaragua, Norway, Oman, Philippines, Poland, Portugal, Qatar, Romania, San Marino, Saudi Arabia, Senegal, Slovakia, Slovenia, South Africa, Spain, Sweden, Switzerland, United Kingdom, United States, Uruguay.*
## Texts and language
You can customize the default text that appears on the Referral Component and provide different language options for your users. The Cello component detects a user's language automatically or you can set it [using Referral Component JS methods](/sdk/client-side/cello-js).
We provide English, German, Spanish, French, Dutch, Italian, Portuguese, Japanese, Danish and Slovak by default and Cello will help you add additional languages on request.
# Personalizing Referrals
Source: https://docs.cello.so/guides/user-experience/personalizing-referrals
Add personalized messages to your landing pages to increase conversion rates
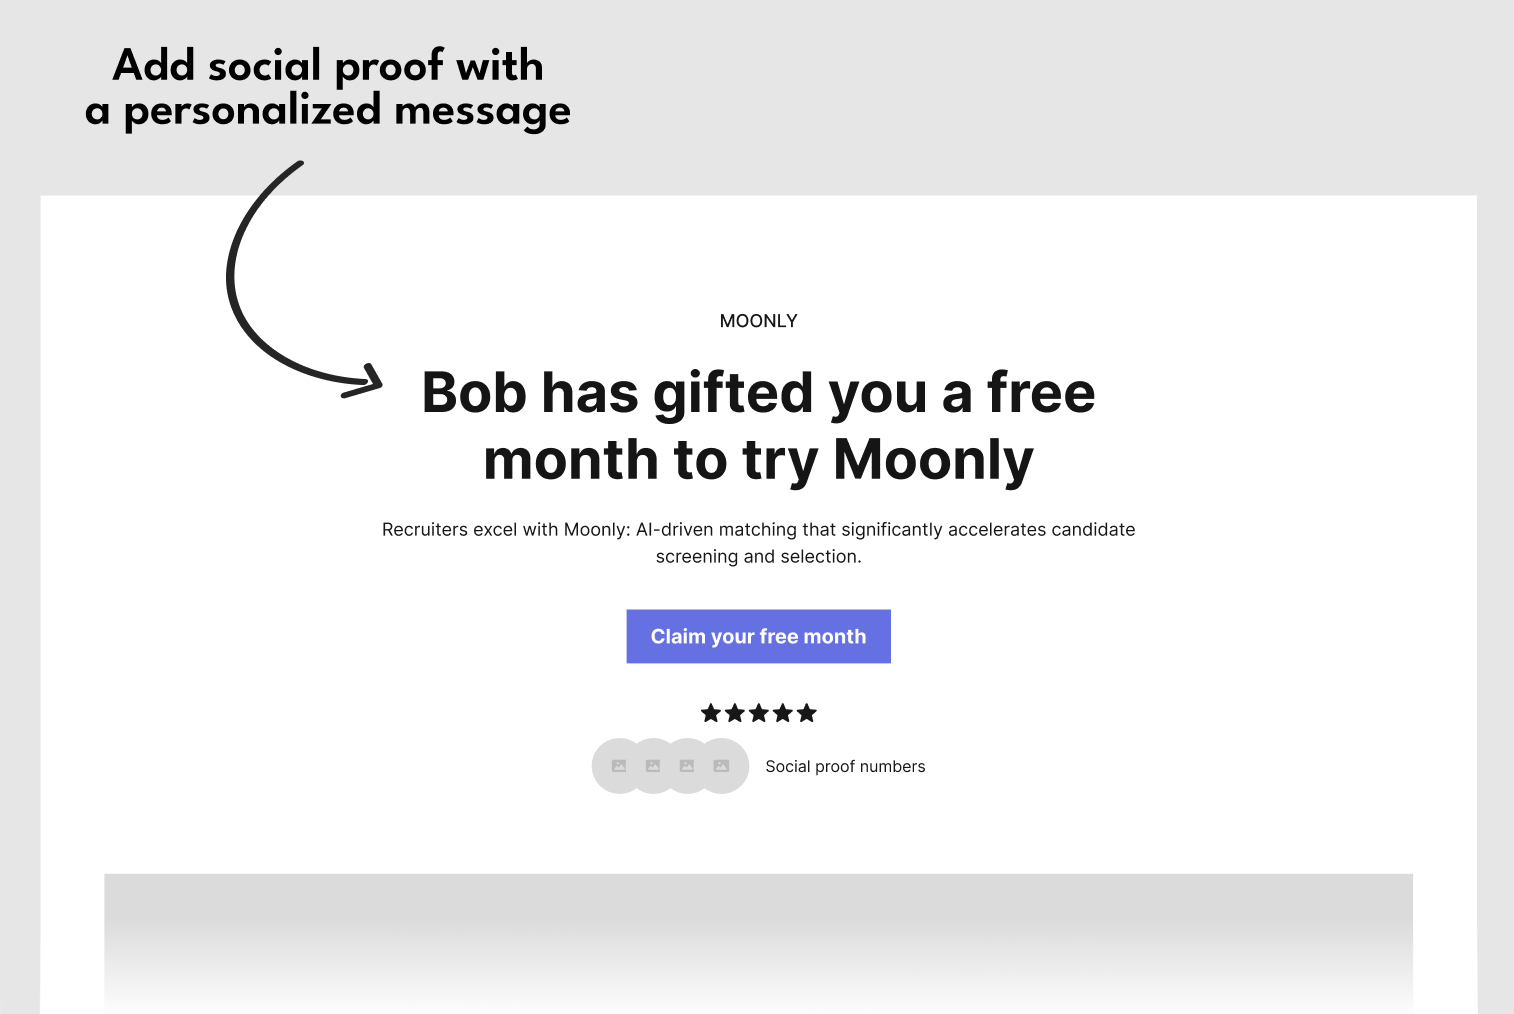 In this guide we will go through:
* The benefits of personalization
* How to add personalization to your landing pages:
* [Inline](#add-personalization-to-the-headline-or-other-page-element) Recommended
* [Using the new user banner](#add-personalization-with-new-user-banner) No code
## Why personalization?
Personalization and social proof, such as including the referrer's name in the landing page headline, are crucial for converting referees into signed-up users due to several key reasons:
1. **Enhanced Trust and Credibility:** Seeing a familiar name like "Bob has gifted you a free month to try Moonly" immediately establishes a sense of trust. The referee recognizes the referrer, which lends credibility to the offer.
2. **Increased Relevance and Engagement:** Personalization makes the offer feel more tailored and relevant to the referee. A message that appears to be handpicked for them can create a stronger emotional connection and engagement with the content, increasing the likelihood of a positive response.
3. **Leveraging Existing Relationships:** Utilizing the referrer's name capitalizes on the existing relationship between the referrer and the referee. This relational dynamic can be a powerful motivator, as referees often value and trust the opinions and choices of their friends or contacts.
4. **Creating a Sense of Community and Belonging:** Personalized messages can give referees the feeling of being part of an exclusive group or community, especially when the message implies a gift or a special offer from someone they know. This sense of belonging can be a strong incentive to join and participate.
5. **Reducing Perceived Risk:** For new users, trying a new service involves some level of perceived risk or uncertainty. A personalized referral reduces this perceived risk, as it comes with an implicit endorsement from someone the referee trusts.
6. **Emotional Appeal:** Personalized messages can evoke an emotional response. Knowing that a friend or acquaintance has thoughtfully extended an offer can create feelings of appreciation and reciprocity, further encouraging the referee to sign up.
In this guide we will go through:
* The benefits of personalization
* How to add personalization to your landing pages:
* [Inline](#add-personalization-to-the-headline-or-other-page-element) Recommended
* [Using the new user banner](#add-personalization-with-new-user-banner) No code
## Why personalization?
Personalization and social proof, such as including the referrer's name in the landing page headline, are crucial for converting referees into signed-up users due to several key reasons:
1. **Enhanced Trust and Credibility:** Seeing a familiar name like "Bob has gifted you a free month to try Moonly" immediately establishes a sense of trust. The referee recognizes the referrer, which lends credibility to the offer.
2. **Increased Relevance and Engagement:** Personalization makes the offer feel more tailored and relevant to the referee. A message that appears to be handpicked for them can create a stronger emotional connection and engagement with the content, increasing the likelihood of a positive response.
3. **Leveraging Existing Relationships:** Utilizing the referrer's name capitalizes on the existing relationship between the referrer and the referee. This relational dynamic can be a powerful motivator, as referees often value and trust the opinions and choices of their friends or contacts.
4. **Creating a Sense of Community and Belonging:** Personalized messages can give referees the feeling of being part of an exclusive group or community, especially when the message implies a gift or a special offer from someone they know. This sense of belonging can be a strong incentive to join and participate.
5. **Reducing Perceived Risk:** For new users, trying a new service involves some level of perceived risk or uncertainty. A personalized referral reduces this perceived risk, as it comes with an implicit endorsement from someone the referee trusts.
6. **Emotional Appeal:** Personalized messages can evoke an emotional response. Knowing that a friend or acquaintance has thoughtfully extended an offer can create feelings of appreciation and reciprocity, further encouraging the referee to sign up.
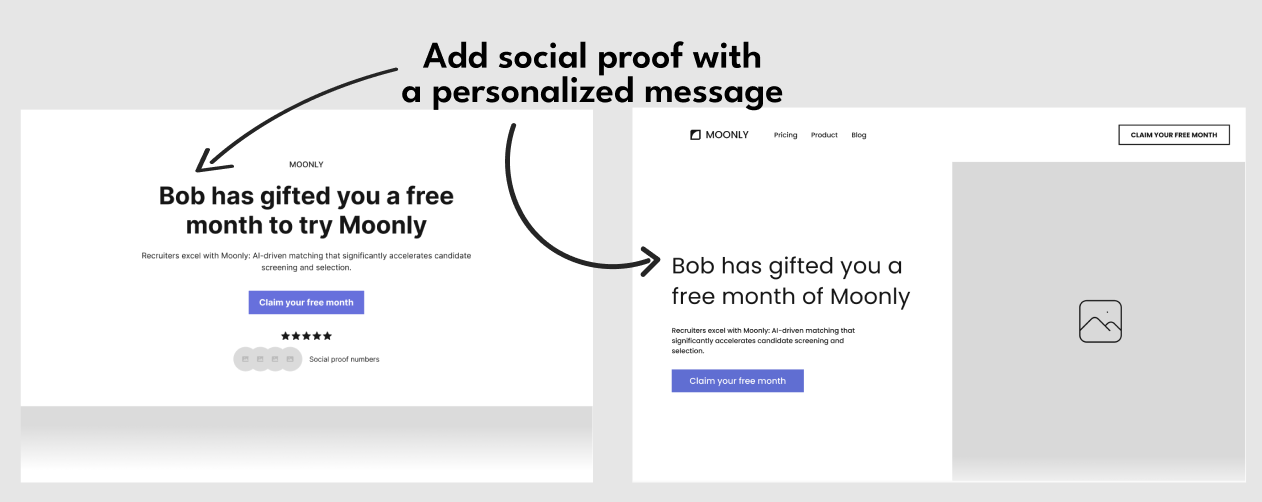 To add the referrer's name to an element on the page that the new user lands on when following an invite link, you need to follow these steps:
### Turn personalization on for your product
Go to [New User Experience setup in Cello Portal -> Personalization tab](https://portal.cello.so/setup/new-user-experience) and add personalization.
To add the referrer's name to an element on the page that the new user lands on when following an invite link, you need to follow these steps:
### Turn personalization on for your product
Go to [New User Experience setup in Cello Portal -> Personalization tab](https://portal.cello.so/setup/new-user-experience) and add personalization.
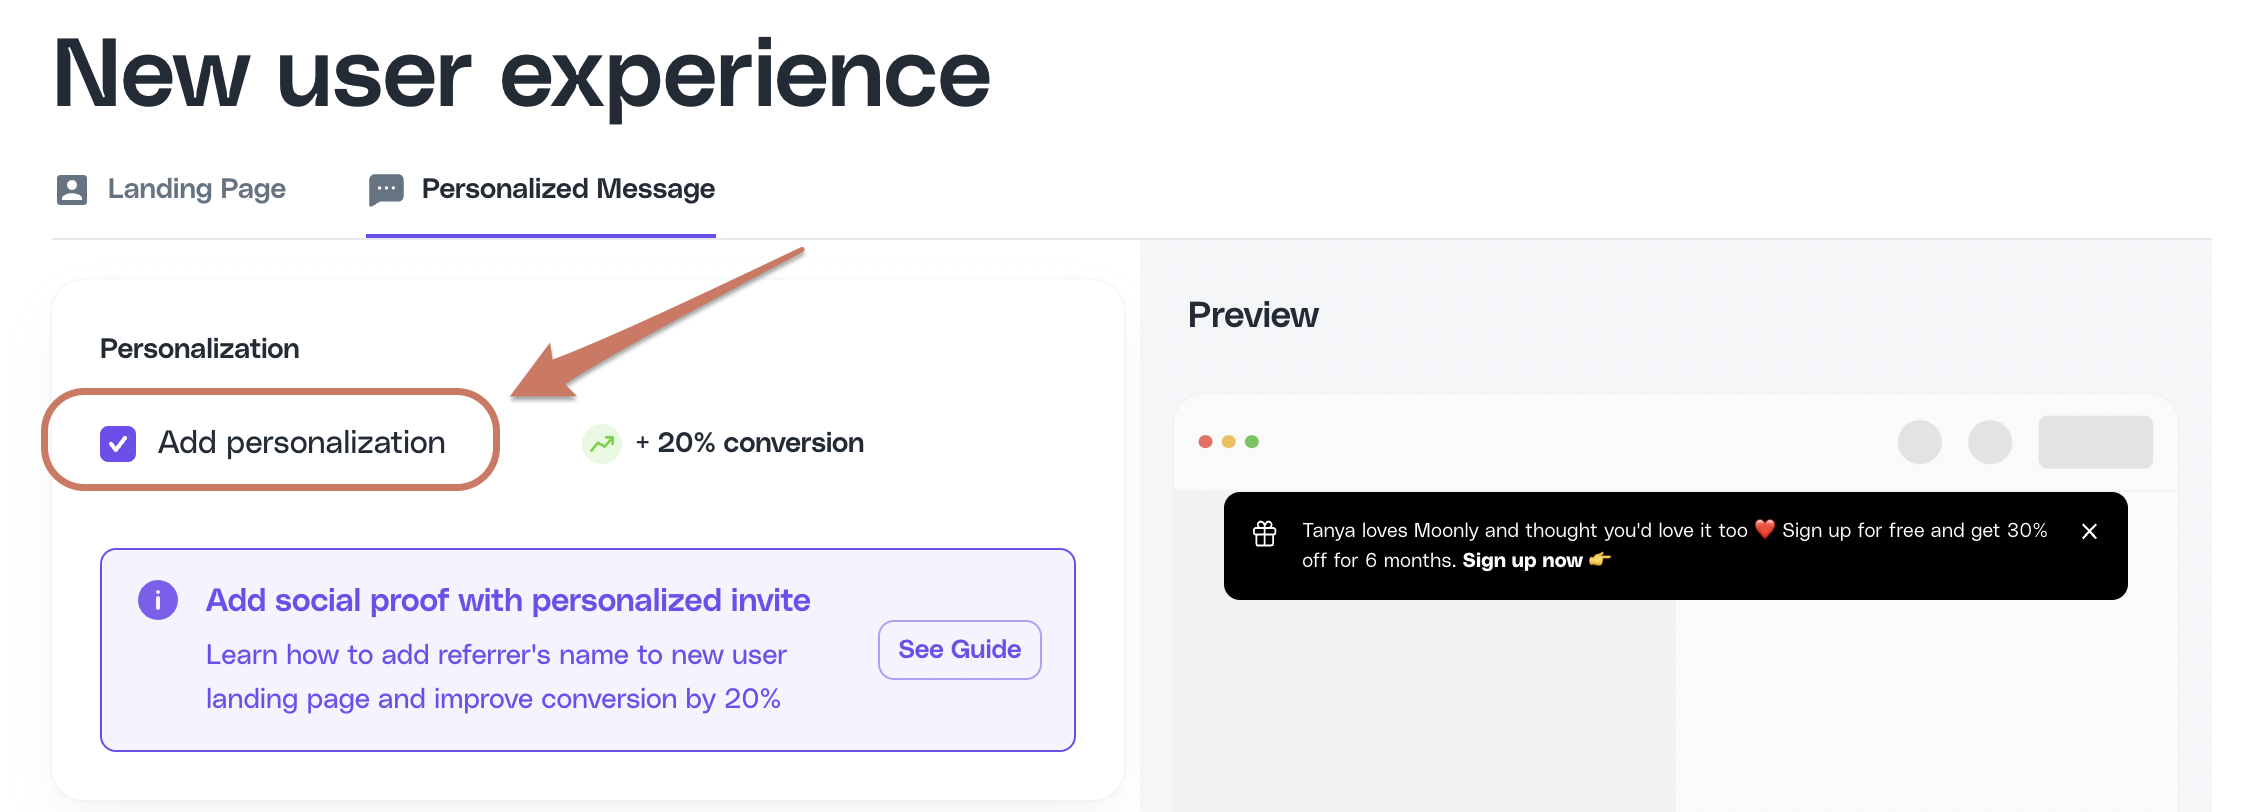 When personalization is turned on, an extra parameter will be added to the URL of your landing page, e.g. `celloN=VGFuamE`
```html
https://getmoonly.com/?productId=getmoonly.com&ucc=pNRB1aYqArN&celloN=VGFuamE
```
### Use the attribution script methods to get referrer information
[Attribution script](/sdk/client-side/attribution-js-usage#getreferrername) provides a JS method `getReferrerName()` to fetch the name of the referrer.
```javascript
const referrerName = await window.CelloAttribution("getReferrerName");
console.log('Referrer name:', referrerName);
```
When personalization is turned on, an extra parameter will be added to the URL of your landing page, e.g. `celloN=VGFuamE`
```html
https://getmoonly.com/?productId=getmoonly.com&ucc=pNRB1aYqArN&celloN=VGFuamE
```
### Use the attribution script methods to get referrer information
[Attribution script](/sdk/client-side/attribution-js-usage#getreferrername) provides a JS method `getReferrerName()` to fetch the name of the referrer.
```javascript
const referrerName = await window.CelloAttribution("getReferrerName");
console.log('Referrer name:', referrerName);
```
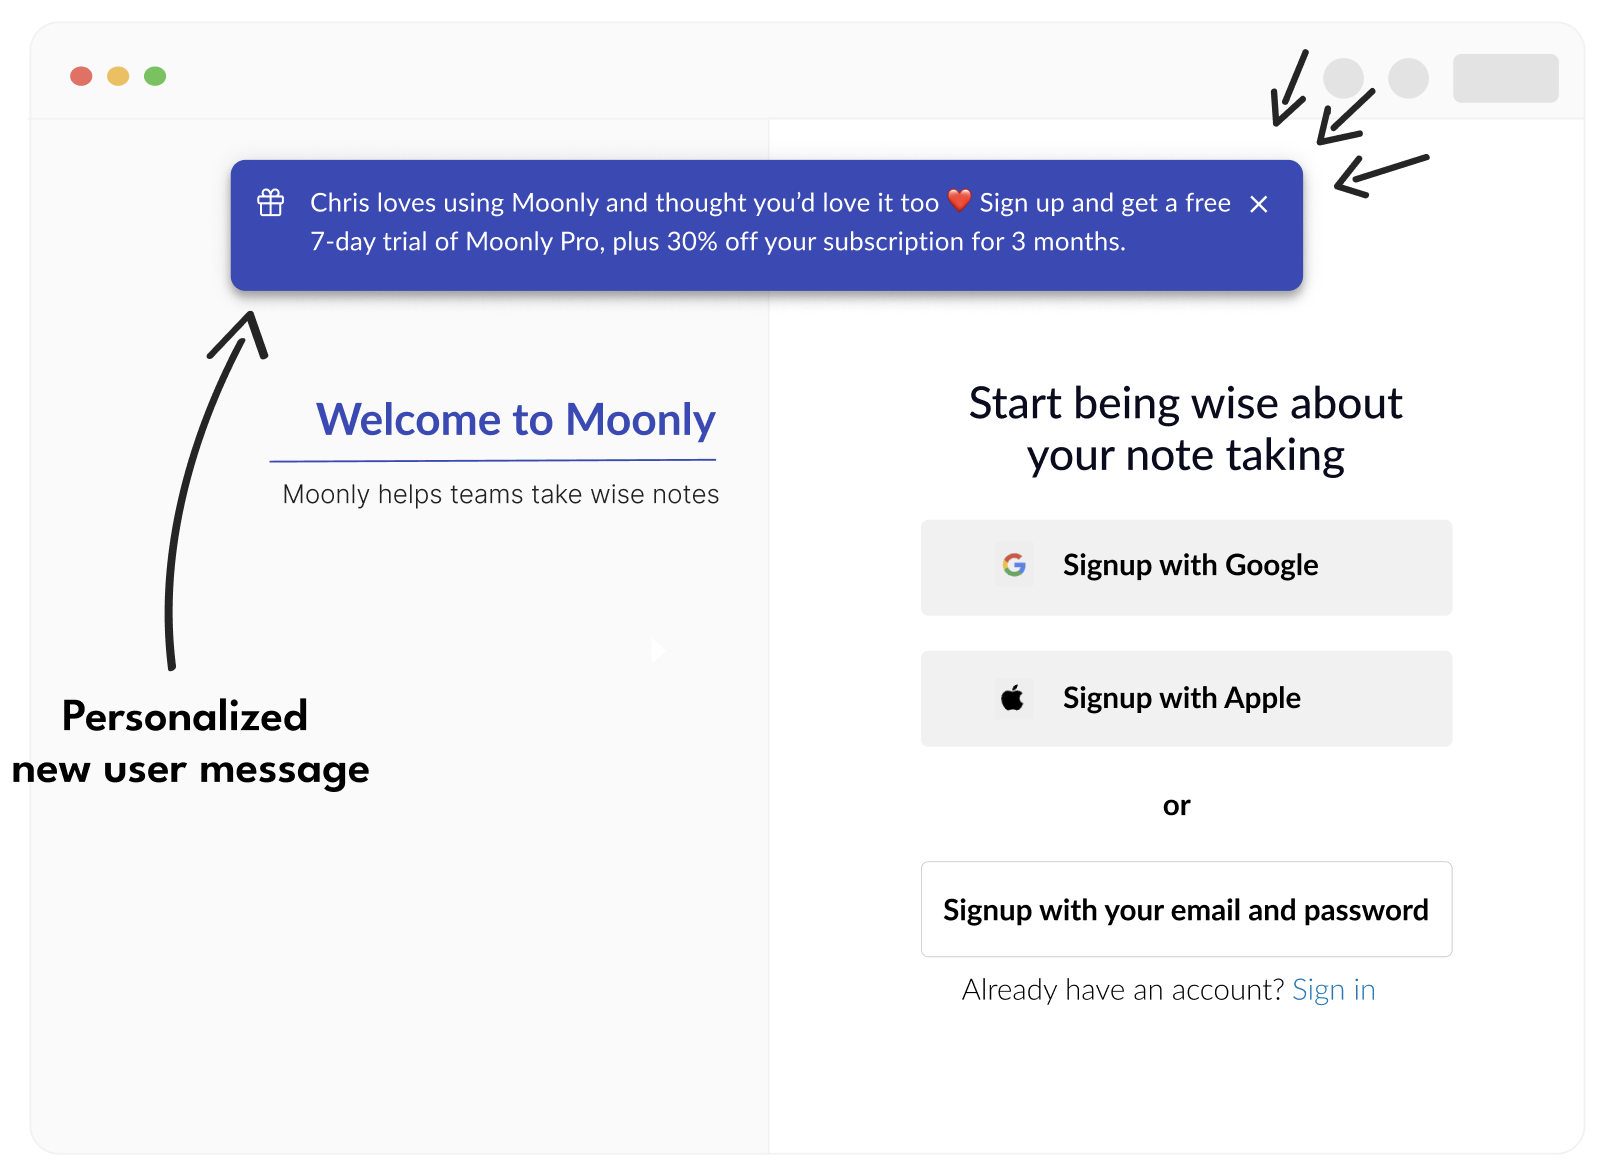 The banner with a personalized message is easily added in a few steps:
* Add [Cello attribution script](/sdk/client-side/embedded-script-tag) to your landing page.
* Go to [New User Experience setup in Cello Portal -> Personalization tab](https://portal.cello.so/setup/new-user-experience) and turn the banner on.
The banner with a personalized message is easily added in a few steps:
* Add [Cello attribution script](/sdk/client-side/embedded-script-tag) to your landing page.
* Go to [New User Experience setup in Cello Portal -> Personalization tab](https://portal.cello.so/setup/new-user-experience) and turn the banner on.
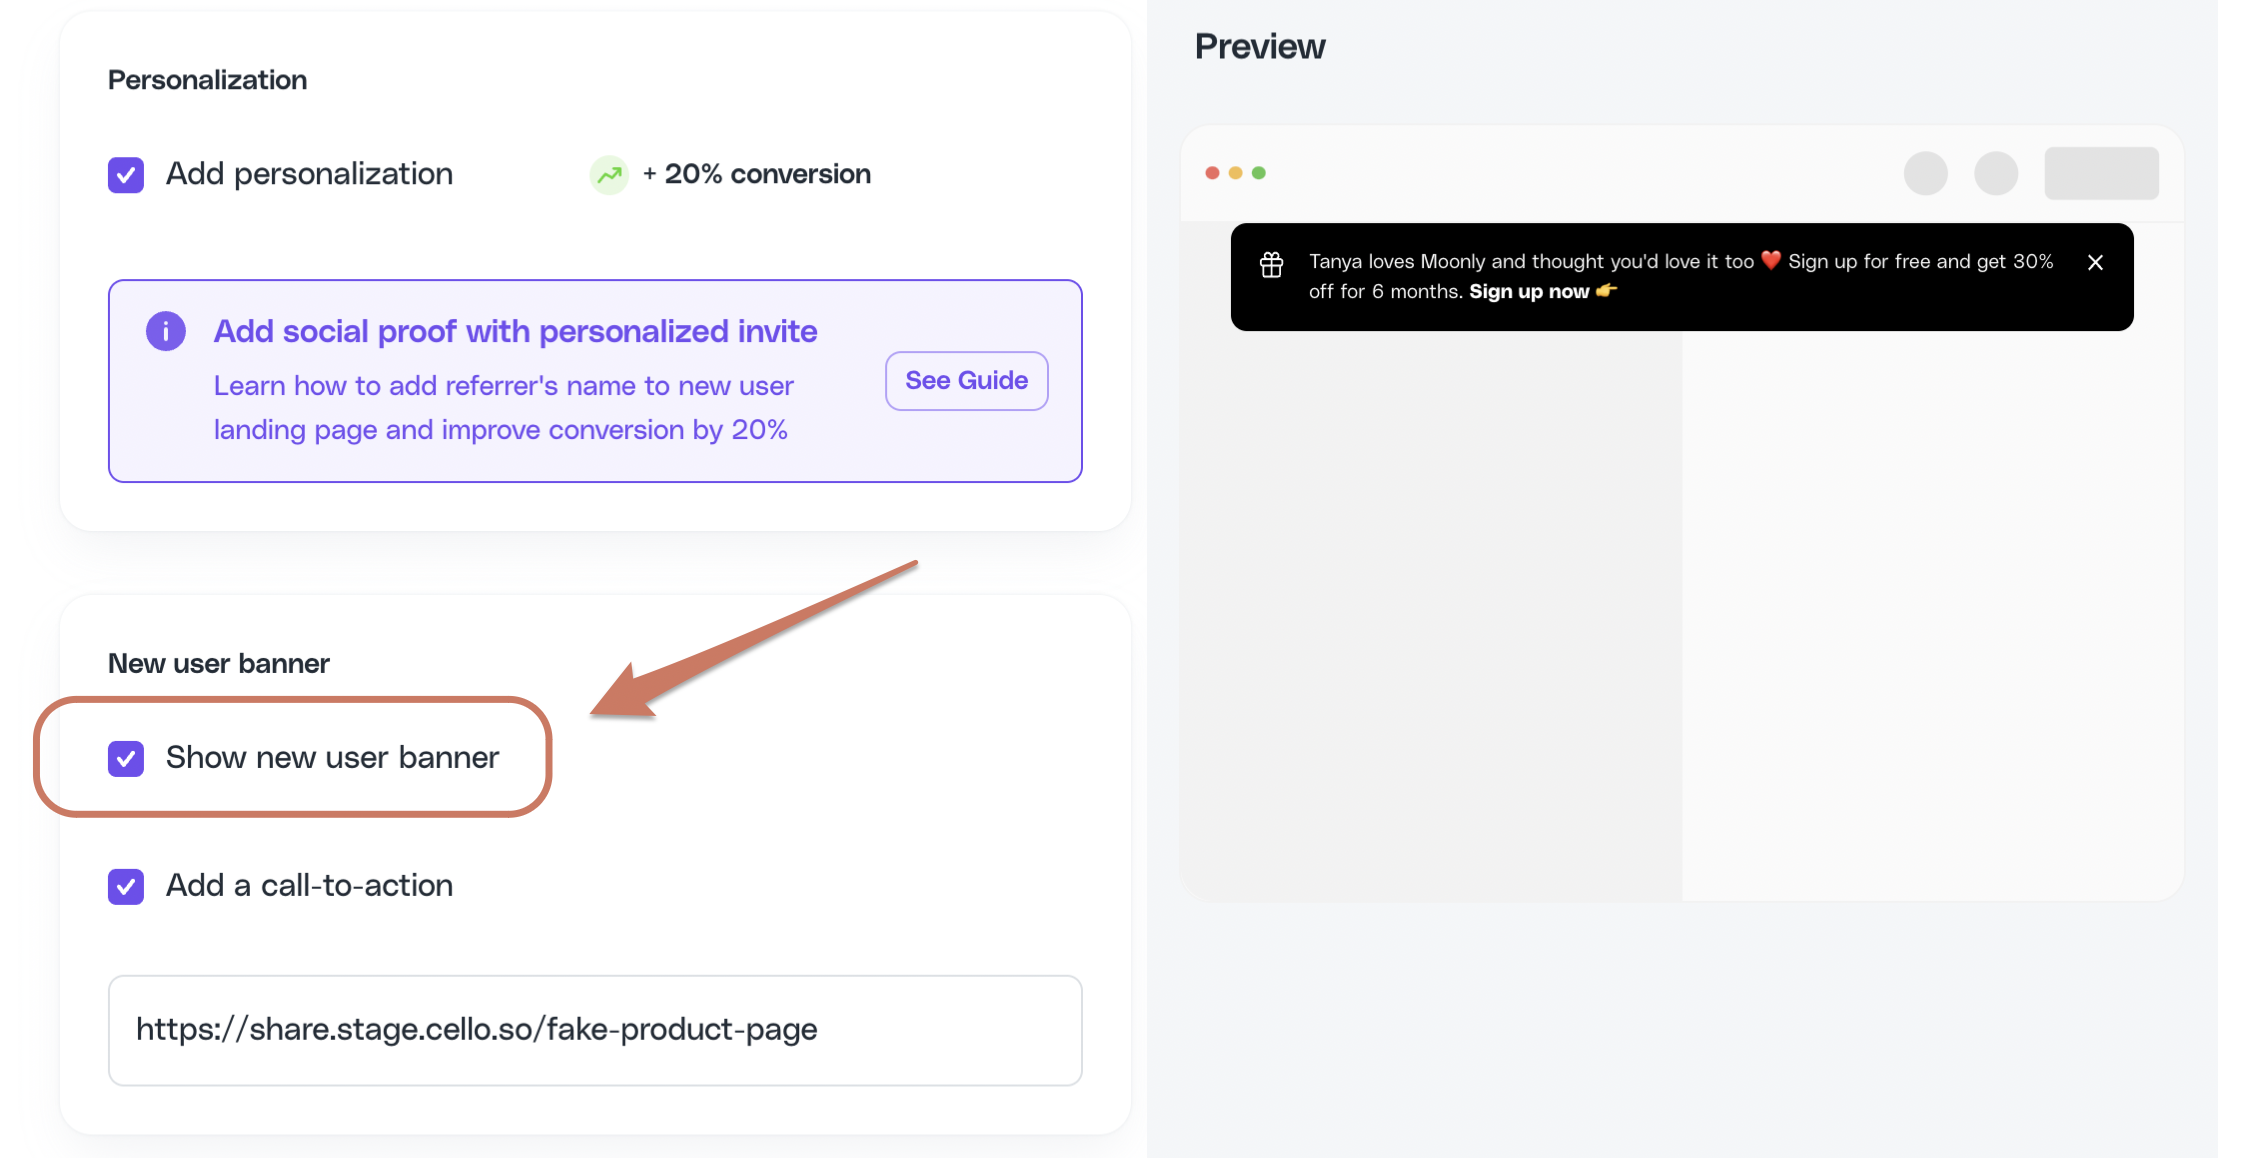 Visitors who follow the Cello invite link will have a banner displayed with a custom message containing an offer and the name of their referrer.
### Testing the Banner Implementation
To verify the banner works correctly:
```javascript
// Test banner functionality
async function testPersonalizationBanner() {
// Check if attribution script loaded
if (typeof window.CelloAttribution !== 'function') {
console.error('Attribution script not loaded - banner won\'t work');
return;
}
// Test with sample referral data
const testUrl = `${window.location.origin}${window.location.pathname}?productId=test&ucc=testUcc123&celloN=VGVzdFVzZXI=`;
console.log('Test this URL for banner:', testUrl);
// Check current page data
const ucc = await window.CelloAttribution("getUcc");
const referrerName = await window.CelloAttribution("getReferrerName");
const campaignConfig = await window.CelloAttribution("getCampaignConfig");
console.log('Current page attribution data:', {
ucc,
referrerName,
campaignConfig,
bannerShouldShow: !!(ucc && (referrerName || campaignConfig))
});
}
// Run test after page load
setTimeout(testPersonalizationBanner, 2000);
```
# Referral Notifications and Emails
Source: https://docs.cello.so/guides/user-experience/referral-notifications-and-emails
Cello provides notifications that are seamlessly integrated with your product experience to inform, activate and continuously engage users with the referral program
Cello provides notifications that are seamlessly integrated with your product experience to inform, activate and continuously engage users with the referral program. This page provides details on the notifications types and how to customize based on your needs.
## Notifications types and triggers
Notifications the we support fall into 2 categories: **in-product** announcement and alert and **external** like email. These notifications and their associated triggers are designed to work in conjunction your existing product engagement touch points in a seamless way.
### Alert and Badge
**Alert** is a notification that appears under Rewards tab. It is accompanied with a **badge**.
Visitors who follow the Cello invite link will have a banner displayed with a custom message containing an offer and the name of their referrer.
### Testing the Banner Implementation
To verify the banner works correctly:
```javascript
// Test banner functionality
async function testPersonalizationBanner() {
// Check if attribution script loaded
if (typeof window.CelloAttribution !== 'function') {
console.error('Attribution script not loaded - banner won\'t work');
return;
}
// Test with sample referral data
const testUrl = `${window.location.origin}${window.location.pathname}?productId=test&ucc=testUcc123&celloN=VGVzdFVzZXI=`;
console.log('Test this URL for banner:', testUrl);
// Check current page data
const ucc = await window.CelloAttribution("getUcc");
const referrerName = await window.CelloAttribution("getReferrerName");
const campaignConfig = await window.CelloAttribution("getCampaignConfig");
console.log('Current page attribution data:', {
ucc,
referrerName,
campaignConfig,
bannerShouldShow: !!(ucc && (referrerName || campaignConfig))
});
}
// Run test after page load
setTimeout(testPersonalizationBanner, 2000);
```
# Referral Notifications and Emails
Source: https://docs.cello.so/guides/user-experience/referral-notifications-and-emails
Cello provides notifications that are seamlessly integrated with your product experience to inform, activate and continuously engage users with the referral program
Cello provides notifications that are seamlessly integrated with your product experience to inform, activate and continuously engage users with the referral program. This page provides details on the notifications types and how to customize based on your needs.
## Notifications types and triggers
Notifications the we support fall into 2 categories: **in-product** announcement and alert and **external** like email. These notifications and their associated triggers are designed to work in conjunction your existing product engagement touch points in a seamless way.
### Alert and Badge
**Alert** is a notification that appears under Rewards tab. It is accompanied with a **badge**.
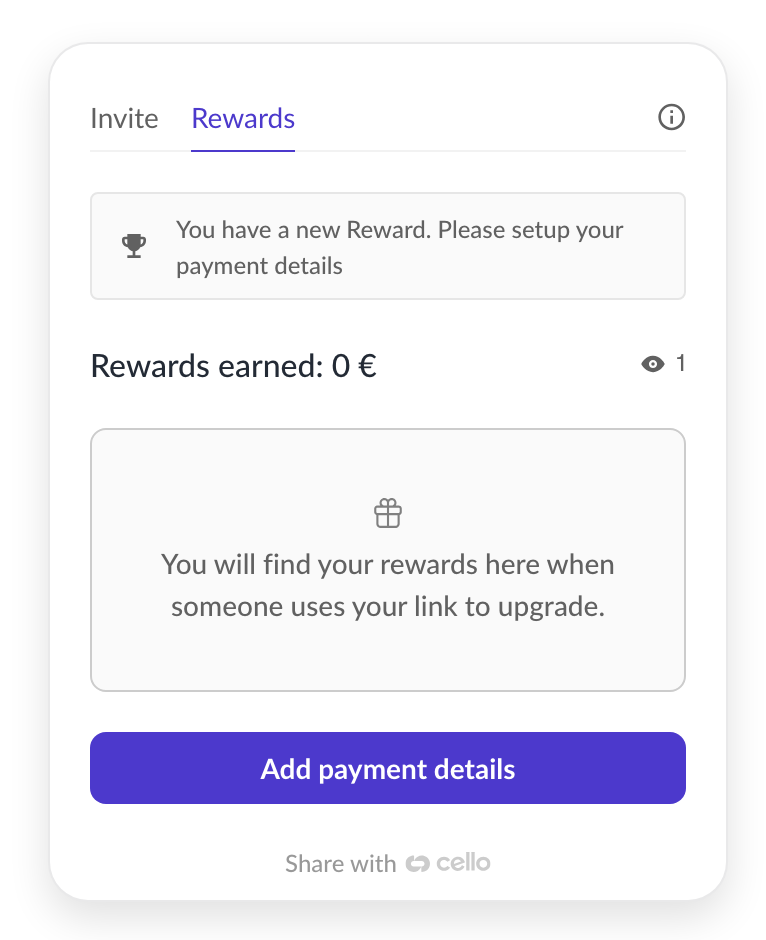 A **badge** is a small colored dot displayed on the launcher opening the widget (Cello button or [Custom Launcher](/referral-component/custom-launcher)) to draw attention to the activity with the referral program without being too distracting from your core product experience.
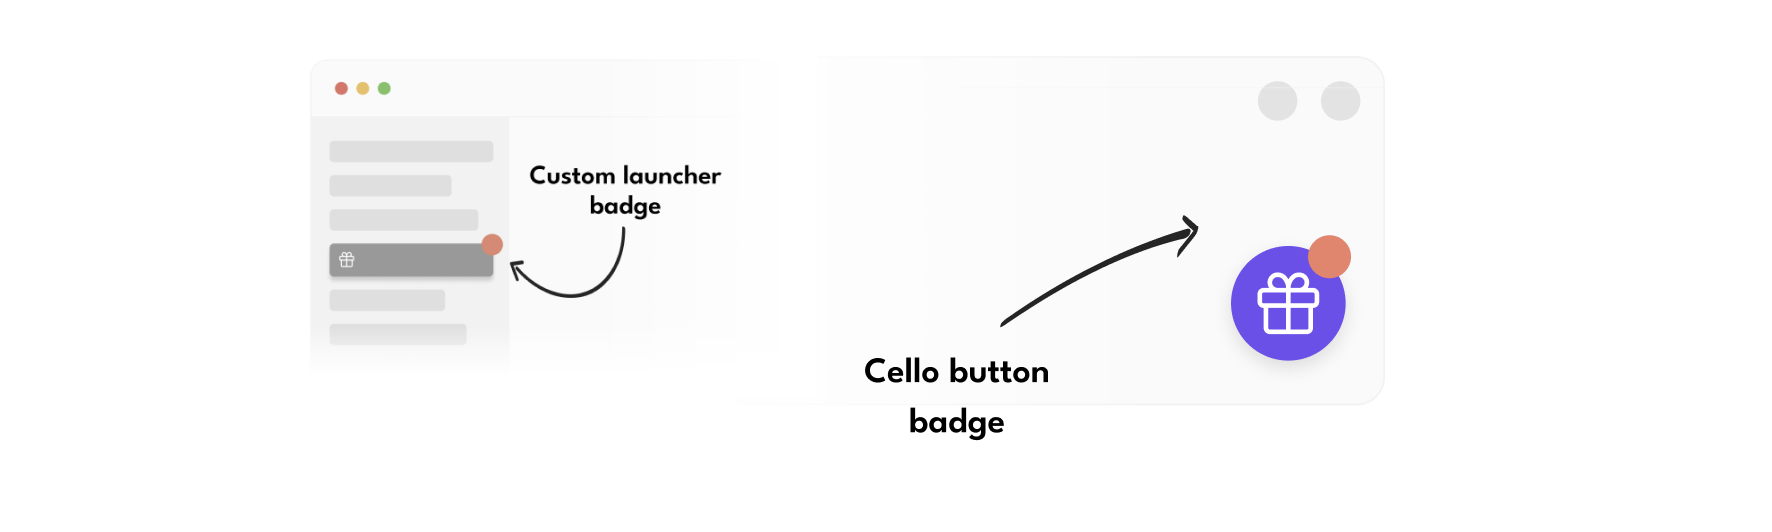 | Type | Description |
| ------------------------------- | ------------------------------------------------------------------------------------------------------------------------------- |
| "New referrer activation" alert | Displayed after referrer has used the product more then 1 day after signs up to bring subtle attention to the referral program. |
| "Successful share" alert | Displayed every time referrer has a new link view. |
| "New reward" alert | Displayed every time the referrer receives a new signup or reward. |
### Announcement
Announcements are callout style message that appears anchored to the launcher, either Cello button or [Custom Launcher](/referral-component/custom-launcher). Announcements can be dismissed by clicking on them or their "X" dismiss button.
| Type | Description |
| ------------------------------- | ------------------------------------------------------------------------------------------------------------------------------- |
| "New referrer activation" alert | Displayed after referrer has used the product more then 1 day after signs up to bring subtle attention to the referral program. |
| "Successful share" alert | Displayed every time referrer has a new link view. |
| "New reward" alert | Displayed every time the referrer receives a new signup or reward. |
### Announcement
Announcements are callout style message that appears anchored to the launcher, either Cello button or [Custom Launcher](/referral-component/custom-launcher). Announcements can be dismissed by clicking on them or their "X" dismiss button.
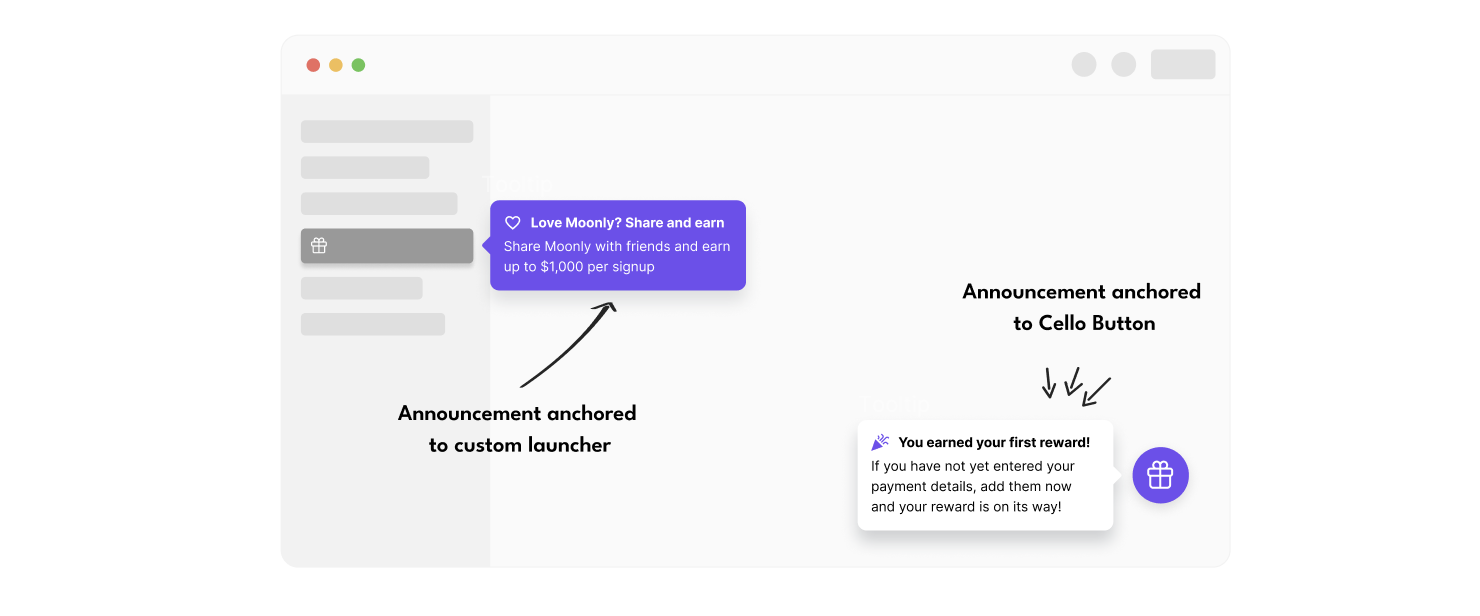 | Type | Description |
| -------------------------------------- | ----------------------------------------------------------------------------------------------------------------- |
| "New referrer activation" announcement | Sent 7 days after a ["New referrer activation" alert](#alert-and-badge) is sent and the user has not acted on it. |
| "New reward" announcement | Sent if the user has not entered their payment details after 7 days of receiving the first reward. |
### Email
Emails are a way to keep your users aware and engage with the referral program without them needing to log into the application. By default, Cello will send emails about the key events in the referral lifecycle.
| Type | Description |
| -------------------------------------- | ----------------------------------------------------------------------------------------------------------------- |
| "New referrer activation" announcement | Sent 7 days after a ["New referrer activation" alert](#alert-and-badge) is sent and the user has not acted on it. |
| "New reward" announcement | Sent if the user has not entered their payment details after 7 days of receiving the first reward. |
### Email
Emails are a way to keep your users aware and engage with the referral program without them needing to log into the application. By default, Cello will send emails about the key events in the referral lifecycle.
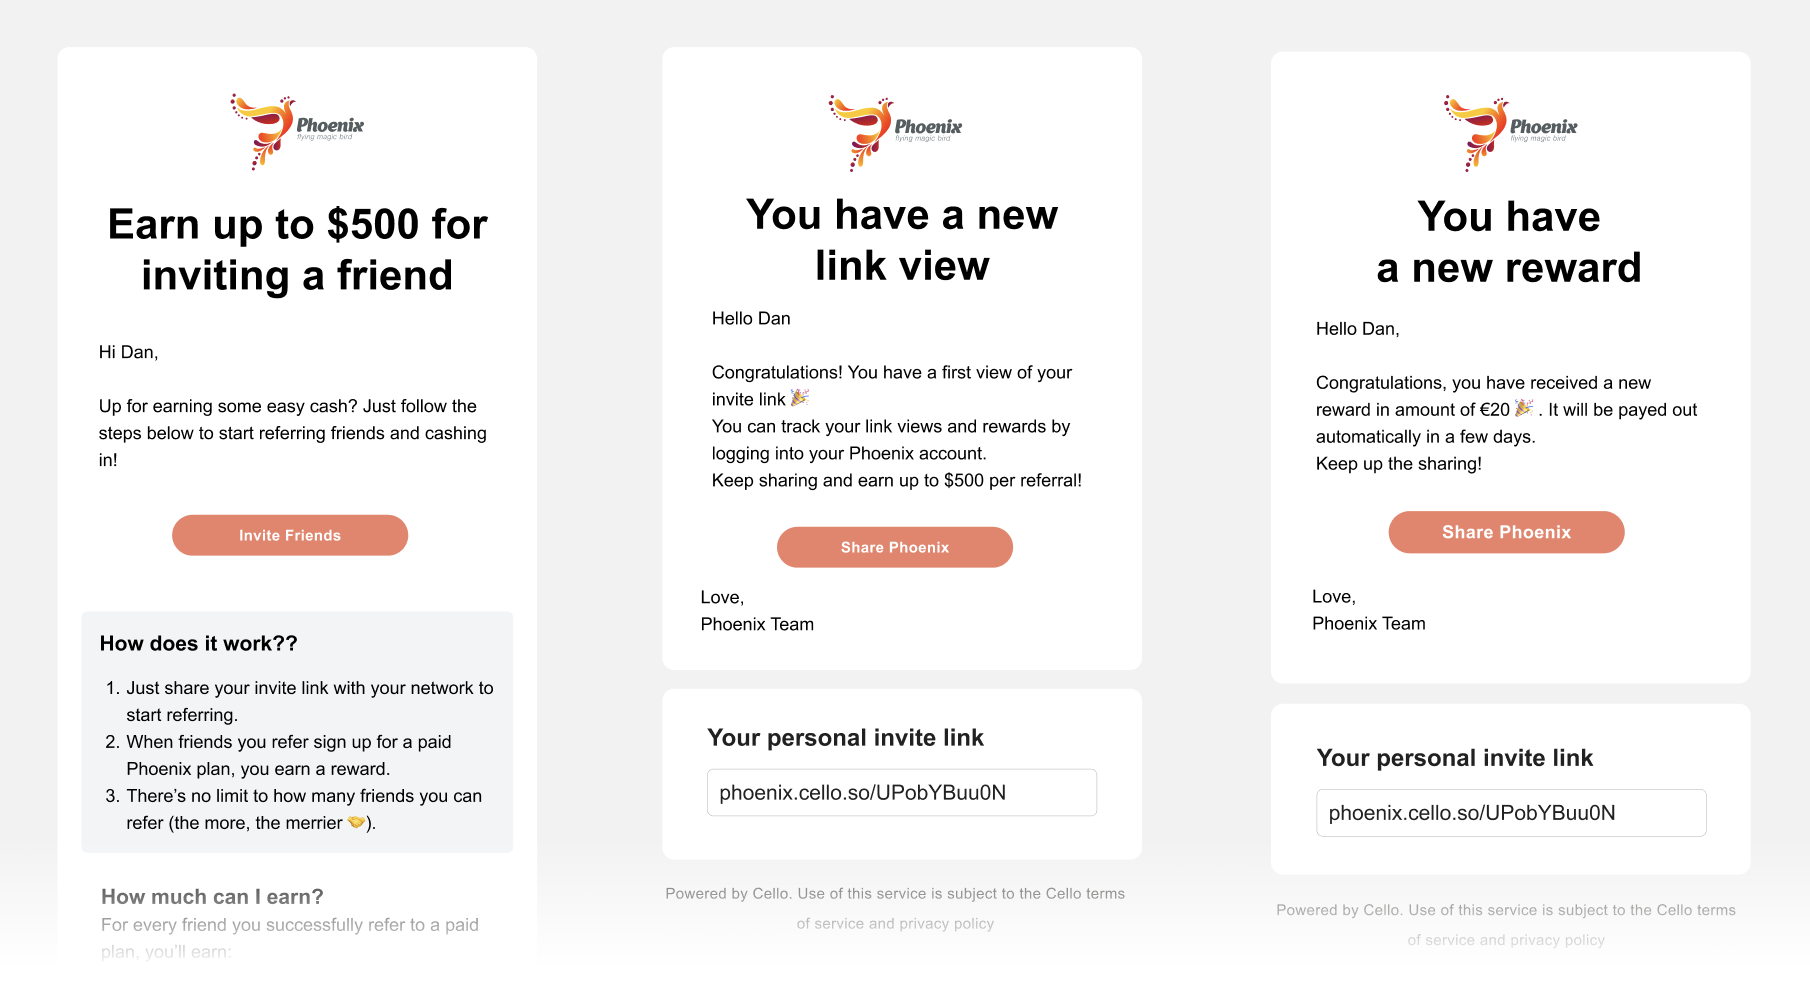
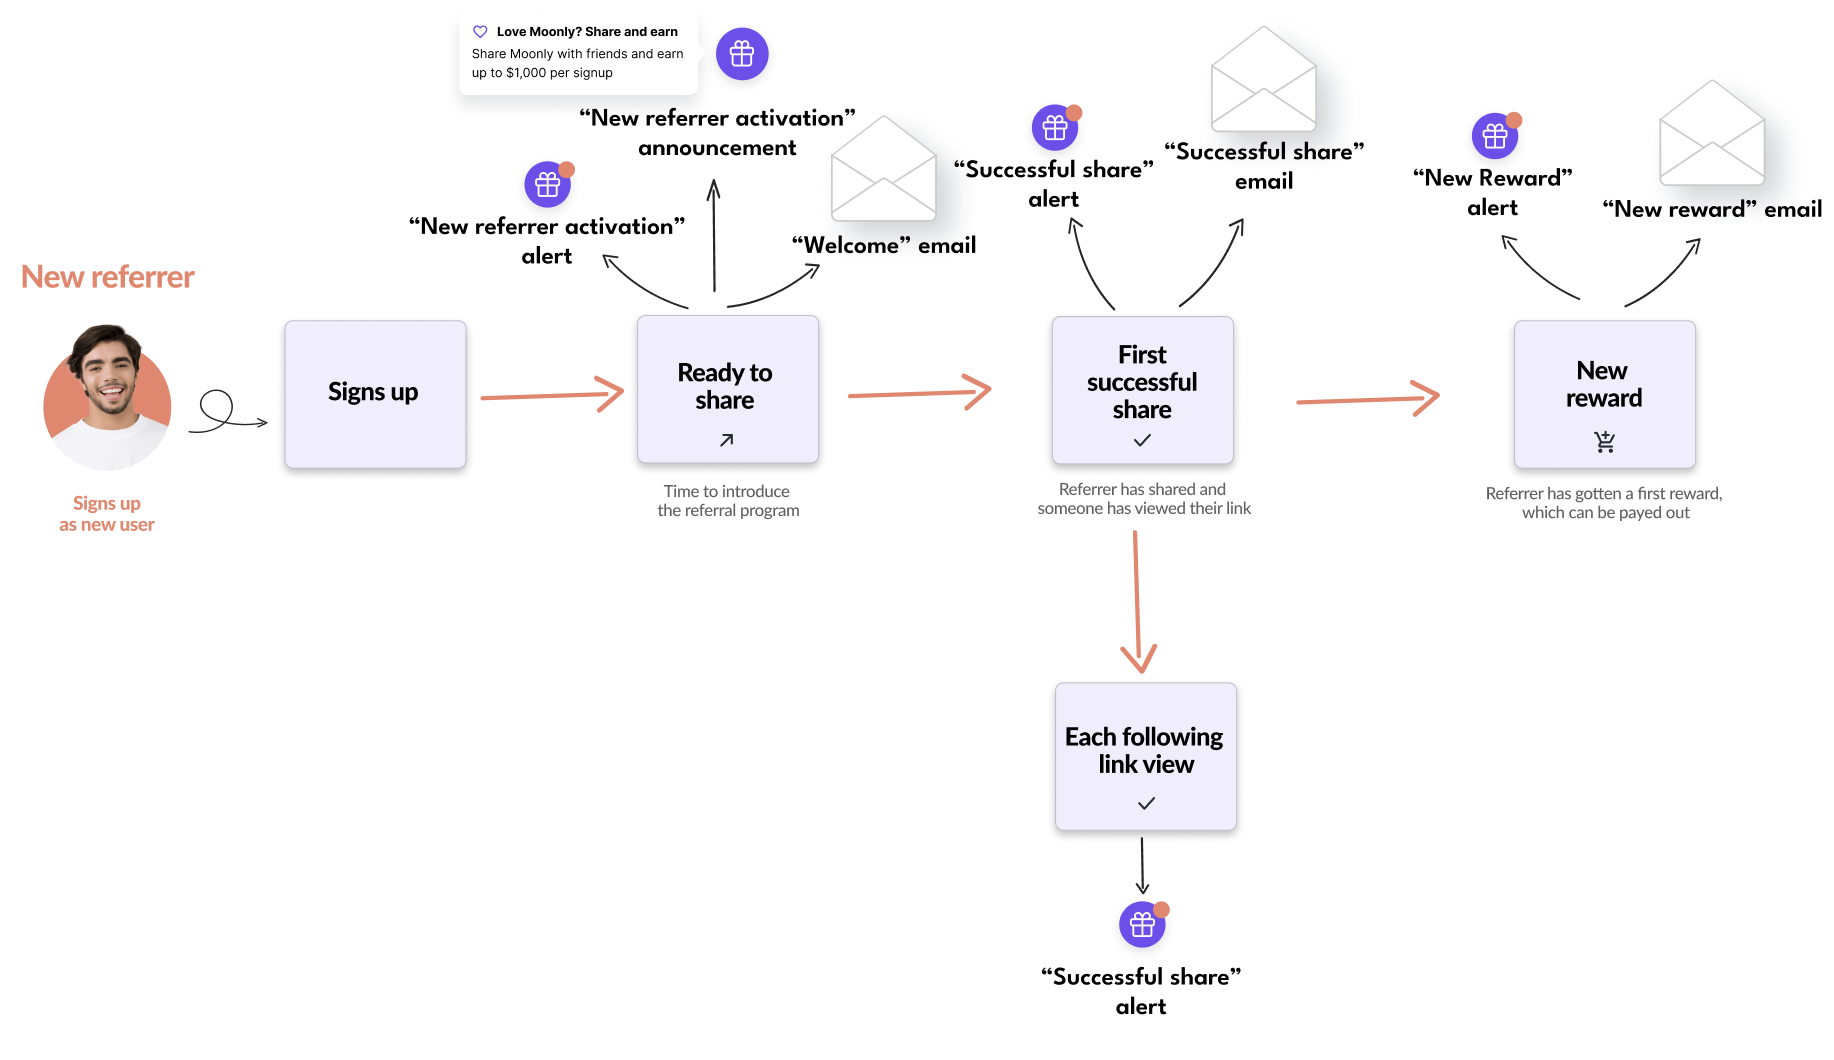 ## Activation campaign
In addition to the default notification journey, you can run **an activation campaign** with Cello to activate users for your referral program with recurring announcements.
## Activation campaign
In addition to the default notification journey, you can run **an activation campaign** with Cello to activate users for your referral program with recurring announcements.
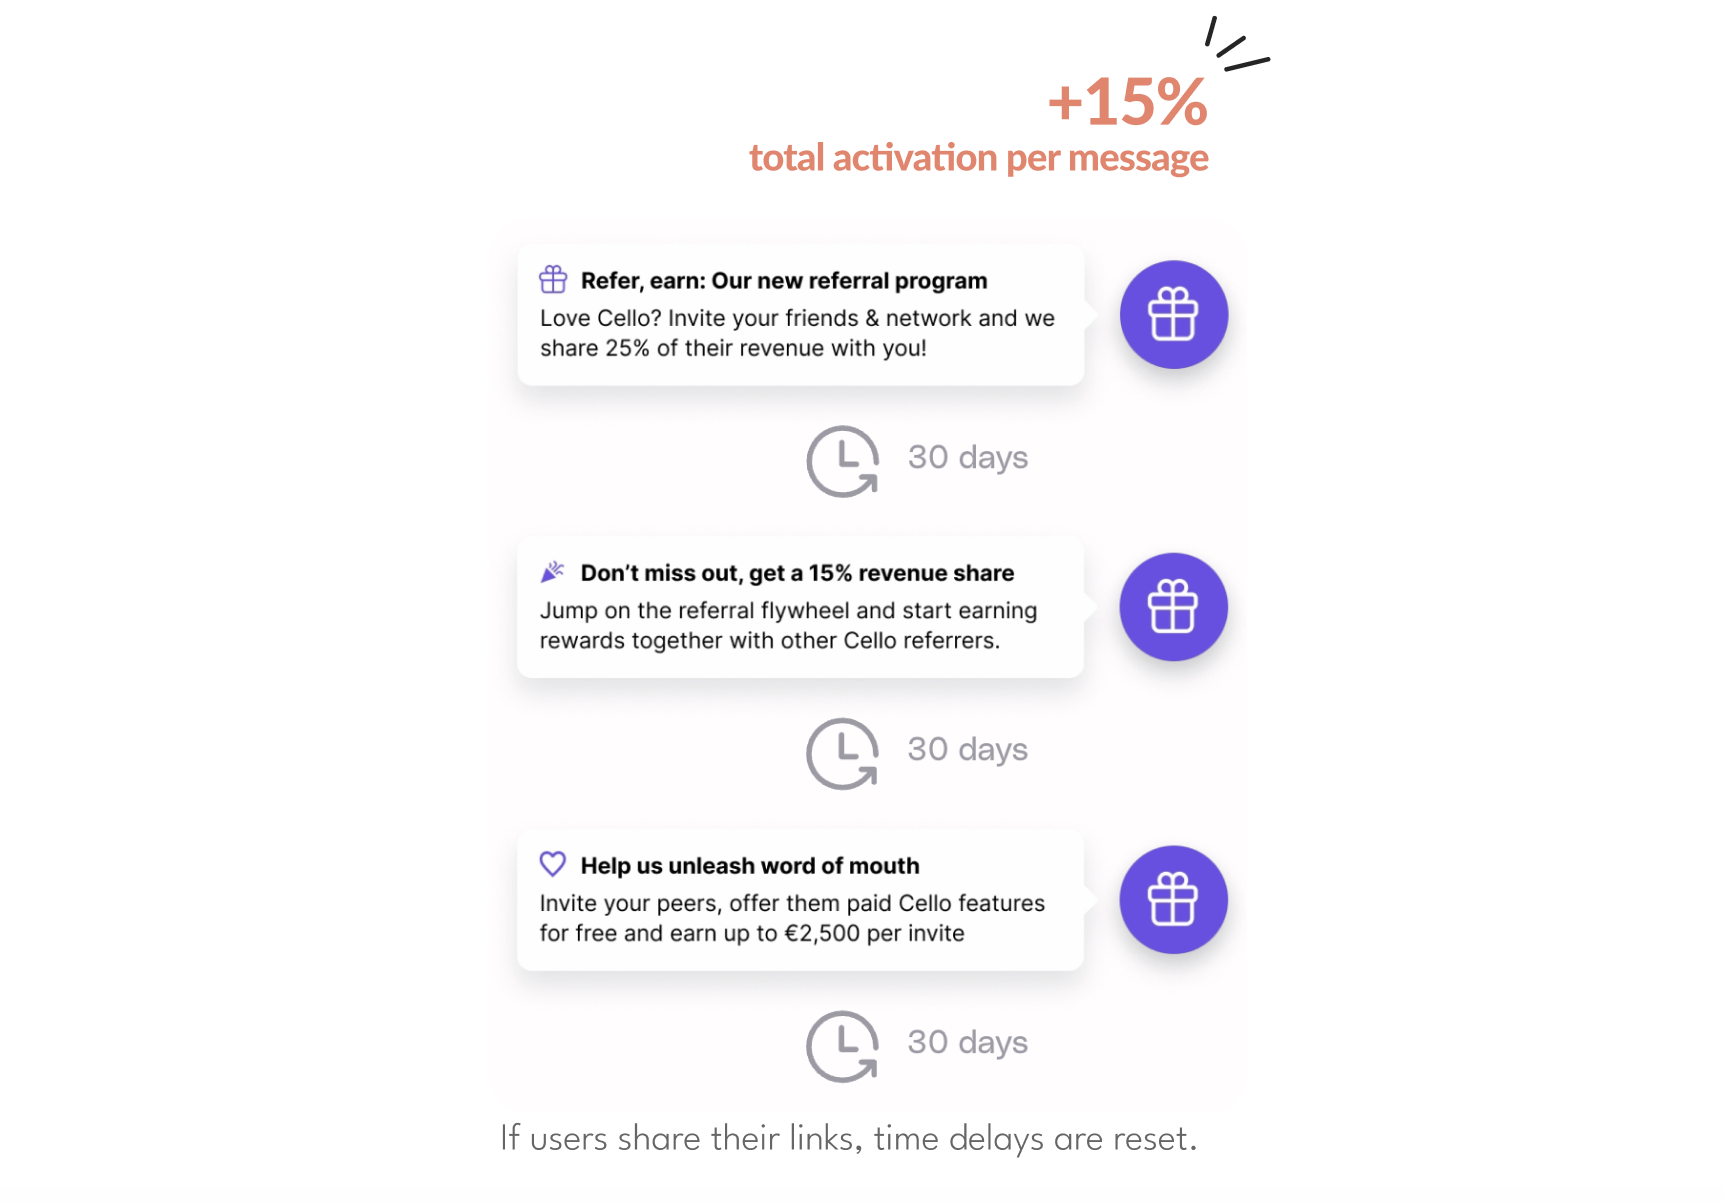 **How it works:**
1. Activation campaign starts 30 days after ["New referrer activation" announcement](#announcement) is sent and the user has not acted on it.
2. The recurring announcements will be only send if the user full-fills a certain activity pattern in the product like:
* Referrer has used the app at least once after reading the last announcement.
* Last activation announcement was read.
* Referrer didn't share in the last 30 days.
## Notification settings
You can preview and configure which notifications you want Cello to send in your [Cello Portal](https://portal.cello.so/setup/notifications).
**How it works:**
1. Activation campaign starts 30 days after ["New referrer activation" announcement](#announcement) is sent and the user has not acted on it.
2. The recurring announcements will be only send if the user full-fills a certain activity pattern in the product like:
* Referrer has used the app at least once after reading the last announcement.
* Last activation announcement was read.
* Referrer didn't share in the last 30 days.
## Notification settings
You can preview and configure which notifications you want Cello to send in your [Cello Portal](https://portal.cello.so/setup/notifications).
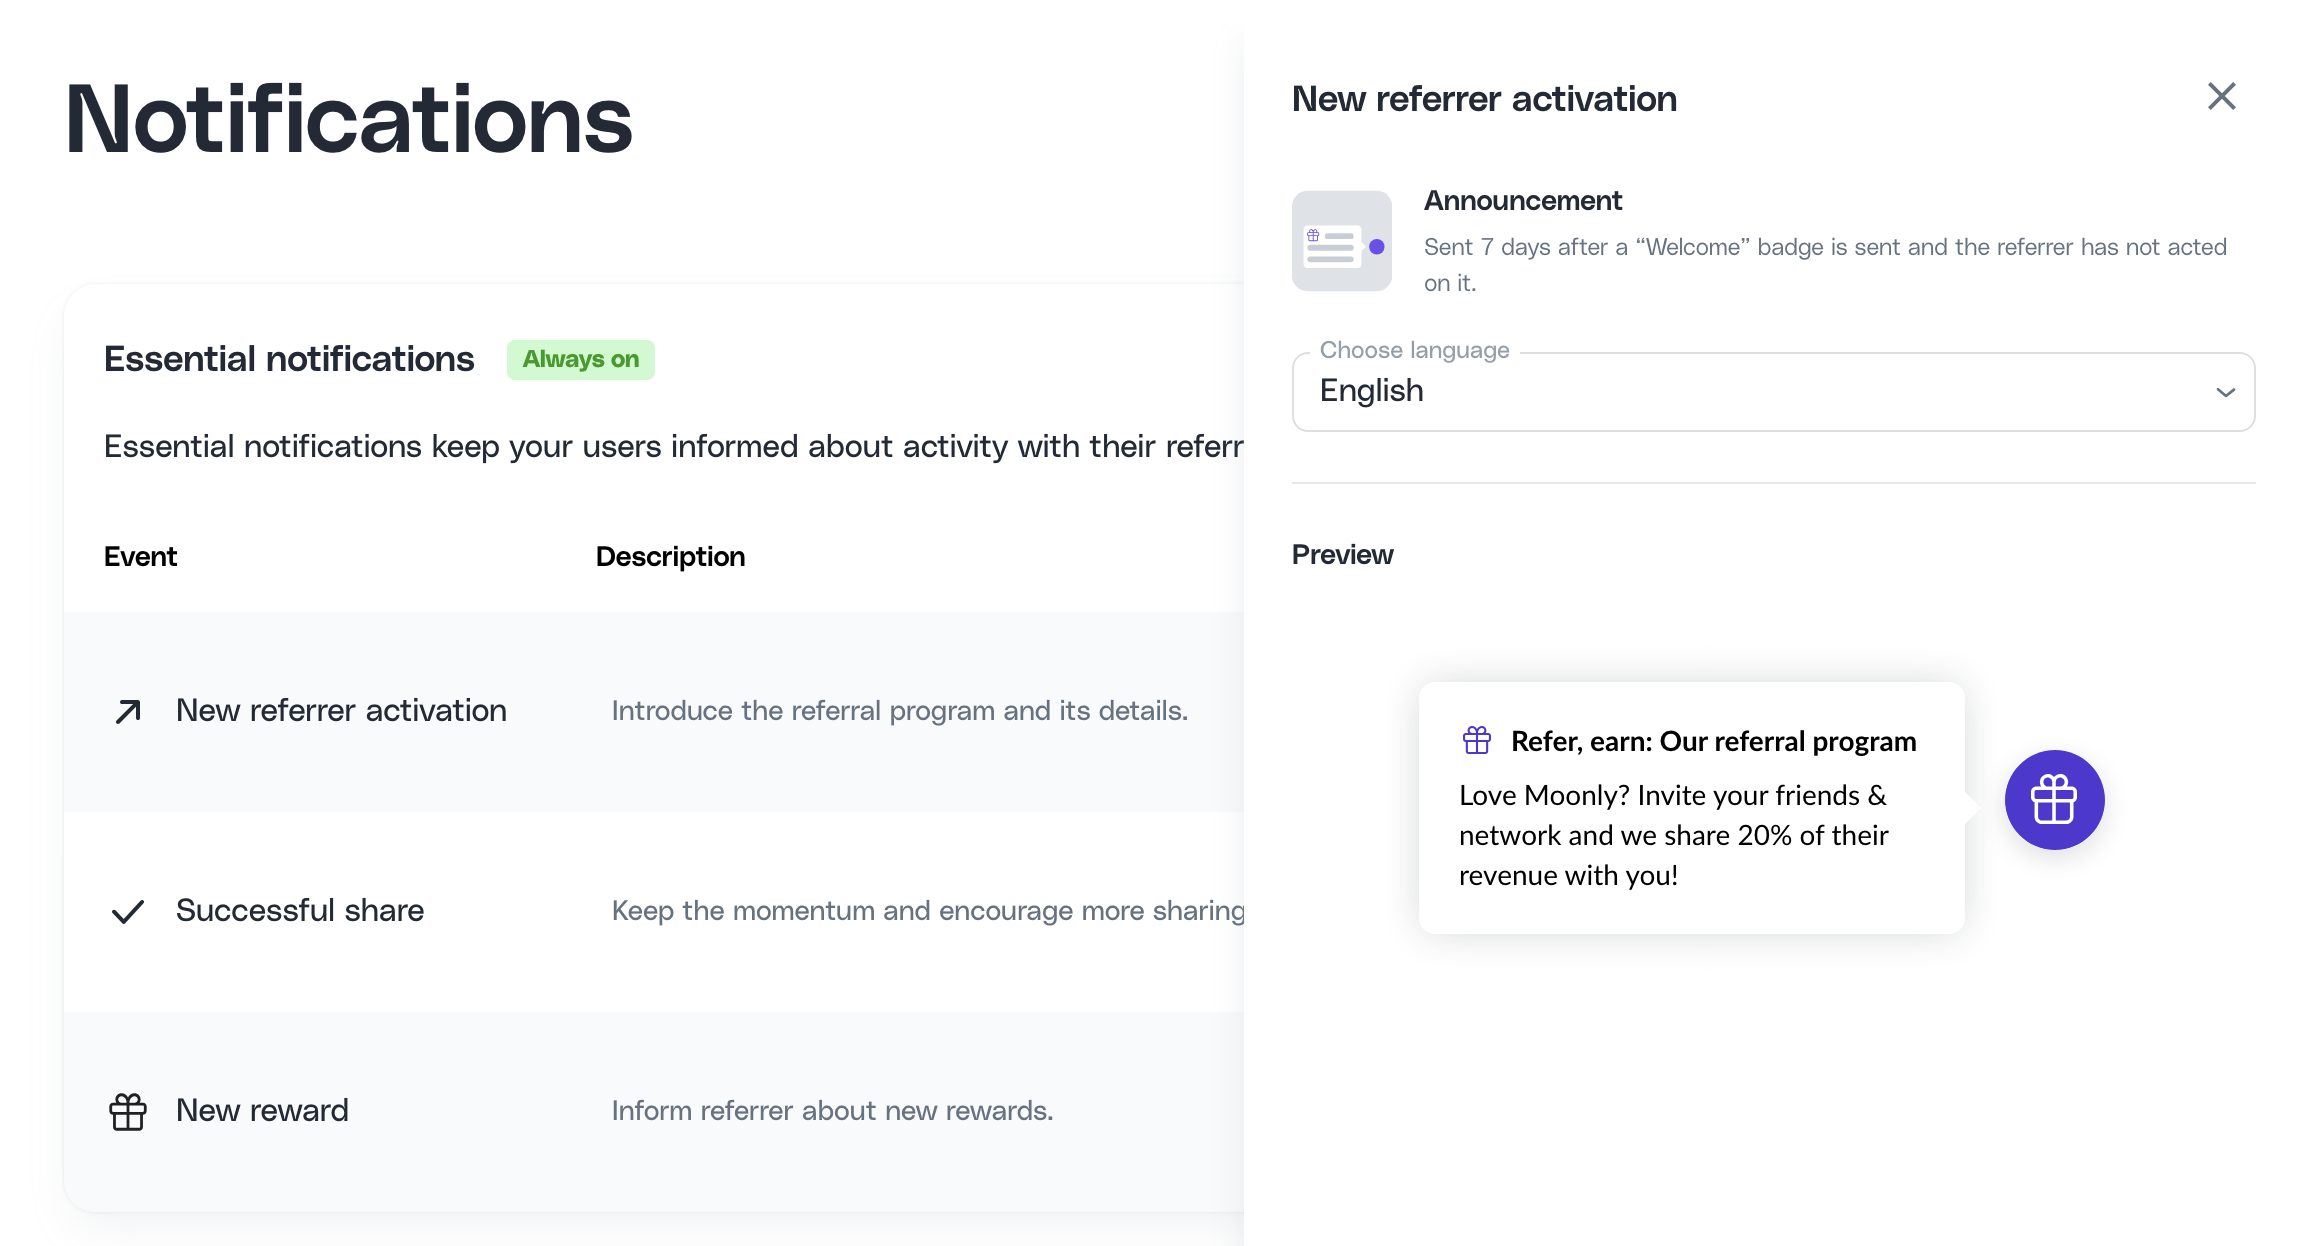 Cello distinguishes between **Essential** and **Engagement** notifications. Essential notifications are **always on** as they are required for the program to run successfully. You can choose to turn off Engagement notifications, however, they do give a significant performance improvement.
# Setup Overview
Source: https://docs.cello.so/integration-overview
Get started with Cello in 4 easy steps
Cello distinguishes between **Essential** and **Engagement** notifications. Essential notifications are **always on** as they are required for the program to run successfully. You can choose to turn off Engagement notifications, however, they do give a significant performance improvement.
# Setup Overview
Source: https://docs.cello.so/integration-overview
Get started with Cello in 4 easy steps
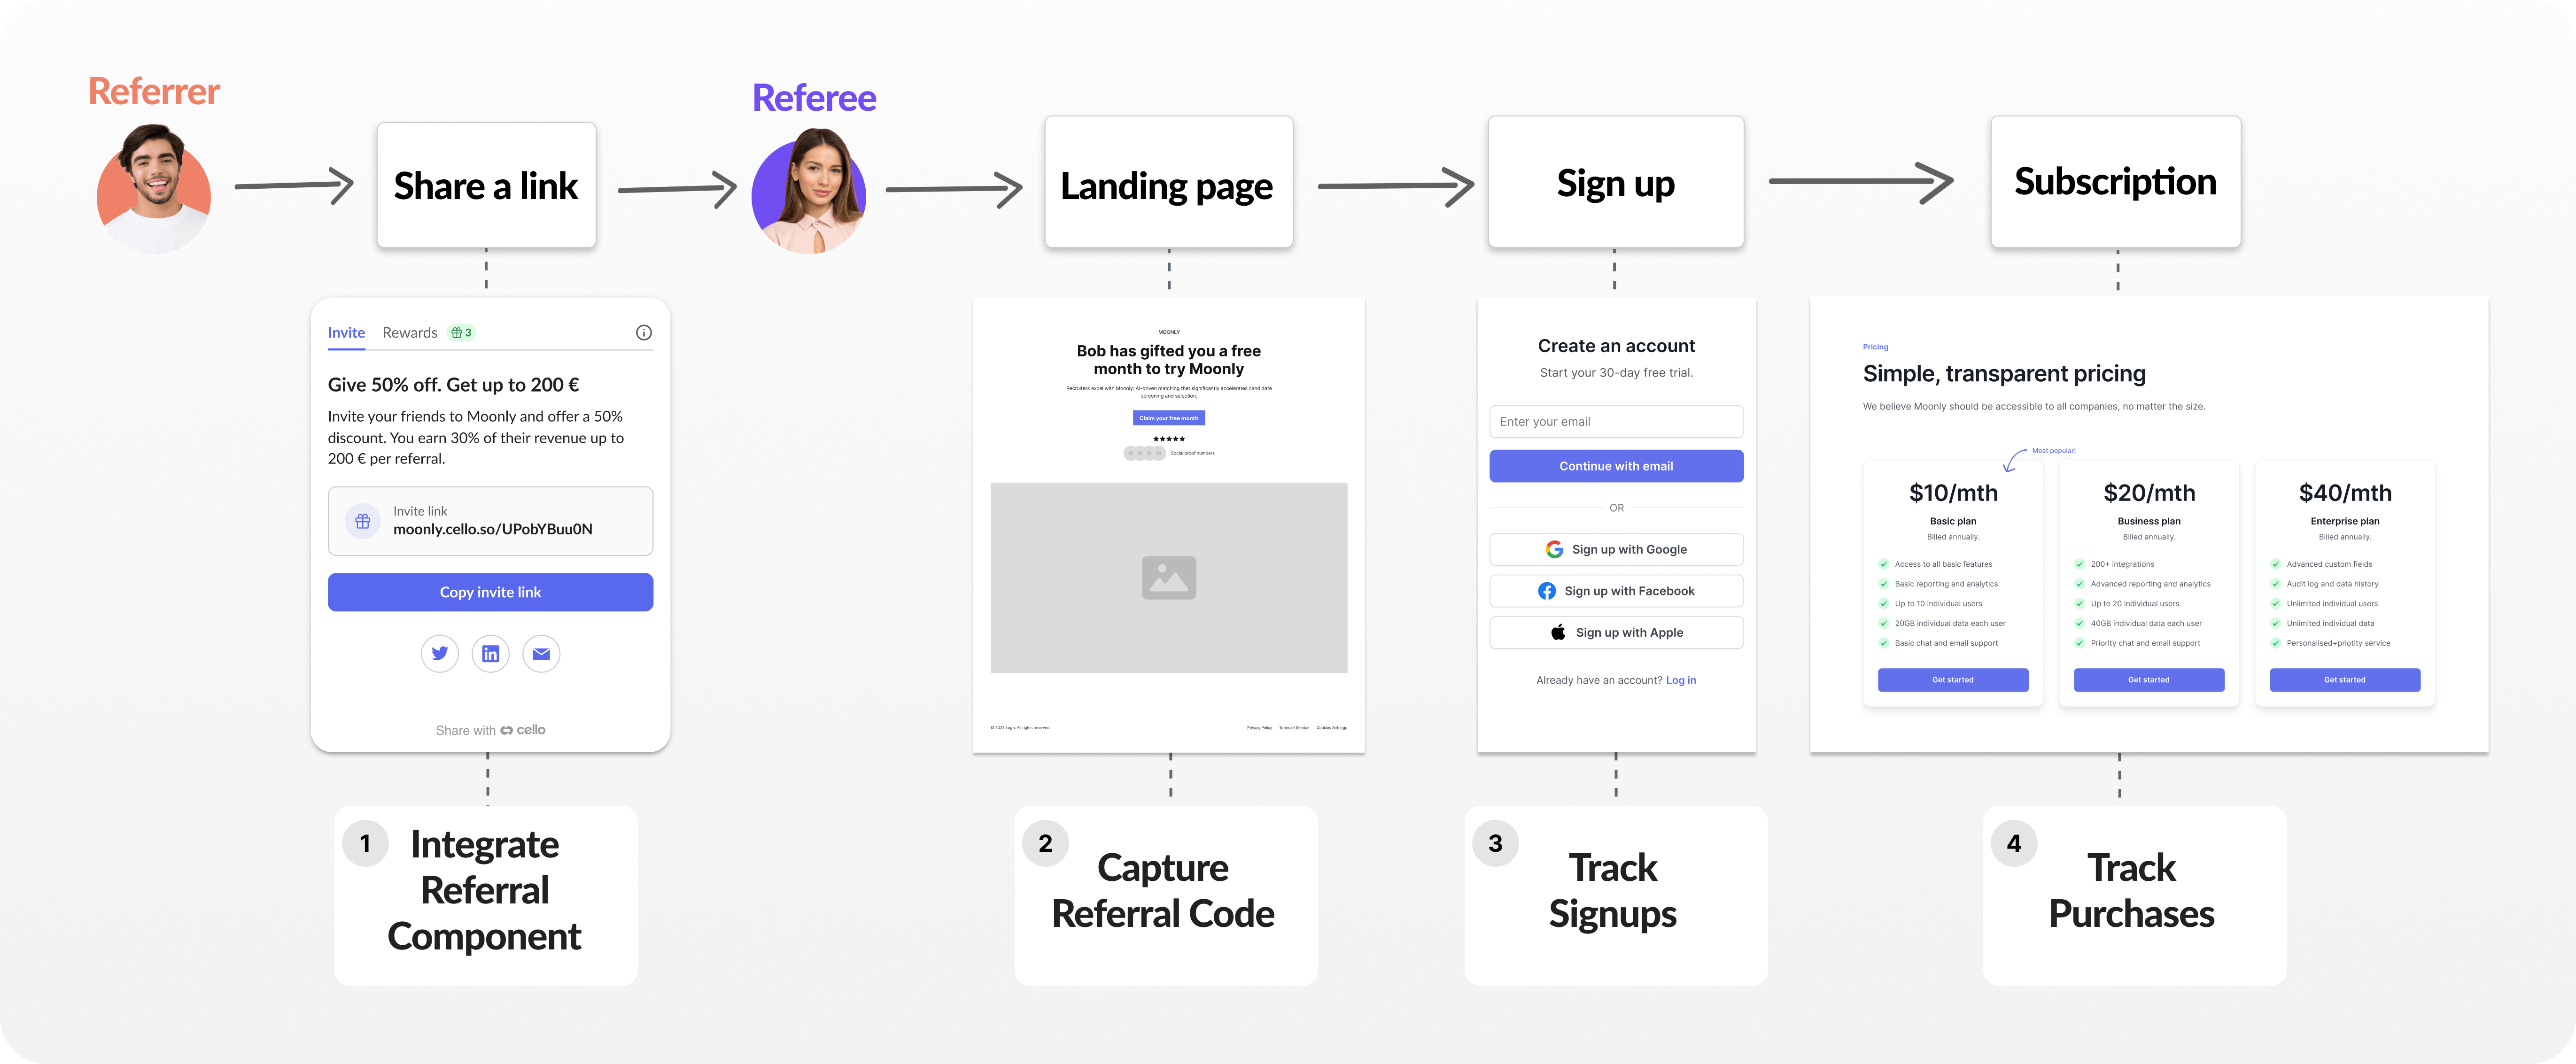 ## Setup Steps
If you did not find your integration guide, complete these steps to integrate Cello, regardless of your tech stack or payment gateway.
## Setup Steps
If you did not find your integration guide, complete these steps to integrate Cello, regardless of your tech stack or payment gateway.
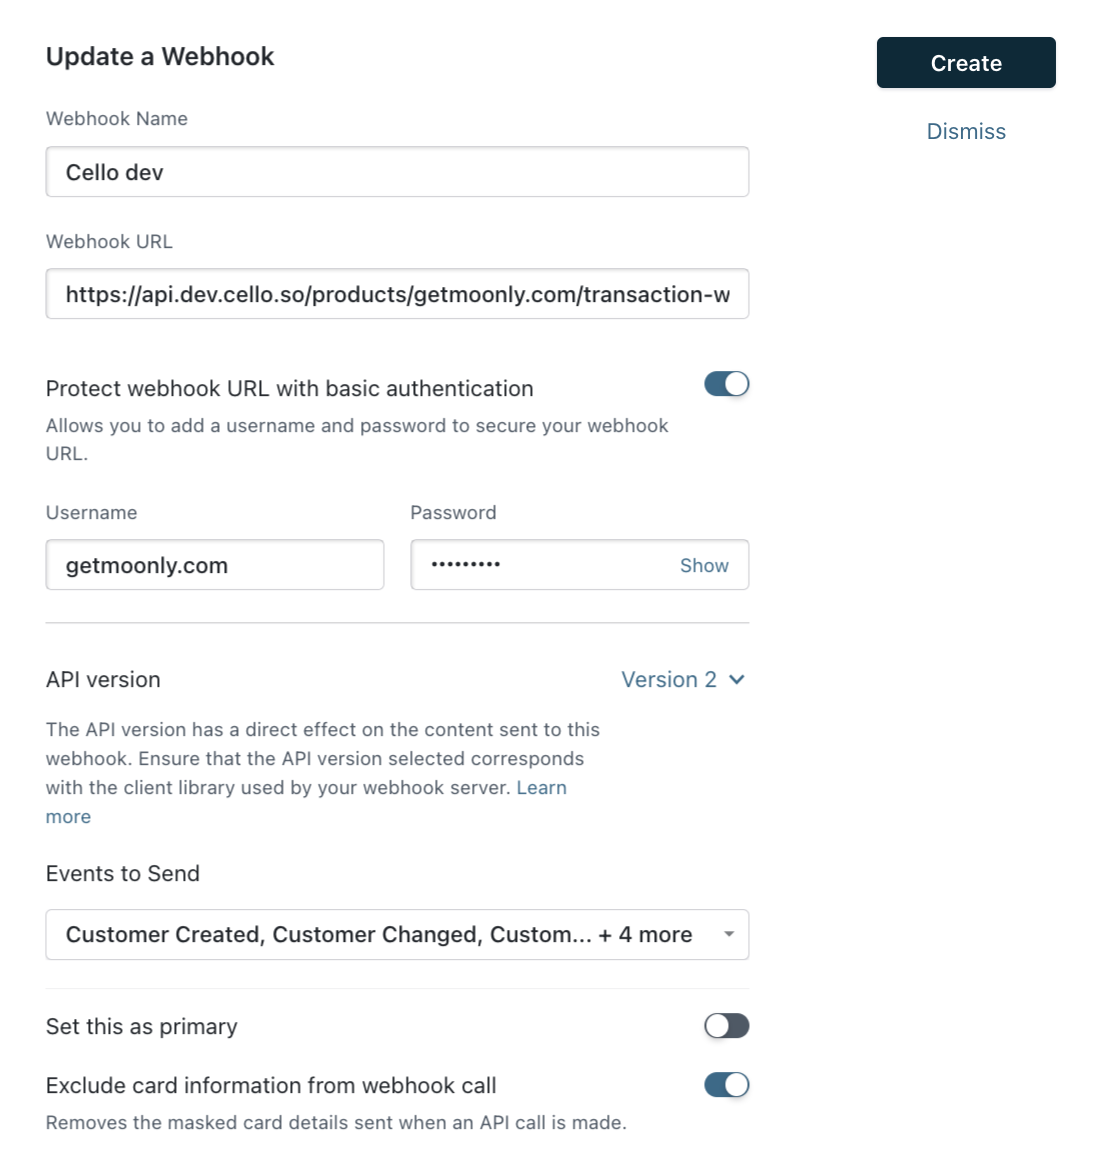
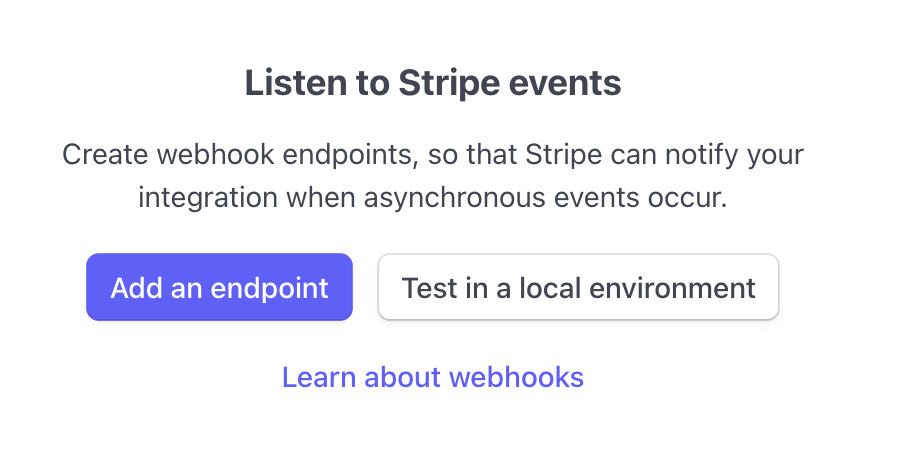
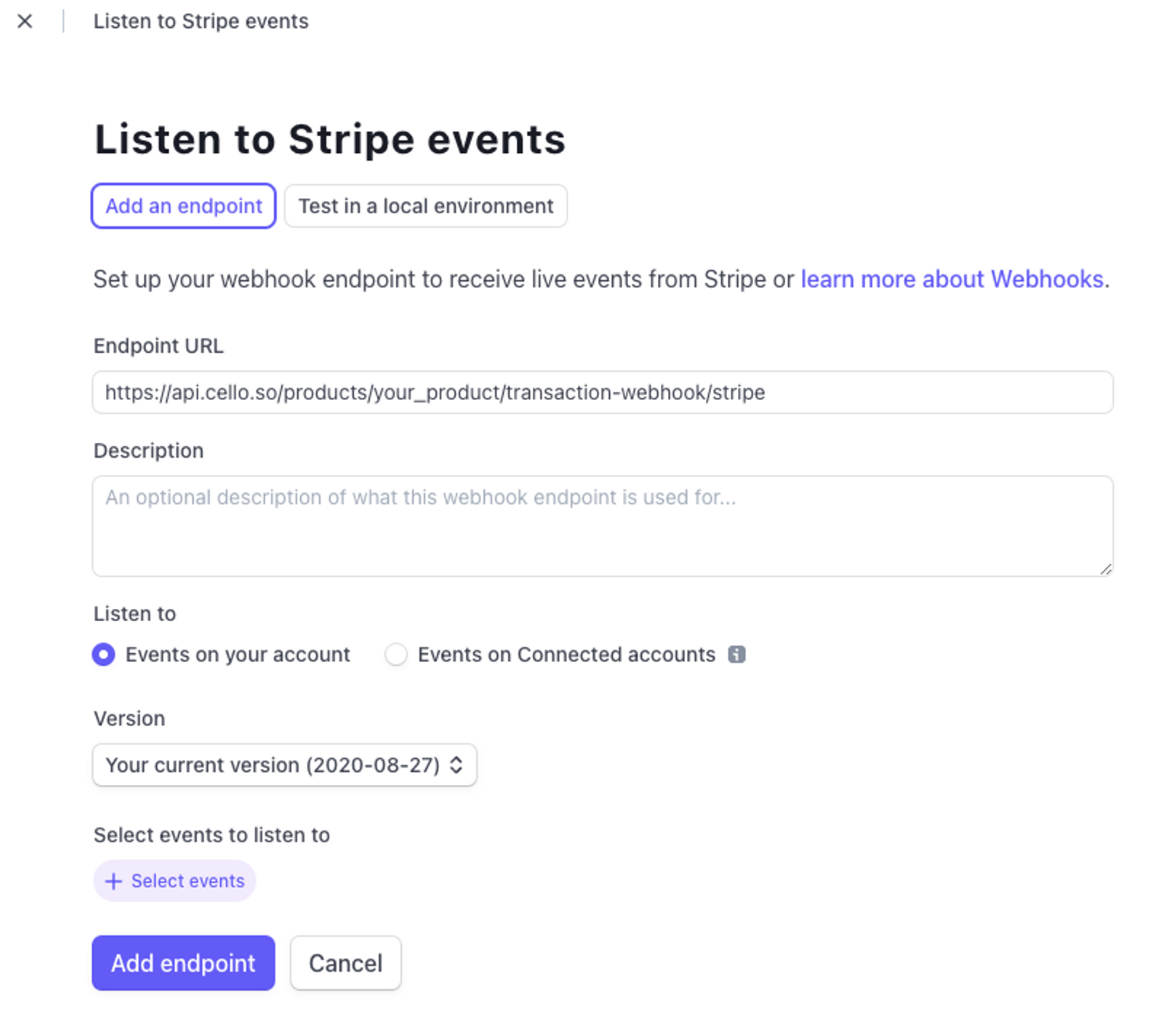
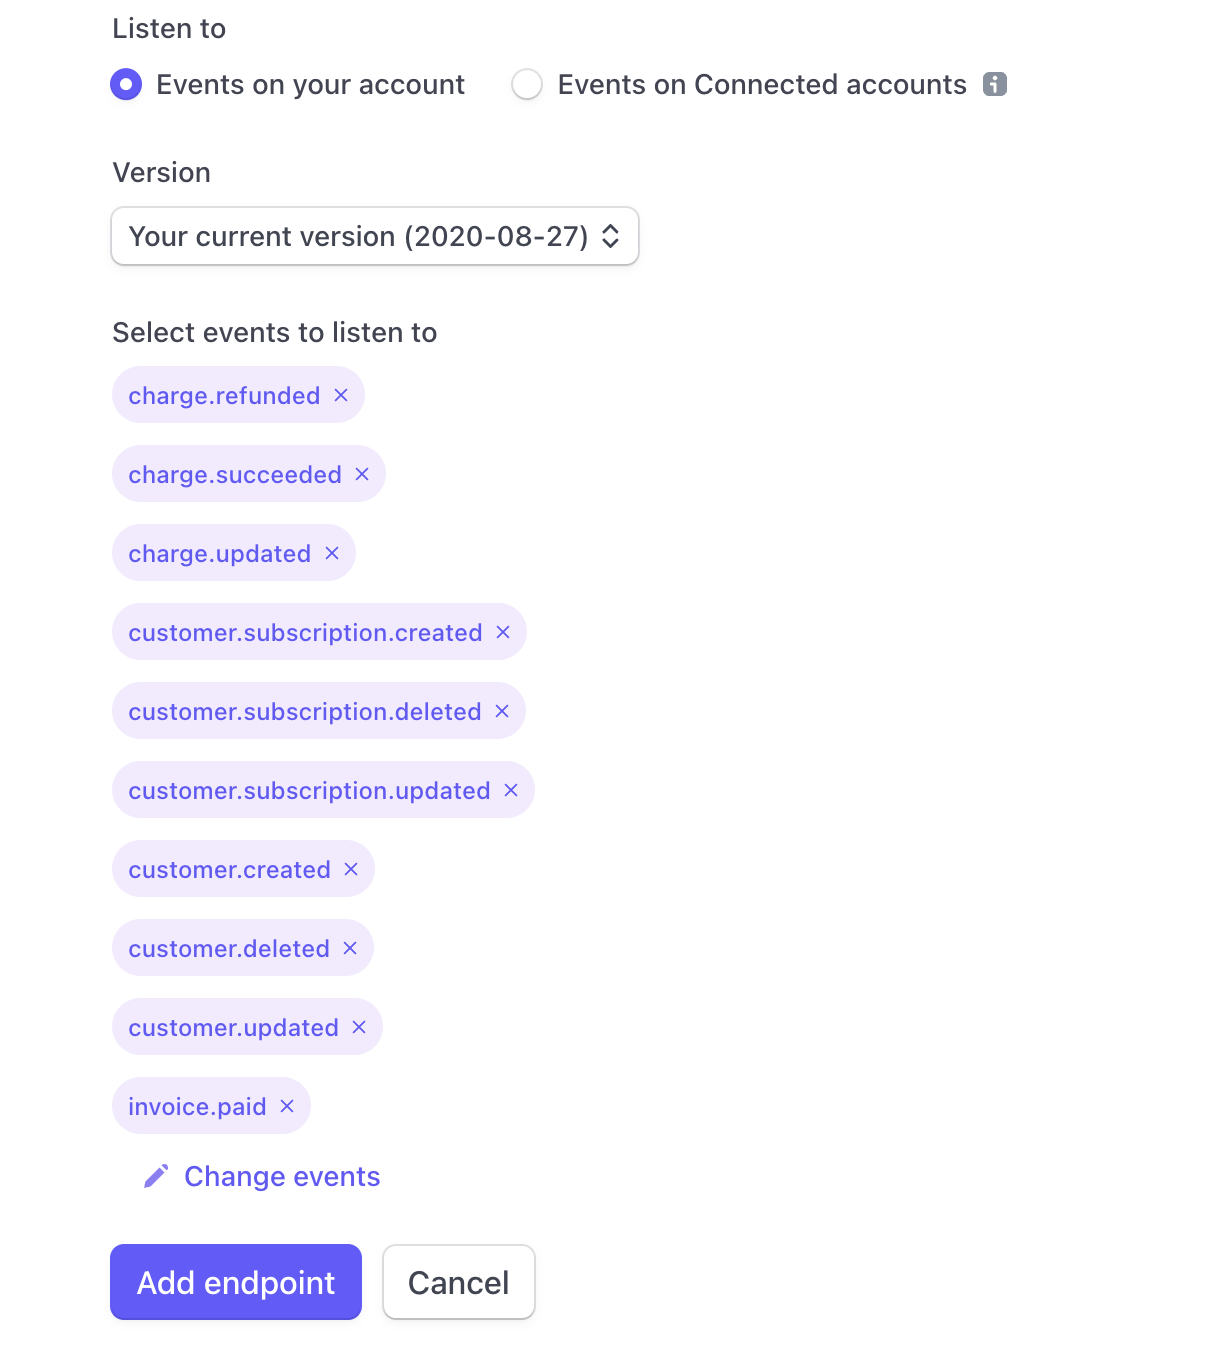

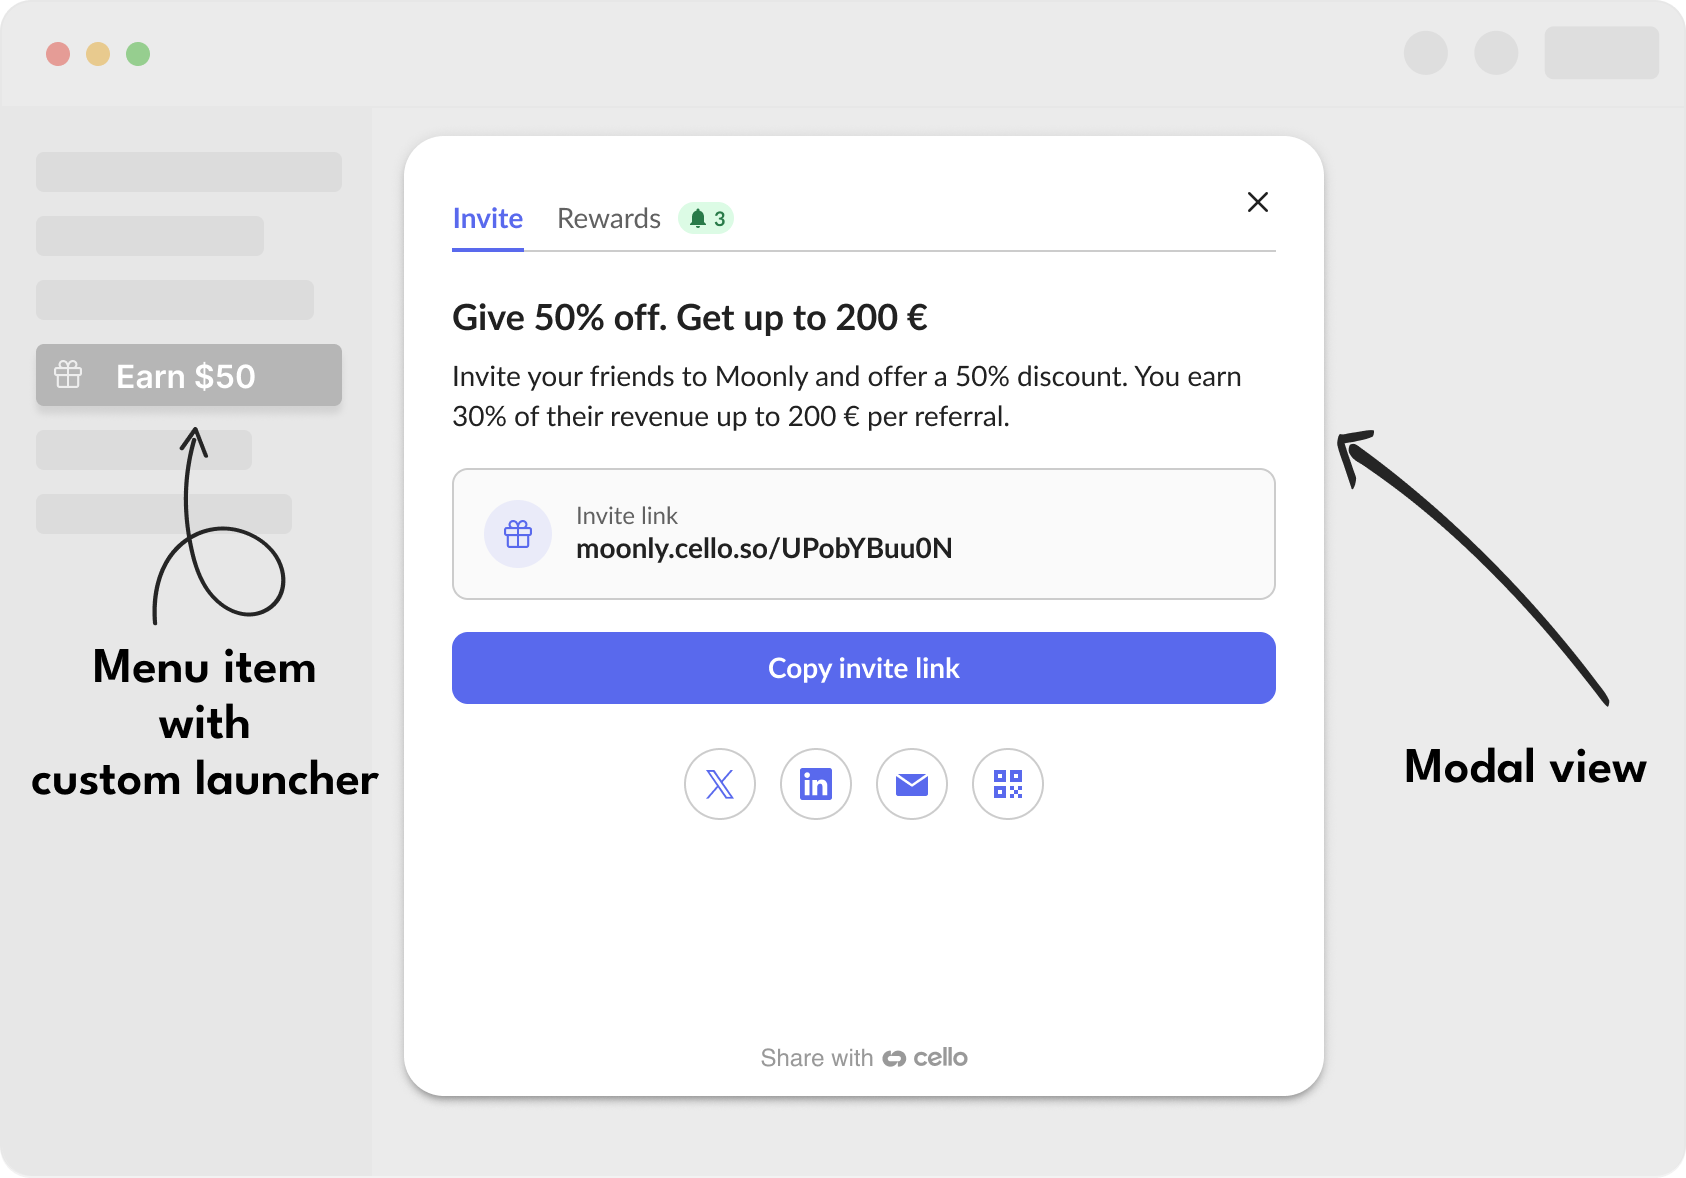
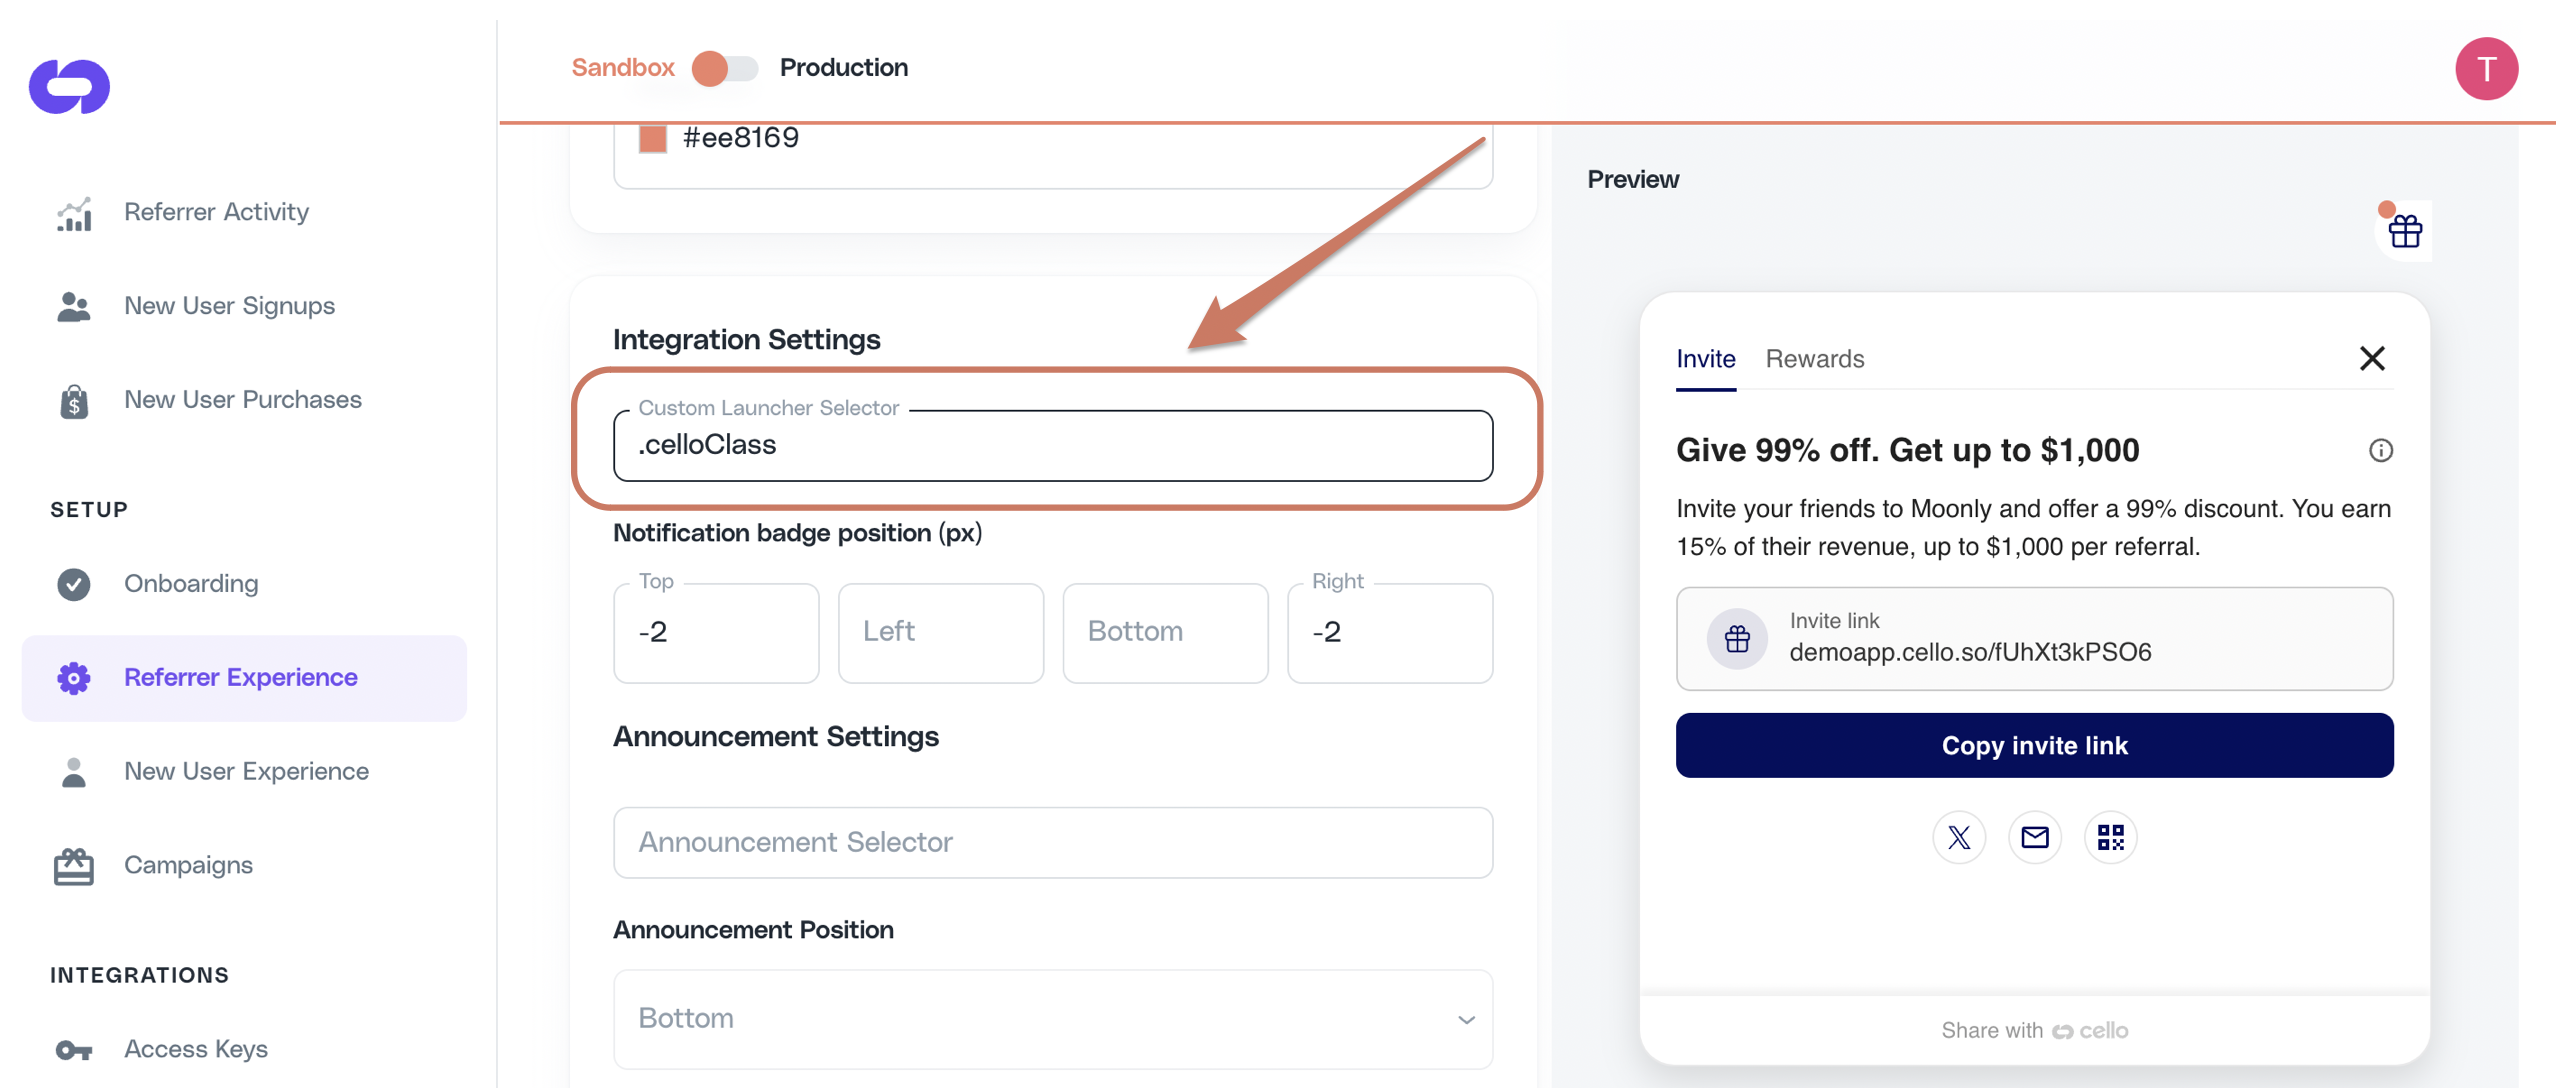 ### Step 3: Initialize Cello
After the custom launcher element exists in the DOM, initialize Cello:
```javascript
window.cello = window.cello || { cmd: [] };
window.cello.cmd.push(async (cello) => {
try {
await cello.boot({
productId: "YOUR_PRODUCT_ID",
token: "USER_JWT_TOKEN",
// ... other configuration
});
console.log("Cello initialized successfully");
// Custom launcher is now active
} catch (error) {
console.error("Failed to initialize Cello:", error);
}
});
```
## Common Issues and Solutions
### Custom launcher not working
### Step 3: Initialize Cello
After the custom launcher element exists in the DOM, initialize Cello:
```javascript
window.cello = window.cello || { cmd: [] };
window.cello.cmd.push(async (cello) => {
try {
await cello.boot({
productId: "YOUR_PRODUCT_ID",
token: "USER_JWT_TOKEN",
// ... other configuration
});
console.log("Cello initialized successfully");
// Custom launcher is now active
} catch (error) {
console.error("Failed to initialize Cello:", error);
}
});
```
## Common Issues and Solutions
### Custom launcher not working
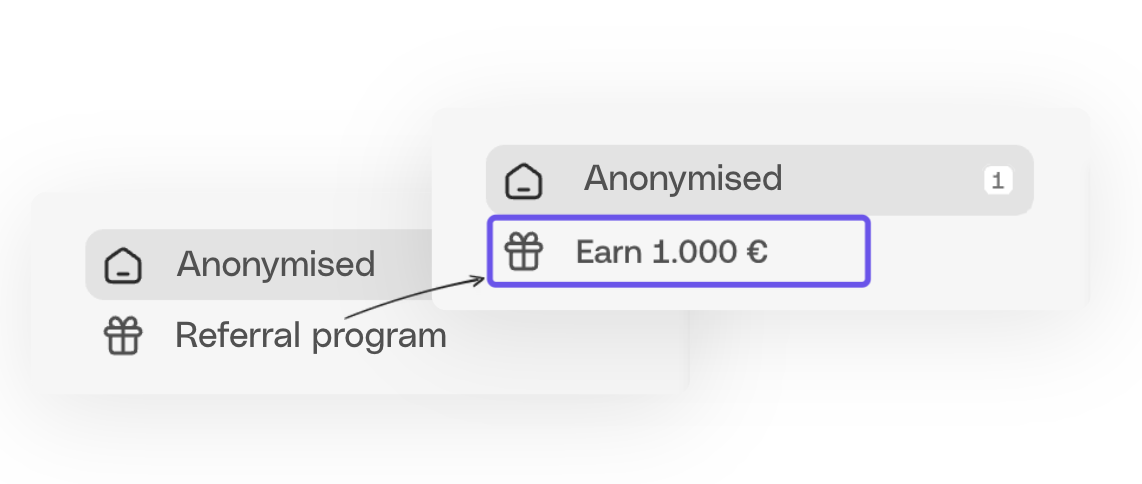 You can get the text for the menu launcher from [cello.js](/sdk/client-side/cello-js). Text will be localized to the [referrer's language](/guides/user-experience/overview#texts-and-language) and the reward amount is based on the [referrer's campaign](/guides/campaigns/setting-up-campaigns).
```javascript
const labels = await window.Cello("getLabels")
const myCustomLauncherLabel = labels.customLauncher
```
## Disable Cello button
**Cello button** is a floating action button or bookmark style button provided as a default Referral Component launcher. When integrating a Customer Launcher, you may choose to disable the Cello button or keep it as an additional launcher.
You can get the text for the menu launcher from [cello.js](/sdk/client-side/cello-js). Text will be localized to the [referrer's language](/guides/user-experience/overview#texts-and-language) and the reward amount is based on the [referrer's campaign](/guides/campaigns/setting-up-campaigns).
```javascript
const labels = await window.Cello("getLabels")
const myCustomLauncherLabel = labels.customLauncher
```
## Disable Cello button
**Cello button** is a floating action button or bookmark style button provided as a default Referral Component launcher. When integrating a Customer Launcher, you may choose to disable the Cello button or keep it as an additional launcher.
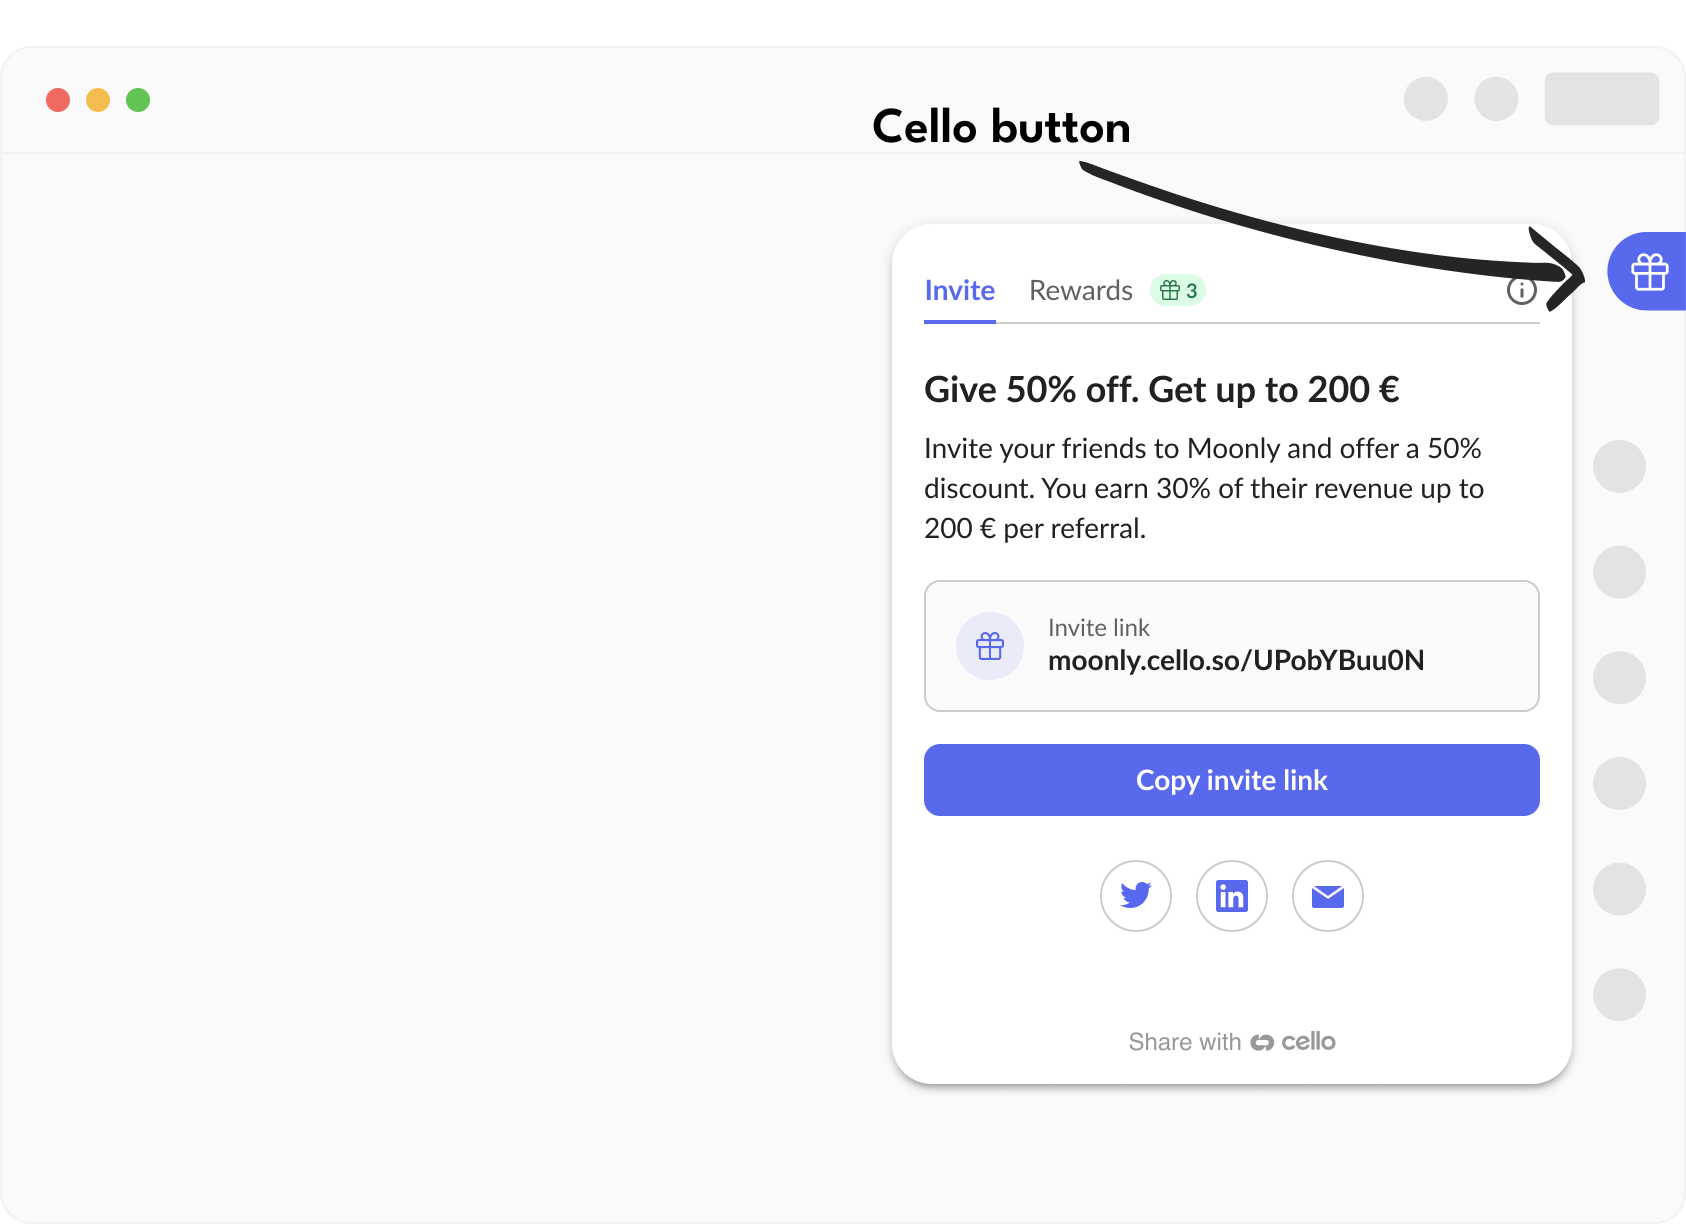 You can choose to disable the default launcher, the Cello button. Go to [Referrer experience](https://portal.cello.so/setup/referrer-experience) settings in Cello Portal and **uncheck** "Show Cello Button".
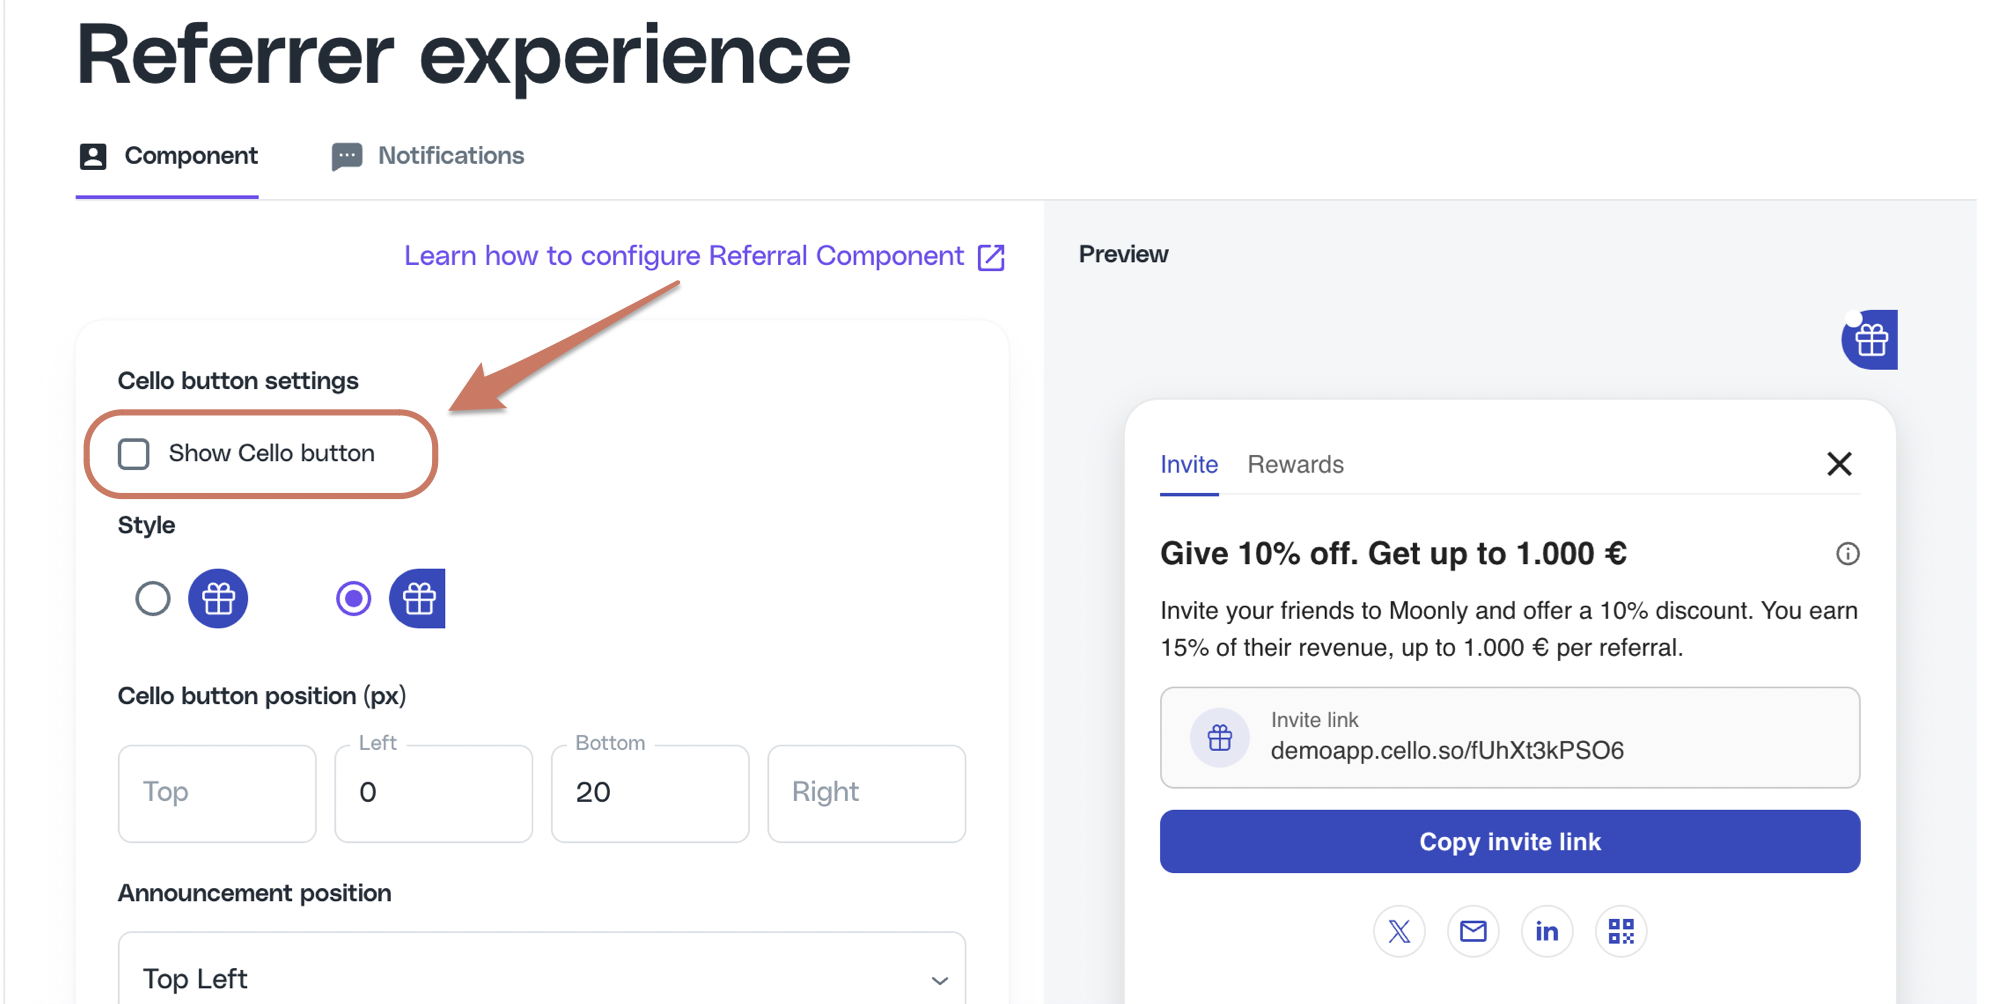 ## Configure notification badge
 Announcement are callout style notifications used to [communicate important information](/guides/user-experience/referral-notifications-and-emails#announcement) to the user if we need to grab their attention and direct them to the Referral Component.
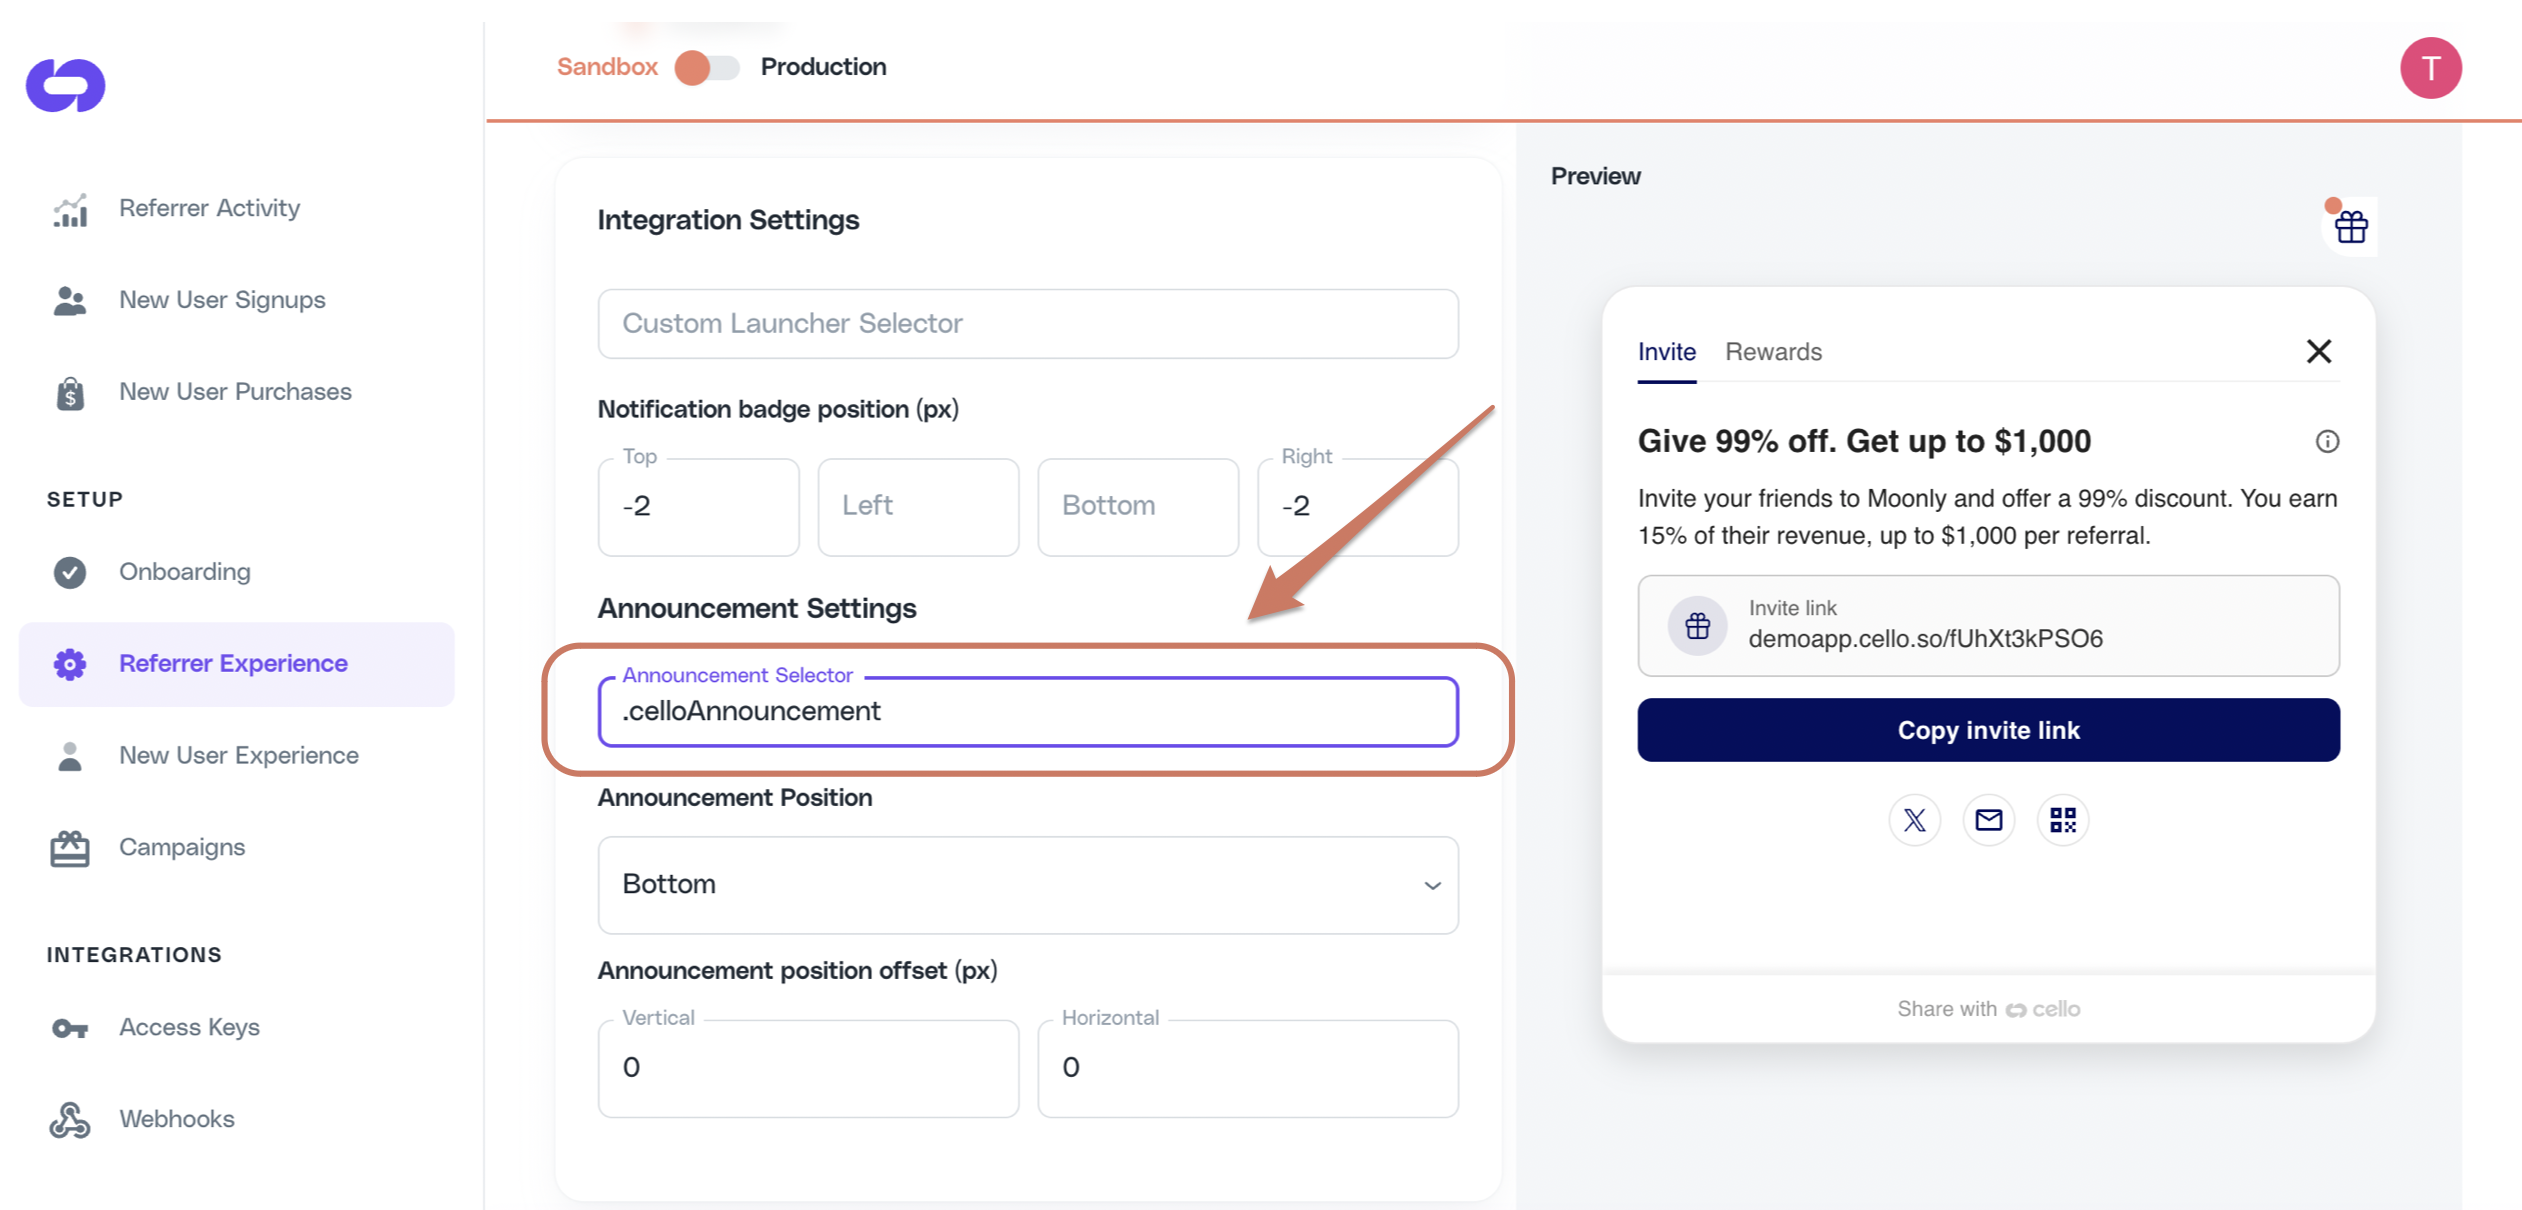 Here you can also configure where you want announcement to be shown relative to the Announcement Selector by specifying **Announcement position** and **Announcement position offset.**
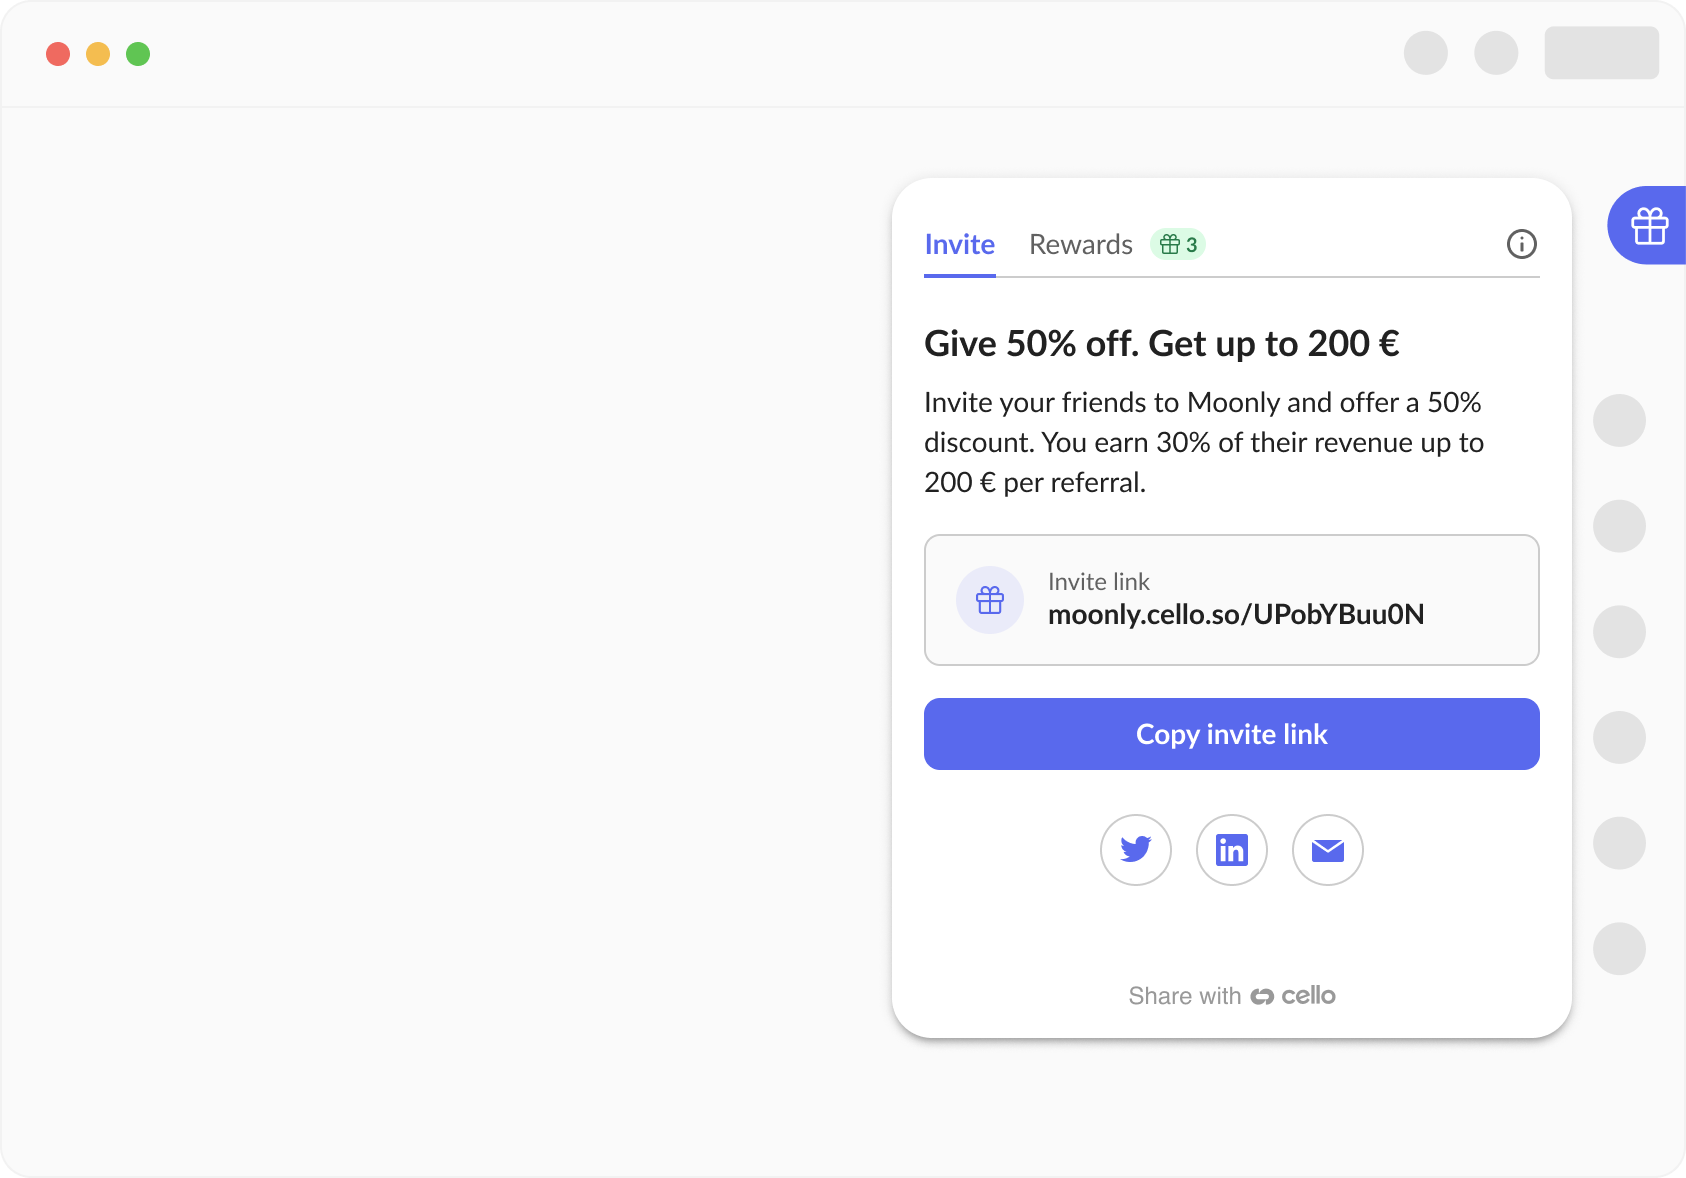 ## What is the Referral Component?
The Referral Component provides a complete referral experience within your product through:
* **First-time onboarding** that explains how your referral program works
* **Multiple sharing options** including link copy, social media, email, and QR codes
* **Progress tracking** showing clicks, signups, and earned rewards in real-time
* **Automated reward payouts** via PayPal, Venmo, and other payment methods
* **In-app and Email notifications** to keep users engaged with referral activity
Learn more about the [complete user experience](/guides/user-experience/overview).
## Key Features
* **Easy Integration** - Add as a floating button to launch the Referral Component or integrate into your existing menu with [custom launcher](/referral-component/custom-launcher)
* **Customizable Offer** - [Configure reward amounts, text, and program details](/guides/campaigns/setting-up-campaigns)
* **In-app Notifications** - [Alerts and announcements](/guides/user-experience/referral-notifications-and-emails) to keep users engaged with updates, promotions, and milestones
* **Email Notifications** - [Automated emails for signups, rewards, and milestones](/guides/user-experience/referral-notifications-and-emails)
* **Multi-language Support** - Available in 10+ languages with automatic detection
* **Cross-platform** - Native SDKs [for Web](/sdk/client-side/cello-js), [iOS, Android, and React Native](/sdk/mobile/introduction)
## Installation Options
## What is the Referral Component?
The Referral Component provides a complete referral experience within your product through:
* **First-time onboarding** that explains how your referral program works
* **Multiple sharing options** including link copy, social media, email, and QR codes
* **Progress tracking** showing clicks, signups, and earned rewards in real-time
* **Automated reward payouts** via PayPal, Venmo, and other payment methods
* **In-app and Email notifications** to keep users engaged with referral activity
Learn more about the [complete user experience](/guides/user-experience/overview).
## Key Features
* **Easy Integration** - Add as a floating button to launch the Referral Component or integrate into your existing menu with [custom launcher](/referral-component/custom-launcher)
* **Customizable Offer** - [Configure reward amounts, text, and program details](/guides/campaigns/setting-up-campaigns)
* **In-app Notifications** - [Alerts and announcements](/guides/user-experience/referral-notifications-and-emails) to keep users engaged with updates, promotions, and milestones
* **Email Notifications** - [Automated emails for signups, rewards, and milestones](/guides/user-experience/referral-notifications-and-emails)
* **Multi-language Support** - Available in 10+ languages with automatic detection
* **Cross-platform** - Native SDKs [for Web](/sdk/client-side/cello-js), [iOS, Android, and React Native](/sdk/mobile/introduction)
## Installation Options
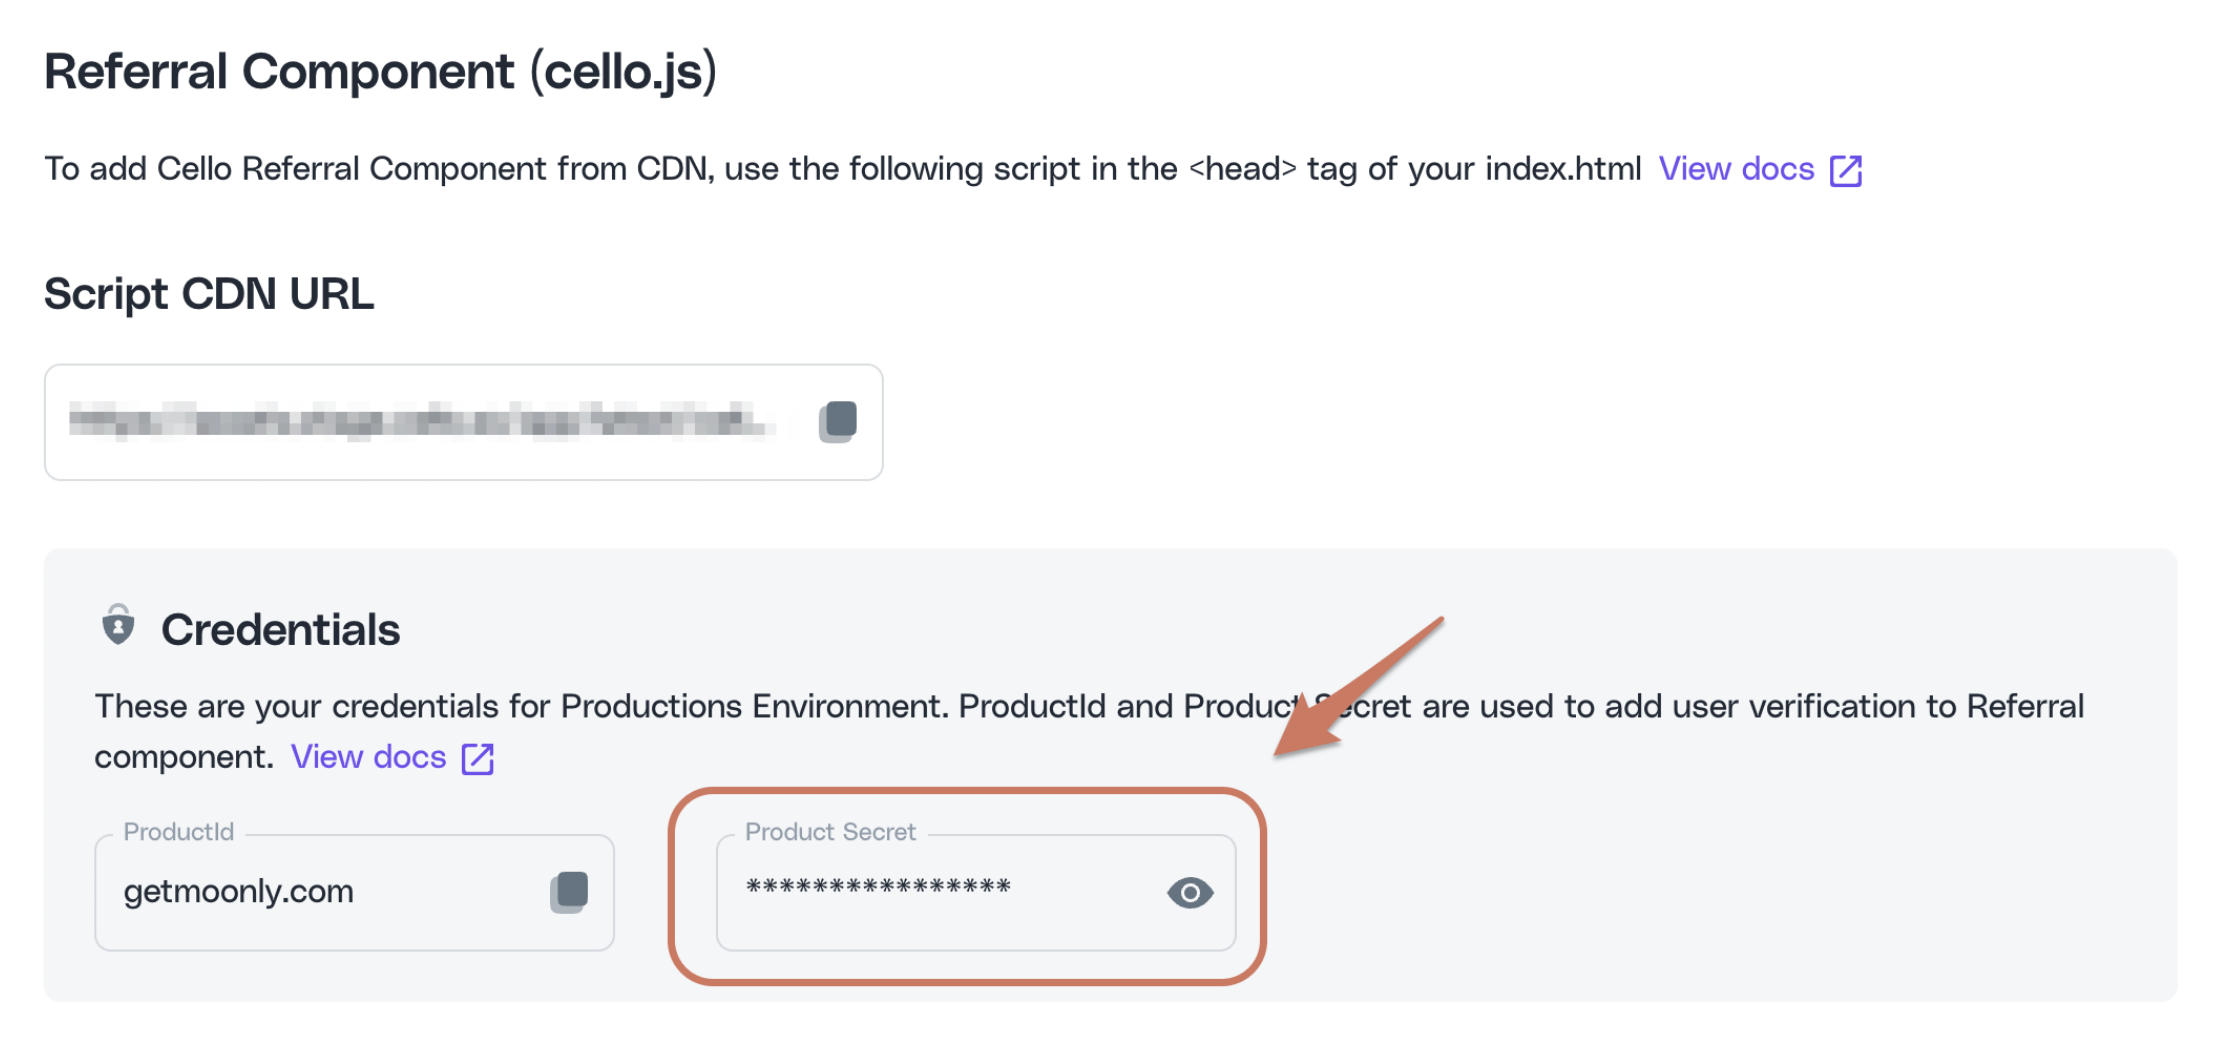 ## Installation Steps
Follow these steps to integrate the Referral Component:
1. Load the Cello script from our CDN
2. Generate a JWT token server-side for user authentication
3. Initialize the component with the token to connect your user session
## Step 1: Load the script
Add the Cello script to your HTML. The script loads asynchronously to avoid blocking page rendering and can be included anywhere on your website. This approach is recommended for optimal SEO performance.
## Installation Steps
Follow these steps to integrate the Referral Component:
1. Load the Cello script from our CDN
2. Generate a JWT token server-side for user authentication
3. Initialize the component with the token to connect your user session
## Step 1: Load the script
Add the Cello script to your HTML. The script loads asynchronously to avoid blocking page rendering and can be included anywhere on your website. This approach is recommended for optimal SEO performance.
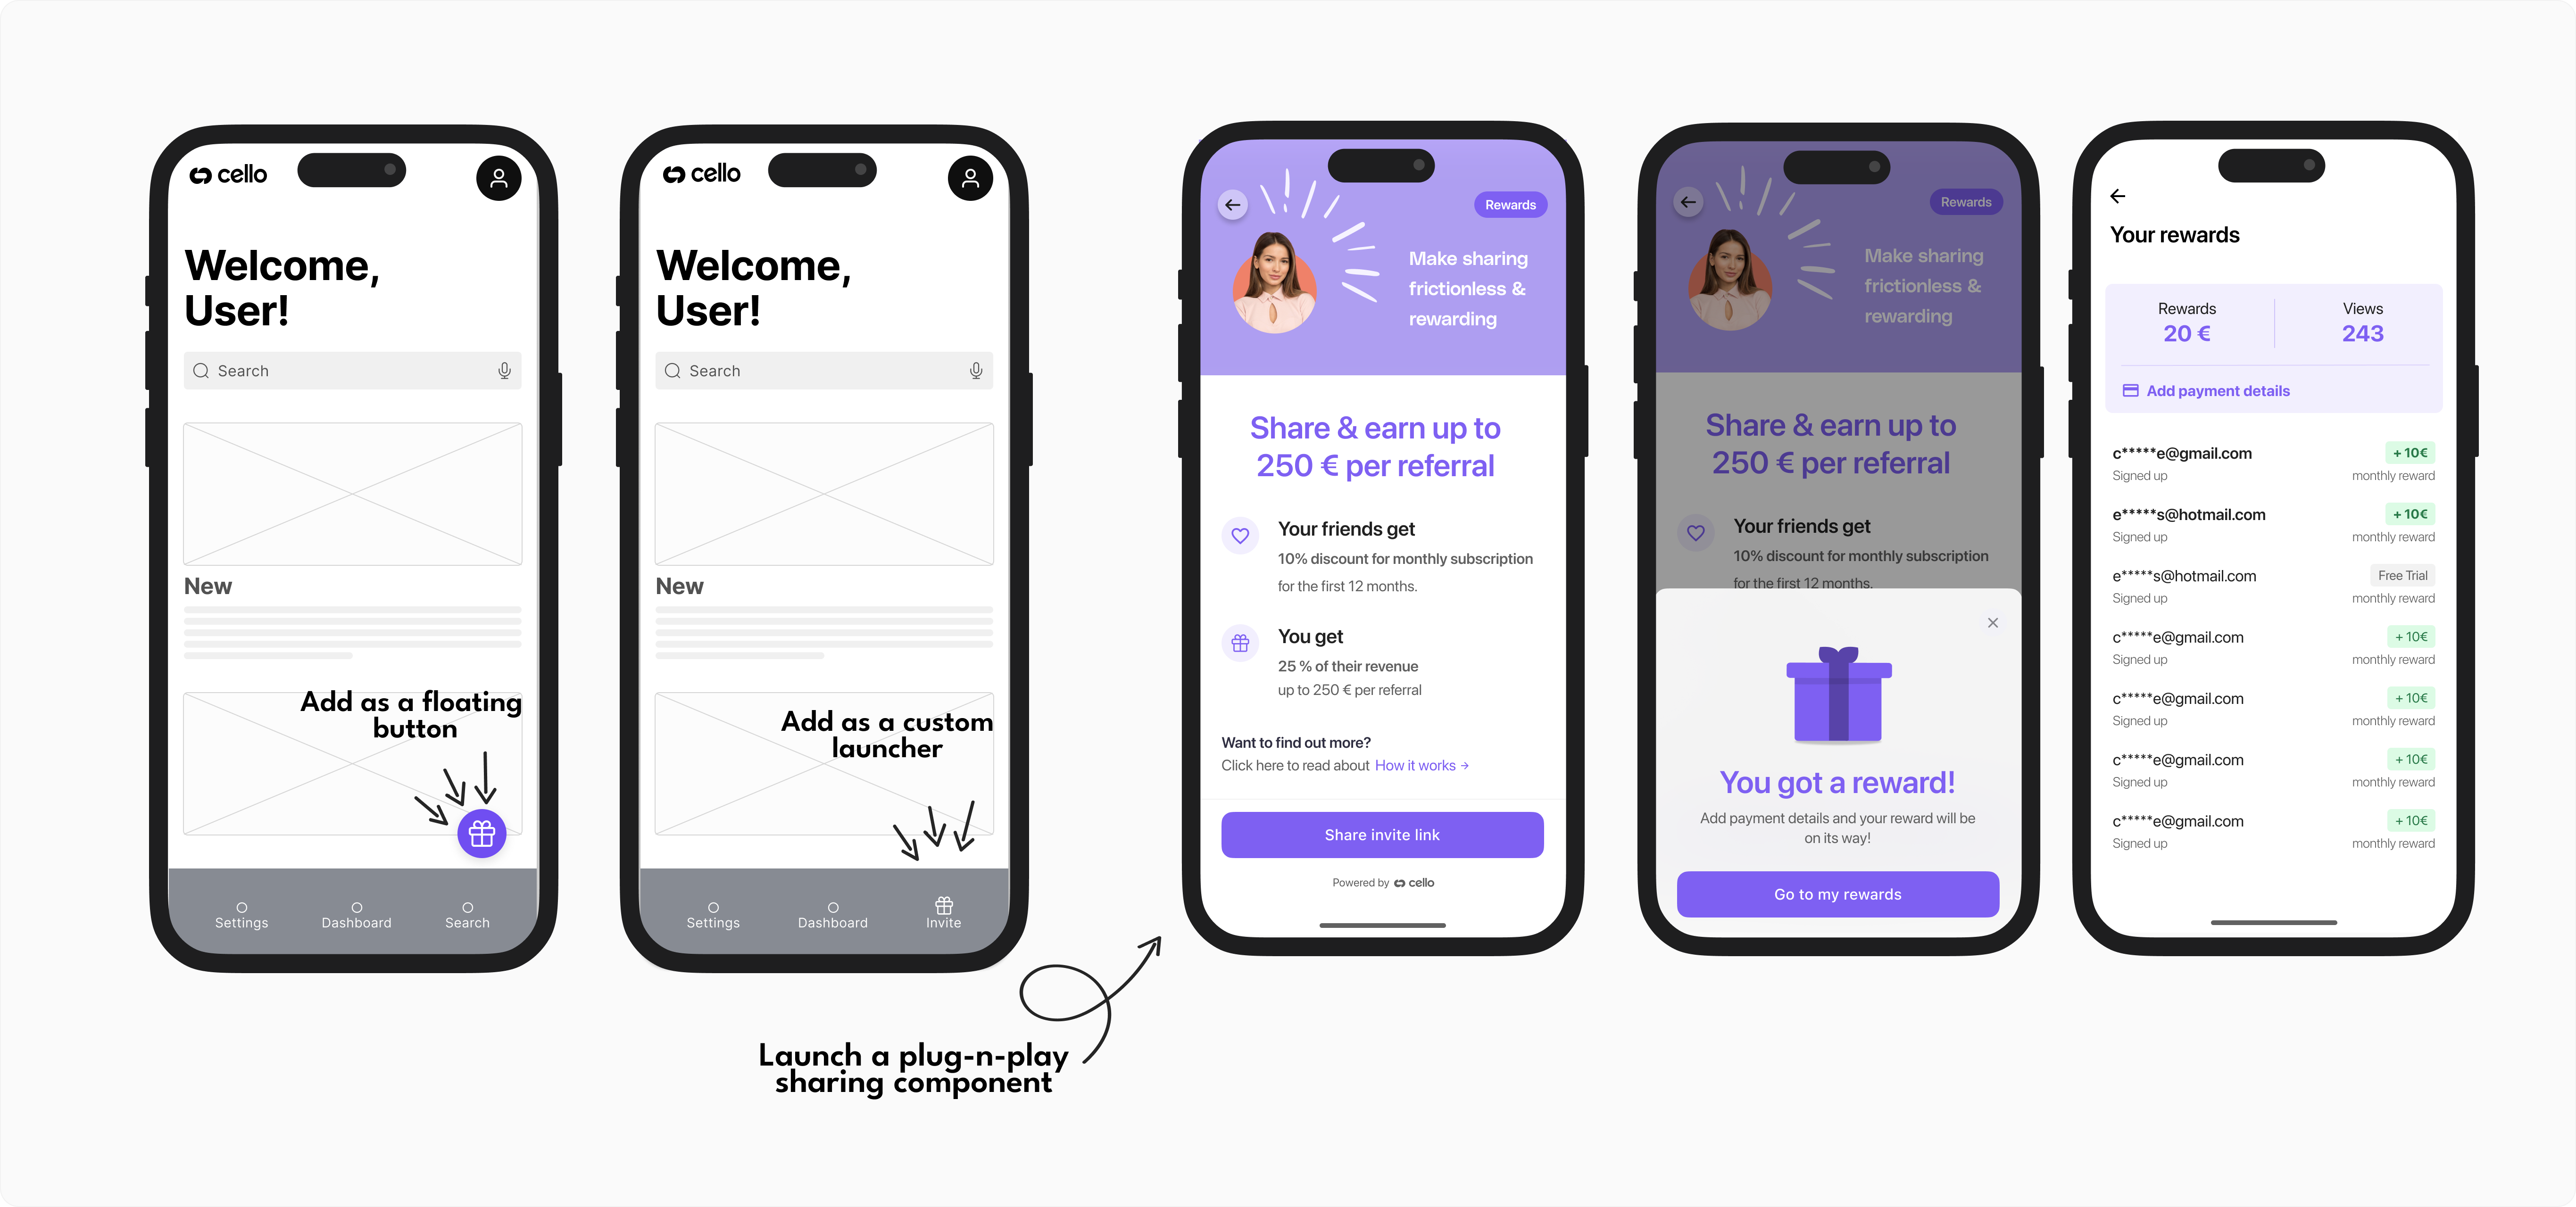 ## Available Mobile SDKs
Cello provides native mobile SDKs that embed a complete referral experience directly into your mobile applications, enabling users to share referral links, track rewards, and receive payouts—all without leaving your app.
## Available Mobile SDKs
Cello provides native mobile SDKs that embed a complete referral experience directly into your mobile applications, enabling users to share referral links, track rewards, and receive payouts—all without leaving your app.
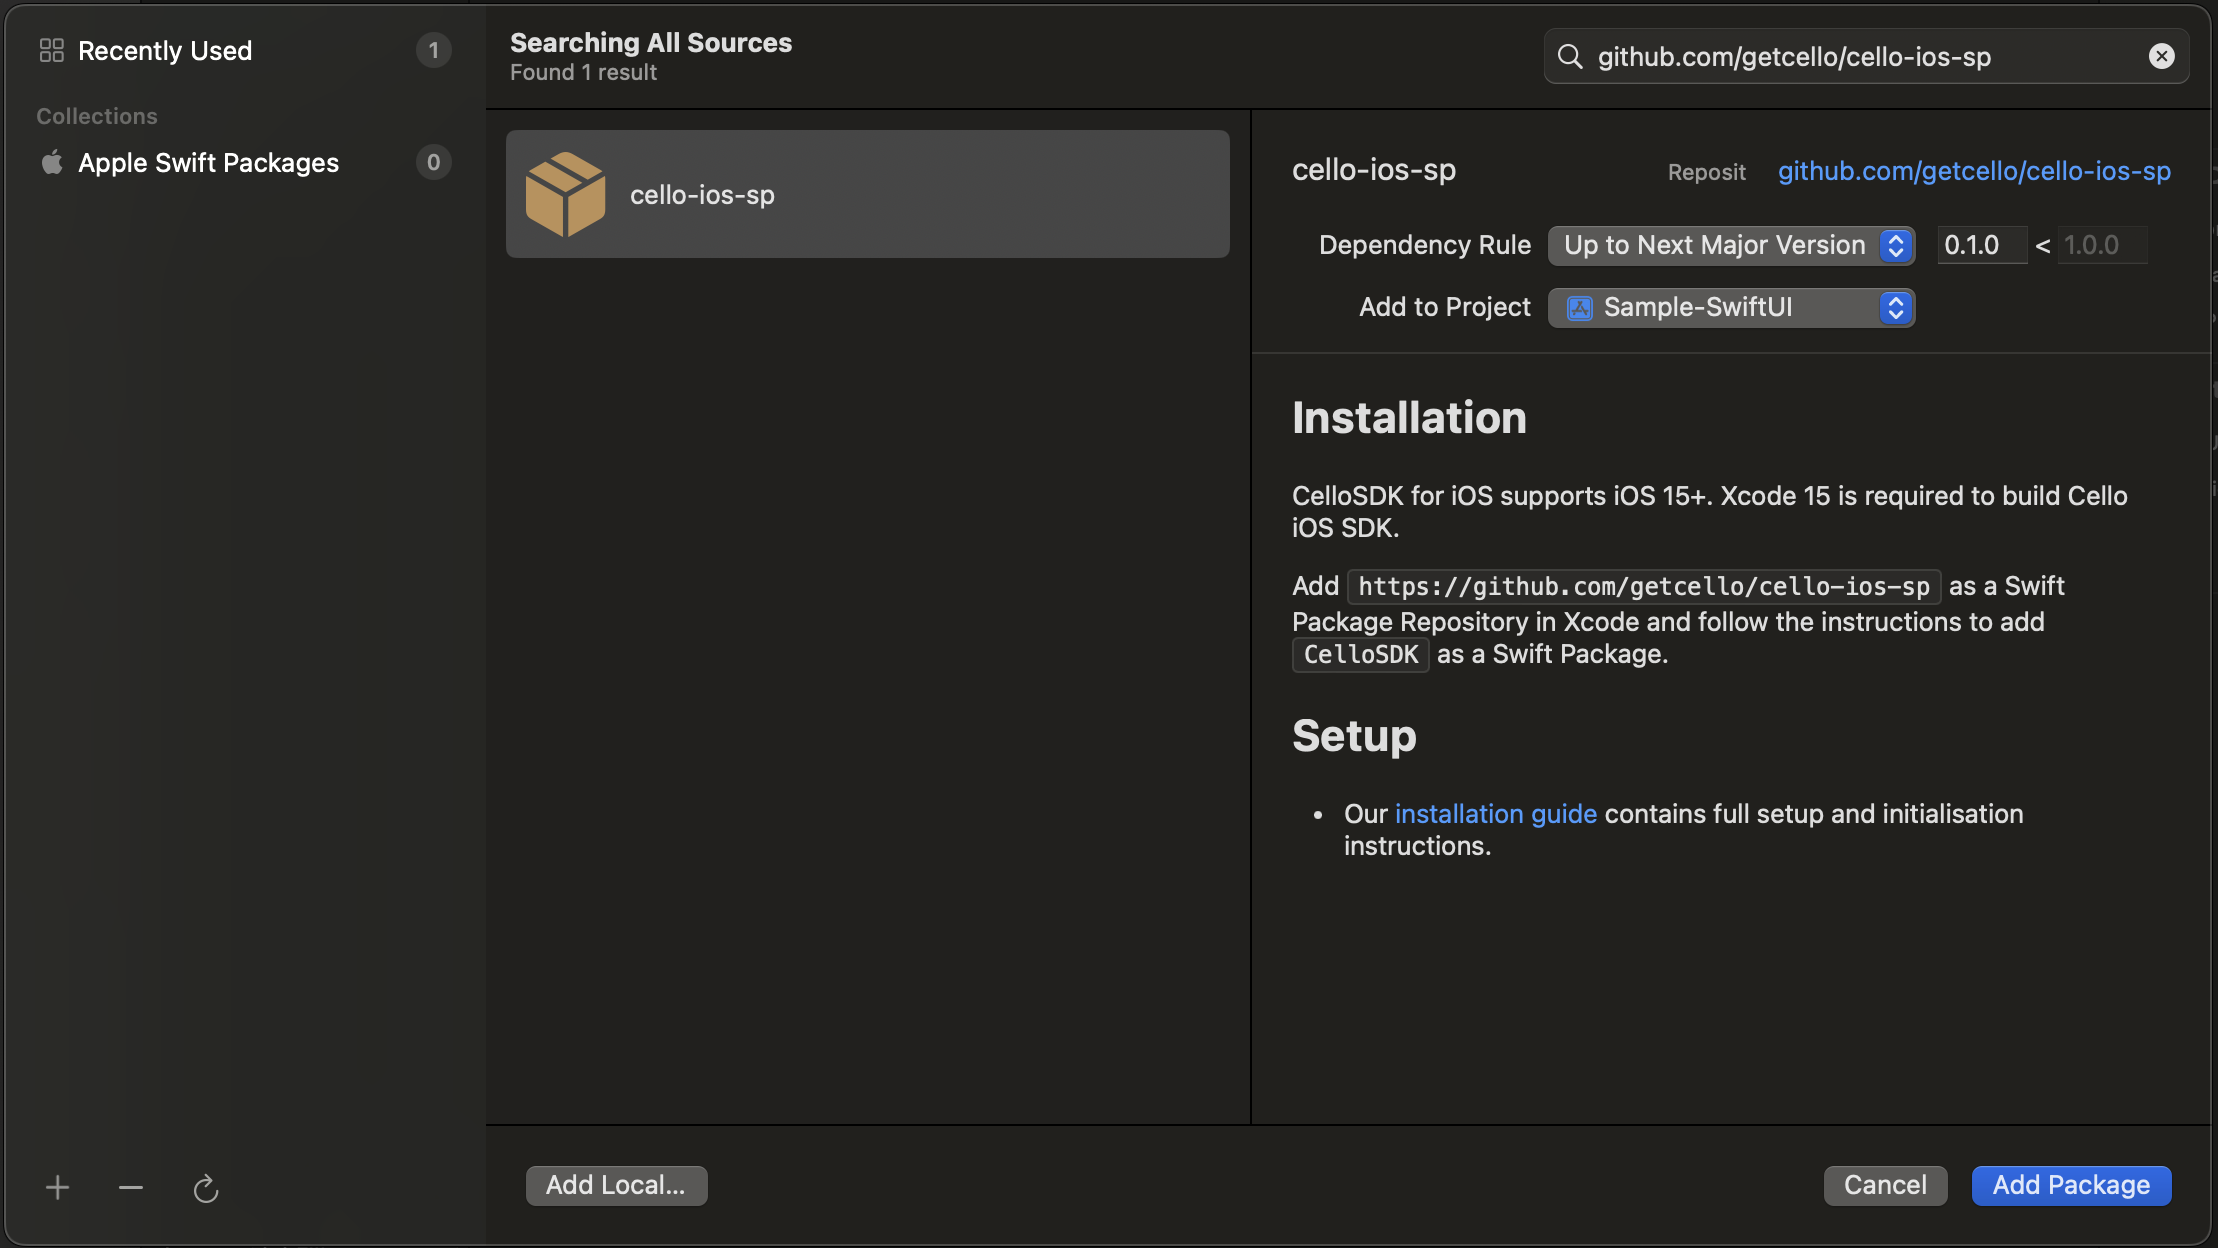 #### Option 3: Install Cello manually
1. Download Cello for iOS and extract the zip. (👉 [**Cello iOS zip download**](https://github.com/getcello/cello-ios-sp/releases))
2. Drag `CelloSDK.xcframework` into your project. Make sure **Copy items if needed** is selected and click Finish.
3. In the target settings for your app, set the `CelloSDK.xcframework` to **Embed & Sign** in the **Frameworks, Libraries, and Embedded Content** section of the **General** tab.
### Choose an Environment
In your Cello SDK setup, you have the flexibility to select the environment in which your application will run. This feature is especially useful for different stages of development, such as testing in a development or staging environment before going live in production. The available environments are:
Available environments:
* `prod` (Production)
* `sandbox` (Sandbox)
*`Default environment: prod`*
#### Configuration Steps
* Open your iOS project in Xcode.
* Navigate to the `Info.plist` file.
* Add a new key-value pair:
```xml
#### Option 3: Install Cello manually
1. Download Cello for iOS and extract the zip. (👉 [**Cello iOS zip download**](https://github.com/getcello/cello-ios-sp/releases))
2. Drag `CelloSDK.xcframework` into your project. Make sure **Copy items if needed** is selected and click Finish.
3. In the target settings for your app, set the `CelloSDK.xcframework` to **Embed & Sign** in the **Frameworks, Libraries, and Embedded Content** section of the **General** tab.
### Choose an Environment
In your Cello SDK setup, you have the flexibility to select the environment in which your application will run. This feature is especially useful for different stages of development, such as testing in a development or staging environment before going live in production. The available environments are:
Available environments:
* `prod` (Production)
* `sandbox` (Sandbox)
*`Default environment: prod`*
#### Configuration Steps
* Open your iOS project in Xcode.
* Navigate to the `Info.plist` file.
* Add a new key-value pair:
```xml