> ## Documentation Index
> Fetch the complete documentation index at: https://docs.cello.so/llms.txt
> Use this file to discover all available pages before exploring further.
# HubSpot + Zapier Quickstart
> Learn how to send Cello signup events from HubSpot deal stage changes using a no-code Zapier workflow.
This guide is **optimized for sales-led products** where conversions are driven by demos, sales calls, or other manual qualification steps tracked in HubSpot.
Use this guide if you:
* Use **HubSpot** as your source of truth for deals
* Want to send Cello signup events (e.g. `demo-call-attended`) **without writing any backend code**
* Trigger events based on **HubSpot deal stage changes** (e.g. "Demo Done", "Qualified", "Purchase Consideration")
# Overview
This guide walks you through building a no-code Zapier workflow that:
1. **Watches HubSpot** for deals moving into a specific stage (e.g. "Demo Done")
2. **Filters** deals to only those with a captured `ucc` referral code
3. **Authenticates** with the Cello API to obtain an access token
4. **Sends a signup event** to Cello using the `POST /events` endpoint
By the end, every qualified deal in HubSpot will automatically generate a Cello conversion event — letting you reward referrers as soon as their referee attends a demo or hits any milestone in your sales pipeline.
# Prerequisites
Before you start, make sure you have:
* A **HubSpot account** with deals flowing through your sales pipeline
* A **Zapier account** (Starter plan or above — Code by Zapier steps require a paid plan)
* A **Cello account** with API credentials (`accessKeyId` and `secretAccessKey`) — generate these in the [Cello Portal](https://portal.cello.so)
* A **`ucc` property** on your HubSpot deal or company object, populated when the referral lands. Follow the [HubSpot Forms attribution guide](/attribution/hubspot) to set this up.
* [Cello JS Referral Component](/referral-component/quickstart) integrated in your product so referrers can share referral links
If `ucc` is not being captured on your HubSpot deals, the Zap will skip every event. Complete the [HubSpot Forms attribution setup](/attribution/hubspot) first and verify with a test referral before continuing.
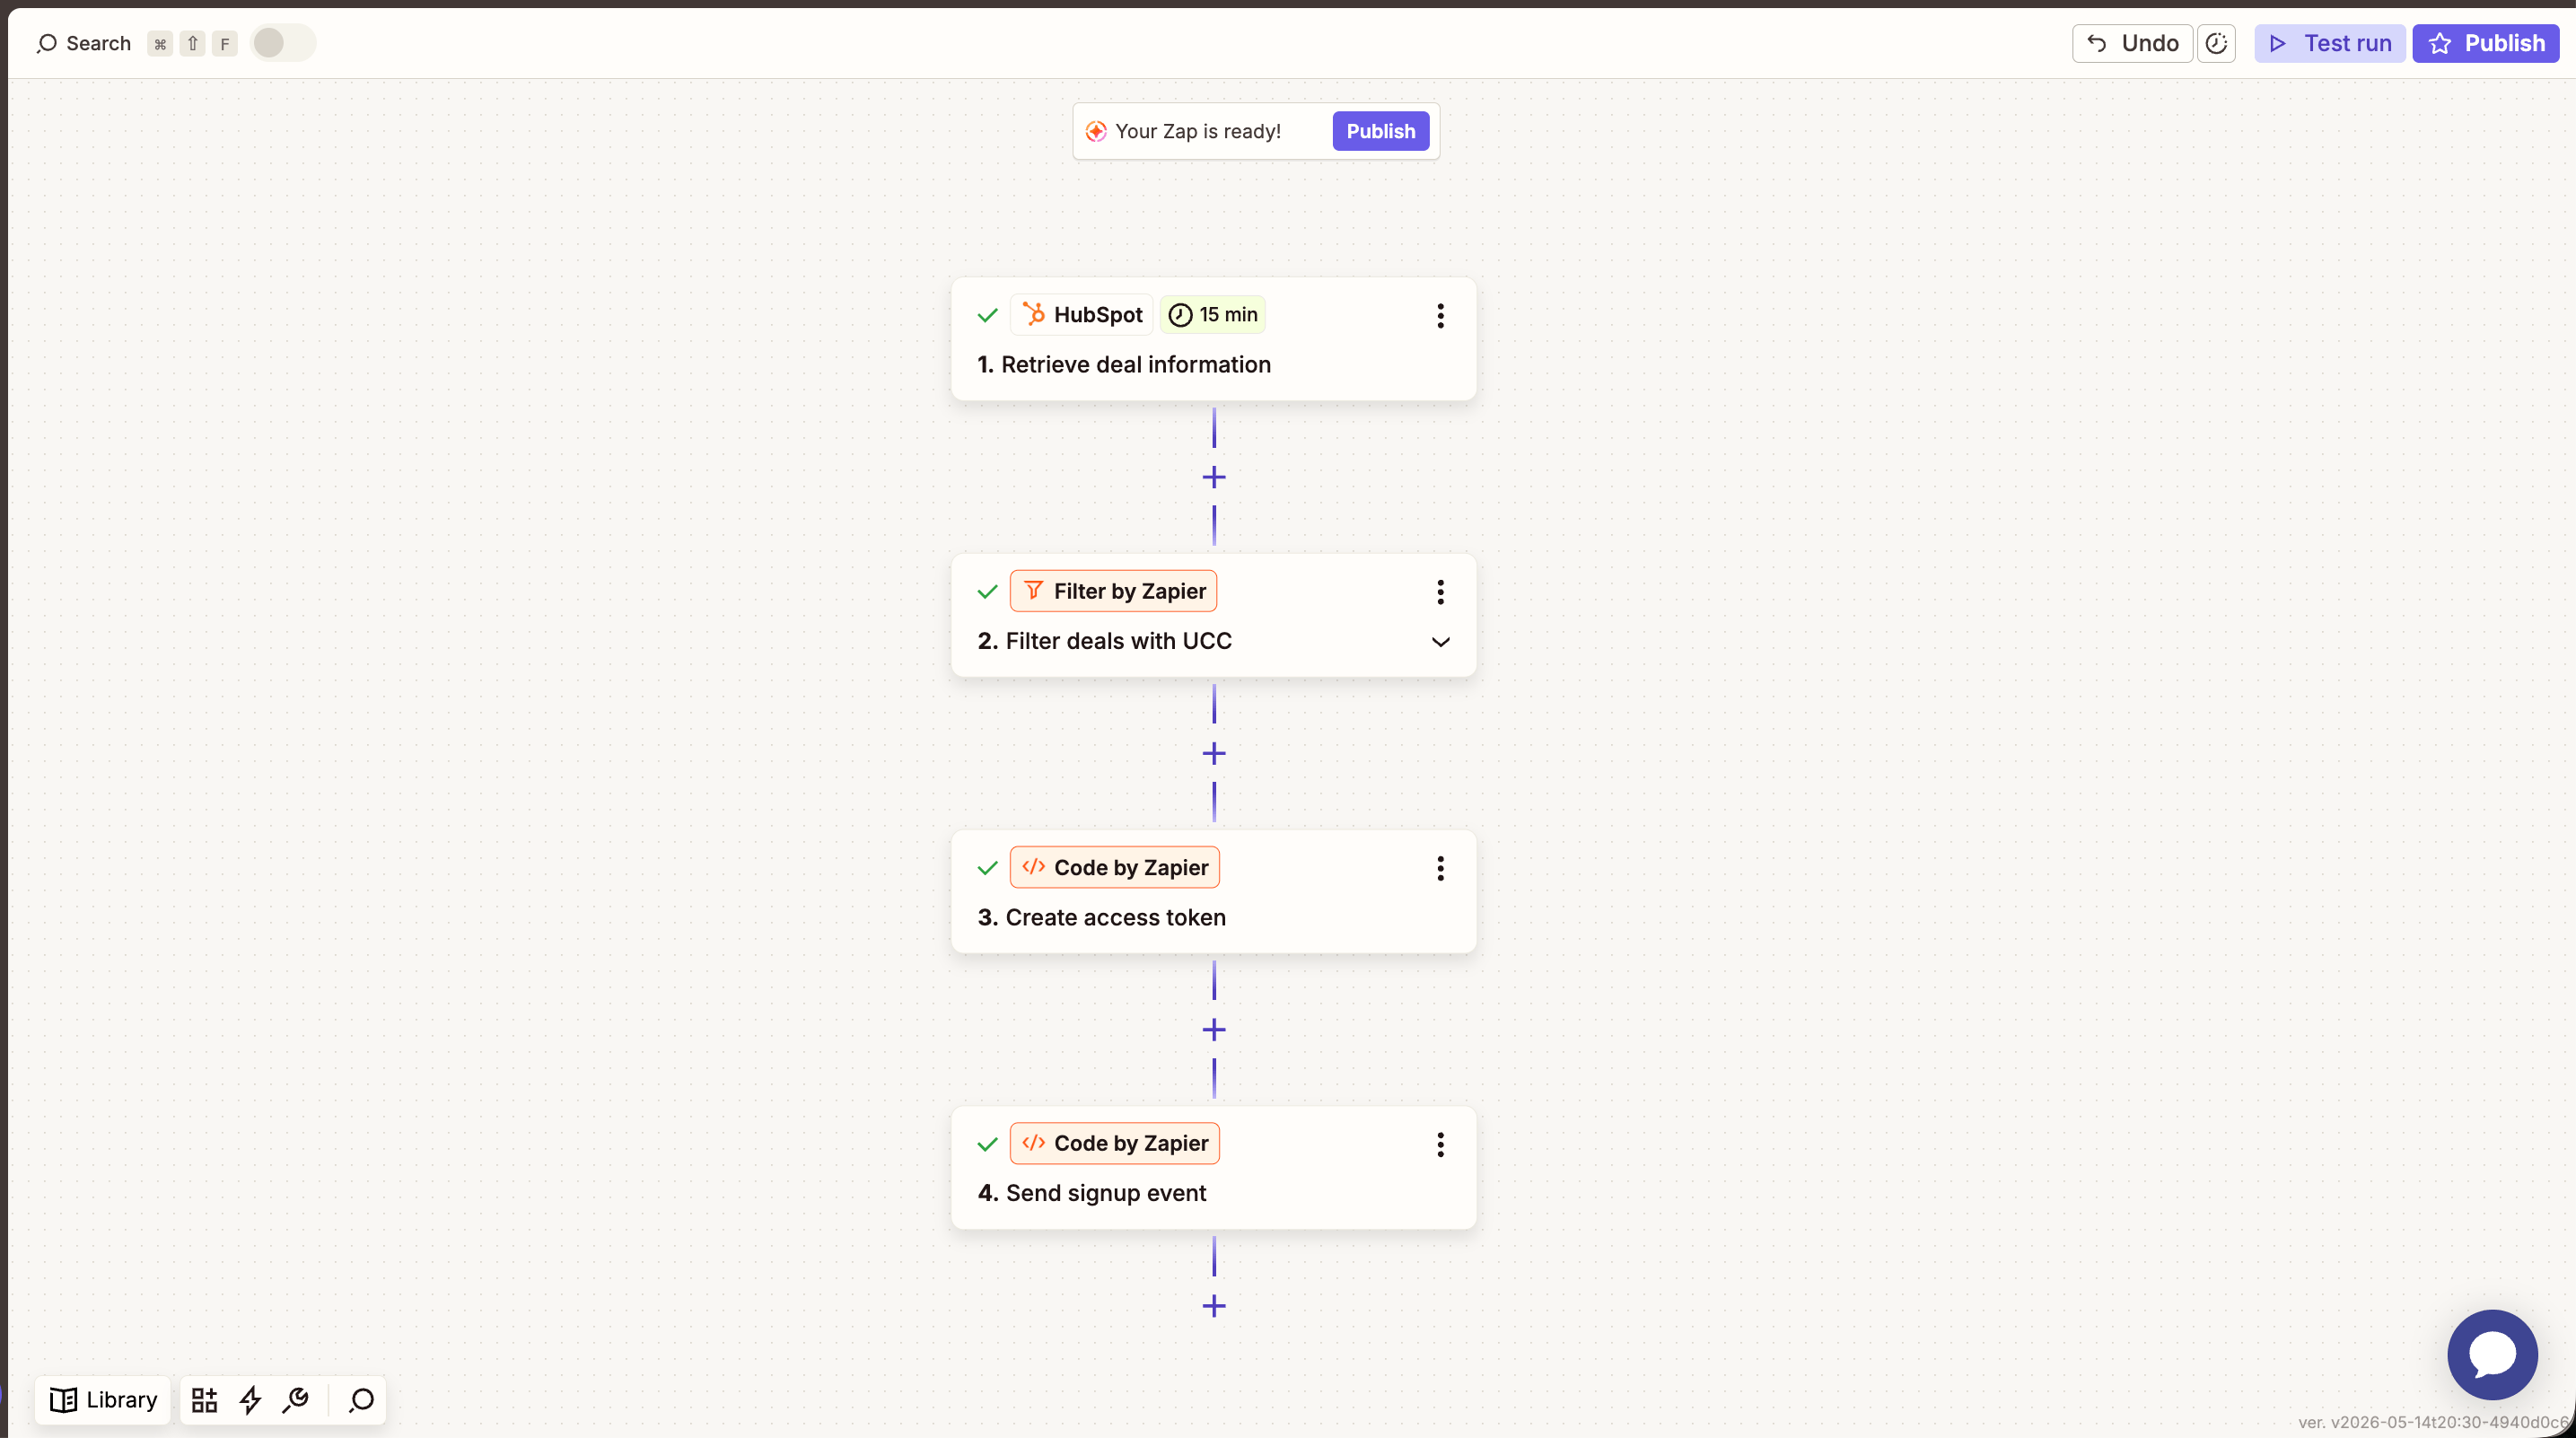
# The completed Zap
Your finished Zap will have four steps:
 # Step 1: Trigger on HubSpot deal stage change
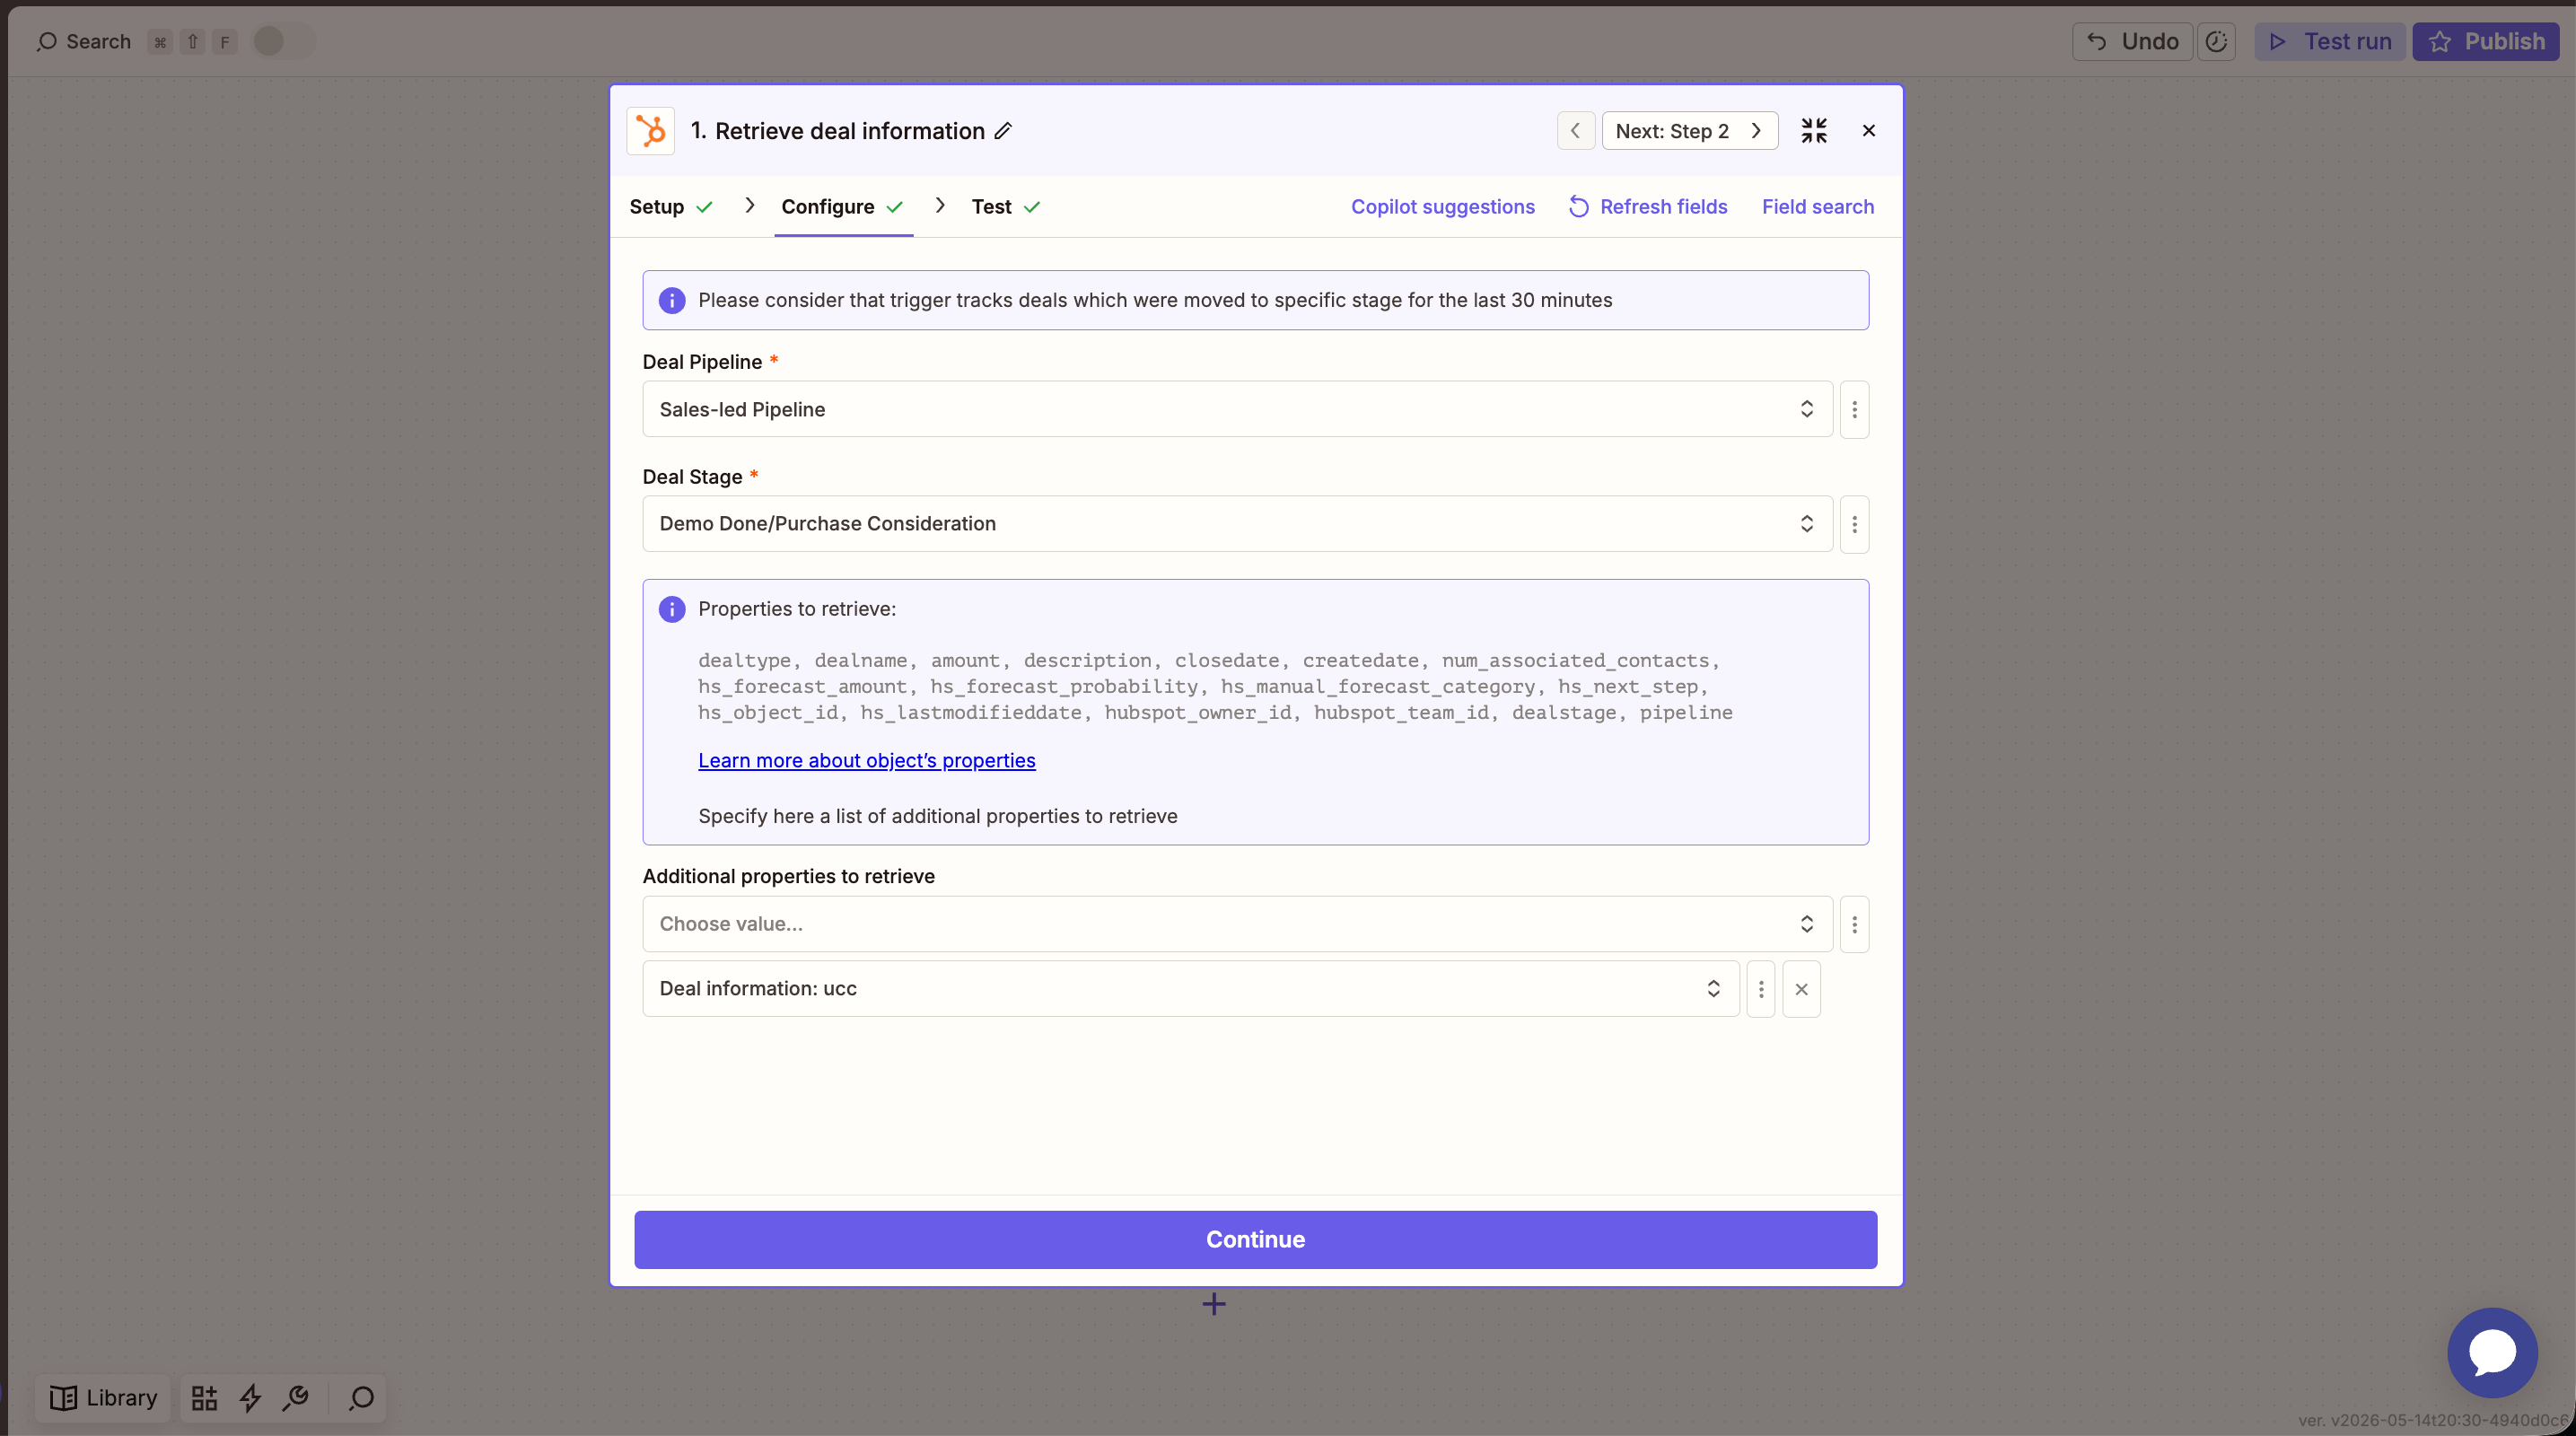
The Zap fires whenever a deal enters the stage you choose (typically the one that represents a qualified conversion — "Demo Done", "Purchase Consideration", or similar).
1. In Zapier, create a new Zap and choose **HubSpot** as the trigger app.
2. Pick the event **"Deal in stage"** (or "Deal Property Changed" depending on your HubSpot plan).
3. Select your **Deal Pipeline** and the **Deal Stage** that should trigger the event (e.g. `Demo Done/Purchase Consideration`).
4. Under **Additional properties to retrieve**, add the `ucc` property so it's available in later steps.
# Step 1: Trigger on HubSpot deal stage change
The Zap fires whenever a deal enters the stage you choose (typically the one that represents a qualified conversion — "Demo Done", "Purchase Consideration", or similar).
1. In Zapier, create a new Zap and choose **HubSpot** as the trigger app.
2. Pick the event **"Deal in stage"** (or "Deal Property Changed" depending on your HubSpot plan).
3. Select your **Deal Pipeline** and the **Deal Stage** that should trigger the event (e.g. `Demo Done/Purchase Consideration`).
4. Under **Additional properties to retrieve**, add the `ucc` property so it's available in later steps.
 The HubSpot trigger checks for matching deals every 15 minutes and only picks up deals moved into the stage in the **last 30 minutes**. Plan your stage transitions accordingly.
Test the trigger and confirm Zapier returns a sample deal with the expected fields: `dealname`, `hs_object_id`, `ucc`, plus any contact/company info you want to forward.
# Step 2: Filter deals without a `ucc`
You only want to send events for deals that came from a referral. Add a **Filter by Zapier** step:
1. Choose **Filter by Zapier**.
2. Set the rule to: `1. Deal information: ucc` **Exists**.
The HubSpot trigger checks for matching deals every 15 minutes and only picks up deals moved into the stage in the **last 30 minutes**. Plan your stage transitions accordingly.
Test the trigger and confirm Zapier returns a sample deal with the expected fields: `dealname`, `hs_object_id`, `ucc`, plus any contact/company info you want to forward.
# Step 2: Filter deals without a `ucc`
You only want to send events for deals that came from a referral. Add a **Filter by Zapier** step:
1. Choose **Filter by Zapier**.
2. Set the rule to: `1. Deal information: ucc` **Exists**.
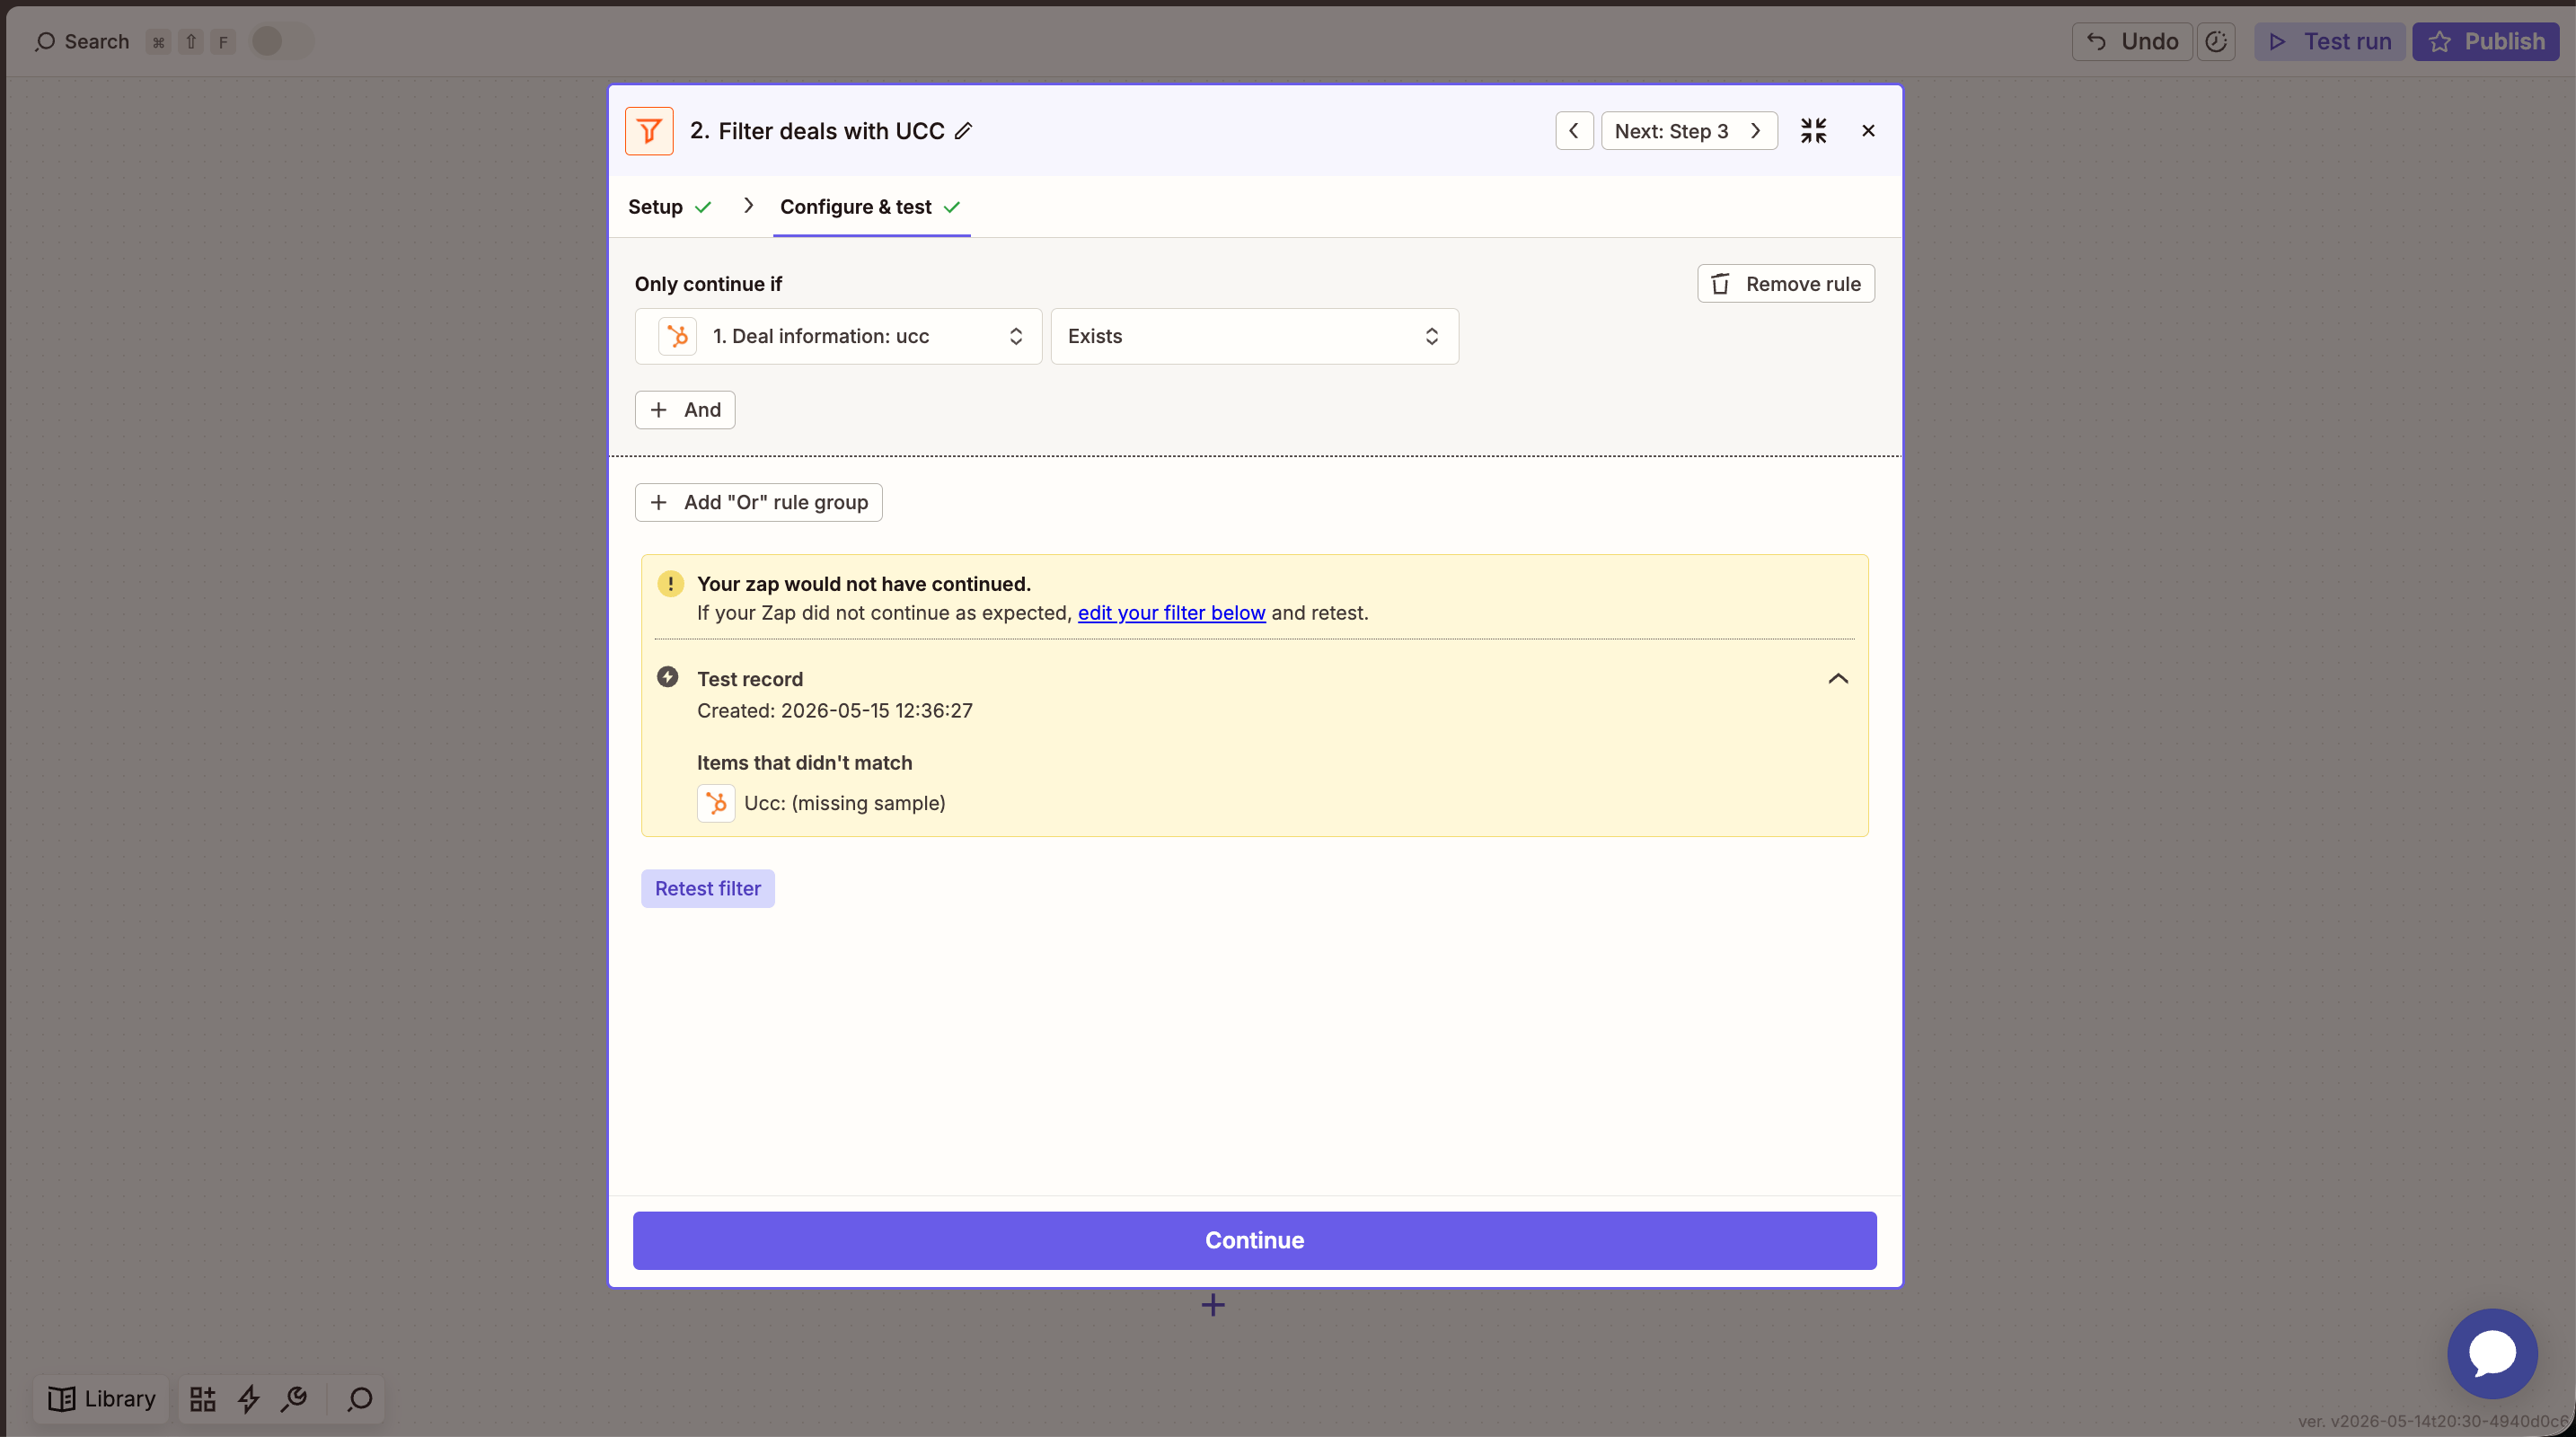 Deals without a `ucc` will stop here and no Cello event will be sent.
# Step 3: Create a Cello access token
Cello uses short-lived access tokens for API auth. Add a **Code by Zapier** step using Python:
1. Choose **Code by Zapier** → **Run Python**.
2. Leave **Input Data** empty (credentials are hardcoded in this step).
3. Paste the snippet below and replace `` and `` with your Cello API credentials.
```python theme={null}
import json
import urllib.request
ACCESS_KEY_ID = ""
SECRET_ACCESS_KEY = ""
body = {
"accessKeyId": ACCESS_KEY_ID,
"secretAccessKey": SECRET_ACCESS_KEY
}
req = urllib.request.Request(
url="https://api.cello.so/token",
data=json.dumps(body).encode("utf-8"),
method="POST",
headers={"Content-Type": "application/json"}
)
try:
with urllib.request.urlopen(req, timeout=10) as resp:
data = json.loads(resp.read().decode("utf-8"))
output = {
"access_token": data.get("accessToken"),
"expires_in": data.get("expiresIn"),
"status": resp.status
}
except urllib.error.HTTPError as e:
output = {
"access_token": "",
"status": e.code,
"error": e.read().decode("utf-8")
}
```
Deals without a `ucc` will stop here and no Cello event will be sent.
# Step 3: Create a Cello access token
Cello uses short-lived access tokens for API auth. Add a **Code by Zapier** step using Python:
1. Choose **Code by Zapier** → **Run Python**.
2. Leave **Input Data** empty (credentials are hardcoded in this step).
3. Paste the snippet below and replace `` and `` with your Cello API credentials.
```python theme={null}
import json
import urllib.request
ACCESS_KEY_ID = ""
SECRET_ACCESS_KEY = ""
body = {
"accessKeyId": ACCESS_KEY_ID,
"secretAccessKey": SECRET_ACCESS_KEY
}
req = urllib.request.Request(
url="https://api.cello.so/token",
data=json.dumps(body).encode("utf-8"),
method="POST",
headers={"Content-Type": "application/json"}
)
try:
with urllib.request.urlopen(req, timeout=10) as resp:
data = json.loads(resp.read().decode("utf-8"))
output = {
"access_token": data.get("accessToken"),
"expires_in": data.get("expiresIn"),
"status": resp.status
}
except urllib.error.HTTPError as e:
output = {
"access_token": "",
"status": e.code,
"error": e.read().decode("utf-8")
}
```
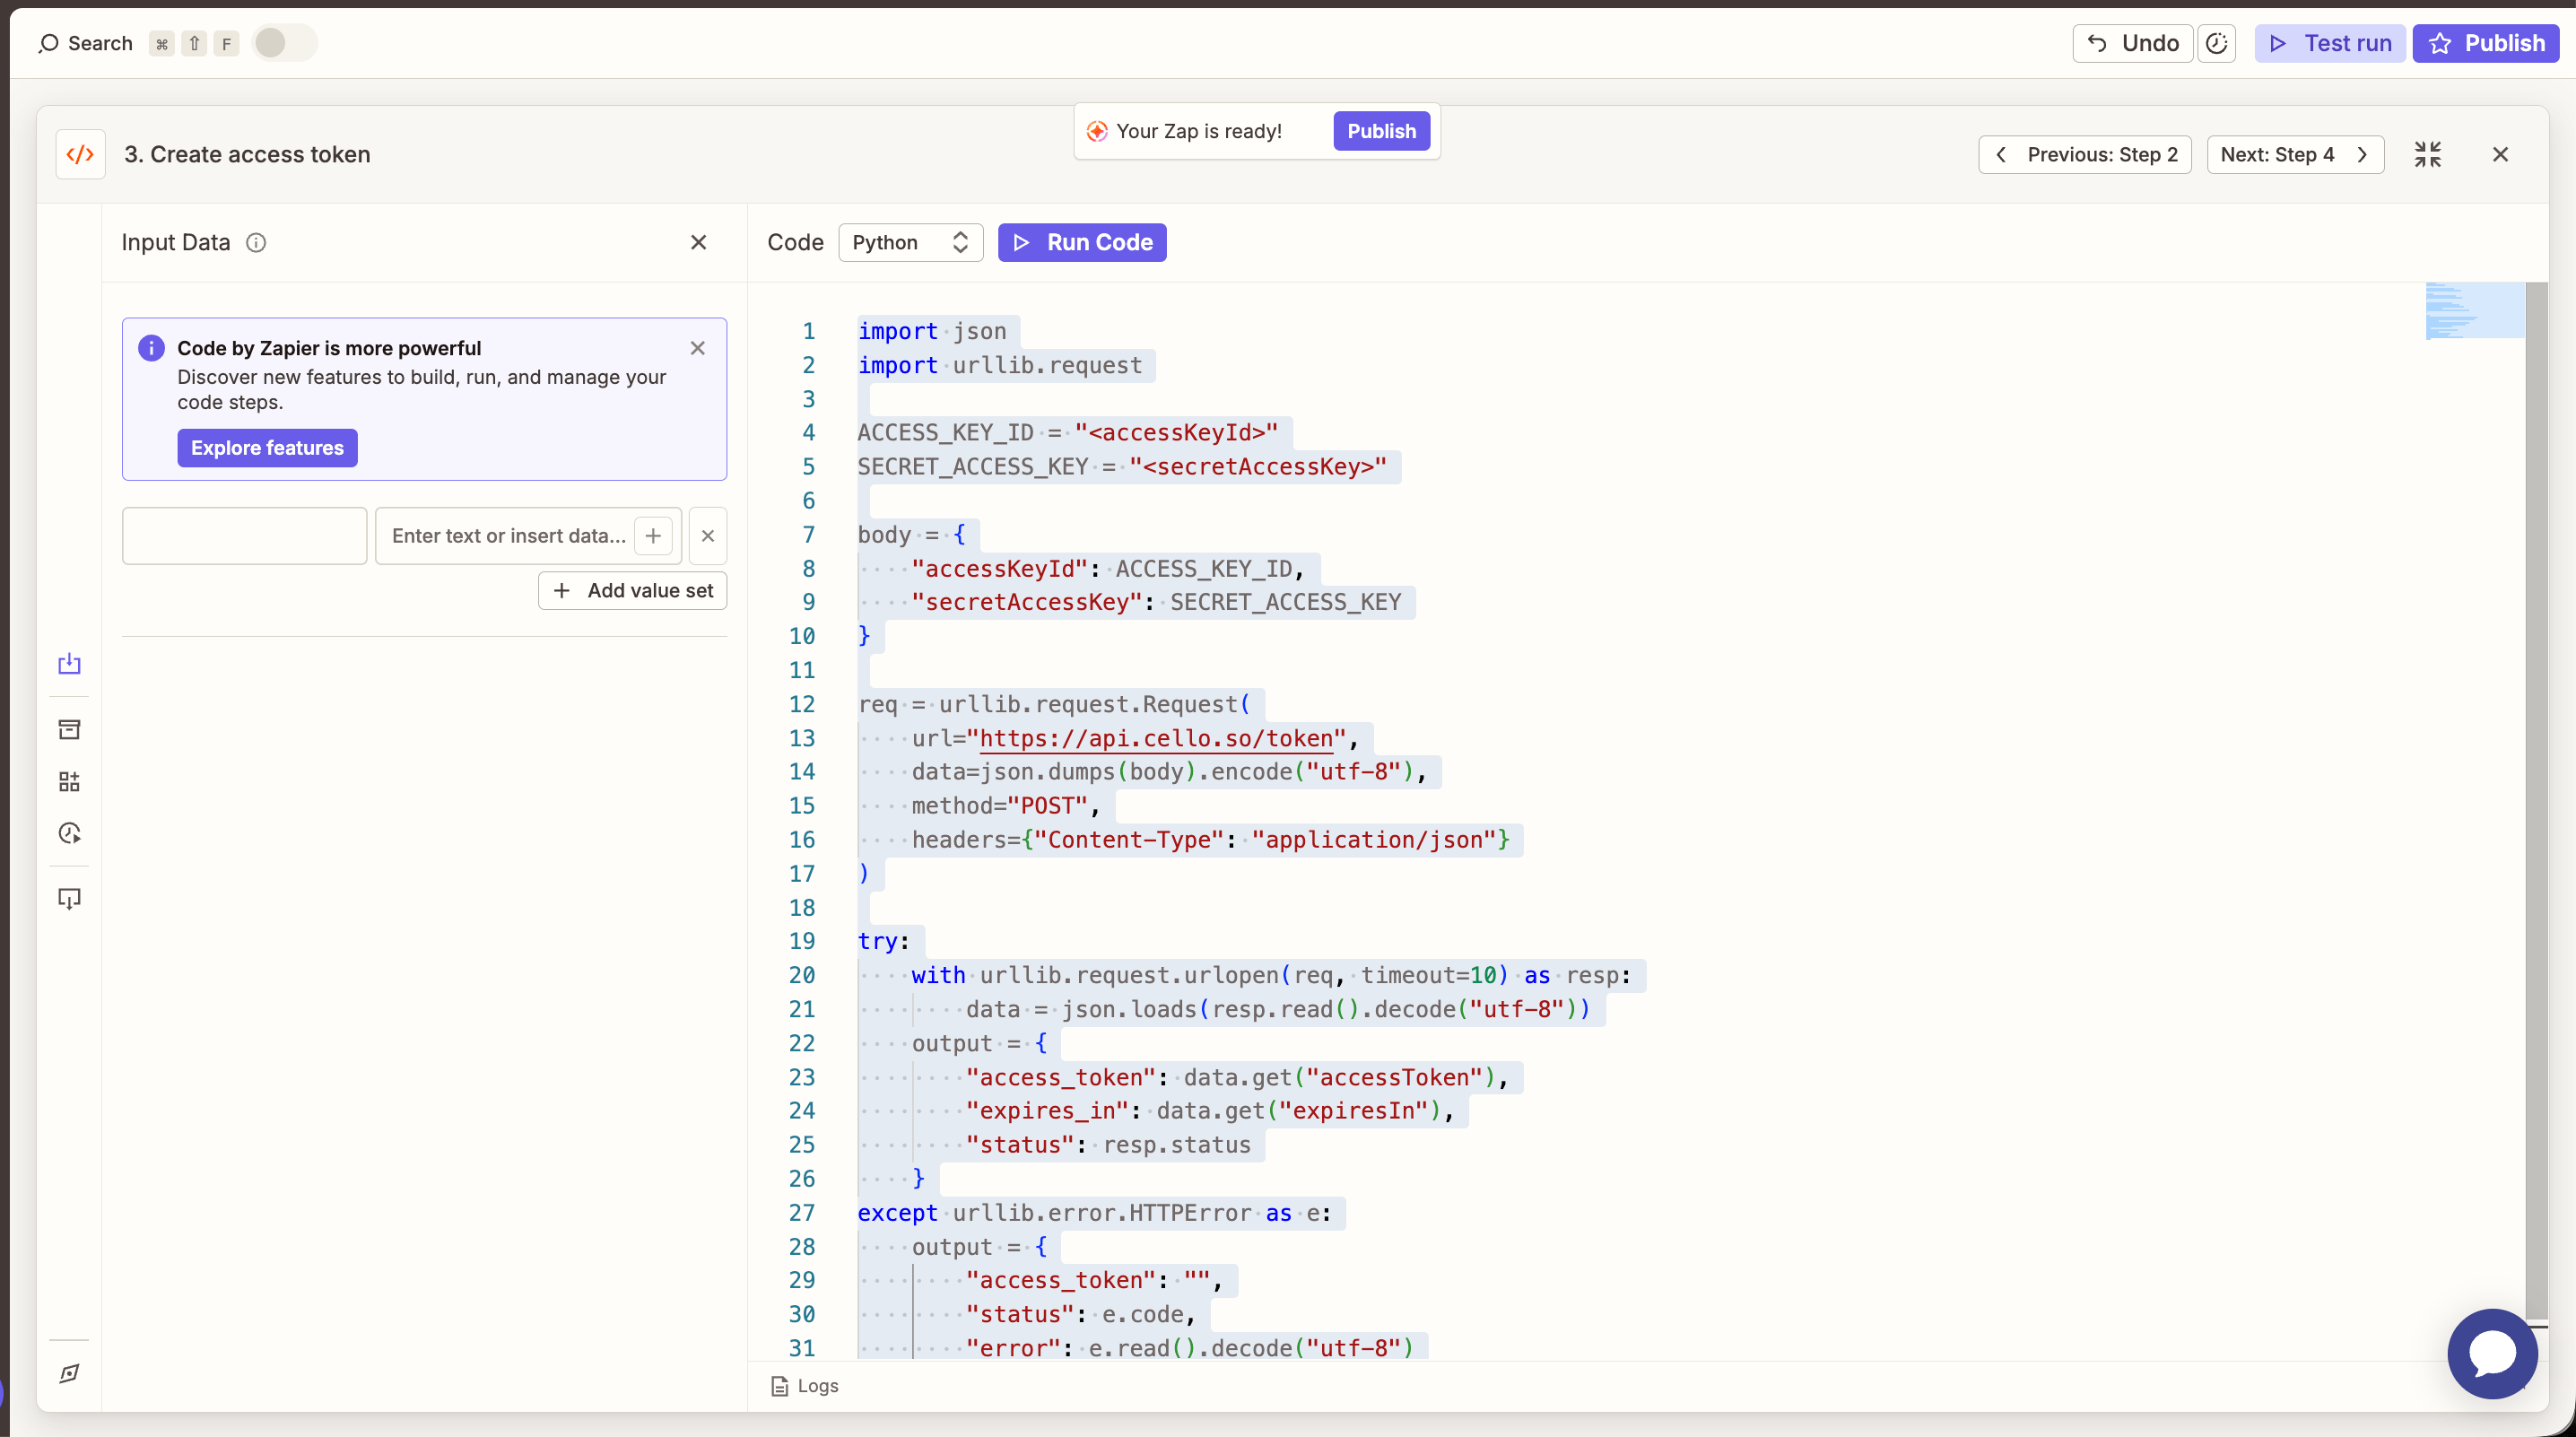 Test the step — you should see an `access_token` value and `status: 200` in the output.
For production, store your `accessKeyId` and `secretAccessKey` in Zapier's **Storage by Zapier** or as **Code by Zapier environment variables** rather than hardcoding them. See [Zapier's guide on storing credentials](https://help.zapier.com/hc/en-us/articles/8496300064525) for details.
Reference: [Cello Authentication API](/api-reference/authentication/get-token).
# Step 4: Send the signup event to Cello
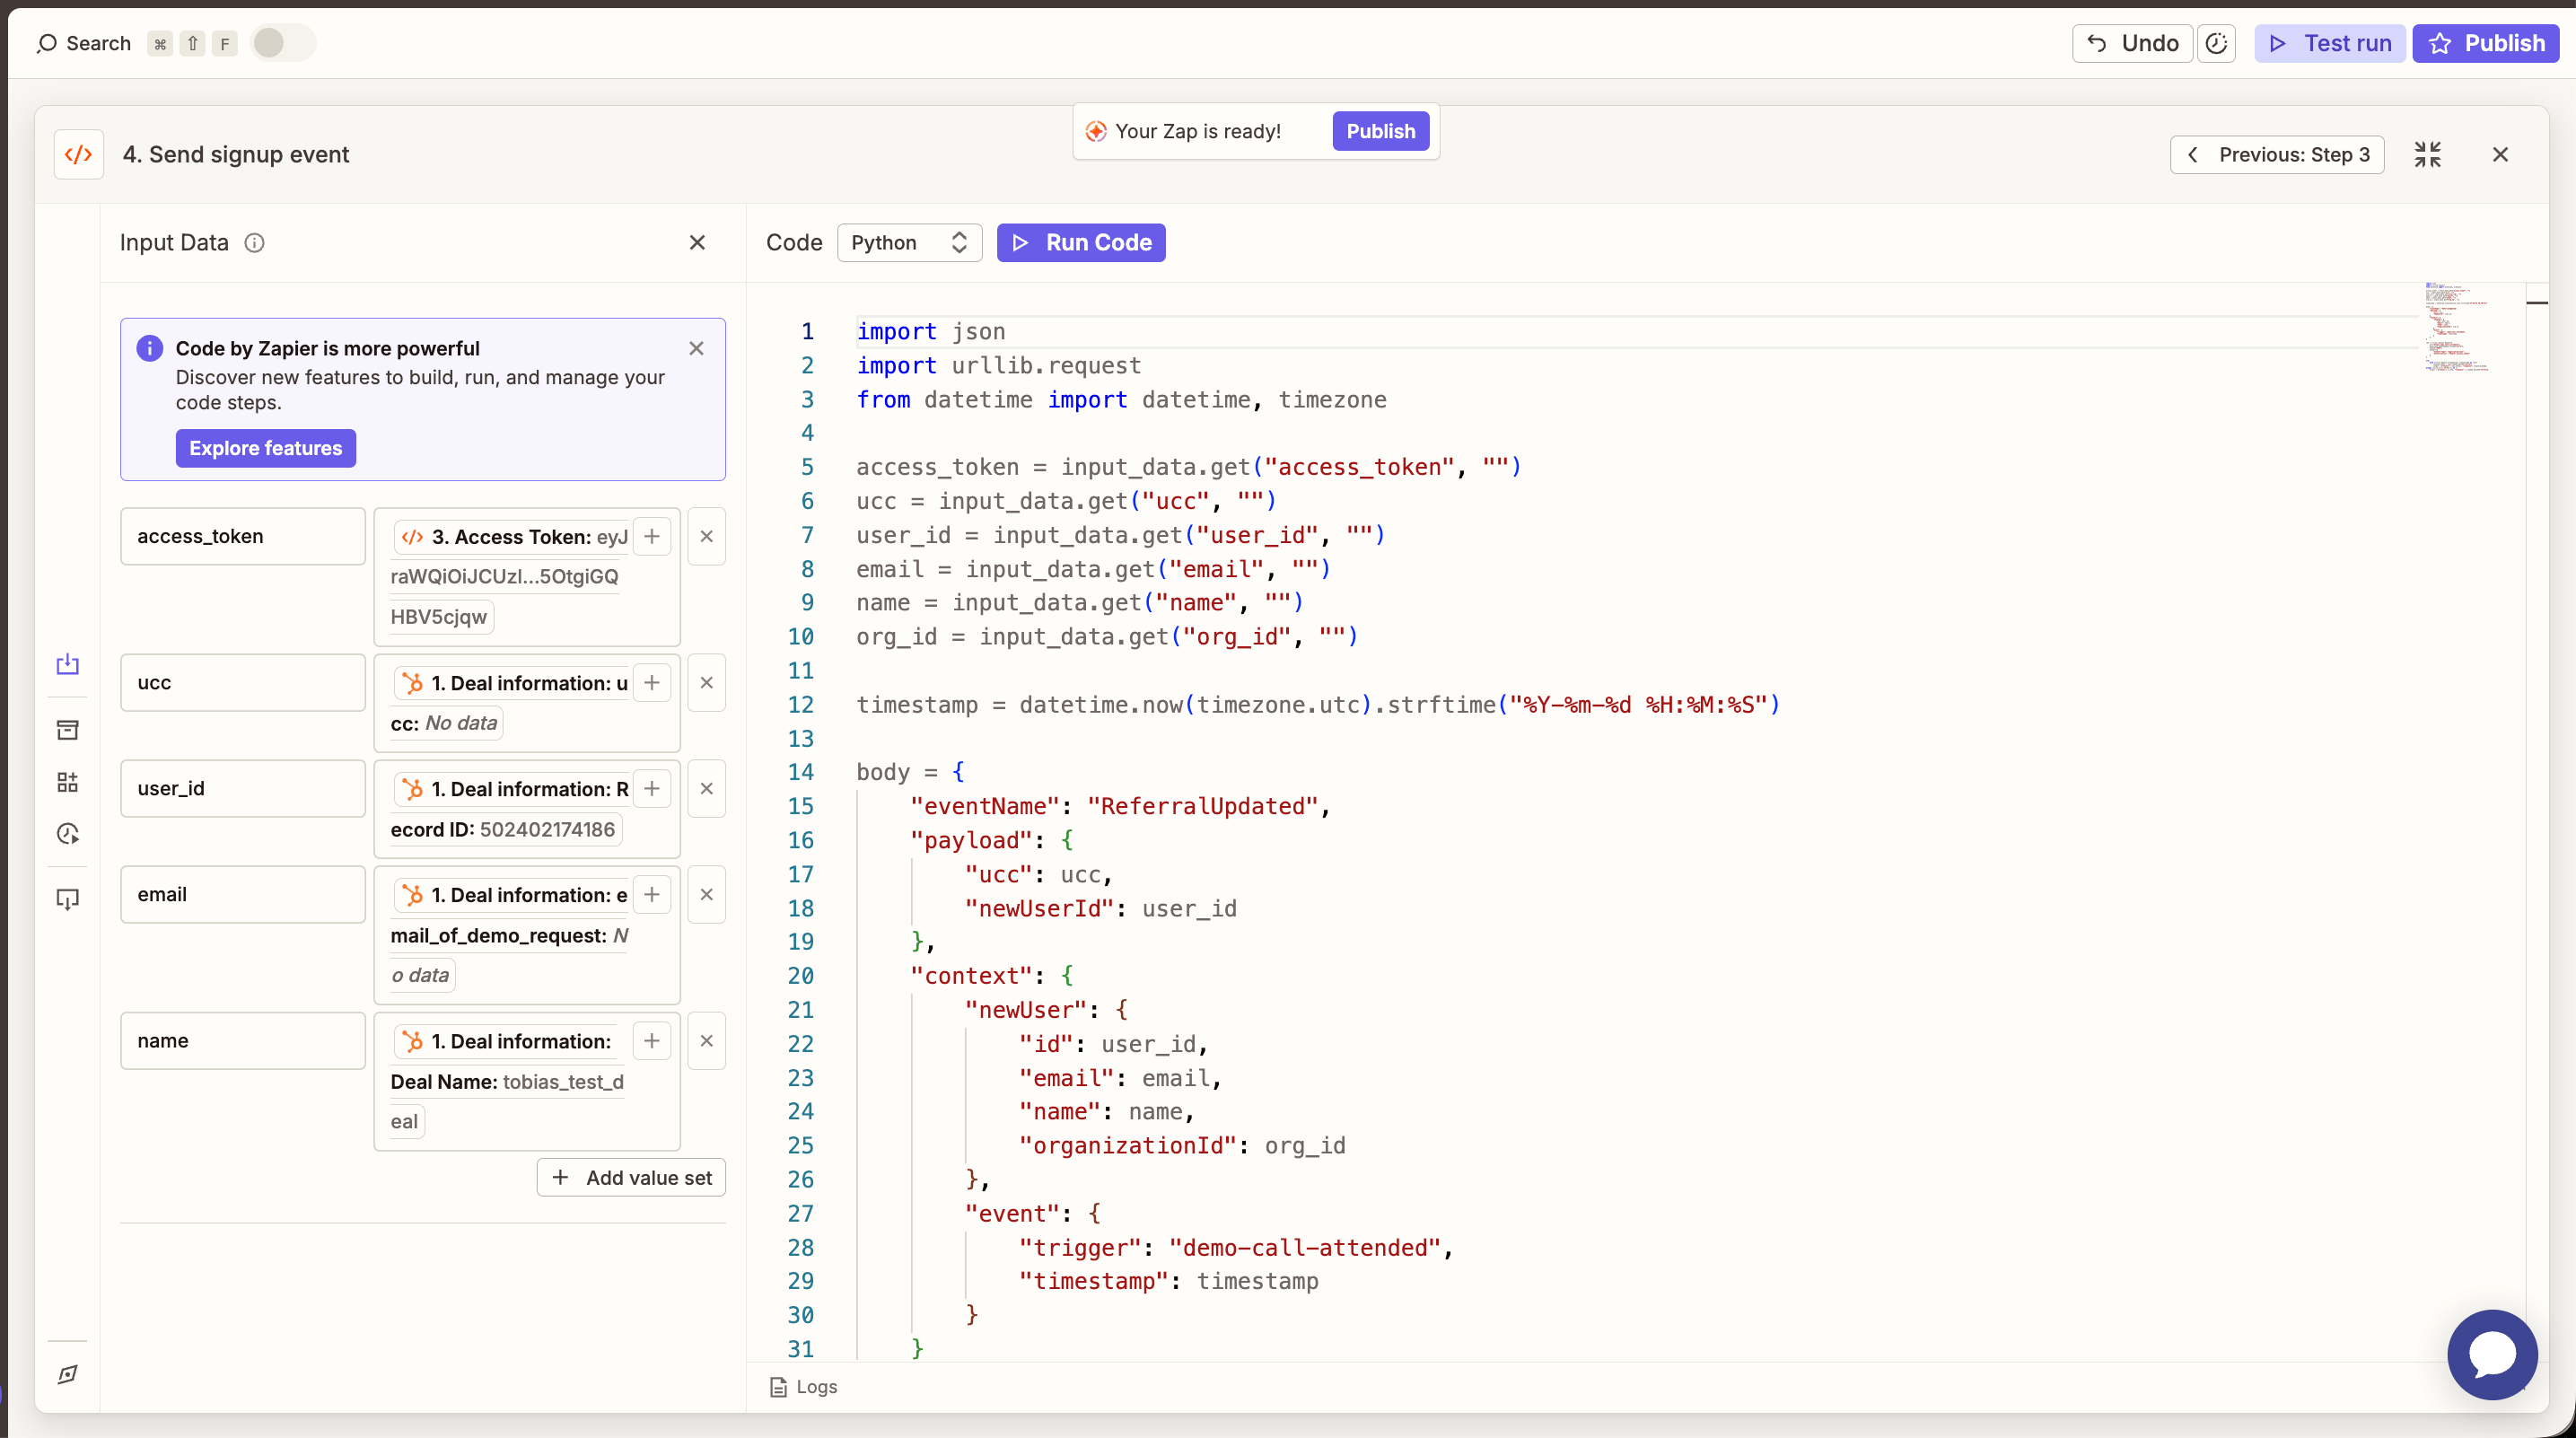
Add a second **Code by Zapier (Python)** step that posts the event to `POST /events`.
1. Choose **Code by Zapier** → **Run Python**.
2. Map the following **Input Data** fields from the previous steps:
| Input Data key | Map from |
| -------------- | ----------------------------------------------------------------------------- |
| `access_token` | Step 3 → `Access Token` |
| `ucc` | Step 1 → `Deal information: ucc` |
| `user_id` | Step 1 → `Deal information: Record ID` (or your own product user ID property) |
| `email` | Step 1 → `Deal information: email_of_demo_request` (or contact email) |
| `name` | Step 1 → `Deal information: Deal Name` (or contact name) |
| `org_id` | Step 1 → company / organization ID (optional) |
3. Paste the snippet below:
```python theme={null}
import json
import urllib.request
from datetime import datetime, timezone
access_token = input_data.get("access_token", "")
ucc = input_data.get("ucc", "")
user_id = input_data.get("user_id", "")
email = input_data.get("email", "")
name = input_data.get("name", "")
org_id = input_data.get("org_id", "")
timestamp = datetime.now(timezone.utc).strftime("%Y-%m-%d %H:%M:%S")
body = {
"eventName": "ReferralUpdated",
"payload": {
"ucc": ucc,
"newUserId": user_id
},
"context": {
"newUser": {
"id": user_id,
"email": email,
"name": name,
"organizationId": org_id
},
"event": {
"trigger": "demo-call-attended",
"timestamp": timestamp
}
}
}
req = urllib.request.Request(
url="https://api.cello.so/events",
data=json.dumps(body).encode("utf-8"),
method="POST",
headers={
"Content-Type": "application/json",
"Authorization": f"Bearer {access_token}"
}
)
try:
with urllib.request.urlopen(req, timeout=10) as resp:
response_body = resp.read().decode("utf-8")
output = {"status": resp.status, "response": response_body}
except urllib.error.HTTPError as e:
output = {"status": e.code, "response": e.read().decode("utf-8")}
```
Test the step — you should see an `access_token` value and `status: 200` in the output.
For production, store your `accessKeyId` and `secretAccessKey` in Zapier's **Storage by Zapier** or as **Code by Zapier environment variables** rather than hardcoding them. See [Zapier's guide on storing credentials](https://help.zapier.com/hc/en-us/articles/8496300064525) for details.
Reference: [Cello Authentication API](/api-reference/authentication/get-token).
# Step 4: Send the signup event to Cello
Add a second **Code by Zapier (Python)** step that posts the event to `POST /events`.
1. Choose **Code by Zapier** → **Run Python**.
2. Map the following **Input Data** fields from the previous steps:
| Input Data key | Map from |
| -------------- | ----------------------------------------------------------------------------- |
| `access_token` | Step 3 → `Access Token` |
| `ucc` | Step 1 → `Deal information: ucc` |
| `user_id` | Step 1 → `Deal information: Record ID` (or your own product user ID property) |
| `email` | Step 1 → `Deal information: email_of_demo_request` (or contact email) |
| `name` | Step 1 → `Deal information: Deal Name` (or contact name) |
| `org_id` | Step 1 → company / organization ID (optional) |
3. Paste the snippet below:
```python theme={null}
import json
import urllib.request
from datetime import datetime, timezone
access_token = input_data.get("access_token", "")
ucc = input_data.get("ucc", "")
user_id = input_data.get("user_id", "")
email = input_data.get("email", "")
name = input_data.get("name", "")
org_id = input_data.get("org_id", "")
timestamp = datetime.now(timezone.utc).strftime("%Y-%m-%d %H:%M:%S")
body = {
"eventName": "ReferralUpdated",
"payload": {
"ucc": ucc,
"newUserId": user_id
},
"context": {
"newUser": {
"id": user_id,
"email": email,
"name": name,
"organizationId": org_id
},
"event": {
"trigger": "demo-call-attended",
"timestamp": timestamp
}
}
}
req = urllib.request.Request(
url="https://api.cello.so/events",
data=json.dumps(body).encode("utf-8"),
method="POST",
headers={
"Content-Type": "application/json",
"Authorization": f"Bearer {access_token}"
}
)
try:
with urllib.request.urlopen(req, timeout=10) as resp:
response_body = resp.read().decode("utf-8")
output = {"status": resp.status, "response": response_body}
except urllib.error.HTTPError as e:
output = {"status": e.code, "response": e.read().decode("utf-8")}
```
 The `event.trigger` value (`demo-call-attended` in this example) determines how Cello classifies the event. Common values:
* `new-signup` — user signed up but no demo yet
* `demo-call-attended` — user attended a sales/demo call
* `qualified-lead` — user has been qualified by sales
Match the trigger to the HubSpot deal stage you're firing from.
Test the step and confirm you receive `status: 200` from Cello.
# Step 5: Verify and publish
1. **Publish your Zap.**
2. Move a test deal into the trigger stage in HubSpot.
3. Wait up to 15 minutes for Zapier to pick up the change.
4. Open the [Event Feed](https://portal.cello.so/integrations/events-feed) in the Cello Portal and confirm the event was received with the correct `ucc`, `newUserId`, and `trigger`.
5. Check [Integration Status](/guides/support/portal/integration-status) — **Signups** should now show as **Connected**.
**You're done!** Every qualified deal in HubSpot will now generate a Cello signup event automatically. To also track purchase events, pair this with the [Stripe](/attribution/use-cases/stripe) or [Chargebee](/attribution/use-cases/chargebee) webhook integrations — or extend this Zap with an additional Code step that posts a `purchase` event when the deal closes won.
# Variations
* **Different trigger stages.** Duplicate the Zap and change the HubSpot deal stage + `event.trigger` value to track multiple milestones (e.g. one Zap for `demo-call-attended`, another for `qualified-lead`).
* **Reward at the organization level.** Set `newUserId` to the HubSpot company ID instead of the deal/contact ID, and populate `newUser.organizationId` accordingly. See [Tracking Signups](/attribution/tracking-signups) for the organization-level attribution model.
* **Use the Zapier HTTP action instead of Code steps.** If you prefer not to write Python, both API calls can be done with **Webhooks by Zapier → POST**. The body and headers are the same as in the snippets above.
The `event.trigger` value (`demo-call-attended` in this example) determines how Cello classifies the event. Common values:
* `new-signup` — user signed up but no demo yet
* `demo-call-attended` — user attended a sales/demo call
* `qualified-lead` — user has been qualified by sales
Match the trigger to the HubSpot deal stage you're firing from.
Test the step and confirm you receive `status: 200` from Cello.
# Step 5: Verify and publish
1. **Publish your Zap.**
2. Move a test deal into the trigger stage in HubSpot.
3. Wait up to 15 minutes for Zapier to pick up the change.
4. Open the [Event Feed](https://portal.cello.so/integrations/events-feed) in the Cello Portal and confirm the event was received with the correct `ucc`, `newUserId`, and `trigger`.
5. Check [Integration Status](/guides/support/portal/integration-status) — **Signups** should now show as **Connected**.
**You're done!** Every qualified deal in HubSpot will now generate a Cello signup event automatically. To also track purchase events, pair this with the [Stripe](/attribution/use-cases/stripe) or [Chargebee](/attribution/use-cases/chargebee) webhook integrations — or extend this Zap with an additional Code step that posts a `purchase` event when the deal closes won.
# Variations
* **Different trigger stages.** Duplicate the Zap and change the HubSpot deal stage + `event.trigger` value to track multiple milestones (e.g. one Zap for `demo-call-attended`, another for `qualified-lead`).
* **Reward at the organization level.** Set `newUserId` to the HubSpot company ID instead of the deal/contact ID, and populate `newUser.organizationId` accordingly. See [Tracking Signups](/attribution/tracking-signups) for the organization-level attribution model.
* **Use the Zapier HTTP action instead of Code steps.** If you prefer not to write Python, both API calls can be done with **Webhooks by Zapier → POST**. The body and headers are the same as in the snippets above.